SEARCH FINESCALE.COM

Enter keywords or a search phrase below:

How do you guys hold it when you p...

1684 views
8 replies
1 rating 2 rating 3 rating 4 rating 5 rating
  • Member since
    December 2003
  • From: Indiana
How do you guys hold it when you p...
Posted by hkshooter on Thursday, April 6, 2006 10:55 PM

Paint? Wink [;)]

It seems every time I get ready to load up the airbrush I stop myself and look at the plane wondering how in the world am I going to hold the thing and paint it when every inch of it needs to ba painted?

I've used locking tweezers, brass rods stuck in places, hemostats. But I've never come up with a good system. Sometimes I end up holding onto it like it's on fire, painting the underside first so maybe it will be dry enough to sit down to get the rest by the time I get to my fingers.

Does anyone have any suggestions? What works best for you?

  • Member since
    December 2003
  • From: Indiana
Posted by hkshooter on Thursday, April 6, 2006 10:57 PM

I guess I should include that I nearly always leave off the landing gear until final construction. But for gear doors I always paint and detail the gear and set them aside til later. So sitting the plane on the gear is out in most cases unless I install and remove them after painting is done.


  • Member since
    February 2003
  • From: Southern California, USA
Posted by ABARNE on Thursday, April 6, 2006 11:54 PM

It kind of depends on the plane in question.  Typically, I'll leave off the prop spinner and insert a suitably narrowed sprue or possibly a large toothpick in place of the prop.  I have a Komet under construction, and for it I have left out it's rocket exhaust nozzle which will allow me to put a piece of sprue in its place while painting.

  • Member since
    November 2005
Posted by Anonymous on Friday, April 7, 2006 2:58 PM

First thing I usually do is place a Rubber Glove on the hand I am not operating the Airbrush with.

Secondly Depending on the plane I will take toothpicks or the wood part of long q-tips and place them in the holes where the landing gear go. I will usually hold the plane by the tail if possible to paint the bottom. (Unless I can find a dowel or such to Stick into the tailpipe of the jet).

Once the bottom is done I place the plane in the q-tip sticks and paint both sides. This gives the paint on the bottom enough time to dry enough to touch if necessary. Then to paint the top I usually either lean the plane on a piece of carboard with the tail down or place a finger with the glove on it into the tailpipe and paint the top.  

  • Member since
    February 2004
  • From: Humble
Posted by rrmmodeler on Friday, April 7, 2006 4:24 PM

I leave off the landing gear and the spinner as well. I paint the underside first holding the plane by its tail. Since I normally don't get to have long paining sessions I let the underside dry and come back to paint the top side the next time. When I paint the top side I paint the plane by still holding the tail or a wing. When I have both wings painted I hold it by just the tail and paint the tail last. The tail is always the last thing I paint.


  • Member since
    January 2003
  • From: The Hoosier State
Posted by plasticmod992 on Saturday, April 8, 2006 2:57 AM

I had that same problem years ago when I was preparing to airbrush my model.  To help others deal with this problem, I put together this short "How-To."  I learned this method many moons ago, inspired by modelers from the pages of FSM.  I'll sow you how I make painting handles shaped from wire hangers to airbrush my aircraft hands free!  Hey, maybe this should be a sticky in "Tips & Techniques" here. (Hint, hint- Jeff Herne)Wink [;)]  Anyway, her we go!    

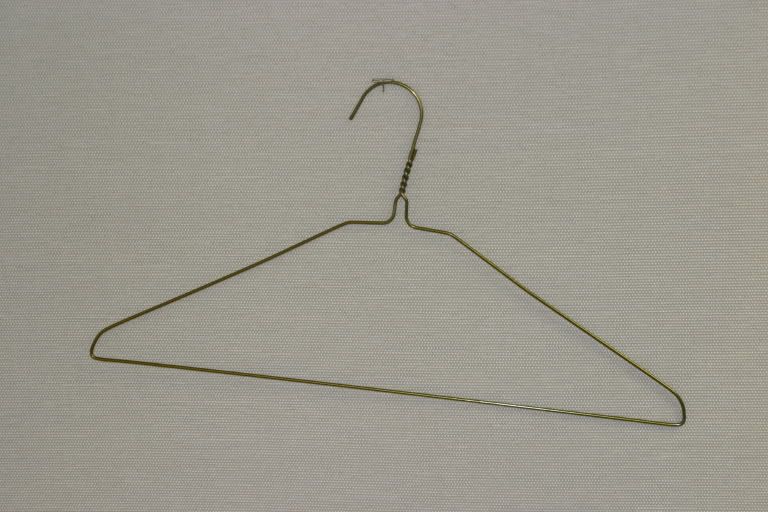
The first thing I do is find a regular wire-type garment hanger.  Wire hangers are ideal becuase they bend easily with pliers and you can form custom shapes to accomodate various models for airbrushing. 


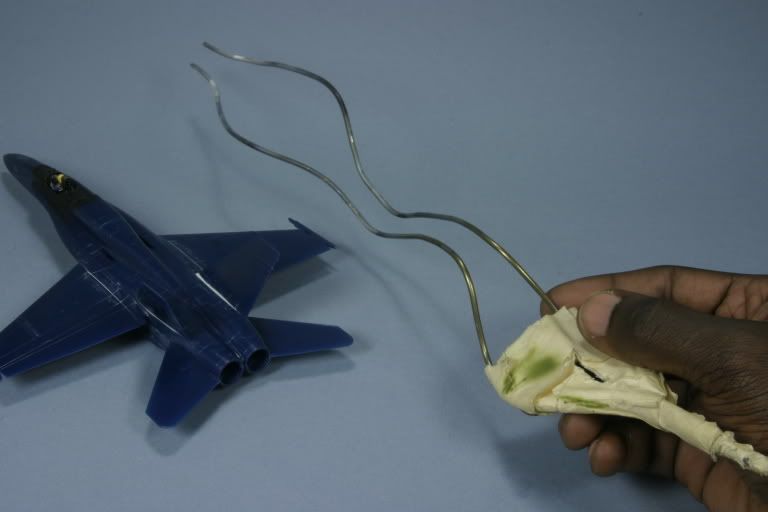
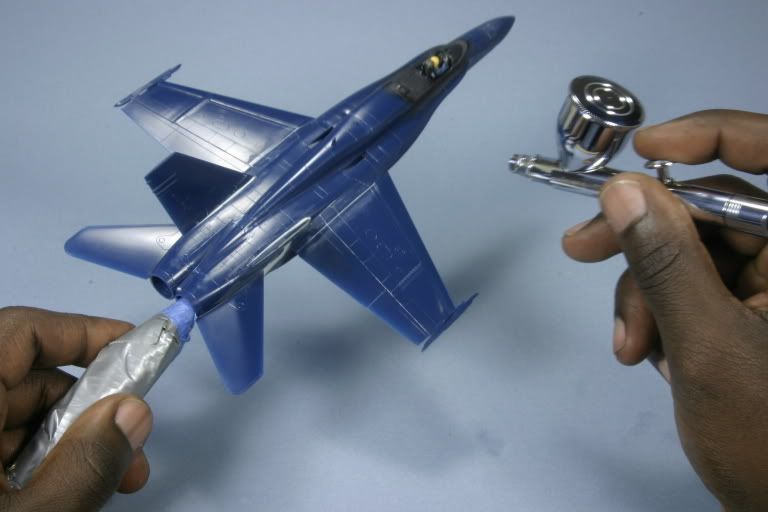
Next, I use priers to shape the hanger into any shape I need.  Also, for creating your handle, you may want to use wire cutters, but I simply bend the wire repeatedly to easily snap off a section where desired.  Sometimes I just bend-off the hook portion of the hanger and use the spiraled stem as the holding prong to be inserted into a wood block to hold the model while it drys.  In the this photo, I did just that.  This one was made to accomadate twin-enigine jets, such as this 1/72nd scale F/A-18A.  I wrapped masking tape around the bottom portion of the shaped hanger to form a stiff handle.  The remaining long prongs can be inserted inside the rear of the model.  Make sure these prongs are long enough so that while you twist and rotate your model during painting they don't easily slip out! 


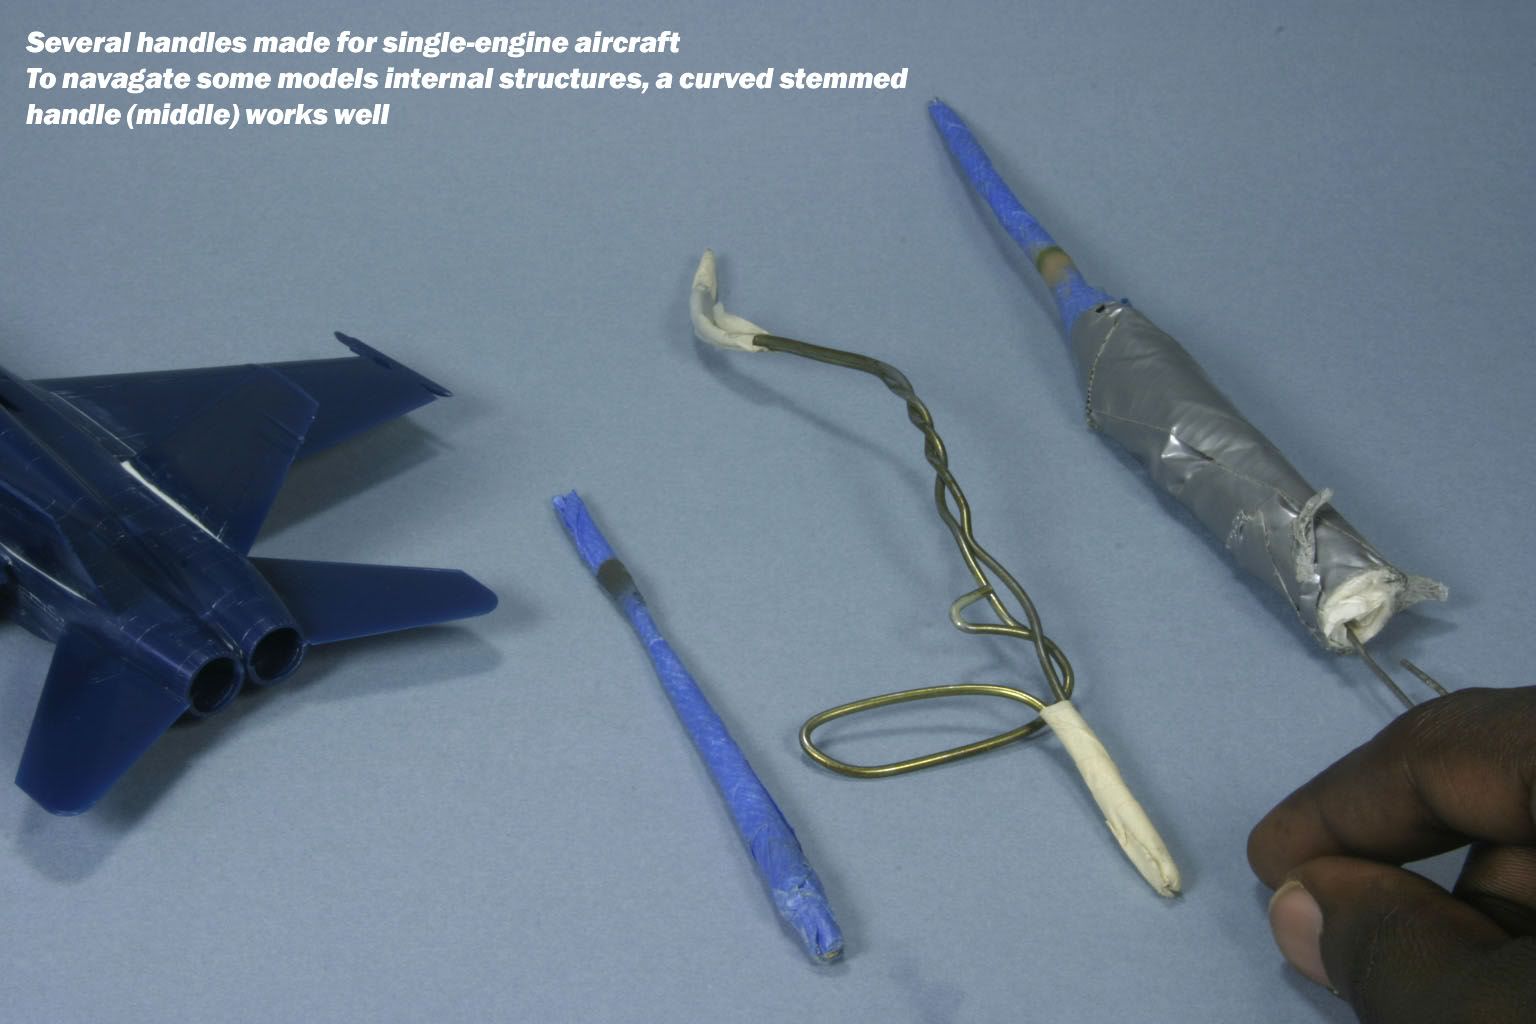
The same goes for single engine jets and WWII aircraft as well, just use your imagination, think about how you want to hold the model comfortably and bend the hanger to shape.  These are some other handles I made for my single-engine jets.  After bending the hanger and fashioning the handle, you need to test fit the stem into the model and make any adjustments.  Realize that some models have very cramped interior spaces, you may need to modify the handle's rod accordingly, so it can fit in and around intake trunking, bulkheads, etc.  Also, I routinely have to wrap masking tape on the stem portion of the handle so it will fit the available openings snuggly.  You don't want the model flopping around as you airbrush! 


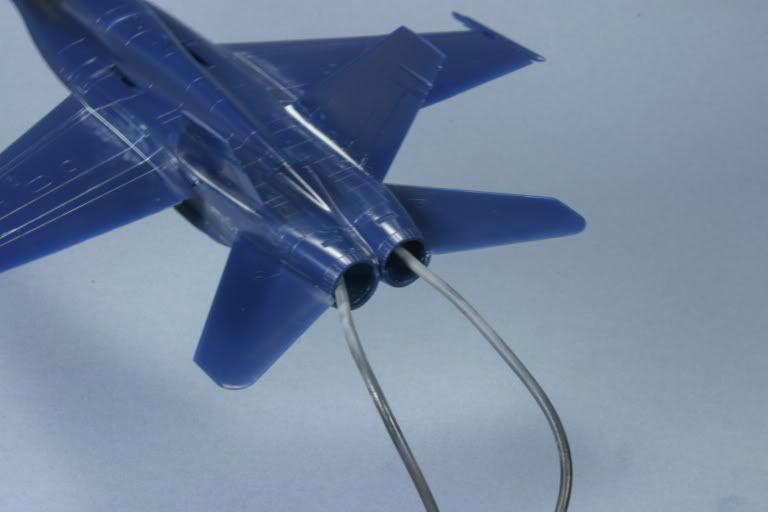
When you're satisfied with your custom shaped handle, insert it into the model.  Also be proactive and take a look at your other kits in the stash.  Does your handles need to have long prongs for 1/48 scale, or relatively short ones to fit the spinner holes for your WWII warbirds?  This two-prong handle will accomadate the majority of my 1/72nd scale twin engine F-15's, F-14s, etc. 


"Hey Ma, look- no hands!"  Here you can see how the handle holds the model for airbrushing.  I can turn, rotate, and angle the model hands free for airbrushing. 


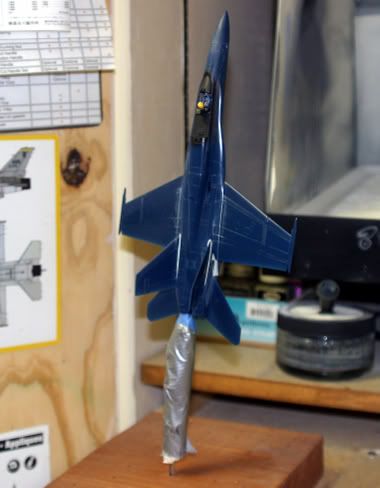
What do you do after painting to let the model dry you ask?  When I make my handles, I leave a 2in section of the spiral section of hanger to serve as a post.  For this one, I shaped a loop with pliers on the rear of the handle so I can insert the handle into a drilled-out hole in a block of wood.  The tiny holes you see in the wood block are to accomodate toothpick handles! 


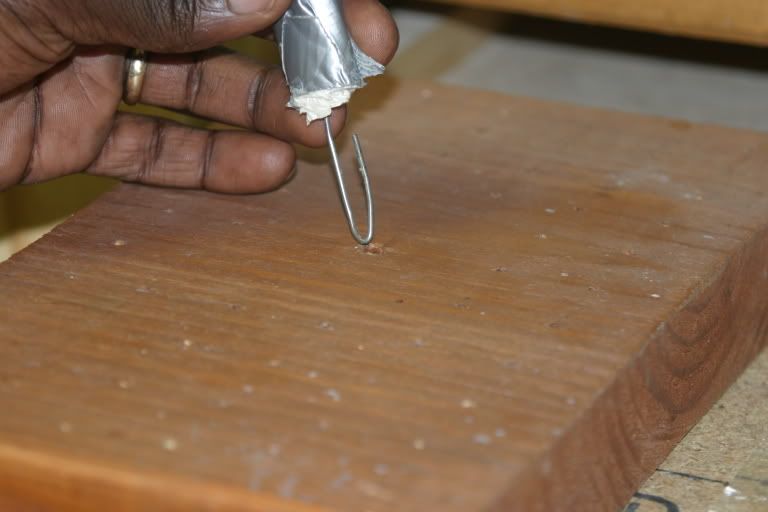
The block is mounted on a shelf just inside my spray booth.  The handle serves double duty.  It holds the model during painting and also to hold it securely as a paint stand until the paint dries. 


Well, there you have it, handles!  That should alleviate some stress as you airbrush that glossy paint scheme or intricate camo job, without fear of handling the model.  Be creative, you can make better ones fashioned from wood dowels, aluminum & brass rods.  Happy modeling!

Greg Williams Owner/ Manager Modern Hobbies LLC Indianapolis, IN. IPMS #44084
  • Member since
    December 2003
  • From: Indiana
Posted by hkshooter on Saturday, April 8, 2006 1:30 PM

Thanks for the input guys. It seems that everybodey just does whatever they can with what they have.

Greg, fine use of the hangers! I wonder if there is a way to implement your idea to prop planes? This question came to me as I was getting ready to paint a F2-A1. the entire model was sealed up with not one open hole. I shot the bottom with Alclad first, which dries nearly instantly. Was able to mask and then shoot the camo while holding the plane from underneath. If I'd have had to shoot the whole plane with one color first I'm not to sure how I'd have done it.

BTW, nice to see a fellow Hoosier on the boards! I'm up north in Warsaw.

  • Member since
    January 2003
  • From: The Hoosier State
Posted by plasticmod992 on Saturday, April 8, 2006 4:31 PM
Hey fellow Hoosier, there's always a solution, so I've learned.  Albeit not always the beast one, but a solution none the less.  I remember an airbrush session, where it seemed like I was attempting to airbrush a hot potato.  It was a desperate situation, and I had to laugh at myself.  Ever since, I made sure that I left an opening on the model so I could insert one of my handles.  For WWII and prop planes, it's a simple matter of leaving off the spinner, inserting the wire handle and spray away.  You can attach the prop as a last assembly step.  Also with prop aircraft you'll always know where you can insert a holding impliment, save for any exceptions where the prop has to be attached prior to painting.  In the case of your model, like others have mentioned- I'll usually designate where I'm going to hold the model during painting, say..a wing tip for example.  Then I come back later, when the rest of the plane is dry and paint the area where I held it.  Post some pics when you're complete, I'd like to see how it turned out!   
Greg Williams Owner/ Manager Modern Hobbies LLC Indianapolis, IN. IPMS #44084
  • Member since
    December 2003
  • From: Indiana
Posted by hkshooter on Sunday, April 9, 2006 12:12 PM
Greg, ask and ye shall receive. Check out the thread "One of my latest" in the aircraft forum.
JOIN OUR COMMUNITY!

Our community is FREE to join. To participate you must either login or register for an account.

SEARCH FORUMS
FREE NEWSLETTER
By signing up you may also receive reader surveys and occasional special offers. We do not sell, rent or trade our email lists. View our Privacy Policy.