SEARCH FINESCALE.COM

Enter keywords or a search phrase below:

Help: Tinting Canopies with clear Tamiya acrylics over Future

7774 views
6 replies
1 rating 2 rating 3 rating 4 rating 5 rating
  • Member since
    December 2002
  • From: Modeling anything with "MARINES" on the side.
Help: Tinting Canopies with clear Tamiya acrylics over Future
Posted by AH1Wsnake on Sunday, November 5, 2006 2:41 PM

Hello all, just wondering if I could pick the brains of some of you more experienced modelers for a minute....

Here is my problem:
I have clear canopy parts that I have coated with about 2-3 coats of future.  I wished to tint these parts with the acrylic Tamiya smoke (I also have some helo greenhouses to tint with green later on). I thinned the smoke to about a 50/50 mix with alcohol, then applied with my airbrush. This did tint my canopies, but it also turned them cloudy. Unfortunately, I think that the alcohol I used for thinning the smoke also acted to eat up the Future coat on my clear parts. End result was a failure, so I gave both canopies an alcohol bath to remove everything, and have started reapplying my Future coats.

Question is, how do I airbrush Tamiya clear tints without damaging the Future coat of my canopies?

Thanks, Andy


"There are only two kinds of people that understand Marines: Marines and those who have met them in battle. Everyone else has a second-hand opinion."
  • Member since
    January 2004
  • From: USA
Posted by MusicCity on Sunday, November 5, 2006 4:14 PM
Personally I'd try it without the Future coat.  But then I may be the only person in the modeling world that refuses to dip canopies in Future because I never get good results.
Scott Craig -- Nashville, TN -- My Website -- My Models Page
  • Member since
    January 2003
  • From: Peoples Socialist Democratic Republic of Illinois
Posted by Triarius on Sunday, November 5, 2006 5:54 PM
Try mixing the Tamiya clear with the Future.

Ross Martinek A little strangeness, now and then, is a good thing… Wink

  • Member since
    August 2005
  • From: Greencastle, IN
Posted by eizzle on Sunday, November 5, 2006 5:57 PM
I dipped my first canopy on my current project. It turned out pretty good, but like Music City said, I would try it without the Future. Tint it first, then dip it in Future, that should take care of it.

Colin

 Homer Simpson for president!!!

  • Member since
    January 2003
  • From: The Hoosier State
Posted by plasticmod992 on Monday, November 6, 2006 7:20 PM

Andy, I use Tamiya acrylics exclusively to tint my clear parts as well.  You'll be surprised to know that you did everything right the first time.  I do exactly the same thing, but you forgot one final step after airbrushing the Tamiya...apply another thin coat of Future.  I apply this final thin coat with a Future moistened Q-tip.  This will seal the Tamiya tint.  This final coat of Future will make the cloudiness completely disappear, leaving a nicely tinted canopy.  Check out my article on ARC, where I tinted the canopy on my EA-6B Prowler: 

http://www.aircraftresourcecenter.com/Gal6/5201-5300/gal5269_EA-6B%20_Williams/gal5269.htm

Greg Williams Owner/ Manager Modern Hobbies LLC Indianapolis, IN. IPMS #44084
  • Member since
    December 2002
  • From: Modeling anything with "MARINES" on the side.
Posted by AH1Wsnake on Monday, November 6, 2006 9:41 PM

Good to know I was on the right path, although tinting before Future sounds like a good idea too.

My only concern with your method, plasticmod, is do you apply the second Future over the wet or dry Tamiya? Won't this second Future coat cause the tint to dilute or run? Thanks for the clarification.

And your build article is amazing, by the way.

Andy.


"There are only two kinds of people that understand Marines: Marines and those who have met them in battle. Everyone else has a second-hand opinion."
  • Member since
    January 2003
  • From: The Hoosier State
Posted by plasticmod992 on Thursday, November 16, 2006 12:33 AM

Thanks, glad you liked my article.  I appologize for the delay, been busy.  Youre right, Future can loosen or desolve un-cured Tamiya very easily.  However, what I do is make sure the underlying Tamiya tint has had plenty of time to dry and cure, usually within a few hours..to be safe.  The subsequent layers of Future can then be applied without fear of disturbing the tinted undercoat.  So just for clarification, here are my exact steps for tinting canopies with Tamiya: 

1) Canopy Prep-  I clean the canopy with a Q-tip soaked with denatured alcohol or Polly S plastic prep and set it aside to dry. 

*A word on Denatured Alcohol Solvent (DNA) and Tamiya acrylics.  This is by far the best and most consistant thinner for Tamiya I have ever encountered.  It thins Tamiya superbly, blends colors (even metalics) more thouroughly than Tamiya's own thinner and when the paint film is dry, adhesion is comparable to enamels!  Whats more is, that it's available in any hardware store paint isle, and it only cost between $3-$4 per US Quart!  I've airbrushed fine lines with no tip dry for long sessions and it is comparably non-toxic as rubbing alcohol, 70% Isoprophyl and Tamiya thinner.  Also, it is (I strongly supect) the main ingredient of Polly S Plastic Prep.  So, I've found that it is also an excellent cleaner for my airbrush too.  It's a mystery to me why other modelers haven't tried this wonder thinner for Tamiya Acrylics!  Ok, on with the rest of the steps.

2) Future coat-  Using a clean Q-tip, I soak (not dripping) the swab in Future and apply a thin coat to the inner and outer sides of the canopy and set it aside in a dust-free container to dry over night.  When applying with Q-tips, use light, quick strokes.  Resist going slow and spending to much time in an area.  Also, like brush painting, avoid re-wipping previously wipped areas.  Thin coats of Future starts drying fast and this can cause fibers to get stuck in the Future and create lap marks, ruining the application.  If this happens, soak the canopy in Windex for 5 minutes, wipe clean, let dry and start again.Grumpy [|(]

3) Tamiya tint- Choose your required color tint and thin it with denatured alcohol or Tamiya thinner (if you must) at a ratio of 1:1.  Airbrush the canopy, and build up the tint layer and intensity slowly to achieve the desired effect.  Usually this is approx. 1 or two light coats.  I then set the canopy in a dust-free plastic container to dry for approx. 3 hours or more.Whistling [:-^]  When dry, the canopy may look dull, but it's OK.  The final Future coat sealer will clarify the canopy in the next step.

4) Future layer sealer-  I apply a thin layer of Future over the tinted canopy using a moistened Q-tip.  Be carefull not to alloy the Q-tip to dry out as mentioned in step #2.  Otherwise, you'll have to soak the canopy in Windex again and start over.Banged Head [banghead]  Keeping the Q-tip wet (not dripping) will prevent this and insure even application.  Apply this final coat to both sides of the canopy for superior clarity.

5) Final step-  Now set the canopy aside to dry and cover with a dust-free container to cure overnight.  Your canopy should be tinted, near crystal clear and shiny!  Mask and paint as normal.Make a Toast [#toast]

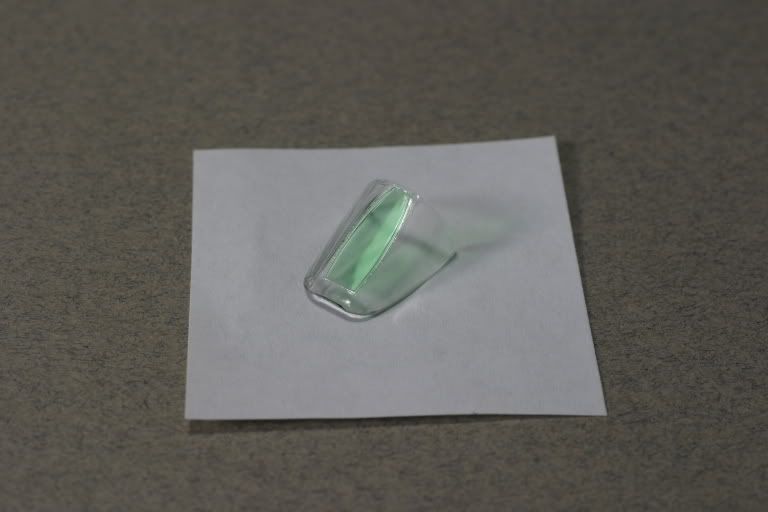
Tinted windscreen for a 1/72 scale F-14B Tomcat 

Greg Williams Owner/ Manager Modern Hobbies LLC Indianapolis, IN. IPMS #44084
JOIN OUR COMMUNITY!

Our community is FREE to join. To participate you must either login or register for an account.

SEARCH FORUMS
FREE NEWSLETTER
By signing up you may also receive reader surveys and occasional special offers. We do not sell, rent or trade our email lists. View our Privacy Policy.