SEARCH FINESCALE.COM

Enter keywords or a search phrase below:

Need a better workbench

10396 views
20 replies
1 rating 2 rating 3 rating 4 rating 5 rating
  • Member since
    July 2003
  • From: Chicago, USA
Need a better workbench
Posted by MonsterZero on Tuesday, May 19, 2009 12:52 AM
My workbench sucks and I'm brainstorming for ideas. Any suggestions? What type of table and where can I get it?
  • Member since
    August 2006
  • From: Neenah, WI
Posted by HawkeyeHobbies on Tuesday, May 19, 2009 7:11 AM

I can make a ton of suggestions but without specifics as to what you build, how much space you have, do you want to stand or sit, enclosed/open, kids or none...all apply to what recommendations to make.

You can see what I and others use both (past and present) by visiting my post Work Bench Overview Pt I and Pt II.

The workbench like shoes has to fit the user to be comfortable as well as functional.


Gerald "Hawkeye" Voigt

http://hawkeyes-squawkbox.com/


"Its not the workbench that makes the model, it is the modeler at the workbench."

  • Member since
    July 2007
Posted by scorpr2 on Tuesday, May 19, 2009 9:07 PM
I bought an old L-shaped desk for $25!  It has 7 drawers and it's plenty big enough for what I work on ( 1/48 aircraft mostly ).  I drilled holes in the top to mount my lights since I couldn't clamp them to the side.  First you need to figure out how much room you have to work with, then decide what you want in a work table/hobby bench.  Good luck!
  • Member since
    June 2008
  • From: Iowa
Posted by Hans von Hammer on Wednesday, May 20, 2009 11:39 AM
I bought a 42 x 24 drawing table and use it for a bench..... I added drawers that I picked up here & there... The table cost me 60 bucks at Hobby Lobby  (with 40% off Coupon)

  • Member since
    January 2009
  • From: clinton twp, michigan
Posted by camo junkie on Wednesday, May 20, 2009 1:05 PM

i use my old computer desk...works great for me!! here's a partial view of it!

"An idea is only as good as the person who thought of it...and only as brilliant as the person who makes it!!"
  • Member since
    August 2004
  • From: Forest Hill, Maryland
Posted by cwalker3 on Thursday, May 21, 2009 1:36 PM
I bought a computer desk from Ikea. Paid about $150 for it.

Cary


  • Member since
    April 2003
  • From: Halfway back to where I started
Posted by ckfredrickson on Saturday, May 23, 2009 3:08 PM

I use an old metal office desk that I picked up at my employer's surplus store pretty cheap.  The drawers are a bit deeper than I prefer, but there's a lot of volume to store stuff and surface area to work on.

My dad set up a pretty cool general-purpose working area in the garage using the kitchen cabinets (which were being replaced with new ones anyway) and then laying a preformed laminate countertop over them.  He left a gap between the lower cabinets so that you could sit there and put your legs underneath, but hardly anybody actually sat there for any period of time.

You may also want to check out used furniture stores to see if you can find a table/desk that's the size you want... Not much purpose in buying new something that'll potentially get hit with the various mishaps of modeling (spilled paint, knife marks, etc.)

  • Member since
    June 2008
  • From: Piscataway,NJ
Posted by jtrace214 on Saturday, May 23, 2009 5:37 PM

Build it yourself,that way you can make it exactly the way you want to. Thats what I'm is the process of doing as I get money. mine is L shaped 5' main work area and prob. gonna be 8' on the other wall to hold my spray booth and machine tools. When done I will snap pics. I will also prob. use my old Craftsman box similar to what Hawkeye did since theres not much in it any more,I upgraded to a Snap On box years ago. Let me know if you need more sugestions I have all kindsa crazy ideas in my head,this is the last bench I want to build.

John

the pic to the left is my weekend condo lol

  • Member since
    October 2007
  • From: Inland Northwest
Posted by Summit on Tuesday, May 26, 2009 11:47 AM

I built mine a year ago last spring. I only had a small room for my hobby area so to get the most of the space I used a "L" shape. The inside legs are set in 4" to not be "Knee Whackers " or "Toe Stubbers"  The Material used was 3/4 " Birch Plywood, 2" x 2", and 1" X 4" lumber cut and ripped to size. Less then $80.00 invested.

All the building takes place on the right hand side. The spray booth in the middle works out Very Good for me. I mix paint and do the decal's on the left side. My Teenage Son has also been known to build on that side. Approve [^]Thumbs Up [tup]

Bench

Sean "I've reached nearly fifty years of age with my system." Weekend GB 2008
  • Member since
    February 2003
Posted by Jim Barton on Tuesday, May 26, 2009 2:41 PM
Try to get as much storage space as you can. Can't have too much of that!

"Whaddya mean 'Who's flying the plane?!' Nobody's flying the plane!"

  • Member since
    August 2006
  • From: Neenah, WI
Posted by HawkeyeHobbies on Tuesday, May 26, 2009 3:38 PM

 Jim Barton wrote:
Try to get as much storage space as you can. Can't have too much of that!

AMEN!

Gerald "Hawkeye" Voigt

http://hawkeyes-squawkbox.com/


"Its not the workbench that makes the model, it is the modeler at the workbench."

  • Member since
    January 2015
  • From: Katy, TX
Posted by Aggieman on Tuesday, May 26, 2009 9:00 PM

^

Agreed on the storage space issue.

A few years ago I decided to scrap the two separate units I had scratch-built but were portable and didn't provide ample space for a permanent L-shaped unit.  I designed it for maximum space, both top side and underneath.  It runs about 6' down one leg of the L and 8' down the other.  I put in a custom drawer unit that I am not real happy with (am considering buying yet another Craftsman tool box to install in that space).

I added an old metal workbench I had to form kinda a "U" shape where I store most of my unbuilt kits and paints/tools.

  • Member since
    January 2003
  • From: Chantilly, Virginia
Posted by CNicoll on Wednesday, May 27, 2009 9:44 PM

If floor space is something of a premium, look at a corner computer desk.   Mine comes with storage areas on both right and left sides, plenty of workspace, and I put my various toolboxes under the desk at the sides (where they are out of my way, but easily accessible).  There are also shelves on both sides for my paints and various supplies.  They are cheap!

Good luck!

On the bench:  Academy 1/72 B-17G 'Blue Hen Chick';  1/48 Tamiya Mustang III; Kitty Hawk 1/32 P-39. 

Completed:  1/48 Tamiya P-51D Mustang - 'Show Bird', 1/32 Dragon P-51D  Flying Tigers 'What if'; 1/32 Tamiya P-51D Big Beautiful Doll

Group build:1/48 Tamiya Mustang III; 1/48 Tamiya P-51D Show Bird

  • Member since
    June 2008
  • From: Iowa
Posted by Hans von Hammer on Thursday, May 28, 2009 7:56 PM

This was my workbench until last Feb when I moved into a place that had a second bedroom for me to turn into The War Room..

It was really nice moving out of the living room, lol..

  • Member since
    March 2008
  • From: london-uk
Posted by ludwig113 on Monday, June 8, 2009 1:47 PM
 Aggieman wrote:

^

Agreed on the storage space issue.

A few years ago I decided to scrap the two separate units I had scratch-built but were portable and didn't provide ample space for a permanent L-shaped unit.  I designed it for maximum space, both top side and underneath.  It runs about 6' down one leg of the L and 8' down the other.  I put in a custom drawer unit that I am not real happy with (am considering buying yet another Craftsman tool box to install in that space).

I added an old metal workbench I had to form kinda a "U" shape where I store most of my unbuilt kits and paints/tools.

now thats my kind of room! i have an ikea desk at the moment, but i'm going to convert my garage(soon to be known as the outhouse/bungalow) into a workroom with a big L shaped workbench.

once the new concrete floor has been put down and i've put in a couple of extra windows i'll build the benches.

  • Member since
    August 2007
  • From: The Plains of Kansas
Posted by doc-hm3 on Wednesday, June 10, 2009 8:02 PM

 MZ, I built mine from a damaged solid core door that I paid $10.00 for at LOWES. Then I bought a couple of storage racks (200#cap. each) at WAL-MART and attached them to the bottom/underside of the door with electrical conduit wall anchors, then crosstied them with a wire rack shelf piece that I had leftover from another project. All in all It cost around $30.00, and is solid as a rock. Then I built a paint rack and paint booth. It sure is nice to have a dedicated build area after all these some 45yrs. of building models on a kitchen table.

                                                                           doc

All gave some and some gave all.

  • Member since
    June 2007
Posted by squeakie on Thursday, June 11, 2009 10:59 AM

You don't really need anything really heavy for modeling, and I also building one too. I was over at my son's house the other day and he had a stack of old flat panel doors in the garage that he'd replaced with six panel doors. They're 24" wide (some were 30" wide), and about 80" long. Of course they all had a hole in one side for the door knob, but for that was OK to run the wires for lights and a power strip. Anyway I'm going to cut the door off at 54", and then use what's left for an "L" shaped bench top. Or more that likely just cut another door and make the side side 54" as well. The one real problem I ran into was that these doors are the hollow type, and I'll have to make a filler strip for there I cut the doors. I'll then screw them together from the underside, and them buy a couple pieces of hard masonite for the top. Then I go over to Lowes and look at cabnet bases in the unfinished section. They have just about anything you can think of. Also in the center (where the two panels join) I'll need to make somekind of the frame work to support all this, and have decided to actually screw the cabnet bases to the frame work. Right now it looks like I'm going to use either an 18" or a 24" multi drawer cabnet on one end and a 12 or 24" one on the other end. The worst part about this project is painting it!

gary

  • Member since
    September 2006
  • From: Bethlehem PA
Posted by the Baron on Thursday, June 11, 2009 11:55 AM

I built mine from salvaged/scrounged lumber, I think the only thing I bought was the stain and urethane varnish to color and seal the work surface.

Here are some shots of it (I apologize for a duplicate post):


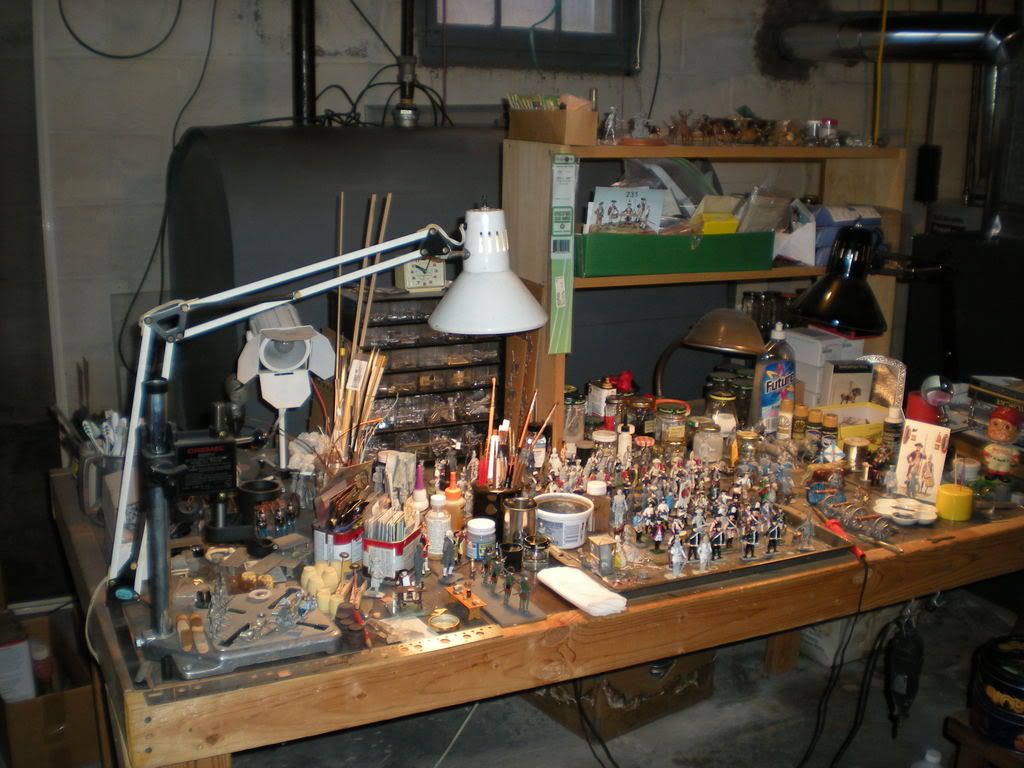
That was taken over Christmas vacation, but it still looks pretty much the same.  Before I bought my house, I was living in a mobile home, saving money for a house.  This bench was carmmed into a spare room that was about 10'x10', and that determined the dimensions, it's about 4'x8'.

As you can see, it's oil-fired, to power the Dremel.  Note the tank behind and the burner to the right...No, just kidding!  It's in the utility side of my basement.

2x4's for the framing came from a theater I belong to, when we struck a set, and the work surface is made up of 4 pieces of 3/4" plywood shelves that I got at work (they were being thrown out).

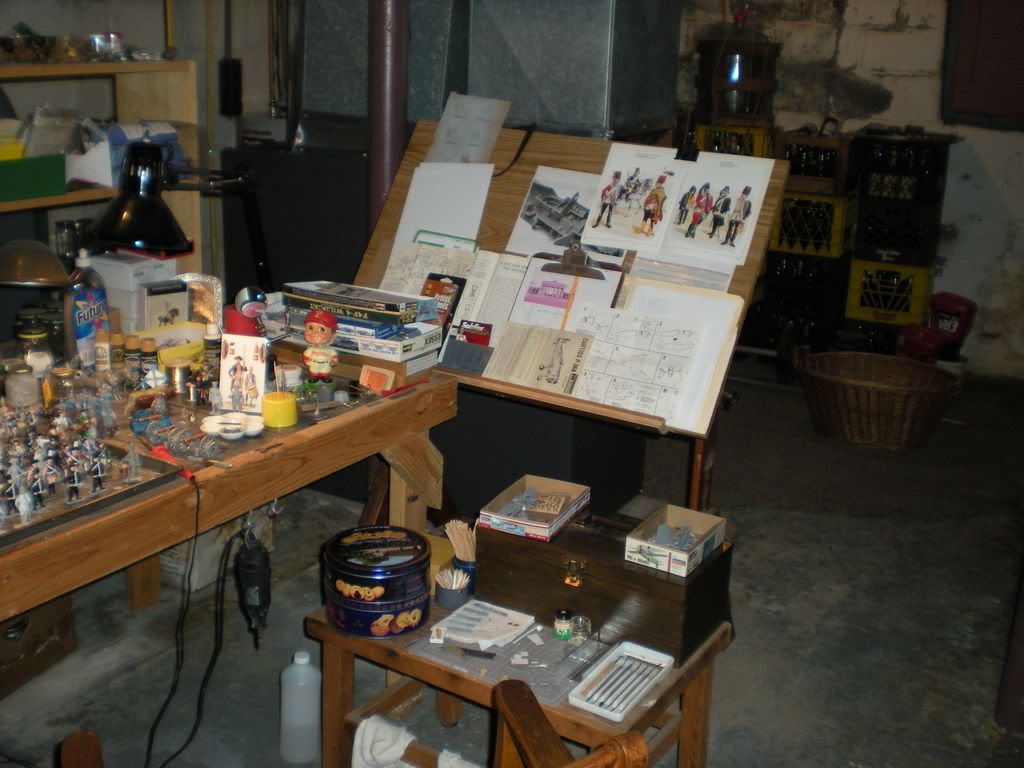
I've since added two more legs about 2' in from the left end of the table, front and back side, and a rail on each, to support some pine board shelving.  That holds more of my kit stash.  The rest of the stash is behind the camera's position.

I'm thinking of adding some shelves along the back of the bench, to add more storage for things that I need to access, but are currently on the bench itself and in the way.

It's true, isn't it--you always need a bigger bench...

The bigger the government, the smaller the citizen.


  • Member since
    March 2008
  • From: East TX
Posted by modelchasm on Sunday, June 14, 2009 10:48 AM

This is a nice topic. I've been planning on building in a corner piece in my study specifically for modeling and model building. Right now I'm using my office desk and its working fine, but I don't really have room for all my tools, paints, etc. to be readily available. Everything is just shoved into drawers. Plus, its not really condusive to trying to have a home business with modeling stuff everywhere.

I've already started building in bookcases along all the walls and plan on adding in a display cabinet in the future. My desk sits in the middle of the room facing towards the entrance opening (there's no door, but rather an 8' opening into the room). I plan on building in a corner cabinet behind the desk so that I could just spin around and work rather than move to another part of the house. I also want the piece to be completely self contained ... in that once everything is folded/ closed up, it just looks like a reular corner cabinet. However, on the inside, I plan on have magnetic tool strips, racks for paint bottles, lights, power strips, shelves for reference books, etc.

I've got some "plans" drawn up ....I'll try to scan and post them later.

Thanks again for the thread!

"If you're not scratching, you're not trying!"  -Scott

  • Member since
    April 2008
  • From: Philadelphia PA
Posted by smeagol the vile on Sunday, June 14, 2009 1:48 PM
I use a long plastic table, the kind you'd see at a flea market or at an outdoor buffet kind of aprty thing, you know the tables I mean.  I have 3 areas set up on it.  The one right next to me for quick painting and such, one with my cutting mat for when I need to do specifc tuff, and my AB/spray painting area all on the same table.  I have a little thing with drawers at the first part, with all my tools and paints in it nice and organised.


  • Member since
    October 2008
  • From: New Jersey
Posted by oddmanrush on Tuesday, June 16, 2009 5:57 PM

I model in my unfinished half basement where I'm kept company by several species of spider that I'm unfamiliar with. We have a special relationship - if they don't bother me, then I won't introduce them to my Xacto knife.

Any how, I was getting tired of working off a concrete slab. Fortunately, my PC just took a dump and I replaced it with a lap top. This freed up the computer desk the PC had been sitting on. Its not large, just rectangular, with a slide out key board shelf and one shelf above the desk top. Very basic. I first purchased it from Staples in the Clearance aisle for around $40 or so. Quite a good deal.

It fits all my paints, tools, and kit I'm working on and its multiple tiers allows me more surface area that takes up less space. It works like a charm! And to think, I'd been putting a computer on it all this time!! 

Jon

My Blog: The Combat Workshop 

JOIN OUR COMMUNITY!

Our community is FREE to join. To participate you must either login or register for an account.

SEARCH FORUMS
FREE NEWSLETTER
By signing up you may also receive reader surveys and occasional special offers. We do not sell, rent or trade our email lists. View our Privacy Policy.