SEARCH FINESCALE.COM

Enter keywords or a search phrase below:

Poly cement expiration

5801 views
11 replies
1 rating 2 rating 3 rating 4 rating 5 rating
  • Member since
    July 2007
Poly cement expiration
Posted by dragos on Tuesday, July 10, 2007 6:39 AM
Hello everybody, this is my first post here.

I've just started a new plastic model kit after a pause of several years (I'm a beginner), and I have a tube of Humbrol poly cement that I used back then. I suppose it's about 7 or 8 years old. I don't see any expiration date on the box or on the tube. Should I still use it or has its properties altered?

This is the kind of cement I am talking about:


Best regards
Dragos
  • Member since
    August 2005
  • From: Sydney, Australia
Posted by Phil_H on Tuesday, July 10, 2007 6:50 AM

If it hasn't dried out, it should be fine - I am using a bottle of cement (Faller "Expert") which I bought in the mid-late 80's and it's still going strong.

However, if you have any doubt, buy new cement. I'd recommend giving liquid cement a go - Once you get the hang of it, you'll be pleased with the results.

  • Member since
    July 2007
Posted by dragos on Tuesday, July 10, 2007 7:24 AM
Thanks!

It hasn't dried out, but I have the impression that once applied it dries faster than it used to, so I have to stick the parts quite fast. I'm happy with the results. My only worry is not to fall apart in time or something.

I'll give the liquid cement a try once I can get myself going to the hobby store.
  • Member since
    July 2007
Posted by dragos on Wednesday, July 11, 2007 6:58 AM
At your recommendation, I have bought a bottle of Mode Master liquid cement for plastics, with a brush on attached to the lid. I never used liquid cement till now. From what I have learned by searching the forum, this should be applied on joints when the parts are fitted together, or to stregthen the existing joints, by touching the brush along the edges. Is this the correct technique ?
  • Member since
    April 2004
  • From: Georgia
Posted by Screaminhelo on Wednesday, July 11, 2007 9:28 AM
Use a separate fine brush.  This will make it much easier to get the glue right where you want it and nowhere else.  The brush that comes with the bottle is kind of like using a cannon to kill a fly, it is clumsy and difficult to keep from getting glue everywhere but the joint that you are working on.  I use an old camel hair brush that is well beyond use for painting.  Now that that one is kind of rough shape for glue now, I will probably buy a cheapie at Hobby Lobby to replace it.  I haven't experimented with synthetic brushes to see if the glue will soften them but I'm fairly certian that a nylon brush will work fine and be cheaper.

Mac

I Didn't do it!!!

  • Member since
    July 2007
Posted by dragos on Wednesday, July 11, 2007 1:18 PM
My first impression using liquid cement:

The odor is killing my throat, the tube cement was perfume compared to this :)
I applied along edges already glued with cement from the tube, and it fills the very small gaps well. However, it leaves glossy stains in the places the brush touches the plastic, in spots often impossible to sand.
  • Member since
    April 2004
  • From: Georgia
Posted by Screaminhelo on Wednesday, July 11, 2007 7:56 PM
Stay with it man.  It is well worth it in the long run.

Mac

I Didn't do it!!!

  • Member since
    January 2006
  • From: Baton Rouge, Snake Central
Posted by PatlaborUnit1 on Sunday, July 15, 2007 10:19 PM

The glossy spots are simply melted plastic that have pooled and dried clear with a bit of the solvent mixed in from the glue. Polish it with a wad of 000 steel wool.

I havent touched tube glue in almost twenty five years, and have no interest in starting now....

If the small brush (or the big honkin thing that comes in some of these bottles) doesnt work well, use a cheap student type draftsmans inking pen with the adjustable tip. I paid two dollars for a really cheap one with a cheap plastic handle and it works great for long fueselage seams (like 1/48 jets).

HTH

David


Build to please yourself, and don't worry about what others think! TI 4019 Jolly Roger Squadron, 501st Legion
  • Member since
    July 2007
Posted by dragos on Tuesday, July 17, 2007 4:47 PM
I ended up using both the tube and the liquid glue. I first apply the glue on the wider contact areas, then apply the liquid on loose corners or to fill the very small gaps between the parts. For small pieces I use only the glue from the tube. The problem is that if I apply the liquid on the outside (visible) part, it will stain spots impossible to sand, such us around small rivets. Would the paint cover these spots?

And I'm not quite sure what the "000 steel wool" is, I have only sand paper with 300, 400, 600 and 1000 granularity. Since I've taken this hobby seriously only recently, my tools arsenal is quite limited at the present.
  • Member since
    January 2006
  • From: Baton Rouge, Snake Central
Posted by PatlaborUnit1 on Tuesday, July 17, 2007 8:56 PM

Hi Dragos

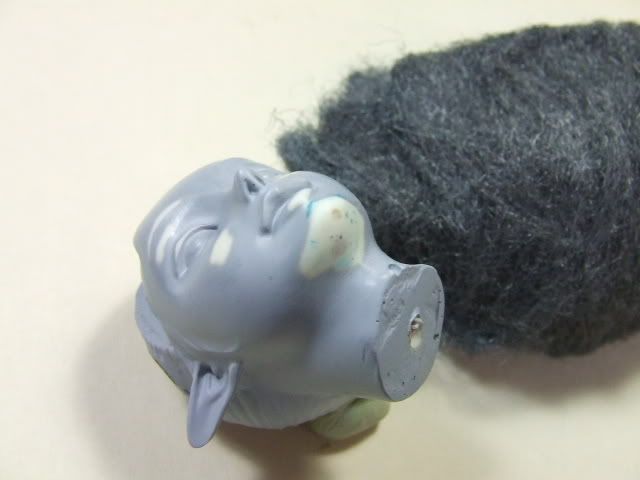
Steel wool is a very fine spun metal, you may be more familiar with kitchen scouring pads like SOS pads that are laoded with soap, that is a steel wool pad, a pretty rough one. Steel wool is used by woodworkers and some metalsmiths for polishing wood and or metal to a high lustre. It comes in a big wad, we can get it here in the US at any discount store. The "000" part is the grade, the more zeros, the finer the wool, very much like the higher the number of sandpaper, the higher the lustre since it is "cutting" less.  A bag will last you a few years. I use it to remove the fine residue you are finding on top of your seams.

Have a look at Usimutu's head and you see a wad of it, I use it to polish the primer and any rough spots on a prepped figure.

Any hardware store or well stocked grocery stores will even have it for a couple of dollars.

Oh, and it leaves fine metallic shavings, so be ready to sweep/ vaccuum your work area.  

David


Build to please yourself, and don't worry about what others think! TI 4019 Jolly Roger Squadron, 501st Legion
  • Member since
    August 2005
  • From: Sydney, Australia
Posted by Phil_H on Wednesday, July 18, 2007 12:47 AM

 dragos wrote:
My first impression using liquid cement:

The odor is killing my throat, the tube cement was perfume compared to this :)
I applied along edges already glued with cement from the tube, and it fills the very small gaps well. However, it leaves glossy stains in the places the brush touches the plastic, in spots often impossible to sand.

Ahh.... I think I know what the problem is.

Not all liquid cements are equal.

There are two broad classes of liquid cements:

  • Hot "Thin" full-solvent types, such as Tamiya "Extra thin", the old Testors, Tenax R7, Ambroid ProWeld (and others), which rely on solvent action alone to "melt" the parts together to form a bond. These cements work best with the "touch to the joint" method.

and

  • "medium" slower acting cements which are less aggressive and thicker because they rely less on the solvent action and contain a "binder" for added strength. This class includes Tamiya "regular" liquid cement, Revell Contacta, Humbrol Precision Poly, Modelmaster Liquid cement (and others). These cements work best when applied on a similar way to tube cements, as they don't flow along joints as easily as the type described above.

Your Modelmaster liquid cement belongs to the second group and includes a plastic "binder" which solidifies as the cement cures. This is what is leaving the glossy marks.

Now having said all that, there's nothing wrong with the Modelmaster cement that you're using - it will still give you better results than blobby tube glue. All it means is that it doesn't flow along joints as easily as the "hot" cements. 

  • Member since
    July 2007
Posted by dragos on Wednesday, July 25, 2007 5:03 PM
 Phil_H wrote:

 dragos wrote:
My first impression using liquid cement:

The odor is killing my throat, the tube cement was perfume compared to this :)
I applied along edges already glued with cement from the tube, and it fills the very small gaps well. However, it leaves glossy stains in the places the brush touches the plastic, in spots often impossible to sand.

Ahh.... I think I know what the problem is.

Not all liquid cements are equal.

There are two broad classes of liquid cements:

  • Hot "Thin" full-solvent types, such as Tamiya "Extra thin", the old Testors, Tenax R7, Ambroid ProWeld (and others), which rely on solvent action alone to "melt" the parts together to form a bond. These cements work best with the "touch to the joint" method.

and

  • "medium" slower acting cements which are less aggressive and thicker because they rely less on the solvent action and contain a "binder" for added strength. This class includes Tamiya "regular" liquid cement, Revell Contacta, Humbrol Precision Poly, Modelmaster Liquid cement (and others). These cements work best when applied on a similar way to tube cements, as they don't flow along joints as easily as the type described above.

Your Modelmaster liquid cement belongs to the second group and includes a plastic "binder" which solidifies as the cement cures. This is what is leaving the glossy marks.

Now having said all that, there's nothing wrong with the Modelmaster cement that you're using - it will still give you better results than blobby tube glue. All it means is that it doesn't flow along joints as easily as the "hot" cements. 

 Hi Phil

If I try to apply this glue like the tube cement on a long surface, I either have to apply a thick layer, risking to leak over margins, or to move very fast, because when I reach the end of the surface the point were I started is dry. If the area to be glued is small and can be covered with a single run of the brush, I agree this is far better than the stringy blobs of the tube cement.

JOIN OUR COMMUNITY!

Our community is FREE to join. To participate you must either login or register for an account.

SEARCH FORUMS
FREE NEWSLETTER
By signing up you may also receive reader surveys and occasional special offers. We do not sell, rent or trade our email lists. View our Privacy Policy.