SEARCH FINESCALE.COM

Enter keywords or a search phrase below:

Dragon 1/35 OH-6 "Egg" WIP, 03/22/09, "FINISHED"

32457 views
53 replies
1 rating 2 rating 3 rating 4 rating 5 rating
  • Member since
    July 2006
  • From: New Jersey
Posted by redleg12 on Wednesday, March 25, 2009 2:29 PM

Kevin - Thanks. Did you notice the patch on the top next to the number....its the old spearhead & powder horn.

As for shaving butts or heads, as Chris pointed out, their butts were already firmly in place. If there was a way to hold the in the cockpit while holding the two body halves togeather and test the cockpit Banged Head [banghead] and I thought to check it first,,,,I would have. The pilot has the worst shave but you really can't tell unless you pick it up and look in through the open door with a magnifyer.

Thanks for stopping by

Chris - Thanks for jumping in and you are correct, thanks again

Rotowash - Thanks for looking and for your comments. It is especially nice coming from you roto guys!!

Rounds Complete!!  

"The Moral High Ground....A Great Place to Emplace Artillery."

  • Member since
    January 2007
  • From: Auburn, Alabama
Posted by rotorwash on Wednesday, March 25, 2009 1:44 PM

Mike,

  She looks great!  It's good to see a later version of the Loach and yours looks pretty fine from where I sit.

    Ray

  • Member since
    December 2003
  • From: Colorado
Posted by psstoff995 on Wednesday, March 25, 2009 9:17 AM
 minimortar wrote:


I wonder tho, would it have been better to have shaved a little height off of the buttocks and feet (or reposit the legs a little) instead of reshaping the heads?


In my opinion, I think had the problem been discovered earlier, or if the tops of the figures weren't under heavy tinted plastic, I’d agree- that would have been an ideal fix- and most likely the route I'd have gone with to preserve some of the figure's natural look, however I can't tell that the tops of their heads are flat now so I suppose the “close shave” worked out in the end

-Chris

US Army Infantryman

  • Member since
    June 2005
  • From: Massachusetts
Posted by minimortar on Wednesday, March 25, 2009 8:44 AM

As always, I watch your builds from the background and this is another fine example off of the Redleg12 workbench! Very nice job with this tough kit and certainly deserving of a spot in your display case! I'd like to have it!

I wonder tho, would it have been better to have shaved a little height off of the buttocks and feet (or reposit the legs a little) instead of reshaping the heads?


Thanks,
Kevin Keefe

Mortars in Miniature
A Scale Model (Plus!) Collection of the Infantryman's Artillery

  • Member since
    July 2006
  • From: New Jersey
Posted by redleg12 on Monday, March 23, 2009 10:50 AM

Aaron - thanks for looking and the comments.

Yep, I thought the same on the base. I originally planned to elevate the egg using a 1/4 plexiglass rod. Well....I got lazySad [:(]

Thanks for the idea and again, for your comments

Rounds Complete!!

"The Moral High Ground....A Great Place to Emplace Artillery."

  • Member since
    September 2015
  • From: The Redwood Empire
Posted by Aaronw on Monday, March 23, 2009 10:34 AM

That is a neat little egg and something I haven't seen built often.

The base idea is really neat and I don't recall seeing anyone do that before. Only thing I can think of that might really bring out the idea of flight would be to put a thick piece of glass or plexiglass down over the photo to give some offset between the canopy and the skids and reinforce the idea it is over the green and not sitting on it. 


  • Member since
    July 2006
  • From: New Jersey
Posted by redleg12 on Monday, March 23, 2009 5:12 AM

Charlie - Thanks for looking and thanks for your comments!

Rounds Complete!!

"The Moral High Ground....A Great Place to Emplace Artillery."

  • Member since
    April 2008
  • From: SE Alabama
Posted by Retired Gunpilot on Sunday, March 22, 2009 10:56 PM

A very nice finish Mike. I love the detail in your aircraft and she looks beautiful/

Charlie

  • Member since
    July 2006
  • From: New Jersey
Posted by redleg12 on Sunday, March 22, 2009 5:35 PM

Chris - I thought an aerial shot on the base would give it some sense of flight!!

Thanks for looking and your kindness

Karl - I think I wore out a file..Shock [:O]. The problem is the canopy is warped east/west and the body is warped north/south. There is no way short of heating it up and bending (which I was not going to try) that you can get it to fit on all the edges correctly.

I do like it, but the canopy seam near the rotor is visable when you look at it close. I agree though, only the builder knows the flaws. I guess I am just frustrated as this kit took up twice the time it should have. I should have finished two weeks ago. Banged Head [banghead].

Oh well...on to the next adventure.Whistling [:-^]

Thanks for stopping in and for your uplifting comments.

Rounds Complete!!

"The Moral High Ground....A Great Place to Emplace Artillery."

  • Member since
    January 2007
Posted by the doog on Sunday, March 22, 2009 4:22 PM

Hey Mike,

That's a shame about the glass canopy; I know the feeling; I've run into those types of problems with some of the auto's I've built. There's not much you can do but file, file, file.

All that notwithstanding, I'd be proud to have this sitting on the shelf! And don't overestimate the contest judges--you could take something home with a fine little mode like this. I certainly don't see the glaring mulligan that you have proposed? Don't forget that only YOU really know the trouble spots--the rest of the presentation is pretty damned fine, all in all!

  • Member since
    December 2003
  • From: Colorado
Posted by psstoff995 on Sunday, March 22, 2009 4:22 PM
Nice finish for such nightmarish problems- I really like the way you've displayed it on the base. You definitely took a poor kit and made due.

-Chris

US Army Infantryman

  • Member since
    July 2006
  • From: New Jersey
Posted by redleg12 on Sunday, March 22, 2009 4:06 PM

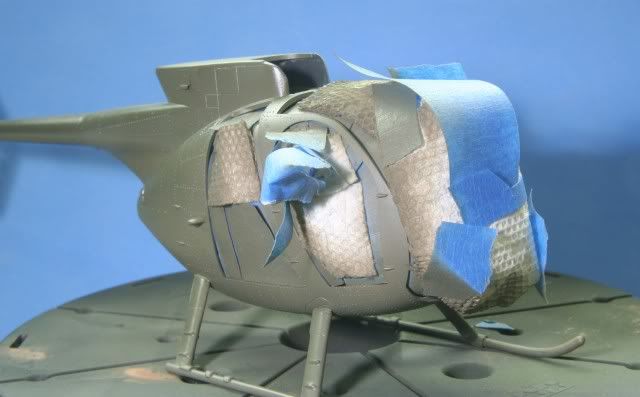
I started with the masking and painting of the main body. I decided to paint he canopy and body separate, a mistake you will see later. After masking the openings I painted the "egg" with Poly Scale OD Green. After a few light coats here is the result.
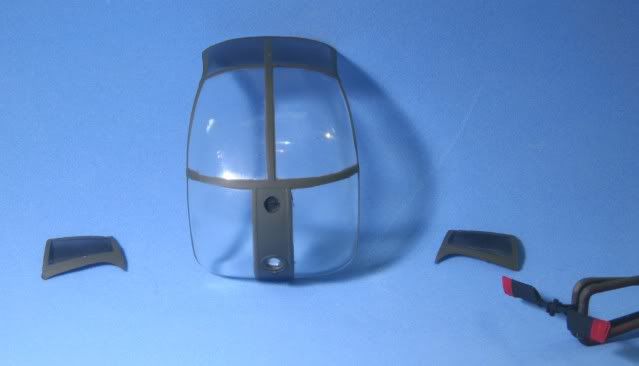
The canopy and side glasses were also masked and painted with the OD Green.
After the paint set up I coated with a thin coat of future for decaling. With all the rivets and panel lines I did not feel comfortable decaling onto flat. Allowing time for the future to set, I then applied the decals which included some custom decals for the aircraft number and the 187th patch. The aircraft number is a pure guess, just tried to make sure it was a real number.  The patch was as I remember the 187th egg which had the patch forward of the number area. Here is the egg with the decals on.
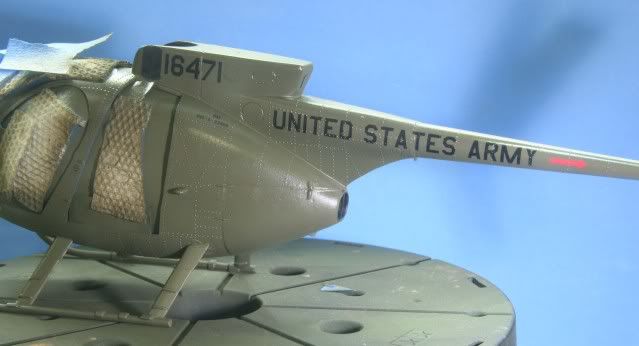
Now came the nightmare....first the figures which Dragon makes for the kit are slightly too tall for the canopy to fit. The tops of their helmets had to be flattened and they were repainted. Fortunately, they sit under the tinted glass and it is almost impossible to tell they are flat heads.

Even with the figures modified, the canopy glass is a HORRIFIC fit to the body. You cannot get the bottom and top edges to line up as the canopy does not match the body shape correctly. Also the body panels are warped (which also caused a lot of the previous seem problems) which cause the body sides to be inside the canopy. After a NUMBER of hours sanding fitting etc, I gave it a shot. First I glued the top and bottom and after some set time, using 3 micro clips per side, pulled the panels out and glued them.

Even with all that, the top panel did not fit perfect and was raise slightly and required EXTENSIVE joint filling. The sides also required some filling. Sanding would cause a problem in that the warped body would pop loose of the glue and so I would go back and start again.

Without going on through this rant, here is the canopy filled and mounted.
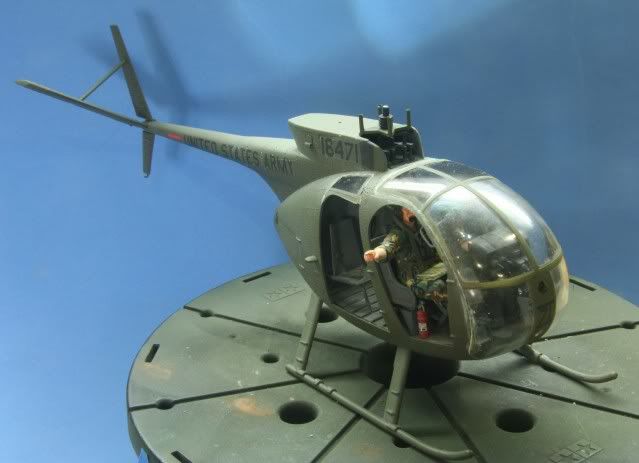
 

If I knew this was going to be this nightmare, I would have mounded the canopy before painting. Once everything was touched up, the final few little parts and the rotors were mounted. I then gave the egg a wash of black to highlight the body panels and rivets.

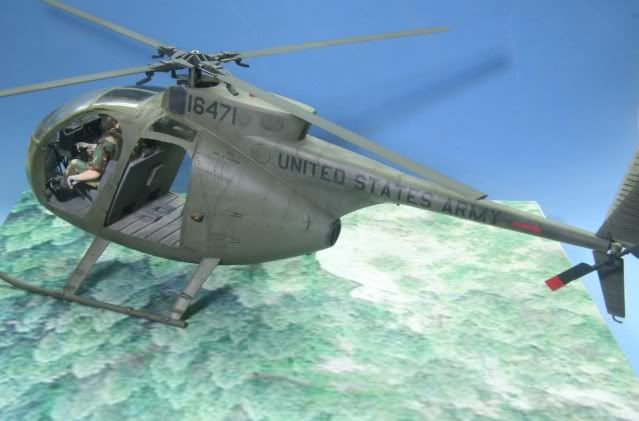
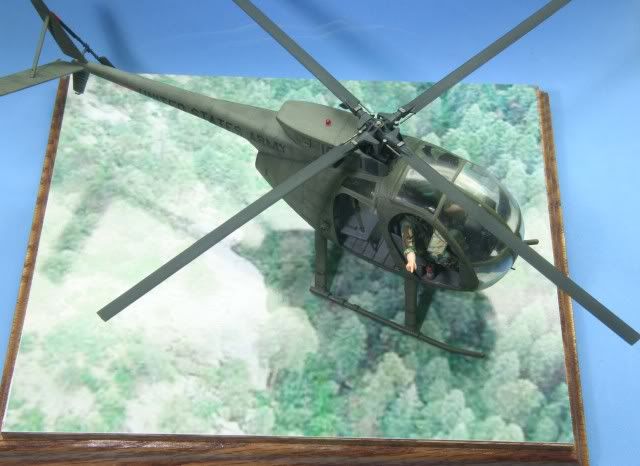
Here are the complete shots of my OH-6...egg. I have to take a mulligan on this one in the canopy top- to the body does show. I was at a point of after 8 hours of working with it....it was time to move on.

It will grace my display cabinet but is not at a standard which I would feel comfortable taking it to a show.

Be warned....if you want to build the OH-6 in 1/35, this kit is the pits. Hopefully Dragon remakes the kit, if not try another scale by another manufacturer.
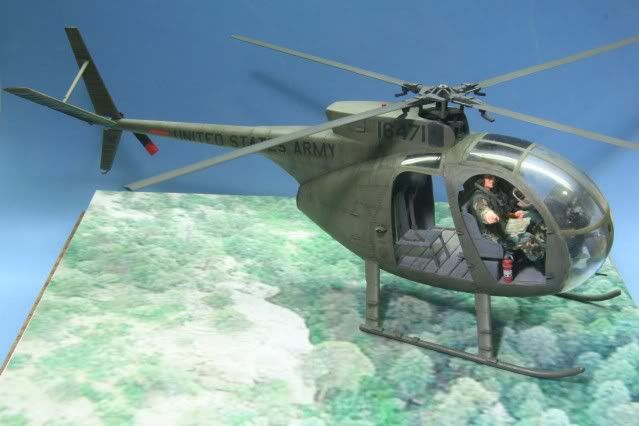
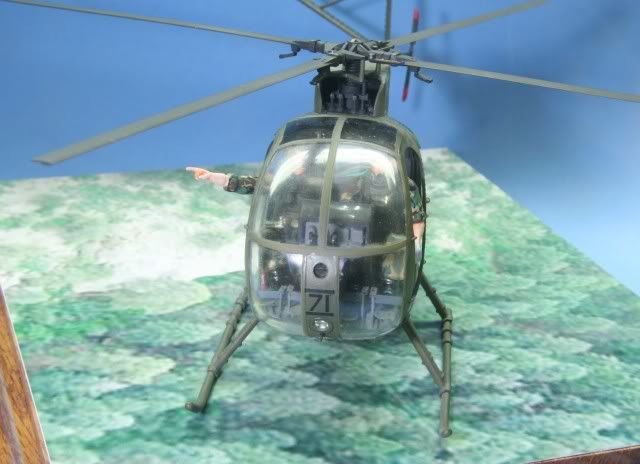
Thank you for looking and for your comments. To the regular roto-wash guys...this old redleg gave it a shot...hope I can come back again with a better kit and build in the future.

Rounds Complete!!

"The Moral High Ground....A Great Place to Emplace Artillery."

  • Member since
    July 2006
  • From: New Jersey
Posted by redleg12 on Monday, March 2, 2009 7:27 PM

 wing_nut wrote:
YOU ARE BUILDING A FLYING MACHINE???? Big Smile [:D]  Looks good Mike.  Be careful building too many outside the usual though.  Look what happened to meWink [;)]

Marc - I thank you for your concern. Understand I was an artillery officer first but was also air assualt....move by helicopter!!!. Besides...these are not wingy things, these the wings rotate.

Nexy my connection...Gino (the guy with the map) is doing artillery observation. Sat in that seat and did the same...feels like a century ago.

So as you can see, not to fear. I will be back building artillery right after this. Now......I could build a Trumpter CH-47 airlifting an M102 howitzer Shock [:O]

Nahhhh....I'll save that for later!!

Thanks for looking. and thanks for the comments.

Rounds Complete!!

"The Moral High Ground....A Great Place to Emplace Artillery."

  • Member since
    April 2005
  • From: Piscataway, NJ!
Posted by wing_nut on Monday, March 2, 2009 7:05 PM
YOU ARE BUILDING A FLYING MACHINE???? Big Smile [:D]  Looks good Mike.  Be careful building too many outside the usual though.  Look what happened to meWink [;)]

Marc  

  • Member since
    July 2006
  • From: New Jersey
Posted by redleg12 on Monday, March 2, 2009 4:50 PM

Manny - It's alway an honor to have you stop in. Yep the figs....made for the kit, do not match the kit. They are a bit taller than wanted. Gino (the observer) seems OK but Joe (the pilot) will need a neck-ectemy. He is in the way by about an 1/8 or slightly less of an inch. His visor knob on the front of his helmet may also have to go.

What a PIA to have to re-do work because the kit is FUBAR. Oh well....no matter what, I'm in the home strech....just gut it out and finish at this point.

Thanks again for looking and for your comments.

Rounds Complete!!


"The Moral High Ground....A Great Place to Emplace Artillery."

  • Member since
    November 2005
Posted by Anonymous on Monday, March 2, 2009 7:14 AM
Wow...this is cool stuff and nice work w/ that old kit...I, too, noticed the guys in the cockpit were further out than the framing for the windscreen...I hope there is not a fit issue there... 
  • Member since
    July 2006
  • From: New Jersey
Posted by redleg12 on Monday, March 2, 2009 5:38 AM

elevenbee - Some how I missed you last week and thus apologize. Thank you for looking and for your comments.

Yep, the BDU was never quite comfortable (though better than the pickel suit) and the early ones, especially the summer weight, fell apart. I agree, the best uniform were the OD jungle fatigues!! 

Retired Gunpilot - I found your grey gloves!! Thanks for looking and your comments.

Ron - Thanks for coming over and taking a look and thanks for the comments.

Rounds Complete!!

"The Moral High Ground....A Great Place to Emplace Artillery."

  • Member since
    January 2005
  • From: in the tank factory in my basement
Posted by biffa on Sunday, March 1, 2009 11:27 PM
Wow that console is wicked Mike seriously nice Thumbs Up [tup]  
Ron g.
  • Member since
    April 2008
  • From: SE Alabama
Posted by Retired Gunpilot on Sunday, March 1, 2009 9:19 PM

Your build is looking beautiful!

Charlie

  • Member since
    December 2003
  • From: Colorado
Posted by psstoff995 on Sunday, March 1, 2009 7:43 PM

That's really too bad- makes sense that it's OOP, maybe they'll revamp it sometime soon, they seem to be rereleasign a few of their older kits with PE and the like- it would make sense that they pulled their helo crew off the market as well, maybe they'll make a Gen2 set.

You're definitly working with what you have though! This build looks awesome so far.

-Chris

US Army Infantryman

  • Member since
    July 2006
  • From: New Jersey
Posted by redleg12 on Sunday, March 1, 2009 7:37 PM

psstoff - Thanks, no its the old OH-6 which flew in the reserves until the late 80s/early 90s.

I'm 6'4" and was never comfortable in the egg.....nither is Gino and Joe. As I said the fit on this kit is the pits. Their own figures don't fit quite well. When I did a test fit, Gino was OK but Joe is going to require a neck shortening for the canopy.

Part of the reason this kit is taking longer is the poor fit, seam filling and dumb stuff like this.

Thanks again

Rounds Complete!!

"The Moral High Ground....A Great Place to Emplace Artillery."

  • Member since
    December 2003
  • From: Colorado
Posted by psstoff995 on Sunday, March 1, 2009 7:28 PM

WOAH!! Way cool, love the figures, the decals continue to turn out great!!

Is the 0H-6 father to the modern MD 500 Little Bird? Always liked that one.

The dash looks amazing and I can't wait for you to seal this up- is it just me though, or are Joe and Gino a little tall? Hope they don't bump heads with the roof!!

-Chris

US Army Infantryman

  • Member since
    July 2006
  • From: New Jersey
Posted by redleg12 on Sunday, March 1, 2009 7:01 PM

Here is my latest update.

 I completed the control console. I first painted with Tamiya Flat Black then masked areas to stay black. I followed with Tamiya Gull Grey. After removing the masking I set instrument decals, and then used Future to create the instrument bezels. The warning lights are painted with Tamiya Yellow Green and the knobs were highlighted with a graphite pencil.

With the front done I turned to the back where I created the wiring harness with 22 and 26 gauge stainless wire painted black.

With the console complete, I mounted it in the cockpit.....Hey....Joe (the pilot) found his gloves. I will wash them for highlights later.

I completed the body assembly which this kit has a VERY POOR fit. Every seam required filling and sanding.

Also completed the painting of the interior of the canopy and the painting and assembly of the rotors.

I should be off to the paint booth shortly

That's where I am at for now. All comments are welcome, thanks for looking.

Rounds Complete!!

"The Moral High Ground....A Great Place to Emplace Artillery."

  • Member since
    January 2009
  • From: Southeastern MA
Posted by ellevenbee on Saturday, February 28, 2009 9:27 AM

Wow, that model is looking great.  I really like the job you did on the crew.  I do agree with one of those other posts, I don't think I ever saw any flight crew flying in BDU's back in the 80's, they all had the one piece nomex.   That being said, it is your model and the BDU's came out awesome. 

Too bad they don't make a weathered BDU version decal.  I remember the initial BDU's (issued before the light-weight hot weather sets) would fade pretty quickly.  After a 6 months or so, the tan would turn to a weird looking light purple-ish color.   I still have a set in the basement somewhere.   Of course, my pride and joy were the OD Vietnam era jungle fatigues.  Much more comfortable than those heavy weight BDUs and they were authorized for wear until (I think), the late 80's.    Since you had to buy them yourself, we always had a mix of uniforms when we were out in the field.   I had no problem spending a few bucks in order to avoid sweating my nads off in those early BDUs.  

Keep up the good work and keep posting pictures.

Regards,

John

  • Member since
    July 2006
  • From: New Jersey
Posted by redleg12 on Monday, February 23, 2009 8:57 PM

Tread - Thanks for stopping in. Yep the camo uniform is decals. I feel like a 1/35 tailor!!

Rounds Complete!!

"The Moral High Ground....A Great Place to Emplace Artillery."

  • Member since
    September 2005
  • From: beacon falls , Ct.
Posted by treadwell on Monday, February 23, 2009 6:29 PM

Hi MikeSmile [:)]

Cool to step out of your 'normal' genre-- I don't know much about helios. yours looks great so far--I am still trying to learn how to fly my 'Blade cp+' 6 channel model helo-- having a little trouble managing the collective and throttle inputs to get a rock steady hover---but thats for another forum--great work my friend --Am I to understand the camo on the pants are decals?----awsome----treadCool [8D]


  • Member since
    July 2006
  • From: New Jersey
Posted by redleg12 on Monday, February 23, 2009 9:42 AM

Karl - Thanks on the figs. Coming from someone like you and knowing the figs in your builds, it  truly is nice to hear.

Thanks for looking

Rounds Complete!!

"The Moral High Ground....A Great Place to Emplace Artillery."

  • Member since
    January 2007
Posted by the doog on Monday, February 23, 2009 8:54 AM

Looking superb, Mike!

WIah I could help you with the gloves/camo info, but I haven't a clue! I just know what I like, and I like what I see! The figures look outstanding, IMO!

  • Member since
    July 2006
  • From: New Jersey
Posted by redleg12 on Monday, February 23, 2009 5:57 AM

Bill and M60 - Thanks for stopping in and for your comments. "I'll be back!!!!!"

Charlie - HOLY ?%^&.....long time no hear. Thanks for stopping in. I will drop you a PM later.

Rounds Complete!!

"The Moral High Ground....A Great Place to Emplace Artillery."

JOIN OUR COMMUNITY!

Our community is FREE to join. To participate you must either login or register for an account.

SEARCH FORUMS
FREE NEWSLETTER
By signing up you may also receive reader surveys and occasional special offers. We do not sell, rent or trade our email lists. View our Privacy Policy.