SEARCH FINESCALE.COM

Enter keywords or a search phrase below:

1/35 MH-47E conversion

46156 views
91 replies
1 rating 2 rating 3 rating 4 rating 5 rating
  • Member since
    November 2013
1/35 MH-47G conversion: Ramp area build-up
Posted by intruder_bass on Monday, May 21, 2007 11:22 AM

  Thanks, Norbert

 Some more progress this weekend! Ramp area frames and wall detail. Still missing all the wiring and piping and ceiling and APU.


All the electric boxes and ramp control are ready but not glued on yet.

Oh BTW just realised that I forgot to take a close up of "how it looked like" on the original trumpeter's plastic.
Anybody can help me with that pic?

Andy

  • Member since
    May 2007
Posted by Norbert J on Thursday, May 17, 2007 7:38 AM

Well Andy

great job

 I just subscribe to tell you I look your build with much interest

 Norbert


  • Member since
    November 2013
Posted by intruder_bass on Wednesday, May 16, 2007 4:18 PM

   Thank you, Frank

 It starting to get into shape. Still have to imitate all the exterior detail - sensors, FLIR mount and rivets)))) Front pylon went through sirious sergery aswell - after all the sanding, filling, comparing to 100 photos and sanding again - there is not much of trumpeter plastic left on it.

  Anyway, worked on ramp area side walls for last 6 days straight. Shoud be able to post some pics on sunday.

  Andy

  • Member since
    July 2003
  • From: Piedmont Triad, NC (USA)
Posted by oldhooker on Tuesday, May 15, 2007 9:14 PM

Bravo Andy!! Thumbs Up [tup]

Beautiful job framing the cockpit and meshing it in with the new nose, I can hardly wait to see the results!      I am continually in reverence of your talent!Thumbs Up [tup]

Thank you for posting these progression shots!

Take care,

Frank

  • Member since
    November 2013
Posted by intruder_bass on Saturday, May 12, 2007 1:55 PM

  Some progress on the nose. New shaped nose cone and absolutly new window framing.


  I will be working on ramp area framing this weekend

  Andy


  • Member since
    August 2004
  • From: Maryland
Posted by Chief Snake on Wednesday, May 2, 2007 12:28 PM

Not a future release. The only thing I did was open the cooling verts, close the top vent screens which didn't belong there and raise the whole thing a bit. Also added the armor plates that protected the linkages. It's primered over now so it doesn't show up. I can't remember how to post to this forum and I'm kinda busy at the moment. Tonight I'll fiddle around a bit and see what I can do.


Chris M 

  • Member since
    November 2013
Posted by intruder_bass on Wednesday, May 2, 2007 11:04 AM

  Sounds promising, man!

  Can we see any pics? I am just quirious how your front pylon turned out - cuz I am working on mine right now )))  or is it classified as "possible future release" Smile,Wink, & Grin [swg]


Andy


  • Member since
    August 2004
  • From: Maryland
Posted by Chief Snake on Wednesday, May 2, 2007 8:31 AM

Mods so far- complete A model interior, new armored seats, gun sight, slaved sight, rear pylon vent repositioned, pylon raised and rear corrected, windows modified, all armor panels on upper fuselage added, front pylon modified, all extra nubs and bumps removed from fuselage, nose glazing modified and sliding windows opened, rotor heads corrected and detailed, ramp modified, 40mm nose turret new constructed and I'm laying out the wing stubs now. Rocket pods are done but I've got to scratch build the cannons.


Chief Snake 

  • Member since
    November 2013
Posted by intruder_bass on Wednesday, May 2, 2007 7:39 AM

  Hi Frank,

 It is Alum. foil - I love this stuff. Easy to use and if you screw it up - no problem - take off the panel and cut another insted. Rivets and screwheads are very easy to make - I think it looks more realistic then kit's floor with recessed riveting.

  Chris,

I also would love to see your ACH-47! I bet it has some extra detail on the body :))))))


Andy

  • Member since
    July 2003
  • From: Piedmont Triad, NC (USA)
Posted by oldhooker on Tuesday, May 1, 2007 11:53 PM

Andy,

The new floor looks great... what is that, aluminum foil?    Thank you for the updates!

Chris,

Many regards, sir.     A 1/35 ACH-47, aye?     I hope you post some progress shots as it goes!   

Take care,

Frank


  • Member since
    August 2004
  • From: Maryland
Posted by Chief Snake on Monday, April 30, 2007 7:02 AM

OOps, guess not!


CS 

  • Member since
    August 2004
  • From: Maryland
Posted by Chief Snake on Monday, April 30, 2007 7:01 AM

Andy, if that is an ACH-47A you're building, email me. I'm building one too and I've made resin copies of alot of distinctive parts such as the ammo cannisters, the .50 cal guns, the thumper gun assembly etc.


Chief Snake 

  • Member since
    November 2013
Posted by intruder_bass on Sunday, April 29, 2007 10:48 PM

   Update on my progress.

New cockpit floor, instrument panel, centre console done on this weekend. Since my GF went to Moscow for a month, I gotto focus on this project and hopefully get the whole nose done in 3 weeks.

Andy

  • Member since
    July 2003
  • From: Piedmont Triad, NC (USA)
Posted by oldhooker on Sunday, April 22, 2007 9:19 PM

Andy,

It looks like you're deep into it now, and she sure is coming together beautifully!! Thumbs Up [tup]     You're the man!! Smile [:)]   You're the Master!! Bow [bow]

Look forward to continuing updates; thanks!

Take care,

Frank

  • Member since
    November 2013
Posted by intruder_bass on Sunday, April 22, 2007 5:20 PM

   Just a little update on my hook

  While dry fitting aft landing gear struts decided to modify the bays. Why? I dont know))) Maybe I'll open them up later...BTW, kits drag links are way too long! Just look at the photo of real thing and compare it to what the kit's look like. Both drag links need to be shorten about 8-9mm. Their mounts are incorrect too. Therefore its easier to rebuild the whole thing...and make it correct!

  Andy

  • Member since
    July 2003
  • From: Piedmont Triad, NC (USA)
Posted by oldhooker on Wednesday, April 4, 2007 12:13 AM

Thanks... Smile [:)]

I zeroed in on a shot of the overhead consol as seen through the front window; it's not real clear, but you can get an idea of how it appeared from the outside too.    

Take care,

Frank


  • Member since
    November 2013
Posted by intruder_bass on Tuesday, April 3, 2007 11:04 PM

 Oldhooker,

The third and fourth pics are exactly what I needed. You saved my day! As always)))) Thanks, man!

 Andy

  • Member since
    July 2003
  • From: Piedmont Triad, NC (USA)
Posted by oldhooker on Tuesday, April 3, 2007 6:06 PM


That "Mustangs" Huey didn't come that way, but you stuck it out and what a fabulous display it turned out to be!     These Chinook kits aren't perfect, and in so being, they render a challange to those who aren't going to have an inaccurate CH-47 setting on their shelves! Wink [;)]     After Market accessories are nice, but there's precious little that can't be accomplished with the right tools and determination... oh, and good reference material of course. Smile [:)]    

Here's some reference photos of the areas in question:

***B or C model, note SAS Ports***

Hope this helps...

Frank


  • Member since
    November 2013
Posted by intruder_bass on Monday, April 2, 2007 10:02 PM

   "Seriously, it all boils down to money. The more accurate you want it, the more it's gonna cost."

  Thats true... but what I am trying to say is that just a half an hour simple google search on the web will fill your CH-47 folder with enough photos for at least noticing that the upper ramp door is not soppose to flip up in open position but it actually slides into the bottom one... And its not like they are some kind of "small short run" company. They can afford a little research...

 The other thing is that 35th scale is pritty damn close to 1/32. The detail should be on same level as their aircrafts in 1/32. But in reality its not even close! Its too poor even for 48th scale!

I dont mind paying extra money for a good kit. (yes, I like to scratchbuild but I am not a freak))))). I would buy this kit even for 200$ if the level of detail was as it is on Apache from Hasegawa... Oh well

 Anyway Smile [:)] its all about having FUN)))))))))right?

I have one more question for hook-spetialists
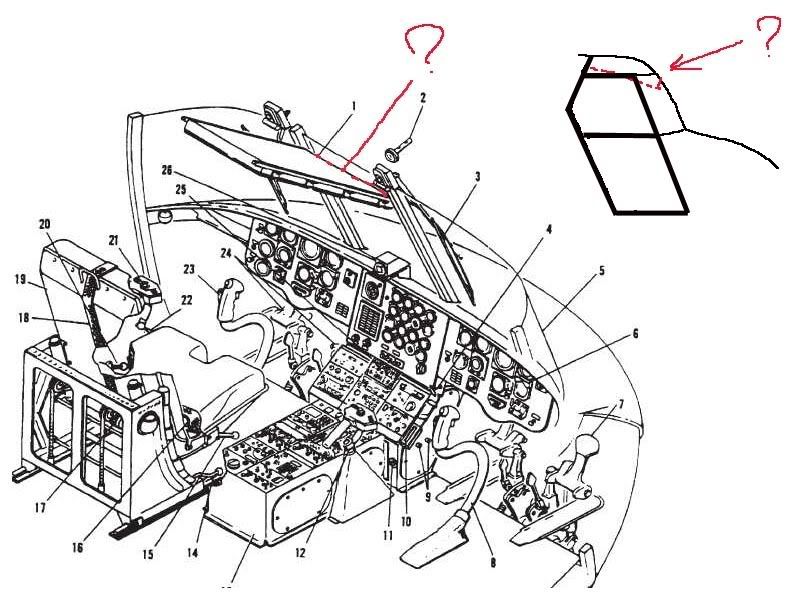
According to this scheme the upper console is kinda overlaping the front center window. It does not in the kit BTW. I was trying to find any photos proving that. Anybody can confirm that?

Second question is do you guys have any dicent photo of pedals area? Or diogram from a manual? Trying to figure out what is what there and how does it work.
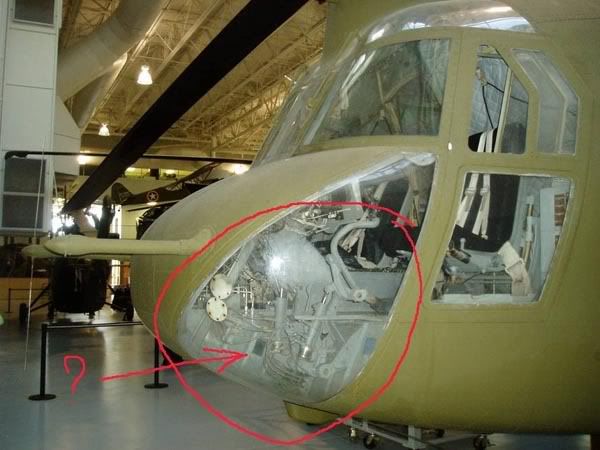
 

 Thanks a lot

Andy


  • Member since
    November 2005
  • From: Newnan, GA
Posted by J.H. Primm on Sunday, April 1, 2007 7:34 PM
 intruder_bass wrote:

  Further the build goes more inaccuracies pop up.

It seems like the doorway into the cockpit should have different shape on top. The cargo bay side should be square (it is in the kit) but the cockpit side should have slight (but noticable) curve. I marked it with red line on the pic. The question: is it an unusual mod of hook on the pic or is Trump cuting corners again? )))


 Second question is also about cutting corners...but on the ramp area.

I marked with red how this area looks from Trumpeter's point of view

The upper serface of ramp. Same thing - red is Trump's work, blue - what should be.

And finaly - looks like this part marked with red arrow they decided to skip...

The last question:"Are they on dope?" (c) :-)

 Andy

The area going into the cockpit is correct as per your photo.

As to whether or not the Chinese are on dope; I'd say no more than the guys desigining what Italeri tried to pass off as a CH-47 in 1/48th scale. At least the communists provide some photo etch with their kit. With the Italians we had to wait for the Czechs to help us out with basic photo etch.

Seriously, it all boils down to money. The more accurate you want it, the more it's gonna cost.

  • Member since
    November 2013
Posted by intruder_bass on Sunday, April 1, 2007 7:22 PM

  Further the build goes more inaccuracies pop up.

It seems like the doorway into the cockpit should have different shape on top. The cargo bay side should be square (it is in the kit) but the cockpit side should have slight (but noticable) curve. I marked it with red line on the pic. The question: is it an unusual mod of hook on the pic or is Trump cuting corners again? )))


 Second question is also about cutting corners...but on the ramp area.

I marked with red how this area looks from Trumpeter's point of view

The upper serface of ramp. Same thing - red is Trump's work, blue - what should be.

And finaly - looks like this part marked with red arrow they decided to skip...

The last question:"Are they on dope?" (c) :-)

 Andy

  • Member since
    February 2007
Posted by amagno on Saturday, February 24, 2007 10:17 PM

 Hello Andy.

I would like to convert The D model to a MH-47E, as my skills are not enough and you are going to convert one, perhaps you can make copies of the main parts like nose etc...I'm willing to pay a very ,very good price on it,the copies are for myself and they won't be copied for others . Please let me know.

Regards 

Amagno  magno357@terra.com.br

  • Member since
    November 2013
Posted by intruder_bass on Tuesday, February 20, 2007 2:55 PM
 oldhooker wrote:

   Besides all that, it's a great kit! Big Smile [:D] 

Big Smile [:D] Big Smile [:D] Big Smile [:D] That is unforgetable kit - thats for sure! ))))))))

 Thanks a lot, Frank, for your compartion pics - that gives me some ideas on where to start from. I am leaning towords cutting the FWD pylon off and custing absolutly new one from Magic Sculp. I still have to figure out what to do with canopy framing... Maybe vacuform?

Andy

  • Member since
    July 2003
  • From: Piedmont Triad, NC (USA)
Posted by oldhooker on Tuesday, February 20, 2007 1:05 PM

Greetings all,

Intruder... my hat's off to you for tackling the 1/35th scale beast! Bow [bow]     I had considered reworking one, but with the price of the kit AND all the modifications that would be required to bring just the fuselage up to specs, I backed away.

The Fwd Pylon on the Trump is high enough, but completely misformed, and in my opinion, needs to be totally reworked, to include the Brow Glass and height of front window panels.     The Aft Pylon isn't high enough and has the wrong profile, the Aft Fuselage (behind the engines) is too wide and too straight, the engines are too big and are mounted too high and the FOD cover isn't shaped right.      Besides all that, it's a great kit! Big Smile [:D]

Here are some comparison photos I compiled back when it was first released.

I hope this helps some, and all the best on your rebuild! Smile [:)]

Take care,

Frank

  • Member since
    June 2003
  • From: Caput Mundi
Posted by Avus on Tuesday, February 20, 2007 10:14 AM
 intruder_bass wrote:
Avus,

 hows you G model going? What are your plans on correcting that thing? I might help you with the E/G nose conversion.

It's still in the box which is collecting dust ...

Got myself Eduard's PE sets and am planning on buying Cobra's interior structure, but I might not need that one.

My corrections will focus on the pylons, as suggested by Oldhooker (if I remember correctly), in an earlier thread, the ramp and the rear section. But there will be plenty of scratch building: external tanks, various counter measures, instrument panel just to name a few.

Thanks for the nose-conversion-help; I'll get back to you on that.

Klaus

Thanks to ImageShack for Free Image Hosting

  • Member since
    November 2005
Posted by Anonymous on Tuesday, February 20, 2007 5:07 AM

I just gotta give ya credit for attention to detail.  Personally I'm gonna eventually do an Italeri 1/48 D model with skis (Sugarbears) and hopefully eventually a 1/48 HH-47 (when it comes out).  Currently doing a 1/72 scale Italeri and Revell (both) HH-47. 

Buuuuuuutttt...I'm more than likely not going to sweat the details you guys are fixing, with the exception of interior/exterior details for things like countermeasures, weapons, CSAR gear & Mods, internal Aux fuel tanks, soundproofing, etc.  I guess in my case considering the basic hull I'm going with the "it looks like a hook" principle.

My hat's off to you guysBow [bow]

  • Member since
    November 2013
Posted by intruder_bass on Monday, February 19, 2007 10:24 PM

   Thanks for replies guys.

  PatlaborUnit1, You are right about doors - some putty and sandpaper will do... about the windows.... I am not sure yet but seems like first 3 arent that bad. The last 2 can be moved though. Maybe I'll just cut off the square panels with the windows inside and slightly shift them in correct position. That will save the window frames. I dont care much about the rivet rows since they are recessed anyway.

  J.H. Primm, I've seen CC stuff on photos on their web page - very impressive!

  Wile E, I would really apriciate if you give me a link on that fwd pylon correction! And you are right about the aft pylon - it needs to be moved up a bit... maybe just 2-3mm. Where is my razor saw? )))))

  Avus,

 hows you G model going? What are your plans on correcting that thing? I might help you with the E/G nose conversion.

  So the main problem of the kit seems to be the FWD pylon.... Hmmmm  that will keep me busy for a while...


Andy

  • Member since
    February 2003
  • From: phoenix
Posted by grandadjohn on Monday, February 19, 2007 11:30 AM
I know Frank(oldhooker) has described fixes(including the pylons) for Chinook kits on this forum. I can't find it right know, you may wish to search also
  • Member since
    March 2006
Posted by Wile E on Monday, February 19, 2007 9:45 AM

 Looks like the entire aft pylon needs to come up quite a bit. I seem to recall a post that details how to correct the fwd pylon. Also, pictures I've seen seem to indicate the curve at the base of the aft pylon behind the engines back to the tail is too sharp. I may be wrong on this but if your going for accuracy, it might be worth comparing to the real thing looking from the tail. The 1/72 scale Chinooks have this problem but at that scale, its fairly easy to correct with putty. From the picture, the nose and the main fuselage look pretty close.

Wile E  

  • Member since
    June 2003
  • From: Caput Mundi
Posted by Avus on Monday, February 19, 2007 7:58 AM

Sign - Ditto [#ditto]

Pylons look bad, mainly the front one!

Klaus

Thanks to ImageShack for Free Image Hosting

JOIN OUR COMMUNITY!

Our community is FREE to join. To participate you must either login or register for an account.

SEARCH FORUMS
FREE NEWSLETTER
By signing up you may also receive reader surveys and occasional special offers. We do not sell, rent or trade our email lists. View our Privacy Policy.