SEARCH FINESCALE.COM

Enter keywords or a search phrase below:

"Death in the Courtyard" *finished, more pics, page 15*

88619 views
364 replies
1 rating 2 rating 3 rating 4 rating 5 rating
  • Member since
    November 2006
  • From: Coastal Maine
Posted by dupes on Thursday, October 23, 2008 12:58 PM

Looking really good to me, Manny. Thumbs Up [tup]

Top heavy blondes...heh. Wink [;)]

  • Member since
    October 2007
  • From: N.H.
Posted by panzerguy on Thursday, October 23, 2008 12:37 PM
  Throw some hay and a couple of top heavy blondes in there and that thing will be perfectTongue [:P]

"Happiness is a belt fed weapon"

  • Member since
    April 2004
  • From: Boston MA
Posted by vespa boy on Thursday, October 23, 2008 12:35 PM
Thats a lot better Manny. It looks like its made of wood now. I really like how you have aged the lower part more than the upper sections. I would suggest a little toning down of the whitewash to just reduce the starkness of it, and a bit more weathering on the flatbed...it would have had scuffs and gouges from use, and the planks would be greying between the joins. You may be outside your confort zone, but it doesn't look over weathered. Stay brave.

http://public.fotki.com/nkhandekar

This ain't no Mudd Club, or C.B.G.B.,
I ain't got time for that now

  • Member since
    November 2005
Posted by Anonymous on Thursday, October 23, 2008 12:19 PM

Okay, doog and Vespa---suggestions taken. Really moved outta my comfort zone on this one...tried to make her look like she has a REALLY old and beaten-up whitewash on her (still have a little touch-ups to do)...hope I didn't ruin it...whaddaya think?


  • Member since
    April 2004
  • From: Boston MA
Posted by vespa boy on Wednesday, October 22, 2008 8:00 PM

Manny,

I'm with Doog on this. It's better than it was and the rusted metal is getting close, but you still have a way to go on the wood. Aged wood is very grey. Keep on going, you're on the right track.

http://public.fotki.com/nkhandekar

This ain't no Mudd Club, or C.B.G.B.,
I ain't got time for that now

  • Member since
    January 2007
Posted by the doog on Wednesday, October 22, 2008 6:34 PM

Looking better than the pristine coat you had at first, Manny, but I'd recommend that you try to get some chippping old paint on it. Unless you're going for a fairly recently-built cart--which would be fine, really, if you like that.

Check the white or yellow balance on your cmaera though--it's really got a serious yelllow tint to your pics; makes it hard to really see what you did. Wink [;)]

  • Member since
    November 2005
Posted by Anonymous on Wednesday, October 22, 2008 11:58 AM
 the doog wrote:

Nice work, as always, Manny, but what made you go with the "fresh lumber" look to the cart? I would have thought a really nicely weathered, old, gray-ish farm cart that had been in the family for like, generations would have been more commonly seen in the old villages?

It looks nice, but I hope it doesn't look "too nice", ya know?

That cart would be a prime candidate for some "hair spay" weathering! You could even do it now--spray the whole thing with hair spray, then with some gungy gray, and start removing it. It would be kinda "reverse weathered" (the old, gray would should be the base coat actually, IMO) but I'll bet it would look a lot more period-appropriate for the setting?

Looking better?

Before:

After:


  • Member since
    October 2007
  • From: N.H.
Posted by panzerguy on Wednesday, October 22, 2008 10:14 AM


  Manny stop teasing and post some pics will yaWink [;)]

"Happiness is a belt fed weapon"

  • Member since
    November 2005
Posted by Anonymous on Wednesday, October 22, 2008 9:05 AM

 SteveM wrote:
What's the progress report, Manny?

Steve


Actually, last night I made a breakthrough...I finished painting all of the metal fittings on the wagon a raw umber color to replicate a patina of rust on them...I must say that I came within a cat's whisker of repainting the entire wagon AGAIN to a more greyish color...But, instead, I decided to try using some washing techniques to get a more aged wood look.  I was skeptical at first because the base color was so light but thought it was worth a shot.  I mixed up a fairly thick acrylic wash that was primarily composed of greys and browns...gave the wagon approx. seven treatments--and whaddaya know? It looks like aged wood!!! I then dunked the individual wheels in the wash and let everything air dry...

I believe I still need to do a little filtering and some dry-brushing to refine the look but I am so glad I am past this "block"...I can now predict with confidence that pics of the finished dio will be up this time next week or sooner...In the meantime I'll post some of the wagon post-wash and get some feedback...thanks for helping me to stay motivated on this one, guys! 

  • Member since
    November 2005
  • From: WA
Posted by airtrans Crash on Wednesday, October 22, 2008 7:21 AM
looks awesome Manny, however I noticed your rifleman in the middle has an empty M1 Garand, is that intentional? If she were loaded the bolt would be closed and no gap on top.
 A man's country is not a certain area of land, of mountains, rivers, and woods, but it is a principle; and patriotism is loyalty to that principle. ~George William Curtis
  • Member since
    June 2006
  • From: AusTx, Live Music Capitol of the World
Posted by SteveM on Wednesday, October 22, 2008 5:42 AM
What's the progress report, Manny?

Steve


Steve M.

On the workbench: ginormous Kharkov dio


  • Member since
    November 2005
Posted by Anonymous on Tuesday, October 21, 2008 7:25 PM
 sfcmac wrote:

 Keep on trucking Manny! With a little effort it may look as good as mine! (Joke) Sorry for the copyright infringement! Great work! Can't wait to see more and your Russian version ain't too bad either!

I'snt it amazing the stuff you find when you clean out your closet?

LMAO !!!
  • Member since
    April 2008
  • From: Philadelphia PA
Posted by smeagol the vile on Tuesday, October 21, 2008 5:48 PM
 sfcmac wrote:

 Keep on trucking Manny! With a little effort it may look as good as mine! (Joke) Sorry for the copyright infringement! Great work! Can't wait to see more and your Russian version ain't too bad either!

I'snt it amazing the stuff you find when you clean out your closet?


<dies>  You seriously didnt drag all of those out, set them up, and take a picture of it and post it... let alone the planning to do it... your nuts my friend


  • Member since
    October 2004
  • From: League City, Texas
Posted by sfcmac on Tuesday, October 21, 2008 3:10 PM

 Keep on trucking Manny! With a little effort it may look as good as mine! (Joke) Sorry for the copyright infringement! Great work! Can't wait to see more and your Russian version ain't too bad either!

I'snt it amazing the stuff you find when you clean out your closet?

  • Member since
    October 2008
  • From: Portland, Oregon
Posted by RickLawler on Tuesday, October 21, 2008 2:58 PM
Manstein's revenge

You are exactly right. My final goal with the cart is for it to lean towards the greyish, weathered look...I wanted, however, to start it off with a base color that looked more like new wood and weather it "down" from there...if that makes any sense...Like I mentioned previously, I tried several other colors but felt that they were too close to the finished look I wanted and thought that the weathering process might take the effect "over the edge"...Once the metal fittings are finished, the cart will start getting aged using raw umber, grey and black washes, filters, etc...

...might even entertain the hair spray method as you mentioned, especially if I decide to go with a PAINTED cart... 

A really flaked-off white paint job might be cool...


Hey, one idea for achieving your cart weathering.  This little cart is built from evergreen.  I began by painting it the blue, then masked irregular spotches with liquid mask. Over painted with combination airbrush and hand brush the grey/brownsih colors, removed the masking and finished with a light filter of greysh-white to tone the blue down.
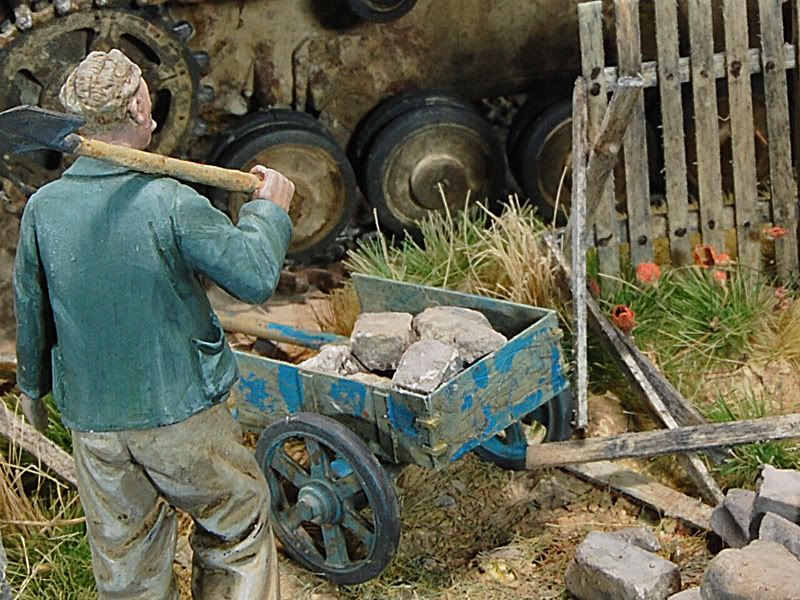
 

- chipped blue paint!

With Vallejo's the whole process takes about 15 minutes.

  • Member since
    July 2006
  • From: New Jersey
Posted by redleg12 on Monday, October 20, 2008 9:45 PM

As usual, another work of art on your part. As usual....I love the figures

Nice work on the cart. Outstanding work

Rounds Complete!!

"The Moral High Ground....A Great Place to Emplace Artillery."

  • Member since
    November 2005
Posted by Anonymous on Monday, October 20, 2008 9:29 PM
Thanks, bbrowniii, Bodge, Mobious, doog and Rick...
  • Member since
    October 2008
  • From: Portland, Oregon
Posted by RickLawler on Friday, October 17, 2008 2:35 PM

Hey Manny,

 Just checking out the neighborhood....quite the scene you are putting together. Thanks for making me feel welcomed to the forums.


rick

  • Member since
    September 2007
  • From: Relocating
Posted by Mobious on Tuesday, October 14, 2008 5:47 PM

 Hello,

 Checking in on the progress,

 MR, the weathering sequence makes sense. The chipping paint on the wagon is a cool idea. Will be looking forward to progress pics.

 Mobious


"It's a problem of applied physics" Roy Brown

  • Member since
    April 2003
  • From: 41 Degrees 52.4 minutes North; 72 Degrees 7.3 minutes West
Posted by bbrowniii on Tuesday, October 14, 2008 10:59 AM

Manny

This is looking really nice.  I was thinking of you yesterday as I watched a couple of episodes of "Band of Brothers".  In episode 4 (the one that covers the Market-Garden drops) there are a couple of carts almost identical to yours.  Made me wonder how the progress was coming.  Can't wait to see more!

'All that is necessary for the triumph of evil is for good men to do nothing' - Edmund Burke (1770 ??)


  • Member since
    January 2007
Posted by the doog on Monday, October 13, 2008 11:08 PM
Cool, Manny! I'll be checking in! Big Smile [:D]
  • Member since
    January 2008
  • From: Bournemouth UK
Posted by Bodge on Monday, October 13, 2008 12:11 PM
Cool , go for the chipped effect.Yeah!! [yeah]
  • Member since
    November 2005
Posted by Anonymous on Monday, October 13, 2008 10:27 AM
 the doog wrote:

Nice work, as always, Manny, but what made you go with the "fresh lumber" look to the cart? I would have thought a really nicely weathered, old, gray-ish farm cart that had been in the family for like, generations would have been more commonly seen in the old villages?

It looks nice, but I hope it doesn't look "too nice", ya know?

That cart would be a prime candidate for some "hair spay" weathering! You could even do it now--spray the whole thing with hair spray, then with some gungy gray, and start removing it. It would be kinda "reverse weathered" (the old, gray would should be the base coat actually, IMO) but I'll bet it would look a lot more period-appropriate for the setting?

You are exactly right. My final goal with the cart is for it to lean towards the greyish, weathered look...I wanted, however, to start it off with a base color that looked more like new wood and weather it "down" from there...if that makes any sense...Like I mentioned previously, I tried several other colors but felt that they were too close to the finished look I wanted and thought that the weathering process might take the effect "over the edge"...Once the metal fittings are finished, the cart will start getting aged using raw umber, grey and black washes, filters, etc...

...might even entertain the hair spray method as you mentioned, especially if I decide to go with a PAINTED cart... 

A really flaked-off white paint job might be cool...

  • Member since
    January 2007
Posted by the doog on Monday, October 13, 2008 9:31 AM

Nice work, as always, Manny, but what made you go with the "fresh lumber" look to the cart? I would have thought a really nicely weathered, old, gray-ish farm cart that had been in the family for like, generations would have been more commonly seen in the old villages?

It looks nice, but I hope it doesn't look "too nice", ya know?

That cart would be a prime candidate for some "hair spay" weathering! You could even do it now--spray the whole thing with hair spray, then with some gungy gray, and start removing it. It would be kinda "reverse weathered" (the old, gray would should be the base coat actually, IMO) but I'll bet it would look a lot more period-appropriate for the setting?

  • Member since
    November 2005
Posted by Anonymous on Monday, October 13, 2008 8:53 AM
Thanks for the feedback Vespa and Subfixer...I might "steal" some of Ian's water effects techniques---Who knows, I might even attempt that "water-cooler, gurgling" water stream!!!
  • Member since
    March 2004
  • From: Spartanburg, SC
Posted by subfixer on Sunday, October 12, 2008 8:45 AM
Sooperb, Manny! You might also try to simulate a hole on the barrel lid to allow air in as the water drains out. Otherwise, the escaping water would be more of gurgling trickle.

I'm from the government and I'm here to help.

  • Member since
    April 2004
  • From: Boston MA
Posted by vespa boy on Saturday, October 11, 2008 11:04 PM

Making great progress there Manny. It sounds as if the cart would have been easier to scratchbuild from wood than all the work you had to put in.

I really like the water coming out of the barrel. It looks just right. One thing I would be careful of with the barrel is the overdone woodgrain, and I would also tend towards a more grey tone of the wood. Something to think about for the cart as well.

http://public.fotki.com/nkhandekar

This ain't no Mudd Club, or C.B.G.B.,
I ain't got time for that now

  • Member since
    November 2005
Posted by Anonymous on Saturday, October 11, 2008 9:44 AM

Thanks, Steve and Dupes...no serious issues w/ painting the wagon other than it is really tedious as all of the iron fittings were molded integral to the wooden parts which makes painting more of a chore, and figuring out in some areas what is wood and what is iron...Grain detail on this kit is really non-existant, but I'm not sweating that too much---I figure if the finishing is up to snuff it'll pass. I also had to repaint the thing about 4 times to get an acceptable base shade for the wood as a starting point....finally found a color that matched fresh lumber farly well...I am using raw umber for the iron fittings...here are some in-progress shots of the wagon and building w/ some added wooden green trim:

And some of you wanted some more angles of the GI's:

More to come !!!


  • Member since
    November 2006
  • From: Coastal Maine
Posted by dupes on Saturday, October 11, 2008 8:25 AM
Finally got a chance to go back a few pages to take a look at how the figures are turning out...Manny, I'm still pushing hard for a "Manstein Figure Tutorial"! If not in the magazine, then just here on the forums would be highly sufficient. Bow [bow]
  • Member since
    June 2006
  • From: AusTx, Live Music Capitol of the World
Posted by SteveM on Saturday, October 11, 2008 7:02 AM

Hey Manny... was wondering what kinda issues you were having, painting your wagon. I will be painting mine soon, and am not lookiing forward to it Disapprove [V] I suppose the raised detail for wood grain will make me cringe. Curious if you had any heads up.

Steve


Steve M.

On the workbench: ginormous Kharkov dio


JOIN OUR COMMUNITY!

Our community is FREE to join. To participate you must either login or register for an account.

SEARCH FORUMS
FREE NEWSLETTER
By signing up you may also receive reader surveys and occasional special offers. We do not sell, rent or trade our email lists. View our Privacy Policy.