SEARCH FINESCALE.COM

Enter keywords or a search phrase below:

dio i started recently...

8437 views
30 replies
1 rating 2 rating 3 rating 4 rating 5 rating
  • Member since
    August 2015
dio i started recently...
Posted by sf_plane_nut on Thursday, February 19, 2009 11:48 PM
the rock wall has been a fun experiment...i need to fill in the spaces in the wall with glue from the backside then cover it all up with bushes...i got one of those coconut plant liner things and when pulled apart looks great for the bush branches...spray with glue and add foliage...should work...

the sherman will have some infantry with it and they will be checking out the road sign of maybe meeting with another vehicle coming the other way...what do you think...


  • Member since
    January 2008
  • From: Woodbine, MD
Posted by 666Irish on Friday, February 20, 2009 5:42 AM

Looks great so far. Just the kind of tedious work that I would torture myself with! LOL.

My only comment would be that with the wall stones strewn about the road, I would add a damaged section to the wall on the side of the road to show where they came from.

She was only a whiskey maker, but he loved her still.

  • Member since
    August 2015
Posted by sf_plane_nut on Friday, February 20, 2009 11:41 AM
those are just there from working on the wall...next time i build one i will make a damaged section...i have way more to do...i will be adding bushes along the backside of the wall today and see how they look...
  • Member since
    January 2007
  • From: Northern California
Posted by trexx on Friday, February 20, 2009 4:38 PM

There's a glaring flaw, man. There's no airplane!

He, he, he...

You're rock wall is teriffic. One thing, here in the Motherlode of Northern California, there's rock walls here and there built by Chinese laborors during the Gold Rush and they're all three or four rocks thick, not one row. It makes it makes them stable... and last quite a long time apparently!

  • Member since
    August 2015
Posted by sf_plane_nut on Friday, February 20, 2009 6:35 PM
i didnt really have enough rocks that size to do that but once i get my rock supply up i will make a really nice one...i added some bushes...more ground cover and put the trees in...i think it is coming along nicely...any suggestions ?....


  • Member since
    January 2007
  • From: Northern California
Posted by trexx on Friday, February 20, 2009 7:59 PM

Dude! It looks dang realistic.

Your in progress diorama just needs finesseing to show a story...

ideas:

1) unexploded aerial bomb in the road...

2) mine sweepers...

3) reluctant cow in the road...

4) rotten little children of the enemy taunting...

5) enemy flag trophy scene...

  • Member since
    August 2015
Posted by sf_plane_nut on Friday, February 20, 2009 10:37 PM
thanks man...that means a lot...i have been trying to use what i have been absorbing on here...i am going to paint the figures soon and they will be holding up and checking the map against a road sign...i think it will work....we shall see...
  • Member since
    June 2008
  • From: Piscataway,NJ
Posted by jtrace214 on Saturday, February 21, 2009 6:48 AM

Sf, looks great so far.Love the trees good idea.Where did you get rocks all the same size like that? Maybe a Jeep in the front with a guys looking at a map on the hood? Df. need one more vehical to fill it up.


John

the pic to the left is my weekend condo lol

  • Member since
    April 2008
  • From: Charlottesville Va
Posted by Stern0 on Saturday, February 21, 2009 10:19 AM
Looks great so far..ground work is awsome....Can't wait to see more!Thumbs Up [tup]
Always Faithful U.S.M.C
  • Member since
    August 2015
Posted by sf_plane_nut on Saturday, February 21, 2009 12:05 PM
my wife and i go to this place called scrap...scrap-sf.org i got bags of rocks there but i had to seperate them myself...fun tedious work...i will be adding another vehicle at the crossroads going over a map like you said..sounds good to me...figures are my downfall but i have some good ideas this time...

i also found a good place to get presier figures and as soon as i get me check will be getting some...i just have some italieri one's for now...thanks for the kind words guys...i am pretty happy with it...much better than my first one!...
  • Member since
    July 2013
Posted by DURR on Saturday, February 21, 2009 12:57 PM

 sf_plane_nut wrote:
i didnt really have enough rocks that size to do that but once i get my rock supply up ...any suggestions ?....]

yeah shake your head you'll get more      Clown [:o)]

just kidding   

good start  keep it up

  • Member since
    August 2015
Posted by sf_plane_nut on Wednesday, February 25, 2009 10:30 PM
 DURR wrote:

 sf_plane_nut wrote:
i didnt really have enough rocks that size to do that but once i get my rock supply up ...any suggestions ?....]

yeah shake your head you'll get more      Clown [:o)]

just kidding   

good start  keep it up


i always thought those rocks were falling from out of nowhere...now i know...
  • Member since
    June 2008
  • From: Iowa
Posted by Hans von Hammer on Wednesday, February 25, 2009 10:50 PM
I bet that now would be a bad time to tell you how to make castings of rock walls with about a good handfull of those stones and some sheetrock mud that would cut your construction time by about two-thirds, wouldn't it...Big Smile [:D]

  • Member since
    September 2005
  • From: North Pole, Alaska
Posted by richs26 on Thursday, February 26, 2009 2:14 AM

Sorry to say this but your rock wall doesn't look right.  Most rock walls were built from the rocks that were plowed up and picked up from farmers' fields.  These were rough and ill shaped as they worked themselves up from below the surface of the earth.  These are pieces of gravel that are smooth from being tumbled in a streambed.  These pieces would have to come from the bottom of a very large and very fast river.  It would be better if you would take a hammer to themj to rough them up.  They look toy-like and not that represenative of a European landscape. 

WIP:  Monogram 1/72 B-26 (Snaptite) as 73rd BS B-26, 40-1408, torpedo bomber attempt on Ryujo

Monogram 1/72 B-26 (Snaptite) as 22nd BG B-26, 7-Mile Drome, New Guinea

Minicraft 1/72 B-24D as LB-30, AL-613, "Tough Boy", 28th Composite Group

  • Member since
    June 2008
  • From: Iowa
Posted by Hans von Hammer on Thursday, February 26, 2009 2:45 AM

True dat... Figured I'd let someone else chime in on that...  But now that the cat's outta the bag, it's easy enough to camouflage... But rather than startin' over & hittin' 'em with a hammer, it's a simple enough job to pookie the wall up with some sheetrock mud for mortar, then do a bit of "moss work" with some Woodland Scenics "Turf".  After the motar dries, give it some dark washes and then brush on some white glue along the tops of the rocks where they protude from the mortar...

Be sure to add some moss here and there around the location as well and don't sweat the directions... Moss grows on all sides of a tree, rocks ain't any different...

For field rocks, I hunt around near the gutters & curbs, and edges of parking lots... That's where the rugh stuff is livin'.. Half an hour will give you a scale half-mile of wall material...

  • Member since
    August 2015
Posted by sf_plane_nut on Sunday, March 8, 2009 8:35 PM
thanks for the advice on the wall...i knew when i started it the rocks were too rounded so the next one i do will be a little "rockier"...

hammer i did see your explanation about making a mold for the rock wall...it is on my list of things to try...
i will be trying to work some sheetrock mud in there for mortar and see how that comes out...

been working on some jeeps for it in the meantime...


  • Member since
    August 2015
Posted by sf_plane_nut on Thursday, November 19, 2009 6:06 PM
so hans i took your idea and used some sheetrock joint compound to fill in the walls...some pastel wash and bam...looks like a wall...trying out some different colors for the figures...what do you guys think?...this guy is just a sample...a little greener on the coat?...


  • Member since
    October 2007
  • From: Ireland
Posted by alfaspud on Thursday, November 19, 2009 7:12 PM

I think your dio looks great! But most old rural stone walls were 'dry' ie they didn't use mortar in between the stones, peasant farmers didn't waste money on cement. So I think maybe you should have left it the way it was.

Also as stated in a previous reply they were built from stones pulled out of the ground so they would be rougher, not round like yours.

But doing a search for some pics of some dry stone walls here in Ireland, you can find many different types of rock used, also the way the walls were built depended on the shapes of the rocks available.

Here's some different examples.

This last one is made of faily round stones, probably sourced from a beach, the wall is only one stone thick and look at those gaps!
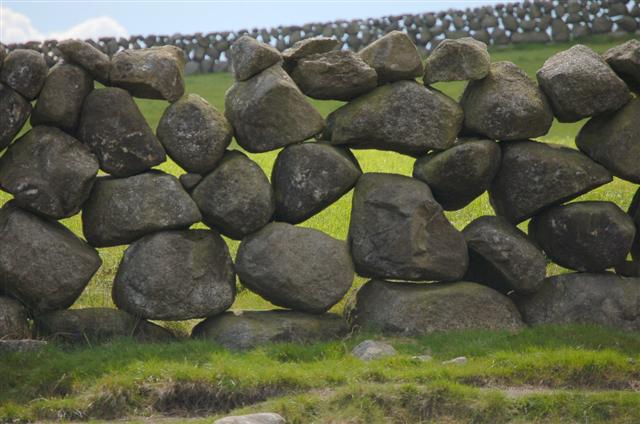
Basically what I'm trying to say is, unless you are building a dio and depicting an stone wall thats in a photo, nobody can tell you your wall is wrong. Keep up the good work!

Keith
  • Member since
    June 2008
  • From: Iowa
Posted by Hans von Hammer on Thursday, November 19, 2009 7:34 PM

The wall looks really good, pard... I'd think about the mortar-color though... It'd probably look better in a lighter shade.. Not sure exactly what shade, but one that's lighter than the rock itself...  I'd also try drybrushing some highlights onto the rocks in order to accentuate their shapes and to add some depth; perhaps a "concrete" color of some kind, a medium tan or the like... Alfaspud makes a good point about construction, but since the walls are along a road, I doubt that they would "farmer-built"... I'd venture a guess that regular stone masons built those kind of walls..

As for the figure's jacket, if it's M1943 field jacket, I'd say it needs to be more a lighter shade of the color of the trousers.  If it's the paratrooper jacket, I'd say a bit more on the tan side, like MM SAC Bomber Tan... The M42 Jump jacket and trousers, when I paint them, are usually done in MM SAC Bomber Tan on the trousers, Armor Sand for the jacket.


  • Member since
    April 2009
  • From: Carmel, IN
Posted by deafpanzer on Thursday, November 19, 2009 8:38 PM
WOW!  The wall looks A LOT better now... what a big difference!  I really like it.  I have been to England and I saw plenty of walls like this near, around or in the towns.  Looking GREAT! Thumbs Up [tup] One day I have to try this...  

Andy

  • Member since
    August 2015
Posted by sf_plane_nut on Thursday, November 19, 2009 10:58 PM
thanks for the info hammer...i will pick up some bomber tan tomorrow...i was messing around with the web belt color...ended up thinking the field drab was too dark and went with some dk earth and armor sand mixed in...there is some infantry thrown in that they picked up along the way so i have a couple different variations going...i will finish some color and post pic's tomorrow...
  • Member since
    August 2015
Posted by sf_plane_nut on Sunday, November 22, 2009 11:35 PM
the bomber tan and armor sand is the way to go...cant believe it was so easy...got the men mostly painted and laid out...need to set some pins in the feet for final mounting...just dusted them with some black chalk powder to tone everything down...
at some point i will find some jeep driver figures for it...or maybe not....
going to stick with the wall the way it is...this was all just a big experiment in a bunch of things i have been wanting to try out...i am pretty happy with it right now....need to figure out how the tankers need to be painted next...

and they are the horrible old hasegawa ones...as soon as i find some better ones they will be replaced...well here you go...let me know what you think...

when i start a new one it will be 1/35 and involve a tank...more firsts for me...


  • Member since
    August 2015
Posted by sf_plane_nut on Sunday, November 22, 2009 11:37 PM
guess i could paint the road sign...might help....a few touch ups here and there...
  • Member since
    June 2008
  • From: Iowa
Posted by Hans von Hammer on Monday, November 23, 2009 10:12 AM

Gettin' there... Glad I could help..

Just a suggestion though.. Try bringing some of the road color up onto the tracks and tires, along with the figure's boots.. That little touch "ties" the subjects to the groundwork... 

Also a tip from a technical POV.. Soldiers operating mine detectors remove their helmets, weapons, equipment, and web gear, any items with steel in them, since some mines were fuzed with magnetic detonators... Thee's also another Soldier that works with him... His job is provide security for the operator and to mark any spots that the detector indicates may be a mine.   You may also want to add a German minefield warning sign to the front area (facing away from the Americans), is if the Yanks are just about clear of the mines...  A skull & cross-bones with the words, "ACHTUNG!! MINEN" is always a good touch, especially for your non-military viewers who may not know what's going on...

Here's some examples:

  • Member since
    August 2015
Posted by sf_plane_nut on Monday, November 23, 2009 11:26 AM
great idea hans...i will copy those and try to print one out...the figure with the detector came that way so no major surgery for him...we have had enough of that around here lately....

i still have to flat coat the jeeps and when done with that will dust everything together with the tank as well...got the figure mounted last night so we will see what i can finish up...
  • Member since
    June 2008
  • From: Iowa
Posted by Hans von Hammer on Monday, November 23, 2009 11:46 AM

If you want a bigger selection of signs in various sizes, I used the keywords, "Achtung Minen" to search Google Images...

Also, the turret hatches... Are they cylindrical "tubs" rather than open to the rest of the turret?

  • Member since
    August 2015
Posted by sf_plane_nut on Monday, November 23, 2009 12:38 PM
they are open to the rest of the turret...they are going to have some tanker dudes hanging out in them so nothing will be visible in there...cant wait to do this in 1/35...thats a whole different ball game...
  • Member since
    December 2006
  • From: t.r.f. mn.
Posted by detailfreak on Monday, November 23, 2009 2:51 PM
You are heading down the road to dio. stardom,just keep experimenting and building and bingo.Just the additions and mods you've made so far really show your ability.Thumbs Up [tup]

[View:http://s172.photobucket.com/albums/w1/g-earl828/]  http://i158.photobucket.com/albums/t104/cycledupes/1000Roadwheels4BuildBadge.jpg

  • Member since
    August 2015
Posted by sf_plane_nut on Tuesday, February 2, 2010 8:10 PM

Well i am finally calling it done...learned a lot...got to a point where i just wanted it to be over...i have tons of more stuff for 1/72 dio's but the next one will be 1/35...that should be fun...

Hasegawa Sherman...some 101st airborne...some regular army...just kind of thrown together to get a job done...thanks for all the help...


  • Member since
    January 2009
  • From: hamburg michigan
Posted by fermis on Thursday, February 4, 2010 12:34 PM

 This is 1/72?!?!?!?!?!  I thought for sure it was 1/35!!!

 All looks MANtastic!!! As a former stone mason myself, I do agree that the mortar color could be lighter, but whatever, it still looks great!!!

JOIN OUR COMMUNITY!

Our community is FREE to join. To participate you must either login or register for an account.

SEARCH FORUMS
FREE NEWSLETTER
By signing up you may also receive reader surveys and occasional special offers. We do not sell, rent or trade our email lists. View our Privacy Policy.