SEARCH FINESCALE.COM

Enter keywords or a search phrase below:

Dornier 17Z done

6877 views
17 replies
1 rating 2 rating 3 rating 4 rating 5 rating
  • Member since
    December 2002
  • From: Northern California
Dornier 17Z done
Posted by jeaton01 on Friday, March 13, 2009 8:05 PM

This one was started about 3 weeks or a month ago.  I guess I got afflicted with a dose of Git 'er Done or something.  It is the Hobbycraft kit which I received in the Secret Santa 3 GB.  There is good and bad with the kit, uncertain part locations, don't trust 'em decals, clear parts which would make a good bathroom window.  On the plus side the fit wasn't too bad, and the Squadron vac form clear parts worked well, although with more patience I might have gotten a better fit on the nose bowl.  Still perfecting that art.  Full build details are on my web site here:

http://yolo.net/~jeaton/mymodels/do17z/1do17z/1do17z.htm


John

To see build logs for my models:  http://goldeneramodel.com/mymodels/mymodels.html


  • Member since
    January 2009
  • From: Algonquin, IL
Posted by model geek on Friday, March 13, 2009 9:28 PM

I like it! I haven't seen many of these on the forum. The splinter camo looks great. The photography is great as well. Did you shoot outdoors under natural sunlight?

Thanks for sharing.

Tom  


  • Member since
    October 2003
  • From: Southern California
Posted by ModelNerd on Friday, March 13, 2009 9:34 PM
Nice work John! Looks real good from here.Thumbs Up [tup]

- Mark

  • Member since
    September 2003
  • From: South Central Wisconsin
Posted by Daywalker on Friday, March 13, 2009 10:50 PM
Excellent work John!  One question, is the exhaust stain on the starboard wing more of a brown shade, as opposed to the port wing?

Frank 


  • Member since
    July 2003
  • From: Piedmont Triad, NC (USA)
Posted by oldhooker on Friday, March 13, 2009 11:43 PM

WOW!!

 That's  N  I  C  E,  John!! Thumbs Up [tup]

  Looks like it's ready for a mission!

Take care,

Frank

  • Member since
    October 2004
  • From: League City, Texas
Posted by sfcmac on Saturday, March 14, 2009 4:43 AM
Turned out really good! I like the old Hobby Craft kit.  I built the Classic Airframes Luffwaffe version for the last BOB GB and other than having a bombbay to show , the hobbycraft kit compares very well. I always thought the critisms of that kit were way off. Yours is proof positive that it makes a fine representation of the Do-17Z!
  • Member since
    April 2005
  • From: Piscataway, NJ!
Posted by wing_nut on Saturday, March 14, 2009 5:46 AM
Looks good John. I was given 2 of these and have wondered whatthey looked like built up and how they wnet togther.  It looks real nice.

Marc  

  • Member since
    February 2003
  • From: A Spartan in the Wolverine State
Posted by rjkplasticmod on Saturday, March 14, 2009 8:03 AM

Nice one John.  Any problem dealing with the banana curved fuselage halves found in most of these kits ?

Regards,  Rick

RICK At My Age, I've Seen It All, Done It All, But I Don't Remember It All...
  • Member since
    January 2015
  • From: Katy, TX
Posted by Aggieman on Saturday, March 14, 2009 8:43 AM
Nice work John!  Always liked that Flying Pencil. 
  • Member since
    July 2004
  • From: Northern KY
Posted by mucker on Saturday, March 14, 2009 9:44 AM
nice, smooth paint job, John! Very nice addition to your collection.

  • Member since
    December 2002
  • From: Northern California
Posted by jeaton01 on Saturday, March 14, 2009 12:10 PM

Thanks, everyone.  I'm glad you like it. Much better than fruit on the stage or silenceBig Smile [:D]

Rick, the banana shape is caused by the lower fuselage half, my theory is it is getting warped in the demolding process.  I cut it nearly in two with a dremel tool circular saw, mated it to the straight but thin upper fuselage, and superglued the cut.  If you look very close you might see the discontinuity of the curve at the cut, but a little more filling would hide even that.  There is a photo on my web site of the cut and fit:
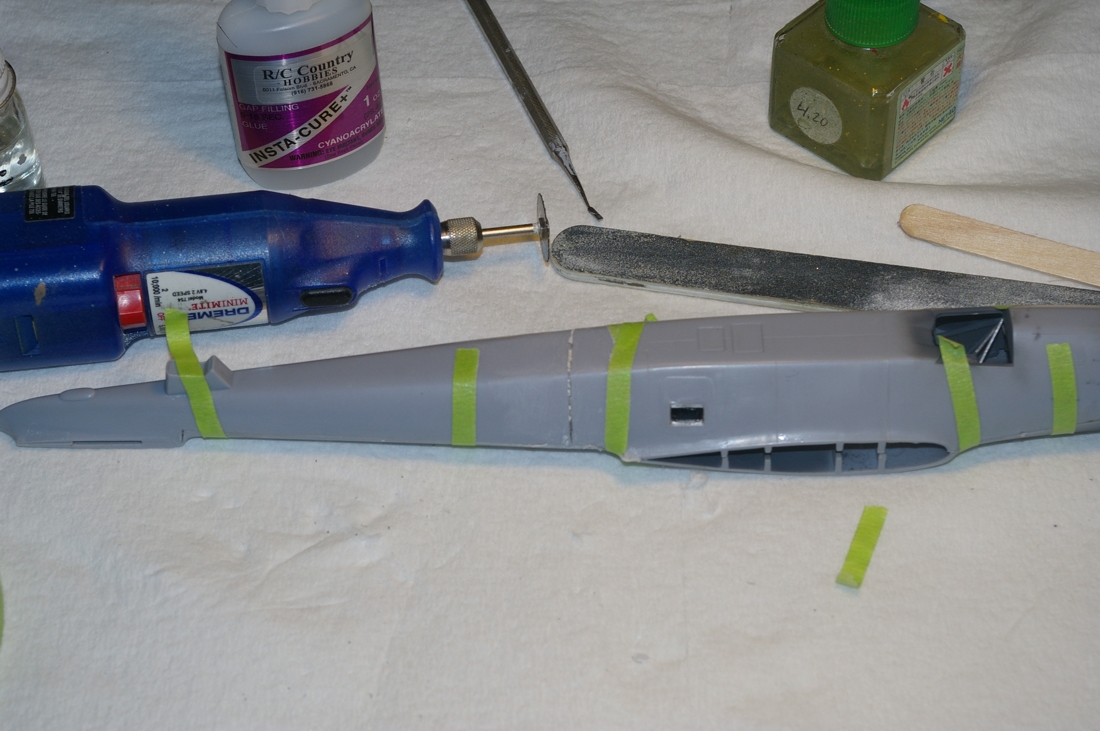
 

The cockpit detail is pretty much made up from the spares box and catches the spirit of photos I have found, a resin interior would be very helpful there, and with all the clear view provided by the Squadron vac form canopies the area is very visible.

Frank, I did an oil paint pin wash on this and I think the color difference is from the different base colors, it just shows up better on the right side because of the lighter base color.  Either that or the BMW 323 on that side is tossing more oil.  I did my best to treat them both the same.  I was happy with the way the wash toned down the markings, the Techmod decals were very bright and glossy to start with.

I also bought the Squadron resin wheels, but they were much too large to fit the gear struts so I didn't use them.

Tom, I prefer outside available light, these pictures were done mid-day and that gives a bit more contrast than is best.  I prefer morning light, but evening light is good too on clear days.  That kind of light gives a softer tone, which cannot be gotten by adjusting the photo exposure in the computer, at least not with my skills.

John

To see build logs for my models:  http://goldeneramodel.com/mymodels/mymodels.html


  • Member since
    October 2007
  • From: Inland Northwest
Posted by Summit on Saturday, March 14, 2009 12:27 PM
Outstanding job ~ John Thumbs Up [tup] Thank you for showing your "fix" on the Fuselage and the input on the canopy glass. . Very simple effective fixes. I am inspired to dig mine out of the pile now. 
Sean "I've reached nearly fifty years of age with my system." Weekend GB 2008
  • Member since
    February 2007
  • From: Bournemouth UK
Posted by Luftwoller on Saturday, March 14, 2009 2:14 PM

Very nice work John. I think i read on Swannys site about the bend in the hobby craft kit. You sorted it perfectly. I love it and need to add one to the stash.

Top marks.

...Guy

..'Your an embarrassment to the human genus, makes me ashamed to call myself Homo'.
  • Member since
    December 2004
  • From: Yokosuka, Japan
Posted by luftwaffle on Monday, March 16, 2009 9:48 AM
Great job on a somewhat difficult kit!

aka Mike, The Mikester My Website

"He has all the virtues I dislike and none of the vices I admire."   -Winston Churchill

  • Member since
    January 2003
  • From: 40 klicks east of the Gateway
Posted by yardbird78 on Monday, March 16, 2009 10:54 AM

Outstanding work on the Luftwaffe bird.  The finish is superb.

Darwin, O.F.  Alien [alien]

 ,,

The B-52 and me, we have grown old, gray and overweight together.

  • Member since
    September 2007
  • From: galt, ca.
Posted by dirtball on Monday, March 16, 2009 12:01 PM
  John, I agree with all! Great looking build. Nice to see you post a build.........Harv
"I once shot an elephant in my pajamas. How he got in my pajamas, I`ll never know!"
  • Member since
    January 2007
  • From: Northern California
Posted by trexx on Monday, March 16, 2009 2:46 PM

A seriously fine job on that dastardly "mail plane"! Your are GOOD!

I want to jump in a Hurricane and blaze away at it!


  • Member since
    May 2006
  • From: Tampa, Fl
Posted by zipmeister on Monday, March 16, 2009 2:51 PM

 Great job John! You did a wonderful job. Much better that I ever could. Nice to see it come out so well. Bravo!!

JOIN OUR COMMUNITY!

Our community is FREE to join. To participate you must either login or register for an account.

SEARCH FORUMS
FREE NEWSLETTER
By signing up you may also receive reader surveys and occasional special offers. We do not sell, rent or trade our email lists. View our Privacy Policy.