SEARCH FINESCALE.COM

Enter keywords or a search phrase below:

1/48 Hasegawa Ki-43-I Hayabusa "Oscar" (FINISHED)

16710 views
43 replies
1 rating 2 rating 3 rating 4 rating 5 rating
  • Member since
    February 2012
  • From: Olmsted Township, Ohio
1/48 Hasegawa Ki-43-I Hayabusa "Oscar" (FINISHED)
Posted by lawdog114 on Sunday, August 18, 2013 10:16 PM

After completing my AVG P-40B, I decided I needed it's nemesis as well.  I dug out my 1/48 Hasegawa Ki-43 I "Oscar" to fit the bill.  I'll acknowledge that I'm not a huge fan of the early Oscar, with its two wimpy pea shooter weapons in the cowl and two-bladed prop WWI style, but it was formidable in the right hands and produced many aces.  With the exception of Berna decals and PE seatbelts, this one will be built out of the box. 

I started with the cockpit.  The cockpit on the Ki-43 was very small, so I felt that aftermarket would be a waste here.  Furthermore, I didn't think the stock cockpit was all that bad for what could be seen anyways.  I started by thinning out the seat sides to scale then painted everything XF-1 Flat Black as a shadow base.  I then mixed up XF-71 Cockpit Green with a tad of XF-49 Khaki to simulate Nakajima Green and sprayed it.  My research indicated that most Japanese aircraft only had lap belts (if any), therefore, I added these with some PE I had in the spare box.    The boxes were picked out with black silver and then a post shade was added.  After a Testor's Gloss clearcoat, the instrument panel got the kit decal under Micro Sol.  I love this option because it looks so much better than i can do.  The trick is to get it lined up right over the molded dials.   Everything then got a Detailer wash and then a dusting of Testor's flat coat.    

A test fit in the fuselage....it's good..

See what I mean, once it gets closed up all detail is lost......

This is about two hours of work and I'm already at this stage.  This should be a quick build. 

Joe

 "Can you fly this plane and land it?...Surely you can't be serious....I am serious, and don't call me Shirley"


  • Member since
    June 2013
Posted by bvallot on Sunday, August 18, 2013 10:58 PM

I like it Joe!  The lighting looks a little better on the third photo.  I think you picked those colors well.  I'm not much of an "out-of-the-bottle" kind of guy for painting most things either.  =]  I've got two Zeros that I learned a lot of lessons on.  I'm a little anxious myself to do another to see it pop more.

I might have to try that 1st coat of Flat Black trick next time.  It seems to be working quite nice here. =]

On the bench:  

Tamiya F4U-1  Kenneth Walsh


  • Member since
    May 2004
  • From: Mount Bretherton Model Aircraft Observatory
Posted by f8sader on Monday, August 19, 2013 4:48 AM

Great work, very inspiring!  If I were to achieve results like that, I wouldn't believe my hands actually did it!  Does that kit still have the raised panel lines?  With the instrument decal, are you saying you literally melt the kit decal into the raised instrument faces with Micro-Sol?  Also, you get a "most excellent" award from me on the photography!

Lon-ski

  • Member since
    November 2009
  • From: SW Virginia
Posted by Gamera on Monday, August 19, 2013 7:46 AM

Great job on the cockpit there Joe!

And that is a really good kit, I built one a few years ago, state of the art quality.

"I dream in fire but work in clay." -Arthur Machen


  • Member since
    December 2006
  • From: N. Georgia
Posted by Jester75 on Monday, August 19, 2013 7:47 AM

Goodness Joe, your P-40 is still drying!! At first glance I thought that was an after market pit!! Looking great so far!

Eric


  • Member since
    December 2003
  • From: Charleston, SC
Posted by sanderson_91 on Monday, August 19, 2013 7:12 PM

Joe, that's a beautiful looking office!  Can't wait to see more!

Steve


  • Member since
    January 2010
  • From: MN
Posted by 101stAirborne on Monday, August 19, 2013 7:57 PM

Great start! Can't wait to see more

Models on the bench:

Too many to count!


G-J
  • Member since
    July 2012
Posted by G-J on Monday, August 19, 2013 8:25 PM

Awesome!  Just awesome.  I love the detail.

On the bench:  Tamyia Mosquito Mk. VI for the '44 group build.  Yes, still.

On deck: 

  • Member since
    February 2012
  • From: Olmsted Township, Ohio
Posted by lawdog114 on Wednesday, August 21, 2013 8:46 PM

Thanks for the compliments folks.  I figured I would stop in for an update.  The honeymoon ended with the cockpit.  The airframe has given me nothing but problems.  For starters, the port side fuselage piece on my kit was slightly warped, just enough to irritate me.  Then the dry-fit of the wings to fuselage revealed the notorious Hasegawa wing root gaps.  I ended up gluing the top of the wings to the fuselage to avoid this issue later.   Like this...

I added the lower wing then had more problems at the trailing wing edge(s) and where it met the fuselage.  Actually the whole trailing edge fit lousy.  At the fuselage, I had to fill and sand the seam then rescribe the panel line.  I used a sewing needle hucked in my pin vise to restore the rivet detail.  No real biggie since this area is usually trouble on Hasegawa kits, but still annoying.  Here's the result after an hour of sanding and filling. 

Pehaps my biggest gripe is the wing tip design.  Because of the different variants, you have to add them like their sptifire kits.  Unfortunately, they're thicker than the wing (just enough to annoy) and then to complicate things even further, the piece cuts right through the aileron. so you have to fill and sand this area.  Its a real pain and alot of that rib detail there was lost.  As you can see I still didn't get it quite right.......just a stupid design. 

On Hasegawa kits, I only usually primer the seams because their panel lines tend to be on the shallow side.  I like to keep as much paint out of them as possible so the wash will stay in the lines later.  For a sanity break, I'm probably going to change gears and work on the engine next.    I test fitted the engine and cowl which seem to fit good.  It took me about 4 hours to get to this point.  It's not perfect but I'm the self proclaimed master of smoke and mirrors...lol. 


More to come

Joe

 "Can you fly this plane and land it?...Surely you can't be serious....I am serious, and don't call me Shirley"


  • Member since
    February 2011
  • From: Bent River, IA
Posted by Reasoned on Wednesday, August 21, 2013 10:18 PM

Gee whiz Joe, (or should we call you fermis 2?) you are cranking them out.  The CP looks great, it is a shame to bury it and your overcoming the challenges is admirable, looking forward to more.

Science is the pursiut of knowledge, faith is the pursuit of wisdom.  Peace be with you.

On the Tarmac: 1/48 Revell P-38

In the Hanger: A bunch of kits

  • Member since
    June 2013
Posted by bvallot on Thursday, August 22, 2013 8:18 AM

That's unfortunate about the wing tips.  It seems you've got em licked pretty good though!  Maybe next time try cutting the ailerons out and setting them up together first.  Of course, you make more work for yourself putting them back on.  So I guess it all depends on how much aggravation you feel like putting up with. =P

How do you feel about the accuracy of this kit's panel lines and access doors so far?

On the bench:  

Tamiya F4U-1  Kenneth Walsh


  • Member since
    November 2009
  • From: SW Virginia
Posted by Gamera on Thursday, August 22, 2013 8:53 AM

I don't even see the underside seam Joe, looks great to me. Does seem like they'd mold the ailerons separate though, would make it much easier.

"I dream in fire but work in clay." -Arthur Machen


  • Member since
    December 2003
  • From: Charleston, SC
Posted by sanderson_91 on Friday, August 23, 2013 8:19 AM

Looking good Joe!  Those wingtips look like a real PITA.  


  • Member since
    December 2009
  • From: Wausau Wi.
Posted by woodspiderF-18 on Friday, August 23, 2013 1:38 PM

What nice work....I hope to get to that point...

  • Member since
    February 2012
  • From: Olmsted Township, Ohio
Posted by lawdog114 on Monday, August 26, 2013 10:04 PM

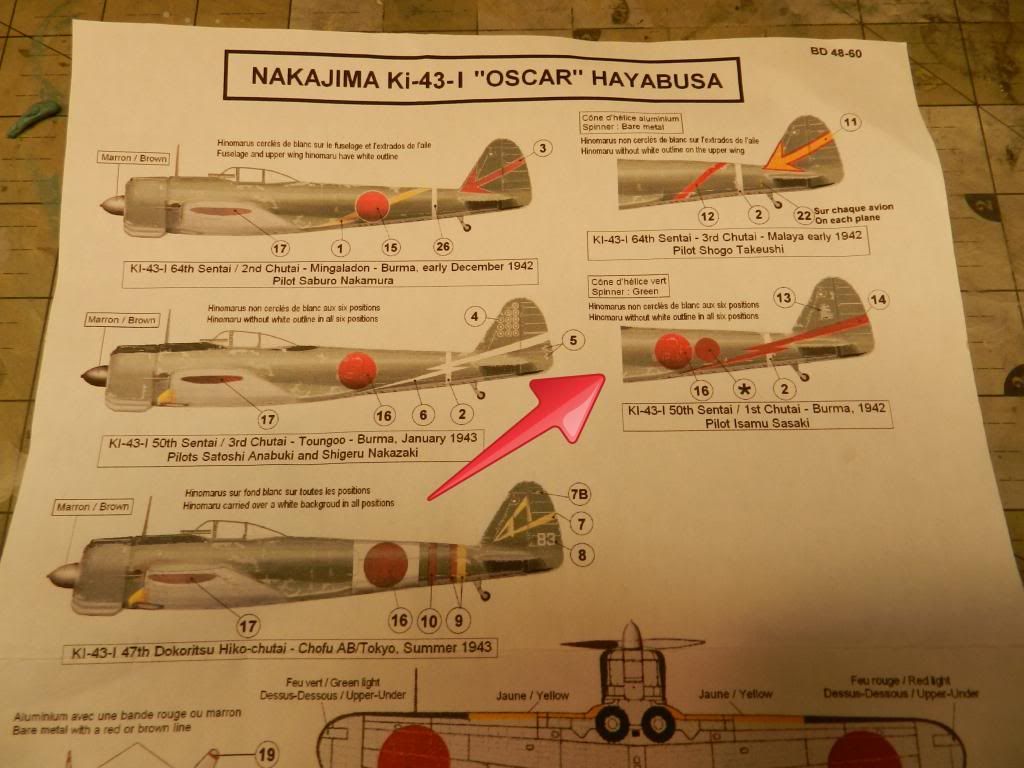
I was able to get some bench time in last night.  As I said earlier, I wanted an Oscar that may have tangled with the AVG.  I had Berna Decals in the stash with at least two subjects from the appropriate time frame, being Burma in early 1942.  I had success with Berna on my recent zero build, so I decided to try them again on this subject.  Of the appropriate planes, I ultimately decided on Isamu Sasaki's 50th Sentai Hayabusa in early 1942.  Did he fight the AVG?  I dunno....but his first victory was over Rangoon so the timing is certainly right.  Before the war was over, Sasaki would obtain 38 kills to include a few B-29's.  The Berna sheet is really no road map on how Sasaki's Oscar looked (See sheet and red arrow below) so I alot will be guess work here.  The sheet shows the rear end then you have to assume the rest looks like the profile subjects on the sheet.  Its confusing.   I read somewhere (don't remember where) that early Oscars were delivered in NMF and then the Green Upper was added in the field.  With this reasoning, I ultimately decided on Japanese Army Green (XF-13) over natural metal.
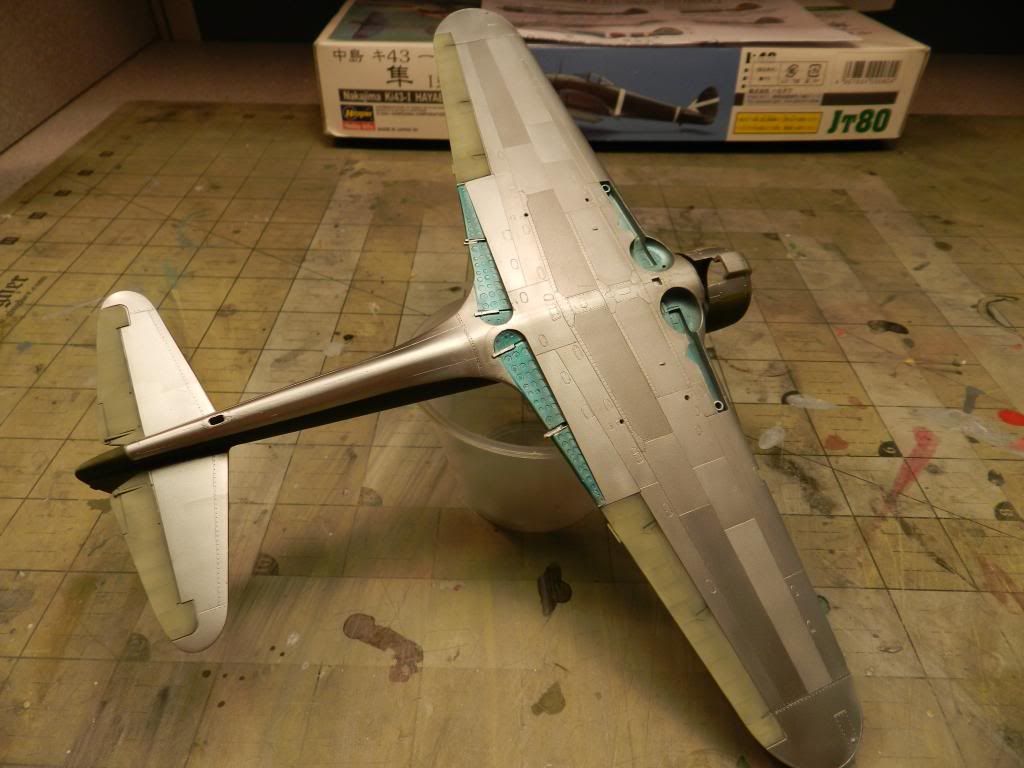
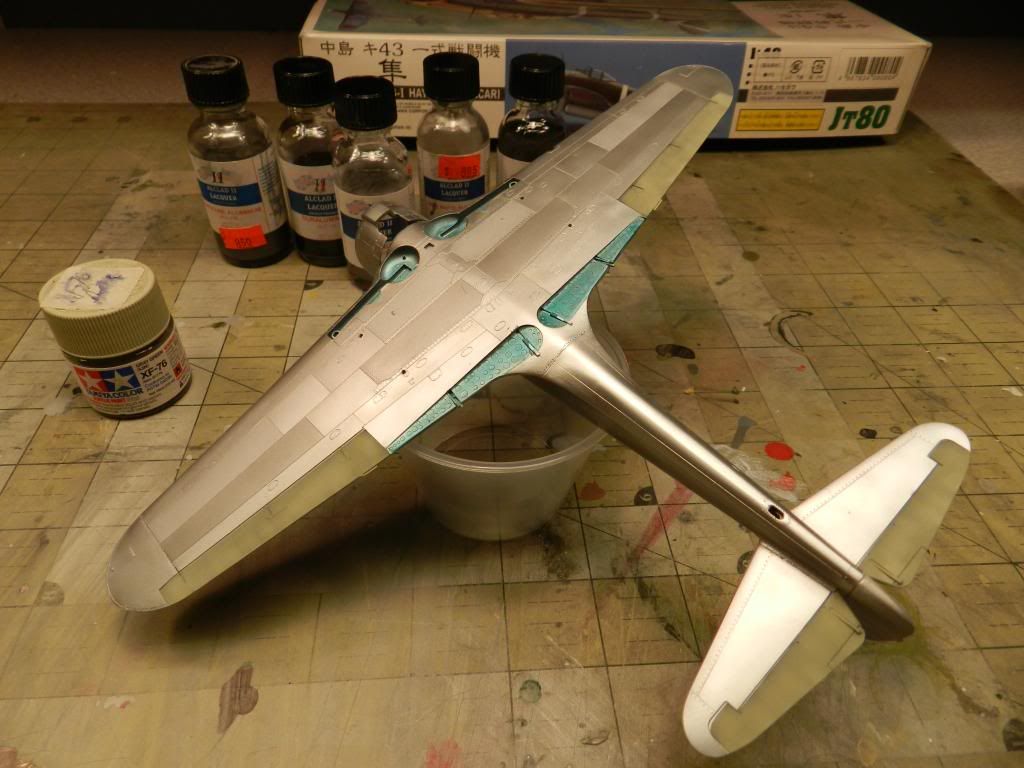
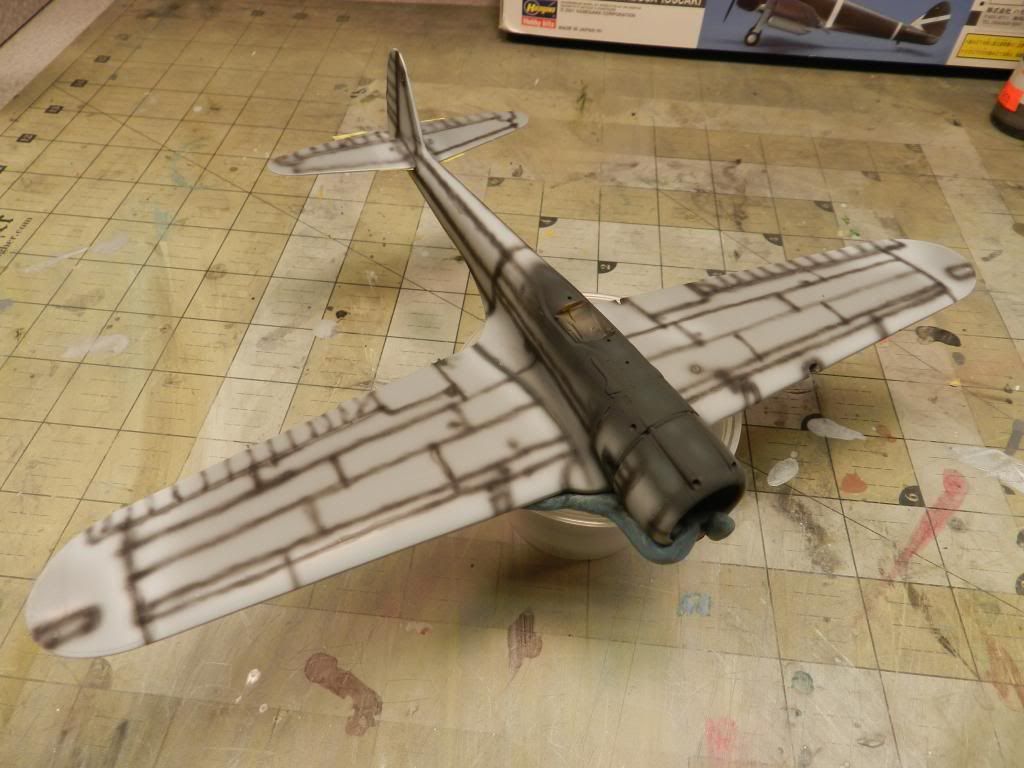
I started with the lower NMF by spraying Alclad Duraluminum.  This is my favorite overall shade...not too shiny not too dull.  I then taped off different panels and sprayed them Aluminum, Semi-Matte Aluminum, Dark Aluminum, and Airframe Aluminum.  I love this technique and really brings a NMF alive.  The doped control surfaces were supposed to be a greyish green.  I went with XF-76 Grey Green. The wheel wells and flap roofs were taped off and sprayed in a mix of Tamiya Clear Blue and Green to simulate the Aotake Blue commonly sprayed in these areas.  Here's how it turned out after a light post shade.
   

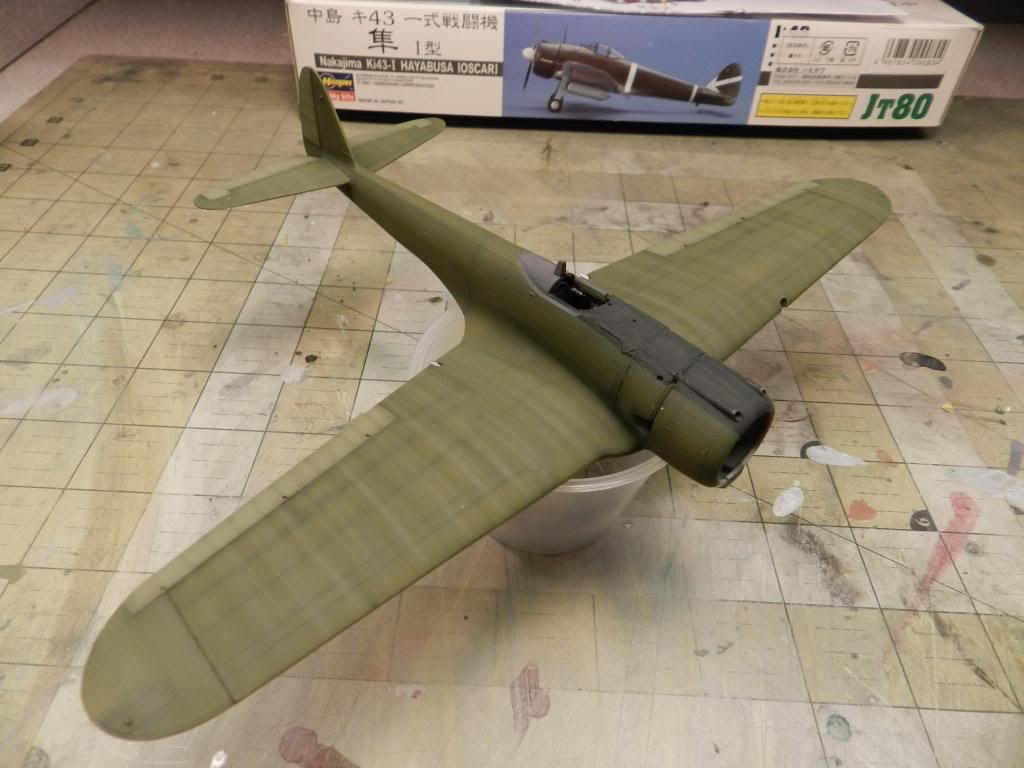
I flipped it over and preshaded the upper surface for the IJA Green. I used tamiya tape for the fuselage demarcation lines then blue tac for the lower cowl.  I added the black anti glare panel on the upper cowl with XF-69 NATO Black.  My research revealed that the yellow ID stripes were not used yet in early 1942, so I did not add these. 
The glare panel was taped off and I sprayed the upper surface with XF-13 Japanese Army Green cut with a smidge of XF-49 Khaki to brown it up a bit more.  I then added a bit of XF-57 Buff and made condensation streaks across the upper wings.  A bit more buff was added and I faded the control surfaces.  It seems a bit overdone but through experimentation, I've learned that the rest of the process (clear cote, decals, wash, dull cote) will tone it down to "just noticeable".  . Here's where I'm at. 
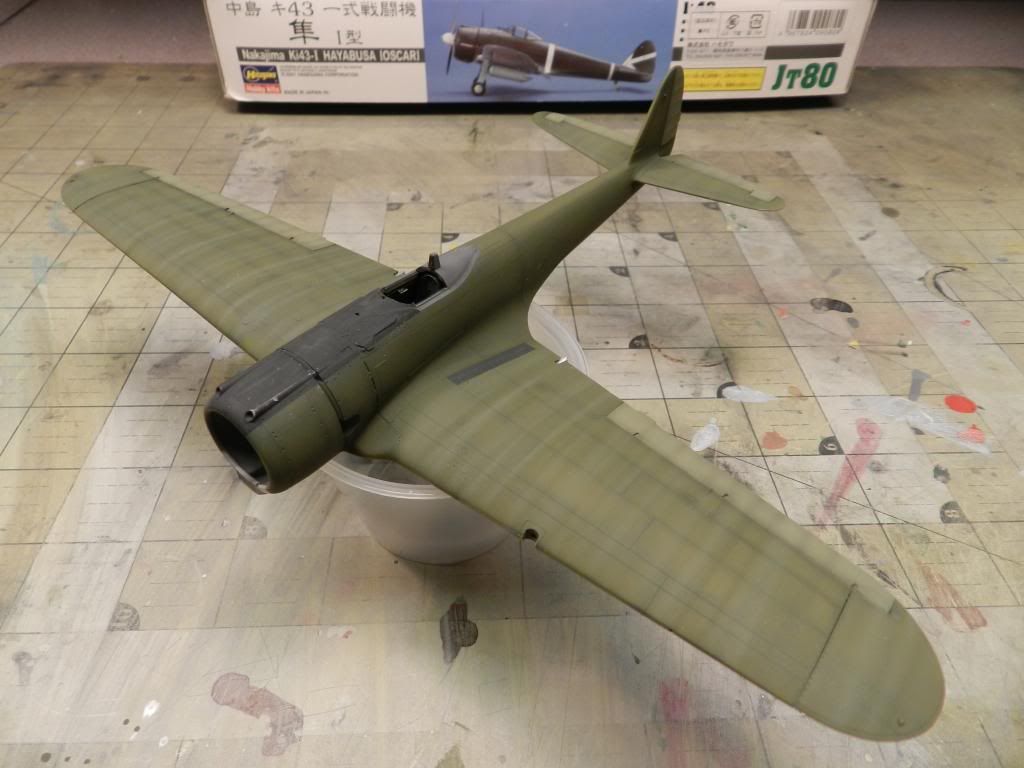
   

I may still paint in the fuselage band and bisecting lightning bolt in lieu of the decals.  I'm undecided.  More to come......

Joe 


 "Can you fly this plane and land it?...Surely you can't be serious....I am serious, and don't call me Shirley"


  • Member since
    February 2011
  • From: Bent River, IA
Posted by Reasoned on Monday, August 26, 2013 10:09 PM

Always love to see your paint finish Joe.

Science is the pursiut of knowledge, faith is the pursuit of wisdom.  Peace be with you.

On the Tarmac: 1/48 Revell P-38

In the Hanger: A bunch of kits

  • Member since
    February 2012
  • From: Olmsted Township, Ohio
Posted by lawdog114 on Monday, August 26, 2013 10:16 PM

Thanks Reasoned....

 "Can you fly this plane and land it?...Surely you can't be serious....I am serious, and don't call me Shirley"


  • Member since
    December 2003
  • From: Charleston, SC
Posted by sanderson_91 on Tuesday, August 27, 2013 7:31 PM

Gret paint work as usual!  Love the condensation streaking.


  • Member since
    February 2012
  • From: Olmsted Township, Ohio
Posted by lawdog114 on Friday, August 30, 2013 9:00 PM

Thanks guys.  I left off pondering whether to paint the fuselage band and lightning bolts or use the decals.  I ultimately decided to have a go at painting them in.  Besides, how much tougher could it be than that checkered FW 190 cowl I did a while back.  I first taped off the fuselage band and painted it XF-2 Flat White. Here's a tip when doing this, to eliminate the chance of bleed under.  Cut the paint with 91% Isoprophyl Alcohol and use light coats.  It dries almost on contact so it never has the chance to bleed under.  Anyways, next I used the Berna sheet as reference and used Tamiya tape strips to eyeball how the lightning bolts go.  I think I got it close here...

After some more masking, I sprayed the 'bolts XF-7 Flat Red.  I lightened the rudder portion a bit with white.   I must say I'm pretty pleased on how it all turned out.  Decals?.......we don't need no stinkin' decals!,,,,   

The airframe was then sprayed with Alclad Gloss to await decaling.

I also finished the HA-25 mill.  I normally rig ignition wires on all my radial engines but since the Type I had that huge oil cooler up front, I figured I wouldn't waste my time with this.  I built the engine out of the box.  I sprayed it Alclad aluminum and the prop box XF-19 Sky Grey.  I didn't have copper, so I dug out my old bottle of Model Master Burnt Iron to represent it.  I then gave it a detailer wash then blasted it with a Tamiya Smoke for a used look.  


 I should get to the decals soon. 

Joe 

 "Can you fly this plane and land it?...Surely you can't be serious....I am serious, and don't call me Shirley"


  • Member since
    December 2003
  • From: Charleston, SC
Posted by sanderson_91 on Sunday, September 1, 2013 10:15 AM

Joe,

Looking good!  I like that  you painted the lightning bolts and fuselage band - painting always looks much better than big decals like that.  The engine looks sweet too!

Steve


  • Member since
    February 2012
  • From: Olmsted Township, Ohio
Posted by lawdog114 on Wednesday, September 4, 2013 10:47 PM

Thanks Steve.  I'm in for a brief update.  The Berna decals went down without a hitch.  The Hinomarus color is a bit bright for my liking, but there's not much I can do about that.  I had the same problem with Sakai's zero.  I sealed them with more Alclad Gloss and the airframe got a Flory Wash.  I love the worn effect this stuff leaves and it seems to stay in the lines better than my former method of Windson Newton Acrylics. I have black and dark dirt.  The black shows up better on darker colors, such as JA Green or even Olive Drab.     

I assembled the landing gear and added brake lines.  These were added to the frame along with the drop tanks and combat flaps.  There were no issues with the gear leg installation, just a matter of making sure they're straight.  I used the kit tires which are fine.  There's no need for aftermarket here. 

 I think I'm in the home stretch now. 

Joe

 "Can you fly this plane and land it?...Surely you can't be serious....I am serious, and don't call me Shirley"


  • Member since
    July 2012
Posted by magnum278 on Thursday, September 5, 2013 12:03 PM

Looks beautiful!

  • Member since
    February 2011
  • From: Bent River, IA
Posted by Reasoned on Thursday, September 5, 2013 3:59 PM

The underside is absolutely stunning.

Science is the pursiut of knowledge, faith is the pursuit of wisdom.  Peace be with you.

On the Tarmac: 1/48 Revell P-38

In the Hanger: A bunch of kits

  • Member since
    February 2012
  • From: Olmsted Township, Ohio
Posted by lawdog114 on Thursday, September 5, 2013 7:39 PM

Thanks Magnum and Reasoned.  Well I think I'm done.  To recap, its the 1/48 Hasegawa KI-43 Hayabusa "Oscar" in the 50th Sentai markings of 38 kill ace Isamu Sasaka.  With the exception of PE seatbelts and Berna decals, it's built right out of the box.  As I said earlier, I'm not exactly a huge fan of the early Oscar.  It's just too WW I-like for my liking, with its wimpy 7.7 mm machine gun tandem and two bladed prop.  But as I said, men like Sasaka did find success with it. 

Regarding the kit, I thought it would be a "weekend-like" build...wrong.  I had fuselage warpage issues and I absolutely hated the wing tip design.  The lower wing to fuselage fit was lousy too.  I also found towards the end of the build that the panel line detail in the mid fuseage area was "soft" and I had trouble getting the lines to hold a wash.   This is unfortunately common in Hasegawa kits and I remember the same problem on my zero, so I went with good enough. 

Here it is...


......and of course, I couldn't resist.  I'm gonna put my money on the P-40.....

Thanks for looking....comments and question are welcome...

Joe.   

 "Can you fly this plane and land it?...Surely you can't be serious....I am serious, and don't call me Shirley"


  • Member since
    December 2003
  • From: Charleston, SC
Posted by sanderson_91 on Thursday, September 5, 2013 8:20 PM

Wow!  I really like this!  Great paint work as usual. I really like the way you do your bases too!

Steve


  • Member since
    March 2010
  • From: MN
Posted by Nathan T on Thursday, September 5, 2013 8:24 PM

Nice work Joe. Despite the typical Hasegawa issues you turned out a fine looking machine. Really appreciate the clean paint and decal work and the way you nail all the small details. I think kits like this one are a good alternative to build if your into Japanese aircraft and sick of looking at all the Zero builds and pics.


  • Member since
    December 2006
  • From: N. Georgia
Posted by Jester75 on Thursday, September 5, 2013 8:44 PM

Damn Joe, that is gorgeous! Would never guess you had any problems with it.

Eric


  • Member since
    May 2013
  • From: Indiana, USA
Posted by Greg on Thursday, September 5, 2013 8:52 PM

Outstanding work, Joe. Add me to your fan list regarding the underside, it looks simply great (and I don't mean that to undermine the rest of the aircraft).

You are a great painter in my book. Hope to be able to emulate some of your techniques someday.

Oh, and that is one good looking OOB cockpit you pulled off.

Thanks for taking the time to share this build.

  • Member since
    May 2004
  • From: Mount Bretherton Model Aircraft Observatory
Posted by f8sader on Thursday, September 5, 2013 9:20 PM

Incredible, actually!  An artist at work.

Lon-ski

  • Member since
    February 2011
  • From: Bent River, IA
Posted by Reasoned on Thursday, September 5, 2013 9:30 PM

You smacked it good Joe, terrific build and 38 kills with two 7.7 mm's is a testament to a great pilot.  That is one of the craziest flap setups I've seen, again, great work! Toast

Science is the pursiut of knowledge, faith is the pursuit of wisdom.  Peace be with you.

On the Tarmac: 1/48 Revell P-38

In the Hanger: A bunch of kits

JOIN OUR COMMUNITY!

Our community is FREE to join. To participate you must either login or register for an account.

SEARCH FORUMS
FREE NEWSLETTER
By signing up you may also receive reader surveys and occasional special offers. We do not sell, rent or trade our email lists. View our Privacy Policy.