SEARCH FINESCALE.COM

Enter keywords or a search phrase below:

1/72 EKA-3B Skywarrior/Whale - DONE! 09/20/2015

22675 views
75 replies
1 rating 2 rating 3 rating 4 rating 5 rating
  • Member since
    August 2008
Posted by tankerbuilder on Saturday, May 9, 2015 5:04 PM

Well Pawel ;

    Dog gonnit , You did it again !  Now I'll have to go out and get another Plane .! What's up ? you guys don't like floatie thingies ? Great work Pawel !

  • Member since
    May 2009
  • From: Poland
Posted by Pawel on Saturday, May 9, 2015 11:50 AM

Hello!

I've got another update for you.

I finished putting the decals on and started to weather the surface - it's also mostly done. I used dark gray paint (Humbrol 32) thinned with turpentine - put that on the surface detail, waited to dry a little and then I removed the excess with a Q-tip dampened with airbrush thinner. In places where the lines were too shallow I pencilled them in.. The airbrush thinner also washes pencil off, should it slip. The next thing to do would be to put a satin clear coat on top of that and then start the final assembly. Still waiting for the custom PE to correct the wheels. Here's what the model looks at the moment:

Thanks for reading and I hope you liked the pictures - good luck with your builds and have a nice day

Paweł

All comments and critique welcomed. Thanks for your honest opinions!

www.vietnam.net.pl

  • Member since
    May 2009
  • From: Poland
Posted by Pawel on Saturday, May 2, 2015 4:48 PM

Hello!

PJ - with the electronics "blisters" on the sides there isn't so much space on the sides of the hull for the insignia - I guess that's why they are so far back. Thanks a lot for your kind words!

Mike - thanks a lot!

Now I'm movin' on with the decals.

Thanks for your comments and have a nice day

Paweł

All comments and critique welcomed. Thanks for your honest opinions!

www.vietnam.net.pl

  • Member since
    February 2007
  • From: Brunswick, Ohio
Posted by Buckeye on Friday, May 1, 2015 11:23 AM

You are doing an excellent job on this kit! Yes

Mike

  • Member since
    November 2008
  • From: Central Florida
Posted by plasticjunkie on Friday, May 1, 2015 6:53 AM

Awesome job on the Whale. Interesting how the stars and bars are located so far back. Even the Vigilante that was a huge plane had them up front. Great job Pawel.

 GIFMaker.org_jy_Ayj_O


Too many models to build, not enough time in a lifetime!!

  • Member since
    May 2009
  • From: Poland
Posted by Pawel on Friday, May 1, 2015 5:44 AM

Hello!

So here's the next update - it was time to do some decaling. The kit I have gives you two paint options:  VAQ-131, AB-615 from the Mediteranean cruise and the VAQ-130, NG-614 from 1972. I wanted to do a Vietnam bird, and I found two photos of the VAQ-131, NH-615, which was similar to the AB-615, so I decided to develop my own decals using the kit decals as dimensional help. That's what I did and a little company called Malius Manu printed those decals for me. The biggest challenge was to get thin gray and white partition lines between some markings and the black stripes on the tail. In hindsight it would be best to mask the apropriate areas off at painting the stripes - but I didn't do that. My idea was to incorporate those gray and white borders in the decal - it worked with white, but wasn't doable for gray. So I did something else - I masked off and painted the right shapes on a clear decal sheet:

Then I put them on the model:

When this was dry, I put the decals on:

While not perfect, I'm quite satisfied with the results. The declas from Melius Manu react well to the mix of Micro Sol/Set, Mr Mark Softer and Solvaset - working with them is a pleasure.

So now I'm putting the remaining decals on - hope you liked it, thanks for reading and have a nice day

Paweł

All comments and critique welcomed. Thanks for your honest opinions!

www.vietnam.net.pl

  • Member since
    May 2009
  • From: Poland
Posted by Pawel on Saturday, April 18, 2015 1:17 PM

Hello everybody!

Last week I've been working on the landing gear. Black wash and the Hasegawa kit decals really dress up those areas. In the main gear bays there were many details to add, especially the strut operating cylinders, running the whole width of the aircraft. There were also the extension boost cylinders - the little diagonal ones, and also the door latches. Still missing are the door operating cylinders - they will be added together with the doors and are only kit supplied. So here are the bays:

On the other side there's the pressure refuelling plumbing:

Main gear struts:

Front gear strut - there's still a nice PE part to be added:

Thanks for reading - good luck with your projects and have a nice day

Paweł

All comments and critique welcomed. Thanks for your honest opinions!

www.vietnam.net.pl

  • Member since
    May 2009
  • From: Poland
Posted by Pawel on Tuesday, March 31, 2015 3:00 PM

jelliott523 - Thanks a lot! I can't wait too - but it's going to take some time. I'm waiting for some custom PE and decals to arrive.

In the meantime I'm working on the landing gear - I added some Eduard PE and thin copper wire for now:

Thanks for reading and have a nice day

Paweł

All comments and critique welcomed. Thanks for your honest opinions!

www.vietnam.net.pl

  • Member since
    January 2014
  • From: Nampa, Idaho
Posted by jelliott523 on Sunday, March 22, 2015 1:45 PM

YesShe's looking great Pawel!!!  Can't wait to see this beauty finished!

On the Bench:  Lots of unfinished projects!  Smile

  • Member since
    May 2009
  • From: Poland
Posted by Pawel on Sunday, March 22, 2015 1:28 PM

Hello!

Another update - this time I tested how a wash could be applied to my model. I chose the horizontal stabilizers as the test ground. I lightly thinned some Humbrol 32 with turpentine and applied this mix to the panel lines over a thin layer of future. Before an hour passed, I began to wipe the was down with a dry paper towel. The results were OK - as the photo shows:

I hope you like it - thanks for reading and have a nice day

Paweł

All comments and critique welcomed. Thanks for your honest opinions!

www.vietnam.net.pl

  • Member since
    May 2009
  • From: Poland
Posted by Pawel on Monday, March 16, 2015 4:21 PM

Mike - thanks a lot!

Raymond - thanks for your kind words! When you get that picture, could you post it here? It would also help if you asked the man about VAQ-131 - that's the unit "my" Whale belonged to, I could use every help here. BTW, I plan to model the BuNo 142403.

As for the canopy - it changed between models, but only minor details. Looking from the deck it seems to be bubble canopy, but on top there's rather large "roof" with the ditching hatch in it - much better noticeable when you're handling a model. So no real difference between my model and the Lexington whale - in fact they are pretty close together. The Lexington whale looks like a KA-3B tanker to me.

Thanks for your comments and have a nice day

Paweł

All comments and critique welcomed. Thanks for your honest opinions!

www.vietnam.net.pl

  • Member since
    December 2013
  • From: Greenville, TX.
Posted by Raymond G on Monday, March 16, 2015 1:57 PM

Wow! I'm very impressed! I just got back from the U.S.S. Lexington and they have on sitting on the flight deck just as you emerge on top. God, that's a big bird!. My daughter's Navy Jr. ROTC instructor actually flew one, so I am very interested in this thread. I'm trying to get a picture of him with his plane so I can build it.

I noticed the one on the Lex had a bubble canopy and that yours does not. I guess that changed depending on the model? Anyway, great job, especially on a 1/72!!!!  Keep up the great work. Raymond

On the Bench:

U.S.S. Arizona (Revell)

P-51D Tribute (Revell)

57 Chevy Bel Air


  • Member since
    February 2007
  • From: Brunswick, Ohio
Posted by Buckeye on Monday, March 16, 2015 11:33 AM

Looking good!

Mike

  • Member since
    May 2009
  • From: Poland
Posted by Pawel on Sunday, March 15, 2015 1:26 PM

Hello!

Sorry for my late reply!

Mike - thanks a lot for your kind words! I'm glad you like my work.

Devil Dawg, John - thanks a lot!

And i've got another Whale update for you - I managed to put some paint on my model. Here's what it looks like now:

The stripes are for the paint scheme of the VAQ-131. I decided to paint them on instead of using decals from the Hasegawa kit, and I'll be modifying the kit markings anyhow. The stripes and the anti-glare panels are Humbrol 33 black, and the antennae fairings are Humbrol 32 dark gray.

I also have painted with the paints mentioned above - preshading is Humbrol 129 gray over Humbrol 140 gray. White is Tamiya primer from a spray can.

I also found a useful trick on my way - if you're painting over a layer that had a lot of time to dry (like one week here) and there are some imperfections (like places where the tape lifted a bit) you can wait till the fresh layer is dry to the touch, and then clean the imperfections up with a Q-tip moistened with airbrush thinner - it worked for me here.

I hope you like it - thanks for reading and have a nice day

Paweł

All comments and critique welcomed. Thanks for your honest opinions!

www.vietnam.net.pl

  • Member since
    December 2002
  • From: Northern California
Posted by jeaton01 on Sunday, March 1, 2015 12:36 AM

Looks great Pawel.

John

To see build logs for my models:  http://goldeneramodel.com/mymodels/mymodels.html


  • Member since
    March 2005
  • From: Lancaster, South Carolina
Posted by Devil Dawg on Friday, February 27, 2015 9:56 PM

Looking good, Pawel! Keep at it!

Devil Dawg

On The Bench: Tamiya 1/32nd Mitsubishi A6M5 Model 52 Zeke For Japanese Group Build

Build one at a time? Hah! That'll be the day!!

  • Member since
    November 2008
  • From: Far Northern CA
Posted by mrmike on Friday, February 27, 2015 9:50 PM

My honest opinion is that you're doing another one of your very detailed and fun to follow builds. I really enjoy seeing how you add so much to the basic kit. Thanks for keeping us up to date!

Mike

  • Member since
    May 2009
  • From: Poland
Posted by Pawel on Friday, February 27, 2015 4:16 PM

Hello everybody!

Today I finished painting the engines:

The undersides were painted Tamiya white primer, upper surfaces are Humbrol 129 over Humbrol 140 preshading. The red warning stripe is Humbrol 19. The rear of the fairing is a transition between Stainless and Iron from Mr Metal Color, Gunze paints. I picked up some panel lines with a pencil.

Now I'm going to install the engines - painting them after installation would be much harder. Also, there's some filling required where the leading edge of the wing meets the engine pylon.

Thanks for looking and have a nice day

Paweł

All comments and critique welcomed. Thanks for your honest opinions!

www.vietnam.net.pl

  • Member since
    May 2009
  • From: Poland
Posted by Pawel on Monday, February 9, 2015 2:29 PM

jelliott523 - thanks a lot for your kind words! Yeah, the Whale is really something special, isn't it? Thanks for your comment and have a nice day!

Paweł

All comments and critique welcomed. Thanks for your honest opinions!

www.vietnam.net.pl

  • Member since
    January 2014
  • From: Nampa, Idaho
Posted by jelliott523 on Sunday, February 8, 2015 11:01 AM

YesAwesome work there Pawel!  I've been looking at these kits in the various versions.  I had never really looked at this aircraft much, until I visited the USS Midway Museum in San Diego last year and got a good look at the Whale they have on the flight deck.  Its amazing that such a large aircraft could land and be launched from a carrier.  Keep up the great work, I'll be watching this build as well.

On the Bench:  Lots of unfinished projects!  Smile

  • Member since
    May 2009
  • From: Poland
Posted by Pawel on Saturday, February 7, 2015 3:55 PM

Hello everybody!

Aftera long time I've got a small update. I put some of my trusty Tamiya primer on the model. It still works better with a grey undercoat:

There are two small antennae in front of the triangular opening that will take the tail skid. I've built those little antennae out of thick copper wire that I've flattened with a hammer and then filed to shape and then anchored them in appropriately shaped holes. This is almost more writing than actual work, but it gives me hope to keep them babies from breaking off before getting done.

Before I put the primer on I also glued the canopy on and masked it with thin strips of Tamiya tape and Maskol. Then I sprayed a coat of black to gife the frames their inside colour. On top of the black you can now see some overspray from the subsequent painting. The rear edge of the canoy had to be filled and sanded a little, the seam there was a bit too much for me:

That would be it for now - hope you like it! Thanks for reading and have a nice day

Paweł

All comments and critique welcomed. Thanks for your honest opinions!

www.vietnam.net.pl

  • Member since
    May 2009
  • From: Poland
Posted by Pawel on Thursday, January 22, 2015 4:06 PM

Hello everybody!

I wanted to close up the cockpit, but I realized I'm missing the insides of the so-called dittching hatch - a hatch on top of the Whale cockpit meant to be used to get out of the airplane when the normal way (the hatchway in the belly) couldn't be used - like when landing wheels up or in the water. I read that this hatch was supposed to be open during the carrier takeoff by Navy regulations.

I have only very few references of how this thing should look like. But using what little I had here's what I scratch-built using some styrene sheet, yoghurt can lid (aluminium foil) and some copper sheet and wire on paper backing:

I scribed all of those soundproofing seams, then went on to paint that thing:

After that was doneI glued it inside the canopy:

Now I can finally close that cockpit up and start some serious painting.

Thanks for looking and have a nice day

Paweł

All comments and critique welcomed. Thanks for your honest opinions!

www.vietnam.net.pl

  • Member since
    May 2009
  • From: Poland
Posted by Pawel on Wednesday, January 7, 2015 9:10 AM

Hello Mike!

Thanks a lot for your kind words! I also think this machine is cool!

Have a nice day

Paweł

All comments and critique welcomed. Thanks for your honest opinions!

www.vietnam.net.pl

  • Member since
    February 2007
  • From: Brunswick, Ohio
Posted by Buckeye on Tuesday, January 6, 2015 11:14 AM

Very nice work there in 1/72 on a very cool aircraft!

Mike

  • Member since
    May 2009
  • From: Poland
Posted by Pawel on Tuesday, January 6, 2015 10:12 AM

Hello!

Russ - thanks a lot for your comment and for your kind words. I plan to build the EB-66 some day too, but there are so many differences! Then again you know way more about the ECM systems - I'm counting on your help here!

Tomorrow I have to go back to work, so to use the break I worked on some details of my models. I moved on with the gear bays - let me show you my favourite before-after shot. Here's the gear bay OOB:

After I tuned it a bit:

I also added a small fuel vent on the horizontal stabilizer, correct for my BuNo, and deleted the large one (kit part E39, on the left side of the fuselage tail):

I also added the roller for the tail skid, that was missing from the kit:

The last thing I managed to do was to add the refuelling drogue (sculpted from Milliput):

Now I'm working to put everything together to paint the underside of the model white. Hope you liked the photos, thanks for reading and have a nice day

Paweł

All comments and critique welcomed. Thanks for your honest opinions!

www.vietnam.net.pl

  • Member since
    April 2012
  • From: USA
Posted by Striker8241 on Monday, January 5, 2015 5:49 PM

Wow! Great job, Powel! I really like the way the detailing is going in the gear bays. I'll be watching your progress with interest as I plan to build the Air Force version someday.

Cheers,

Russ


  • Member since
    May 2009
  • From: Poland
Posted by Pawel on Sunday, January 4, 2015 1:12 PM

Hello!

Today I started detailing the gear bays. I used styrene sheet and thin copper wire. Here's how it looks so far:

Thanks for reading and have a nice day

Paweł

All comments and critique welcomed. Thanks for your honest opinions!

www.vietnam.net.pl

  • Member since
    May 2009
  • From: Poland
Posted by Pawel on Thursday, January 1, 2015 6:32 AM

Hello!

Happy new year, everybody!

That Whale didn't get much attention in the second half of the last year, but hopefully that's about to change now. After I posted last time I was able to glue the wing to the fuselage, and fill and rescribe that joint. Recently I resumed my work on the flaps and slats. The right wing now looks like on the photo below:

I started working on the slat attachment points. While not very accurate, I couldn't come up with a better way to reliably hold the slat to the wing. I'll try to build it like that and see how it turns out:

I hope you like it, thanks for reading and have a nice day

Paweł

All comments and critique welcomed. Thanks for your honest opinions!

www.vietnam.net.pl

  • Member since
    May 2009
  • From: Poland
Posted by Pawel on Wednesday, March 12, 2014 10:11 AM

Hello again!

The work on the wings continue. Wing is already cut up, the cut off parts will serve as a base to do the slats, the flaps will have to be scratchbuilt. For now I work to show the slat bays and the wing looks like shown on the photos below:

And now for the opposite side - thanks for reading, have a nice day

Paweł

All comments and critique welcomed. Thanks for your honest opinions!

www.vietnam.net.pl

  • Member since
    May 2009
  • From: Poland
Posted by Pawel on Monday, March 3, 2014 9:06 AM

Hello!

It's been a long time, during which the work has been going on steady, although slowly. I glued together the fuselage halves and filled the seams:

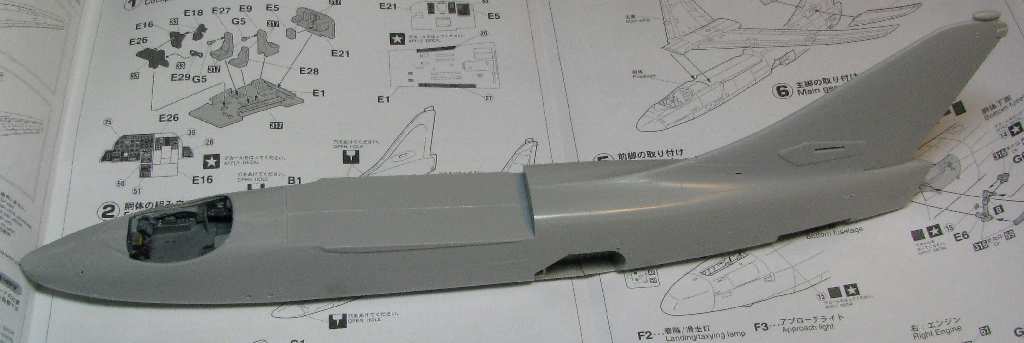
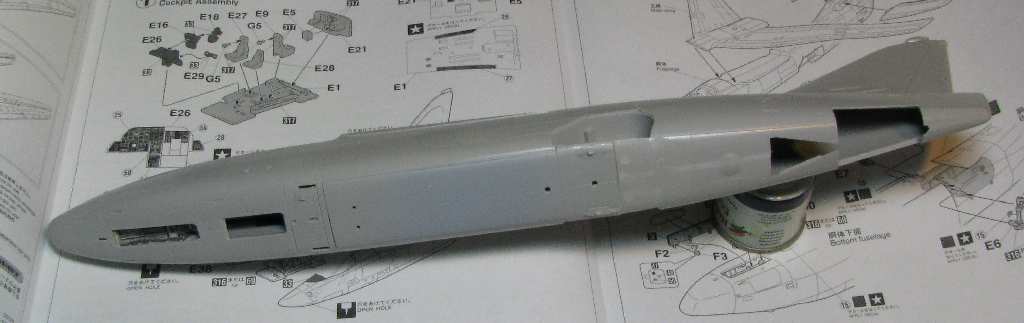
It's good to remember to open a slot just before the forward wheel bay for an antenna, that the more modern Whale variants had. I also dry fitted the "anti buffet fence" behind the crew entry hatch - on the bomber it eased the flow of air around the open bomb bay and enabled a clean drop of bombs. On the EKA-3B variant the bomb bay couldn't be opened in flight, and the fence was also deleted - that's what I'm going to do on my model, too. The slots on the sides of the fence are for retractable catapult attachment points. Behind the fence there are the bomb bay doors, dry fitted.

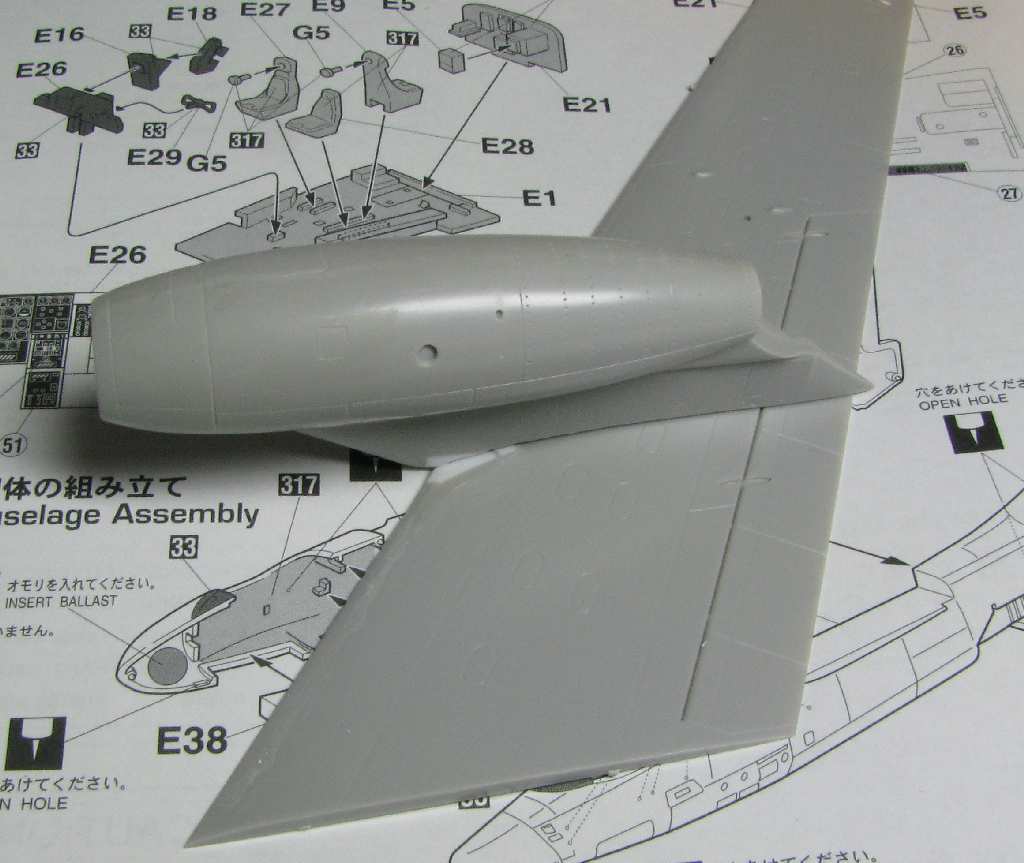
I also started working on the wings - I didn't do much so far, yet there's a lot to write about. You see there were two wings variants on the Whale - basic and the so called CLE wings - in essence widened a bit. My machine should have the basic wing. And the Hasegawa kit shows a curious mix of basic and CLE wing features. The shape is a basic wing, and the details were taken from the CLE wing. Take, for example that little fairing where the wing leading edge and the leading edge of the engine pylon meet:

For a basic wing it shouldn't be there:

More on the differences can be found in this excellent article:

http://tailspintopics.blogspot.com/2010/09/mighty-skywarrior.html

It's also already decided, that my model will have the flaps and the slats deployed - the Skywarriors sitting on the ground usually looked like that.

More on the subject in my next posts, please stay tuned, thanks for reading and have a nice day

Paweł

All comments and critique welcomed. Thanks for your honest opinions!

www.vietnam.net.pl

JOIN OUR COMMUNITY!

Our community is FREE to join. To participate you must either login or register for an account.

SEARCH FORUMS
FREE NEWSLETTER
By signing up you may also receive reader surveys and occasional special offers. We do not sell, rent or trade our email lists. View our Privacy Policy.