SEARCH FINESCALE.COM

Enter keywords or a search phrase below:

Revell/Monogram 1:48 P-40B Flying Tiger AVG (Complete)

40618 views
123 replies
1 rating 2 rating 3 rating 4 rating 5 rating
  • Member since
    March 2008
  • From: Ohio
Posted by B-17 Guy on Saturday, July 26, 2014 2:35 PM

Where's the exhaust manifolds?

  • Member since
    June 2014
Posted by BrandonK on Friday, July 25, 2014 9:56 AM

I love watching these big builds. They give me so many great ideas and the bravery needed to explore techniques that are more advanced. Thanks for the motivation.

On the bench:

A lot !! And I mean A LOT!!

2024 Kits on deck / in process / completed   

                         14 / 5 / 2  

                              Tongue Tied

  • Member since
    June 2013
Posted by bvallot on Friday, July 25, 2014 12:39 AM

FINALLY!

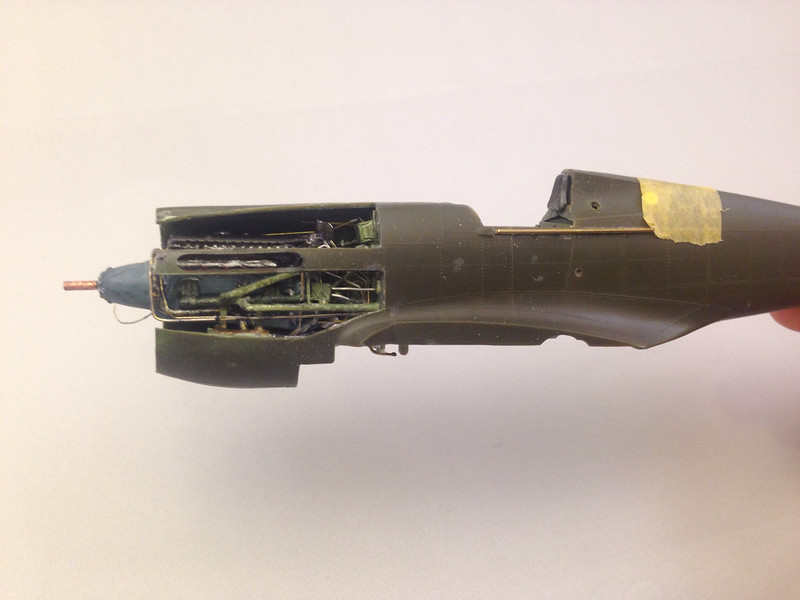
Salvation.  I've finally moved on to this thing called "building the rest of the aircraft."  I first fixed up the gap underneath, sanded and smoothed that shape back.  I played with trying to insert the rear venting duct that fits behind the radiator but there's just not enough room to safely place it in there.  And since I'm trying to reveal the interior, I guess I don't mind leaving that part out.  I admit I would have liked to have included it.

Here's where I'm at.  Fixed the gap/seam.

 image by brittvallot, on Flickr

Backing up a bit, before I fixed the wings to the fuselage I tried fitting everything put together so far and found a tiny space between the undersurface of the flaps.  I came up with this as a solution.  I made a paper mask to make my cuts and applied them to the brass sheet.

 image by brittvallot, on Flickr

Next, before I closed up the rest of the fuselage and tail, I had decided (a while back) that I would fix the tab that would hold the radio aerial line.  I sanded a small strip of plasticard thin and cut it to shape and placed a very small hole for the spring to fit.  I gave it some space so that it would not become weak near the edge and break.  For the spring, I took the smallest piece of brass wire I have and coiled it around the second smallest brass rod and kept it tight so that I could have a tougher spring than the pulled sprue I came up with for the Corsair.  I think this is going to work out a lot better.  It's a lot stronger too. =]

 image by brittvallot, on Flickr

Here's the wings placed up.

 image by brittvallot, on Flickr

 image by brittvallot, on Flickr

 image by brittvallot, on Flickr

This is where I'm at for now.  It'll have to wait until Monday before I can do anything more. Then it'll be a mad dash for the finish line!! =D

On the bench:  

Tamiya F4U-1  Kenneth Walsh


  • Member since
    June 2013
Posted by bvallot on Tuesday, July 22, 2014 1:01 AM

Here's a quick update.

All this is beginning to come together.  Just a few more additions and I'll be able to move much quicker through the rest of this.  At least I'm hoping... =]   So far I haven't run into any real issues with the fit of this kit aside from how I'm editing and detailing parts.

Here is a view of the scoops fitted to the front of the engine cowl that the kit offers.

 image by brittvallot, on Flickr

This is what I settled for in order to maintain the shapes I was looking for on the scoops as well as to keep them matching up with the radiators.

 image by brittvallot, on Flickr

Here it is with all the bell and whistles.

 image by brittvallot, on Flickr

Here's something I'll have to patch up once this epoxy finishes setting.  This gap is do to the radiator assembly being just a bit to big for kit piece.  Everything is pretty much right on the money to scale but somehow it happened anyhow. Since I've cut the panels out to reveal the engine, I have to leave this gap here in order to preserve the shape of the panels that I've cut.  It was a very snug fit before, but after the addition of the scoops they just stopped fitting.  =/ 

 image by brittvallot, on Flickr

One of the last things I'll do is to place the shroud over the exhausts on here to help support this piece.  It's broken once on the back end of it.  The shroud ought to help stiffen it.  Since I'm adding this, I'll leave off the upper and lower Dzus rails right here and just place the very upper and lower to tie everything together.

 image by brittvallot, on Flickr

Any comments at all right here would be certainly appreciated.  I have a fair sense of where I'm going with this here, but I'm definitely in uncharted territory.  =]

Thanks.

On the bench:  

Tamiya F4U-1  Kenneth Walsh


  • Member since
    September 2011
Posted by fightnjoe on Saturday, July 19, 2014 9:28 AM

it is very impressive.  stunning work all the way through.  

joe

Veterans,

Thank You For Your Sacrifices,

Never To Be Forgotten

Where you can find me:

Workbench on FaceBook  Google Plus  YouTube

  • Member since
    June 2013
Posted by bvallot on Saturday, July 19, 2014 12:55 AM

Well, I appreciate that Brandon.  If' it's any consolation, none of this just fell together.  I did fight it a lot at  first.  There was a bit of a learning curve for me for some of this detailing.  Adding some extra detail here and there has never been such an issue, but having so much in such a tight space has proved a little difficult.  I did have to learn some new tricks on the fly to cope with it.  I do my best to outline what I've done so that others can make use of it or improve on some aspect of it.

I hope you find it helpful. And thanks again! =]

On the bench:  

Tamiya F4U-1  Kenneth Walsh


  • Member since
    June 2014
Posted by BrandonK on Wednesday, July 16, 2014 8:01 PM

Well............... I was gonna start my Revell P-40. I think now I'll just push it to the back for awhile cuz this build is gonna make me feel like I'm building with scotch tape and painting with crayons. keep up the good work.

On the bench:

A lot !! And I mean A LOT!!

2024 Kits on deck / in process / completed   

                         14 / 5 / 2  

                              Tongue Tied

  • Member since
    April 2014
Posted by r13b20 on Wednesday, July 16, 2014 7:28 PM

Not in that scale or that detailed. Amazing. Bob

  • Member since
    June 2013
Posted by bvallot on Wednesday, July 16, 2014 7:10 PM

Thanks Fly-n.  =]  It does feel pretty busy to me, but there are a couple more pieces to install before it's completely done.  I just needed to get it into the fuselage and set before moving on.  It was a little maddening trying to keep all this together, but the next time I think it will be easier as I've got over a bit of that learning curve for some of these fiddly bits.

When are you planning on tackling one of these guys?  =]

On the bench:  

Tamiya F4U-1  Kenneth Walsh


  • Member since
    December 2006
  • From: Phoenix, AZ
Posted by Fly-n-hi on Wednesday, July 16, 2014 11:04 AM

Fantastic work on the engine!  It looks very busy and realistic!

  • Member since
    June 2013
Posted by bvallot on Wednesday, July 16, 2014 9:49 AM

Alright!! =] Finally made some headway. I've been a bit anxious about rushing any one part of getting this engine installed before I finished certain necessary steps, but now I think I'm finally rolling with this.  Of course I had to dress this Allison up a little nicer.  I couldn't help myself.  I knew I'd never get every single hose and tube in place at such a tiny scale (especially my first time attempting this) but after I found a beautifully pictured walkaround book on the P-40B/C...I just had to follow through.  And I took a play out of lawdog's playbook and pulled my light box out to film with so these pictures come out better.  But first I wanted share one trick I come up with for working this tiny.  Obviously, some of the detail will be unseen...like origin and insertion points. So here's a photo of what I did when two or more lines were going to the same general location.  The origin gets doubled over which helps to make a tab to anchor it down and allows you to accomplish more with less mess.
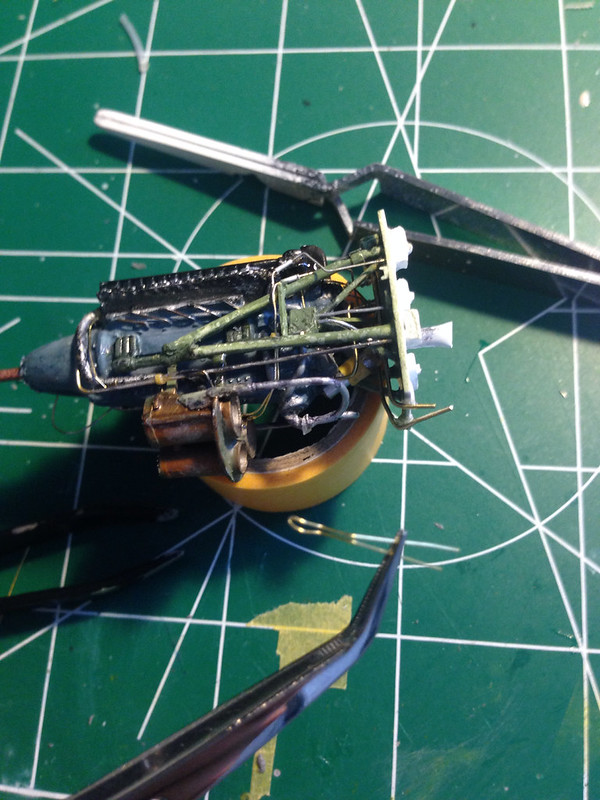
 image by brittvallot, on Flickr

The other trick I used which I can't find a picture of now...was when two lines were next to each other running virtually parallel, I would make a similar tab as outlined above, but here I would hook it onto the the part already in place.  Kind of like threading a needle but instead you're just dropping it onto (the "eye" is just a hook). This helps all this fiddly stuff to be a bit more sturdy.  Hope some finds that useful.

Here's the Allison V-1710-33:
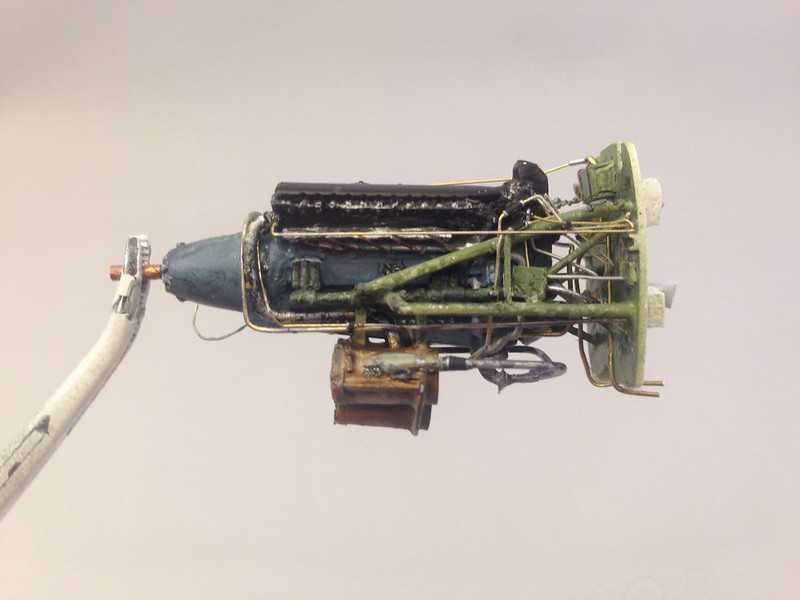
 image by brittvallot, on Flickr

 image by brittvallot, on Flickr
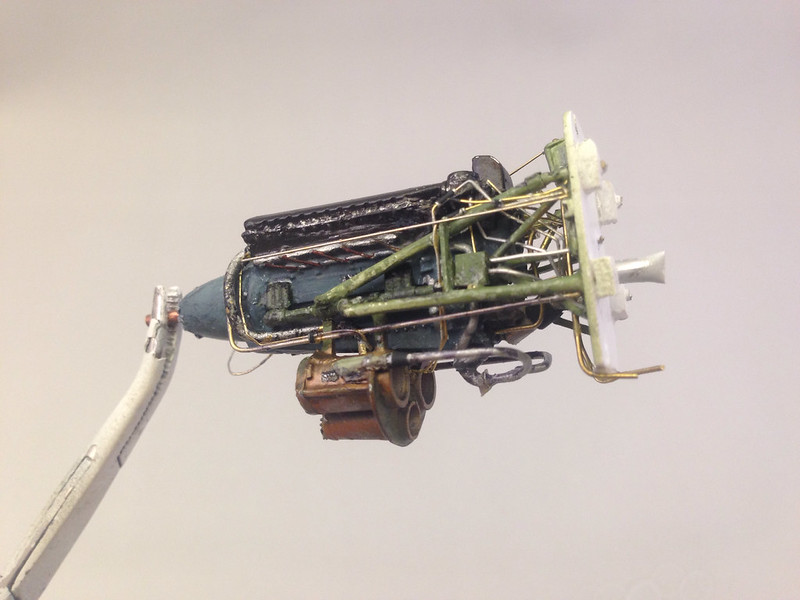
Here's a view of the coolant expansion tank/line and the linkage for the carb.
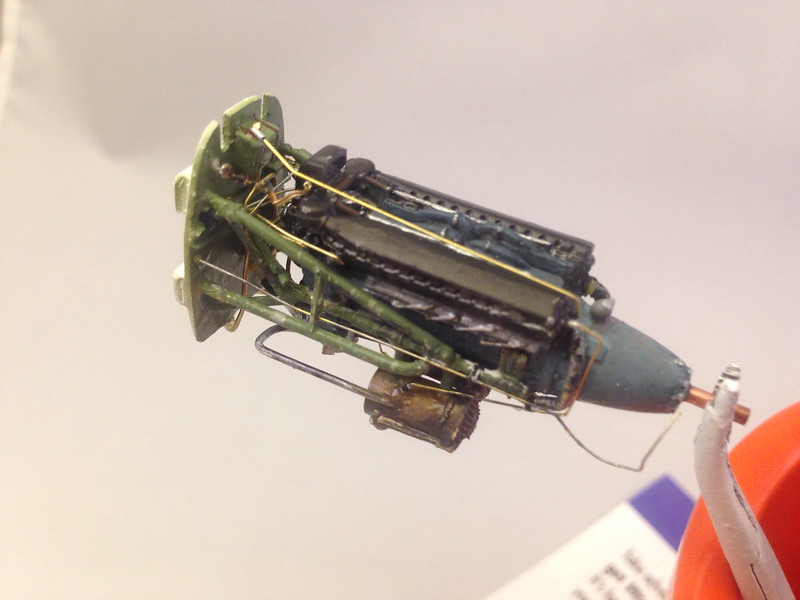
 image by brittvallot, on Flickr

 image by brittvallot, on Flickr
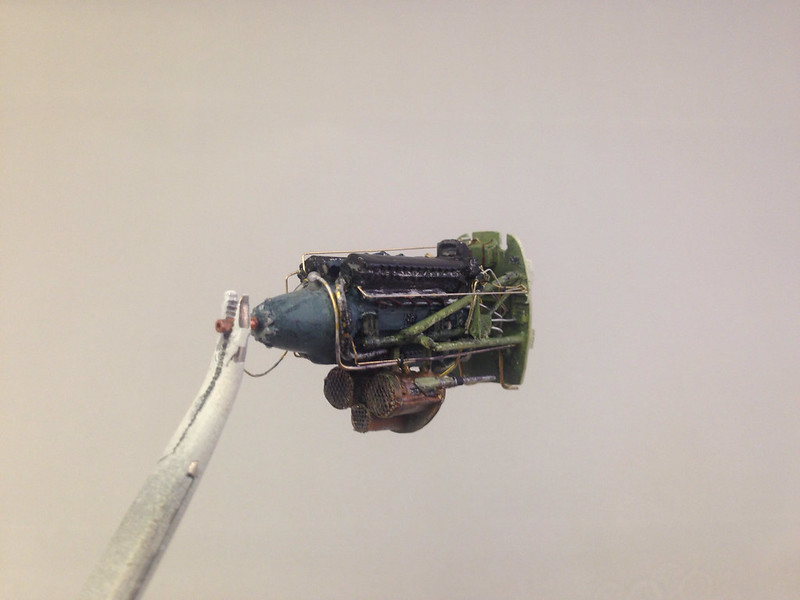
I touched up the paint here and there as needed.  Weathered a bit more...and painted in some placards.  I'm pretty happy with it.  =]

When they say measure twice, cut once...holy sh!t my father would be so happy. =]  Talk about a tight fit!!  Had to be very careful placing this old girl in there as I have some of the fuselage already glued together.  There is absolutely no play left in this engine area.  Which I suppose is actually a good thing...everything should be snug and in it's place which makes me glad I triple checked the fitting every time I added a new major component to this Allison.  So here it is:
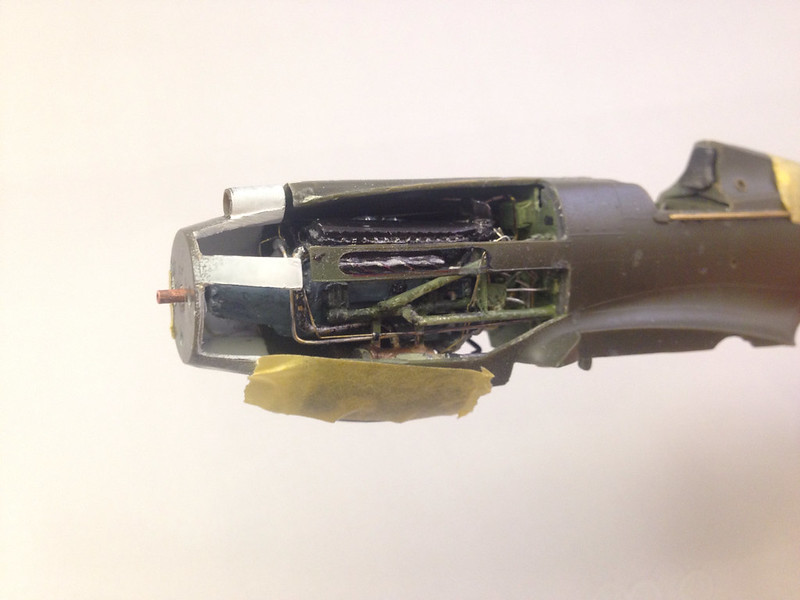
 image by brittvallot, on Flickr

url=https://flic.kr/p/om1Eiu] [/url]image by brittvallot, on Flickr
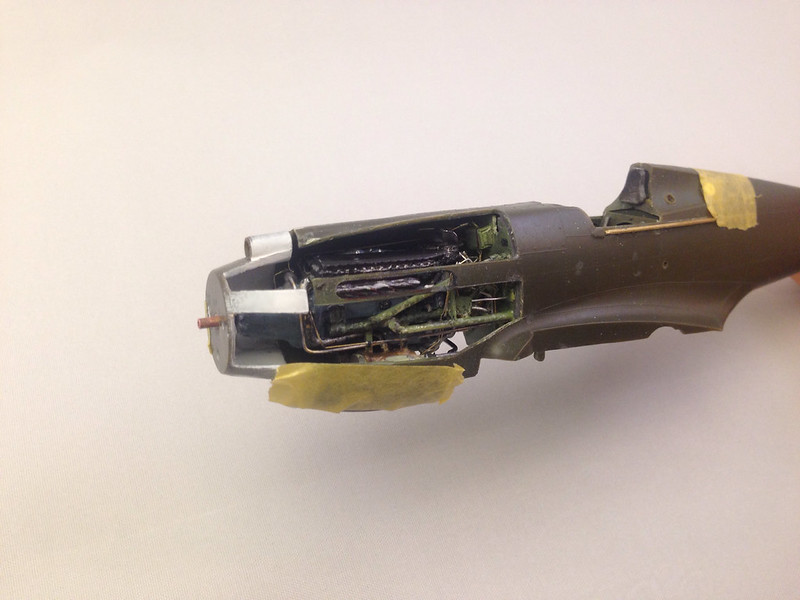
 image by brittvallot, on Flickr

 image by brittvallot, on Flickr
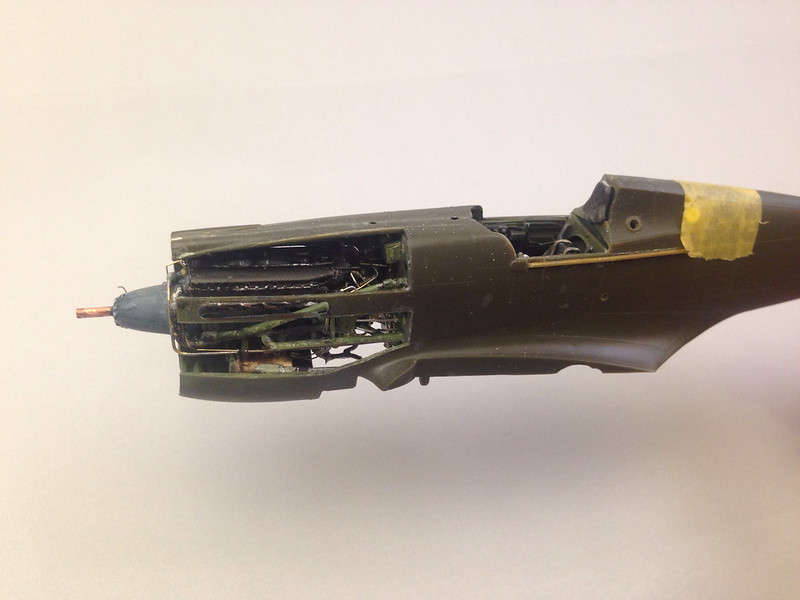
So that's that for now.  I have the Dzus railing to put on next, the intake scoops, misc trimmings, and then solve the magnet problem, and then I can move on to fitting the wings to the fuselage.  =]

Comments and suggests are always welcome.  =]

On the bench:  

Tamiya F4U-1  Kenneth Walsh


  • Member since
    June 2013
Posted by bvallot on Monday, July 14, 2014 12:16 PM

Thanks Brandon.  I'm certainly doing my best.

Baron, I don't know if you saw it earlier, but I wanted to tell you how I appreciate your suggestion to try out the Milliput putty.  It's definitely going to come in handy here for this build.  

And thanks...though it's still got a ways to go.  =]

On the bench:  

Tamiya F4U-1  Kenneth Walsh


  • Member since
    September 2006
  • From: Bethlehem PA
Posted by the Baron on Monday, July 14, 2014 11:52 AM

Incredible detailing on the engine and its compartment!  This is an excellent upgrade to a classic kit.

The bigger the government, the smaller the citizen.


  • Member since
    June 2014
Posted by BrandonK on Monday, July 14, 2014 10:09 AM

Wow, just wow !!

On the bench:

A lot !! And I mean A LOT!!

2024 Kits on deck / in process / completed   

                         14 / 5 / 2  

                              Tongue Tied

  • Member since
    June 2013
Posted by bvallot on Monday, July 14, 2014 12:04 AM

Good Lord.  After lots of cleaning and wedding preparation, I still feel as though I didn't get anything done today.  I tried my best to get this engine mounted, but someone kept finding more and more things that needed my attention. Bang Head 

I did manage this today:

I got the .50 MGs matched up to the gun ports.  It's very hard to see here (I am sorry about that but there's not much to see.)  I ended up making a shim for the shelf they sit on.  I misaligned the shelf by about 3mm which put the barrels off.  So now they are back on.  The one thing I did accomplish here.  The nickel tube you see I have left long to keep the barrel true while it was setting up from the CA and epoxy. (not screwing around here on this part. =] )  I'll cut this tube to the appropriate size for the the .50 barrels.  The left side I believe I will leave removable.

 image by brittvallot, on Flickr

Here are some brass sheets I cut to make the riveting frame for the panels.  Unfortunately, I haven't been able to match them up and glue them in yet.  

 image by brittvallot, on Flickr

This last part I thought I measured right, but somehow I managed to lengthen it by twisting it tight to bend at the front of the scoop.  So all this came back off.  But I figured I'd show it anyhow.  This is more or less what I'll end up with.

 image by brittvallot, on Flickr image by brittvallot, on Flickr 

I swear if I don't wrap this part of the build up soon...this thing might actually start flying....

On the bench:  

Tamiya F4U-1  Kenneth Walsh


  • Member since
    June 2013
Posted by bvallot on Thursday, July 10, 2014 12:02 AM

Thanks for the motivation everyone.  I think I've got this Allison back on course. I have had to be very patient for things to set up before moving on.  Everything is so tiny at this scale. But.. I'm back on DEFCON 5...so crisis averted.  =P

I had hoped to be a little further than this so I can move this along and get her off my bench before the deadline of the P-40 GB. Here's where I'm at now:

I've put all this back together and finally made a few more additions.  Also, I was able to marry the Allison to the mounting brackets.

 image by brittvallot, on Flickr

 image by brittvallot, on Flickr

 image by brittvallot, on Flickr

Just a few more odds and ends and I'll have the .50 cals back reinstalled, then I can finally put this part to rest and move on to the fun part...painting!  =D

 image by brittvallot, on Flickr

On the bench:  

Tamiya F4U-1  Kenneth Walsh


  • Member since
    February 2012
  • From: Olmsted Township, Ohio
Posted by lawdog114 on Wednesday, July 9, 2014 6:10 PM

That Allison is looking fantastic Bvallot.  That landing gear detail looks great too...

Joe

 "Can you fly this plane and land it?...Surely you can't be serious....I am serious, and don't call me Shirley"


  • Member since
    June 2013
Posted by bvallot on Wednesday, July 9, 2014 1:01 PM

Always worked for me.  =]  Glad to help.

On the bench:  

Tamiya F4U-1  Kenneth Walsh


  • Member since
    August 2013
Posted by Jay Jay on Wednesday, July 9, 2014 8:12 AM

good idea Bvallot,  TY


 I'm finally retired. Now time I got, money I don't.

  • Member since
    September 2013
Posted by blackdog62 on Tuesday, July 8, 2014 6:54 PM

just checked its off the glue over night it dryd at the tip abd was wet in the it worked by trimming the tip back.

  • Member since
    September 2013
Posted by blackdog62 on Tuesday, July 8, 2014 6:08 PM

I was just talking to mlh owner about not getting glue to through my extended fine tips mine at home didn't work.

so k purchased some new ones. It took some extra pressure to get it through the tip I thought the hole tip would blow off. Made some tiny dots. Took the tip off cleared the end and left stood up to see if would back drain. When I get home ill check if it worked.

I also use miput and love it its great for wing root seems.

  • Member since
    June 2013
Posted by bvallot on Tuesday, July 8, 2014 11:13 AM

Jay, I'd say that's a fairly common issue with the extender tips.  Even when you handle it properly and return it to it's upright position...=] ...it'll probably still happen.  When that occurs I just give it a little nip with my handy clips for removing kit parts of the sprues/PE parts.  That ought to work more often that not.  That other method is certainly handy as well and it may just depend on what you're working with and how fast you're glueing things.

But definitely don't fool with trying to remove the tip until it's totally used up or when it's just time to change it out.  You probably will go and waste more glue that way.

On the bench:  

Tamiya F4U-1  Kenneth Walsh


  • Member since
    August 2013
Posted by Jay Jay on Tuesday, July 8, 2014 10:46 AM

Ty for the advice on glue-ing

I have tried the extender tips for CA and found they work well for about 3 drops then clog up.  I keep a jar of acetone handy and drop the tips in it when they clog. the next day, I then retrieve the 6 or so tips from the jar and begin again.  So, it's glue a part or two, remove the tip, drop it into the acetone, replace the tip...etc..  All the while wasting the CA that's left in the clogged tip,and the CA that drips out when removing it, which considering the length of the tip, is 10 times more glue than I actually use.  There must be a better,less messy way.

I like the idea of using a small puddle on a post it note and diping the needle/toothpick in.   I think more practice is in order for me to deposit the right amount of glue where I want it.   That must be all pretty basic to you pros but I'm determined to get past this hurdle and with your excellent advice, I will. Thanks again.


 I'm finally retired. Now time I got, money I don't.

  • Member since
    June 2013
Posted by bvallot on Monday, July 7, 2014 8:44 PM

Baron, now I remember.  It was you that mentioned the Milliput.  Cannot thank you enough for mentioning that stuff.  Tried it out just recently on the spinners for that Academy P-38 and it worked like a charm.  Can't wait to use it here to smooth out and reshape the carb intake and gun ports along the cowl.

....whenever that part gets here... =[  lol

But definitely Baron.  Much love.

On the bench:  

Tamiya F4U-1  Kenneth Walsh


  • Member since
    September 2006
  • From: Bethlehem PA
Posted by the Baron on Monday, July 7, 2014 11:51 AM

Great progress!

As far as applicators go, I use toothpicks or straight pins, toothpicks definitely for styrene glue, and either one for CA or epoxy.

The bigger the government, the smaller the citizen.


  • Member since
    June 2013
Posted by bvallot on Monday, July 7, 2014 9:39 AM

Of course! What you need to get to fix that is one of those extender tips that stretches out real long.  There's a couple of different styles of tips.  Most come around one to three inches long.  You can cut them to whatever size you prefer but the trick is that the opening is maybe only 1mm wide.  That will allow you much greater control over how much CA glue you deliver at one time.  =]

I used to have similar issues when I first picked up modeling scale aircraft in college.  Actually, I was 8 when my dad did most of the work on a 1:72 F-15C.  I always thought to myself..."one day..."  and then it was one day at the end of a long semester I had plenty of time off to try one.  It would be three more years before I walked into an actual hobby shop that was stocked with all the goodies one would need to go to work.  I was amazed on what I had been missing out on.  =D  So if you haven't yet...I would recommend you taking a stroll through your local hobby shop and peek at what they've got.  You'll no doubt find a few more goodies to make life easier for you.

On the bench:  

Tamiya F4U-1  Kenneth Walsh


  • Member since
    August 2013
Posted by Jay Jay on Monday, July 7, 2014 8:59 AM

I usually seem to avoid breaking off the fiddly parts.  My biggest downfall is having glue blobs appear at the joining of the parts which ruins the whole look.   I haven't been able to resolve that problem yet,  any advice ?


 I'm finally retired. Now time I got, money I don't.

  • Member since
    June 2013
Posted by bvallot on Sunday, July 6, 2014 11:50 AM

Thanks Jay Jay.  I'd also recommend grabbing some extra patience at the store and perhaps some kind of means of holding/securing what you're working on so that once you complete a job and move on...you don't break five other things off while working on something next to it.  =[

I exercised every four letter word I know and made up some new ones too.  I've had to redo everything you see above.  The tricky part after this is all completed will be to get it installed without breaking anything else.

On the bench:  

Tamiya F4U-1  Kenneth Walsh


  • Member since
    August 2013
Posted by Jay Jay on Friday, July 4, 2014 11:13 AM

Wow, that looks fantasic.  

Now I hafta learn how an aircraft engine works to become a better modeler....LOL


 I'm finally retired. Now time I got, money I don't.

  • Member since
    June 2013
Posted by bvallot on Thursday, July 3, 2014 10:52 PM

Okay. I'm back with a quick update before the weekend starts.  Made a little progress towards getting the engine wired, hosed, and probed so she can be installed onto the engine mounts ASAP.   Hope to get her finished by Tuesday.  I am very wary of where I will locate the magnets in order to pop the panel on and off for viewing.  If anybody out there has had experience with this sort of thing...I'm all ears. =]

 image by brittvallot, on Flickr

 image by brittvallot, on Flickr

 image by brittvallot, on Flickr

Happy 4th everyone.  =]

On the bench:  

Tamiya F4U-1  Kenneth Walsh


JOIN OUR COMMUNITY!

Our community is FREE to join. To participate you must either login or register for an account.

SEARCH FORUMS
FREE NEWSLETTER
By signing up you may also receive reader surveys and occasional special offers. We do not sell, rent or trade our email lists. View our Privacy Policy.