SEARCH FINESCALE.COM

Enter keywords or a search phrase below:

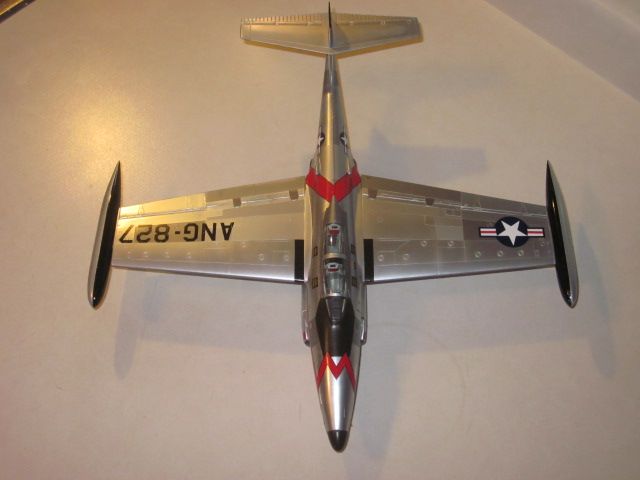
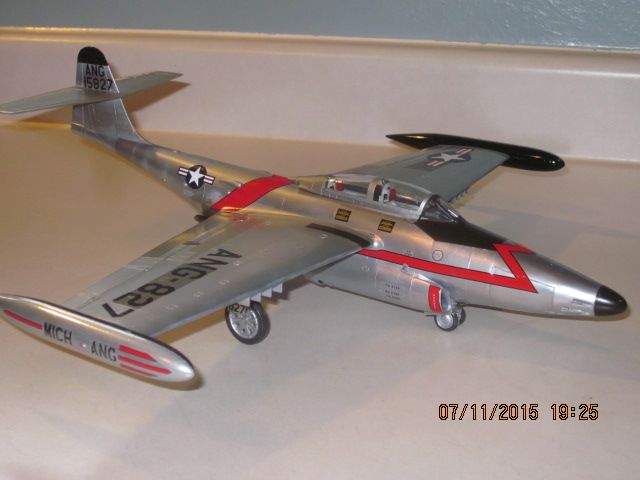
Finished Revell/Monogram 1/48 F-89C Scorpion

6004 views
34 replies
1 rating 2 rating 3 rating 4 rating 5 rating
  • Member since
    July 2015
Posted by Huey54 on Sunday, July 12, 2015 8:24 AM

Job well done.

  • Member since
    August 2013
Posted by Jay Jay on Sunday, July 12, 2015 7:48 AM

Beautifully done.  Really looks like the model is made of aluminum rather than plastic. very realistic.


 I'm finally retired. Now time I got, money I don't.

  • Member since
    July 2004
  • From: Sonora Desert
Posted by stikpusher on Sunday, July 12, 2015 1:24 AM

Beautiful! Keep those Northrop birds coming!


F is for FIRE, That burns down the whole town!

U is for URANIUM... BOMBS!

N is for NO SURVIVORS...

       - Plankton

LSM


  • Member since
    November 2003
  • From: State of Mississippi. State motto: Virtute et armis (By valor and arms)
Posted by mississippivol on Saturday, July 11, 2015 10:52 PM

I love it! You've got to be the high time guy for -89's.

  • Member since
    March 2015
  • From: Streetsboro, Ohio
Posted by Toshi on Saturday, July 11, 2015 10:36 PM

Very beautiful, the silver really eye catching and brings out the character of the aircraft.  Congratulations on a fantastic build!

Toshi

On The Bench: Revell 1/48 B-25 Mitchell


Married to the most caring, loving, understanding, and beautiful wife in the world.  Mrs. Toshi


  • Member since
    February 2003
  • From: Green Bay, WI USA
Finished Revell/Monogram 1/48 F-89C Scorpion
Posted by echolmberg on Saturday, July 11, 2015 8:01 PM

Hi guys!  

As some of you may have been figuring out, I'm a sucker for Northrop planes.  P-61s, flying wings, you name it.  The F-89 is no exception.  Here's my 4th F-89.  I just love these planes.  They were big, brutish-looking and very colorful as well.  Gotta love those '50s era jets.

I painted the entire works gloss white and then picked out a few of the panels with various shades of gloss greys.  When all that was dry, I applied some SnJ powder using some cotton balls.  The different hues of the undertones were picked up nicely by the powder.  If I wanted some additional panels to be picked out, I used MM metalics.  For these, I generally eyeballed some mixtures to vary their shades.

The decals are from an aftermarket Aeromaster sheet that was maybe half a dozen years old.  The decals reacted nicely to Solvaset but a couple of them cracked here and there due to their age I think.

The kit went together great but for some odd reason, it took me four tries to paint the simple fuel tanks.  Either the paint bled under the tape or the demarcation line was too crooked or some other goof up had me stripping the stupid things three times before I finally got it quasi-right.

When all was said and done, a couple of coats of MM metalizer sealer sealed the whole works.

Enjoy!  Comments and critiques are always welcomed.

Eric
JOIN OUR COMMUNITY!

Our community is FREE to join. To participate you must either login or register for an account.

SEARCH FORUMS
FREE NEWSLETTER
By signing up you may also receive reader surveys and occasional special offers. We do not sell, rent or trade our email lists. View our Privacy Policy.