SEARCH FINESCALE.COM

Enter keywords or a search phrase below:

1/32 Trumpeter P-40B..Going Dark

10011 views
159 replies
1 rating 2 rating 3 rating 4 rating 5 rating
  • Member since
    February 2012
  • From: Olmsted Township, Ohio
Posted by lawdog114 on Friday, February 19, 2016 2:02 AM
Coming along nice Joe..

 "Can you fly this plane and land it?...Surely you can't be serious....I am serious, and don't call me Shirley"


GAF
  • Member since
    June 2012
  • From: Anniston, AL
Posted by GAF on Friday, February 19, 2016 12:11 AM

Joe,

Nice detailing!  That's going to be spectacular when finished.

I'm not sure if you've seen this, but since you're starting on the cockpit, I thought I would mention that the NAS museum has a virtual cockpit for the P-40B in their collection.

Just follow the link, scroll down to the bottom and rotate away!

http://www.navalaviationmuseum.org/attractions/aircraft-exhibits/item/?item=p-40b_tomahawk

Gary

  • Member since
    September 2011
Posted by fightnjoe on Thursday, February 18, 2016 10:32 PM

Just a quick update.  


Spent some time getting some of the internal details constructed.  Again they are not 100% but they will work for what I need.


The hydraulic pump.


And the landing gear/flap unit


I have also begun to frame in the cockpit.


I will be doing some crossmembers for the stringers.  These will only be there to make sure the detail has a place to anchor.


All comments, critiques, and criticism are encouraged.


Joe

Veterans,

Thank You For Your Sacrifices,

Never To Be Forgotten

Where you can find me:

Workbench on FaceBook  Google Plus  YouTube

  • Member since
    September 2011
Posted by fightnjoe on Thursday, February 18, 2016 9:47 AM

Jay I am glad I could help ease your frustration a little.


Gamera you really have not missed much to this point.  Still a long road to travel.


Joe

Veterans,

Thank You For Your Sacrifices,

Never To Be Forgotten

Where you can find me:

Workbench on FaceBook  Google Plus  YouTube

  • Member since
    November 2009
  • From: SW Virginia
Posted by Gamera on Thursday, February 18, 2016 8:16 AM

Wow, how on earth did I miss this till now- fantastic work!!! 

"I dream in fire but work in clay." -Arthur Machen


  • Member since
    August 2013
Posted by Jay Jay on Thursday, February 18, 2016 7:59 AM

Ok Joe,

Ty so much for easing my frustration during searches . I now know better how to do it.


 I'm finally retired. Now time I got, money I don't.

  • Member since
    September 2011
Posted by fightnjoe on Wednesday, February 17, 2016 8:47 AM

Very very kind, thank you.


Jay researching is much of the fun of these for me.  Google and Ebay can be your close friends with it.  For me it starts with something simple such as, "P-40 Hydraulic system".  If such a search is empty play with the wording.  Somewhere you will find names for equipment, at that point you are golden.  Just keep searching for the different equipment and make sure you save the searches in a folder.  


Joe

Veterans,

Thank You For Your Sacrifices,

Never To Be Forgotten

Where you can find me:

Workbench on FaceBook  Google Plus  YouTube

  • Member since
    August 2013
Posted by Jay Jay on Wednesday, February 17, 2016 8:32 AM

Very impressive and wonderful scratch building job !

Thanks to your videos I understand how to build the various equipment etc.

My question is where do you find the information as to what radios, gear  etc. go into the aircraft?


 I'm finally retired. Now time I got, money I don't.

  • Member since
    June 2014
Posted by BrandonK on Wednesday, February 17, 2016 8:27 AM

So cool.

BK

On the bench:

A lot !! And I mean A LOT!!

2024 Kits on deck / in process / completed   

                         14 / 5 / 2  

                              Tongue Tied

  • Member since
    September 2011
Posted by fightnjoe on Tuesday, February 16, 2016 6:09 PM

You are all very kind.  Thank you.


Joe

Veterans,

Thank You For Your Sacrifices,

Never To Be Forgotten

Where you can find me:

Workbench on FaceBook  Google Plus  YouTube

  • Member since
    February 2014
  • From: Michigan
Posted by silentbob33 on Tuesday, February 16, 2016 5:57 PM
Amazing work as always Joe

On my bench: Academy 1/35 UH-60L Black Hawk

  • Member since
    April 2008
  • From: Fox Lake, Il., USA
Posted by spiralcity on Tuesday, February 16, 2016 3:03 PM

Fantastic work, I cant wait for some more. Beer


  • Member since
    January 2016
  • From: A Galaxy Far, Far Away
Posted by Hunter on Tuesday, February 16, 2016 1:31 AM

Wow Joe!!! Your build is amazing!!! I will definitely be watching every second of this build. BRAVO Sir, BRAVO Bow Down

Hunter 


  • Member since
    January 2009
  • From: hamburg michigan
Posted by fermis on Monday, February 15, 2016 11:38 PM

YesYes


If I had a third thumb...it'd be up too!

  • Member since
    September 2011
Posted by fightnjoe on Monday, February 15, 2016 10:55 PM

Moving right along with the interior work.


First up was to clean up the access door and then attach a backing plate.


Once that was completed I moved on to putting the stringers in place.  These are .020 hex rod.  


With that done the part of the builds that I truly enjoy could begin.  The interior work.


First up was to prep bulkheads 8 and 9 for radio equipment.  I took some time and set up the racks to mimic what I have seen in pictures.


The next step of course was to actually build up the radio equipment.  Now indulge me on this.  


From left to right.  Radio boxes both recieving and transmitting, dynamotor and antenna switch box, junction box, and the reciever and transmitter.


Now with that ready, before I can add the wiring, I am going to need to do some painting I think.  I may just move on and continue the construction of interior assemblies.  Thinking on this.


All comments, critiques, and criticism are encouraged.


Joe

Veterans,

Thank You For Your Sacrifices,

Never To Be Forgotten

Where you can find me:

Workbench on FaceBook  Google Plus  YouTube

  • Member since
    September 2011
Posted by fightnjoe on Tuesday, February 9, 2016 11:38 PM

Wow.  It really is amazing what can happen when we move past a stumbling block.


Just a bit of an update:


Work has commenced on the interior begining with the tail wheel assembly.  This does not represent 100% accuracy as I needed to make sure there was stability and strength as well.  


Before I go too far I really need to open up the access door on the fuselage.  For that first a template is made out of aluminium foil which is taped to an aluminium can, cut out, and cleaned up a bit.


Next is to drill out the door.  Let the drilling begin.


And drilled out.


Next will be to clean up the cut and then I can put in stringers and back plates.


All comments, critiques, and criticism are encouraged.


Joe

Veterans,

Thank You For Your Sacrifices,

Never To Be Forgotten

Where you can find me:

Workbench on FaceBook  Google Plus  YouTube

  • Member since
    September 2011
Posted by fightnjoe on Tuesday, February 9, 2016 11:37 PM

Many many thanks.


Joe

Veterans,

Thank You For Your Sacrifices,

Never To Be Forgotten

Where you can find me:

Workbench on FaceBook  Google Plus  YouTube

  • Member since
    February 2012
  • From: Olmsted Township, Ohio
Posted by lawdog114 on Tuesday, February 9, 2016 9:15 PM
Speechless...I got nothing. Just amazing work Joe

 "Can you fly this plane and land it?...Surely you can't be serious....I am serious, and don't call me Shirley"


  • Member since
    June 2003
  • From: Cavite, Philippines
Posted by allan on Tuesday, February 9, 2016 8:43 PM

If you dont call this "perfectionism," well....


Im very impressed with your work on this bird.

No bucks, no Buck Rogers

  • Member since
    September 2011
Posted by fightnjoe on Tuesday, February 9, 2016 7:34 PM

Many many thanks.


Joe

Veterans,

Thank You For Your Sacrifices,

Never To Be Forgotten

Where you can find me:

Workbench on FaceBook  Google Plus  YouTube

  • Member since
    June 2013
Posted by bvallot on Monday, February 8, 2016 11:11 AM

Coming along there Joe. =]

On the bench:  

Tamiya F4U-1  Kenneth Walsh


GAF
  • Member since
    June 2012
  • From: Anniston, AL
Posted by GAF on Sunday, February 7, 2016 9:51 PM

Joe,

Some really nice work going on here.  Glad you found the P-40 Blender file helpful.  Smile

Gary

  • Member since
    June 2014
Posted by BrandonK on Sunday, February 7, 2016 11:02 AM

Watching you do this makes me think doing the full PE F6F would be a breeze. Your skills here are amazing.

BK

On the bench:

A lot !! And I mean A LOT!!

2024 Kits on deck / in process / completed   

                         14 / 5 / 2  

                              Tongue Tied

  • Member since
    September 2011
Posted by fightnjoe on Saturday, February 6, 2016 3:37 PM

Many thanks to both of you.


Now...


Bonus material time....


As I started out today I thought why not show what I was doing.  Just a small assembly but it is worth the time.


Today I began by cleaning up the bulkheads.  Remember those....
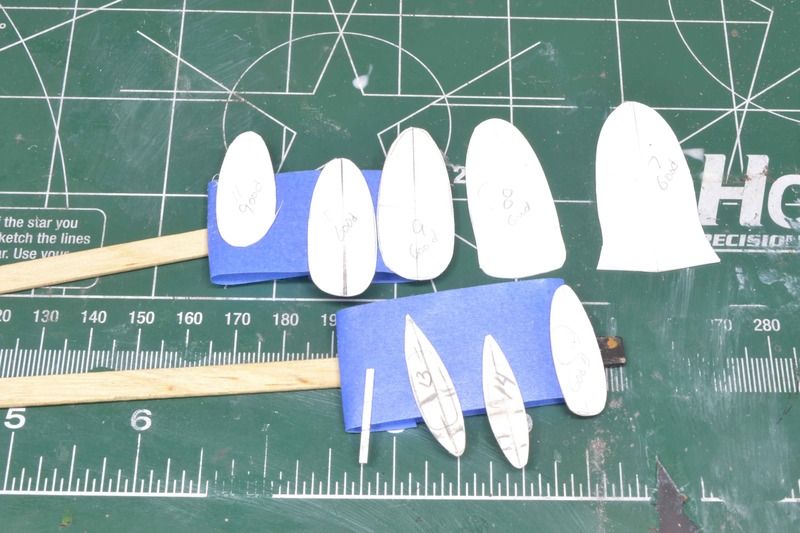


Well I began with punching out a hole, the largest my punch set has, and then using the dremel I worked the bulkheads out to where they looked more like they do in my drawings.  I then went in with 320 sandpaper and cleaned them up.
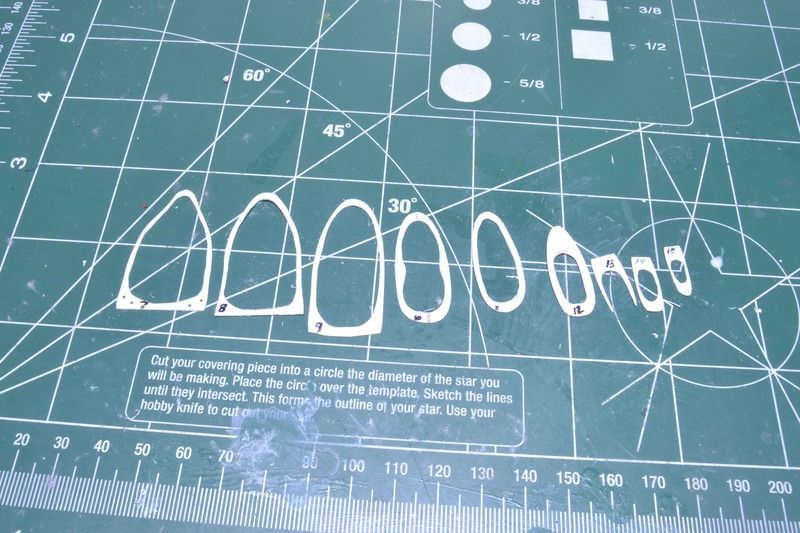


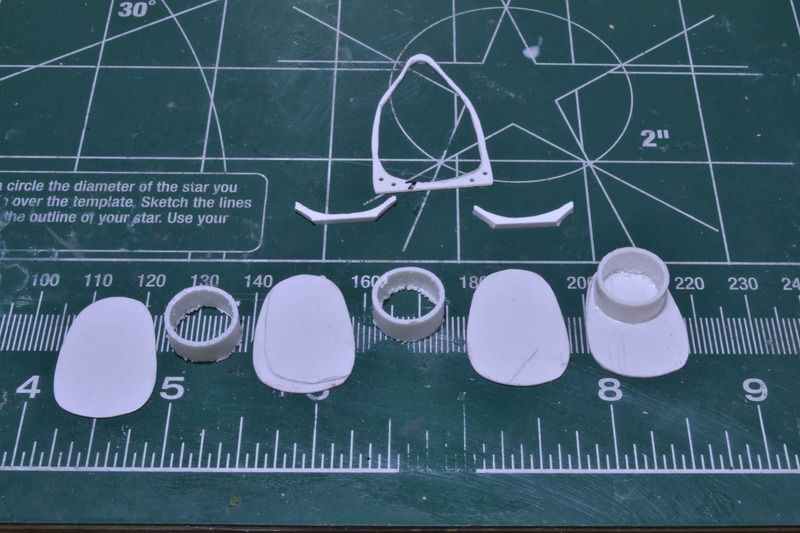
Once that was done I was able to start on the fuel cell.  Using bulkhead #7 as a reference I sketched out the form, that was cut out, cleaned up, and then used as a master to form 3 pieces of sheet styrene.  I then cut two pieces of tube styrene, size isnt important as long as it fits.  I glued the tube to the sheet and then put them all together.


I then used .010 sheet styrene and skinned the framework.  Also using the same bulkhead I fashioned a stand to keep the fuel cell in place.
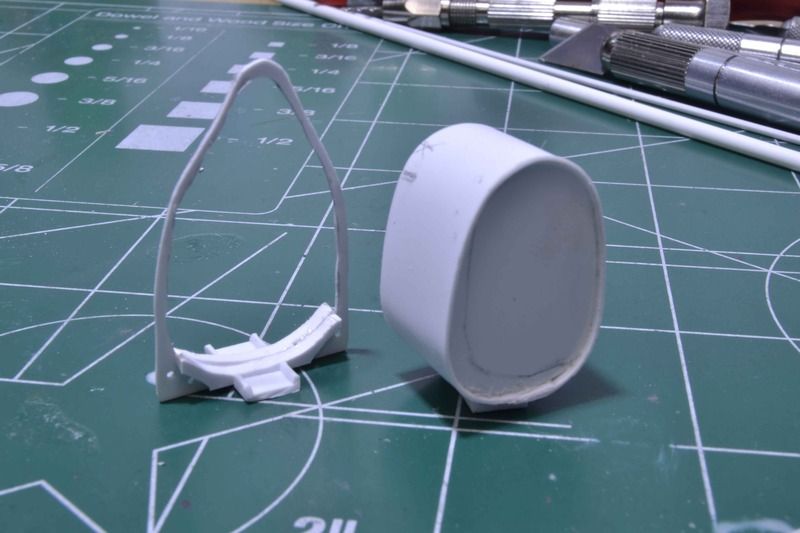


Just that simple.  


Ok next will be to continue to work the interior, most likely starting with the tail and moving forward.  I do need to add detail to most of the bulkheads as well as the fuel cell.


I hope you enjoyed the bonus.


All comments, critiques, and criticism are encouraged.


Joe

Veterans,

Thank You For Your Sacrifices,

Never To Be Forgotten

Where you can find me:

Workbench on FaceBook  Google Plus  YouTube

  • Member since
    March 2015
  • From: Streetsboro, Ohio
Posted by Toshi on Saturday, February 6, 2016 9:14 AM

This build is amazing!

Toshi

On The Bench: Revell 1/48 B-25 Mitchell


Married to the most caring, loving, understanding, and beautiful wife in the world.  Mrs. Toshi


  • Member since
    December 2003
  • From: 37deg 40.13' N 95deg 29.10'W
Posted by scottrc on Saturday, February 6, 2016 9:01 AM

Joe, this project is really looking swell from here.  Keep up the great work, its going to be a great looking representation when finished and worth the effort.  Also, thanks for the resource of the Blender 3D model, I was looking for it a while back and somehow couldn't find it.

Scott

  • Member since
    September 2011
Posted by fightnjoe on Friday, February 5, 2016 10:57 PM

Well it happened yet again.


Wing work volume 2.  


The ammo chute is redone, two frames are redone, and the stringers are now redone.  Seems every step forward is followed by two or ten steps back.


First was to strip out the offending parts.


Than with everything replaced.


I also had worked some on the flap interiors.


Now to move forward.  


All comments, critiques, and criticism are encouraged.


Joe

Veterans,

Thank You For Your Sacrifices,

Never To Be Forgotten

Where you can find me:

Workbench on FaceBook  Google Plus  YouTube

  • Member since
    September 2011
Posted by fightnjoe on Saturday, January 30, 2016 12:21 PM

You are very kind, many thanks.  I am glad you find inspiration in my attempts.


Fermis actually not OCD, more of I did a video and had to clean up the bench a bit to be able to film it without knocking everything onto the floor.


Joe

Veterans,

Thank You For Your Sacrifices,

Never To Be Forgotten

Where you can find me:

Workbench on FaceBook  Google Plus  YouTube

  • Member since
    June 2014
Posted by BrandonK on Saturday, January 30, 2016 11:07 AM

You do such great work. You inspire me to try similar things on my builds. This is pretty cool to watch.

BK

On the bench:

A lot !! And I mean A LOT!!

2024 Kits on deck / in process / completed   

                         14 / 5 / 2  

                              Tongue Tied

  • Member since
    January 2009
  • From: hamburg michigan
Posted by fermis on Saturday, January 30, 2016 8:30 AM

fightnjoe
 

All comments, critiques, and criticism are encouraged.


Joe

I was hoping to find some mess on/around your bench to criticize, but looks like your OCD is stronger than mine!!!

 Very fine work good sir!

JOIN OUR COMMUNITY!

Our community is FREE to join. To participate you must either login or register for an account.

SEARCH FORUMS
FREE NEWSLETTER
By signing up you may also receive reader surveys and occasional special offers. We do not sell, rent or trade our email lists. View our Privacy Policy.