SEARCH FINESCALE.COM

Enter keywords or a search phrase below:

Hasegawa D3A1 Type 99 "Val"

2745 views
12 replies
1 rating 2 rating 3 rating 4 rating 5 rating
  • Member since
    January 2015
  • From: Katy, TX
Hasegawa D3A1 Type 99 "Val"
Posted by Aggieman on Friday, December 7, 2018 1:13 PM

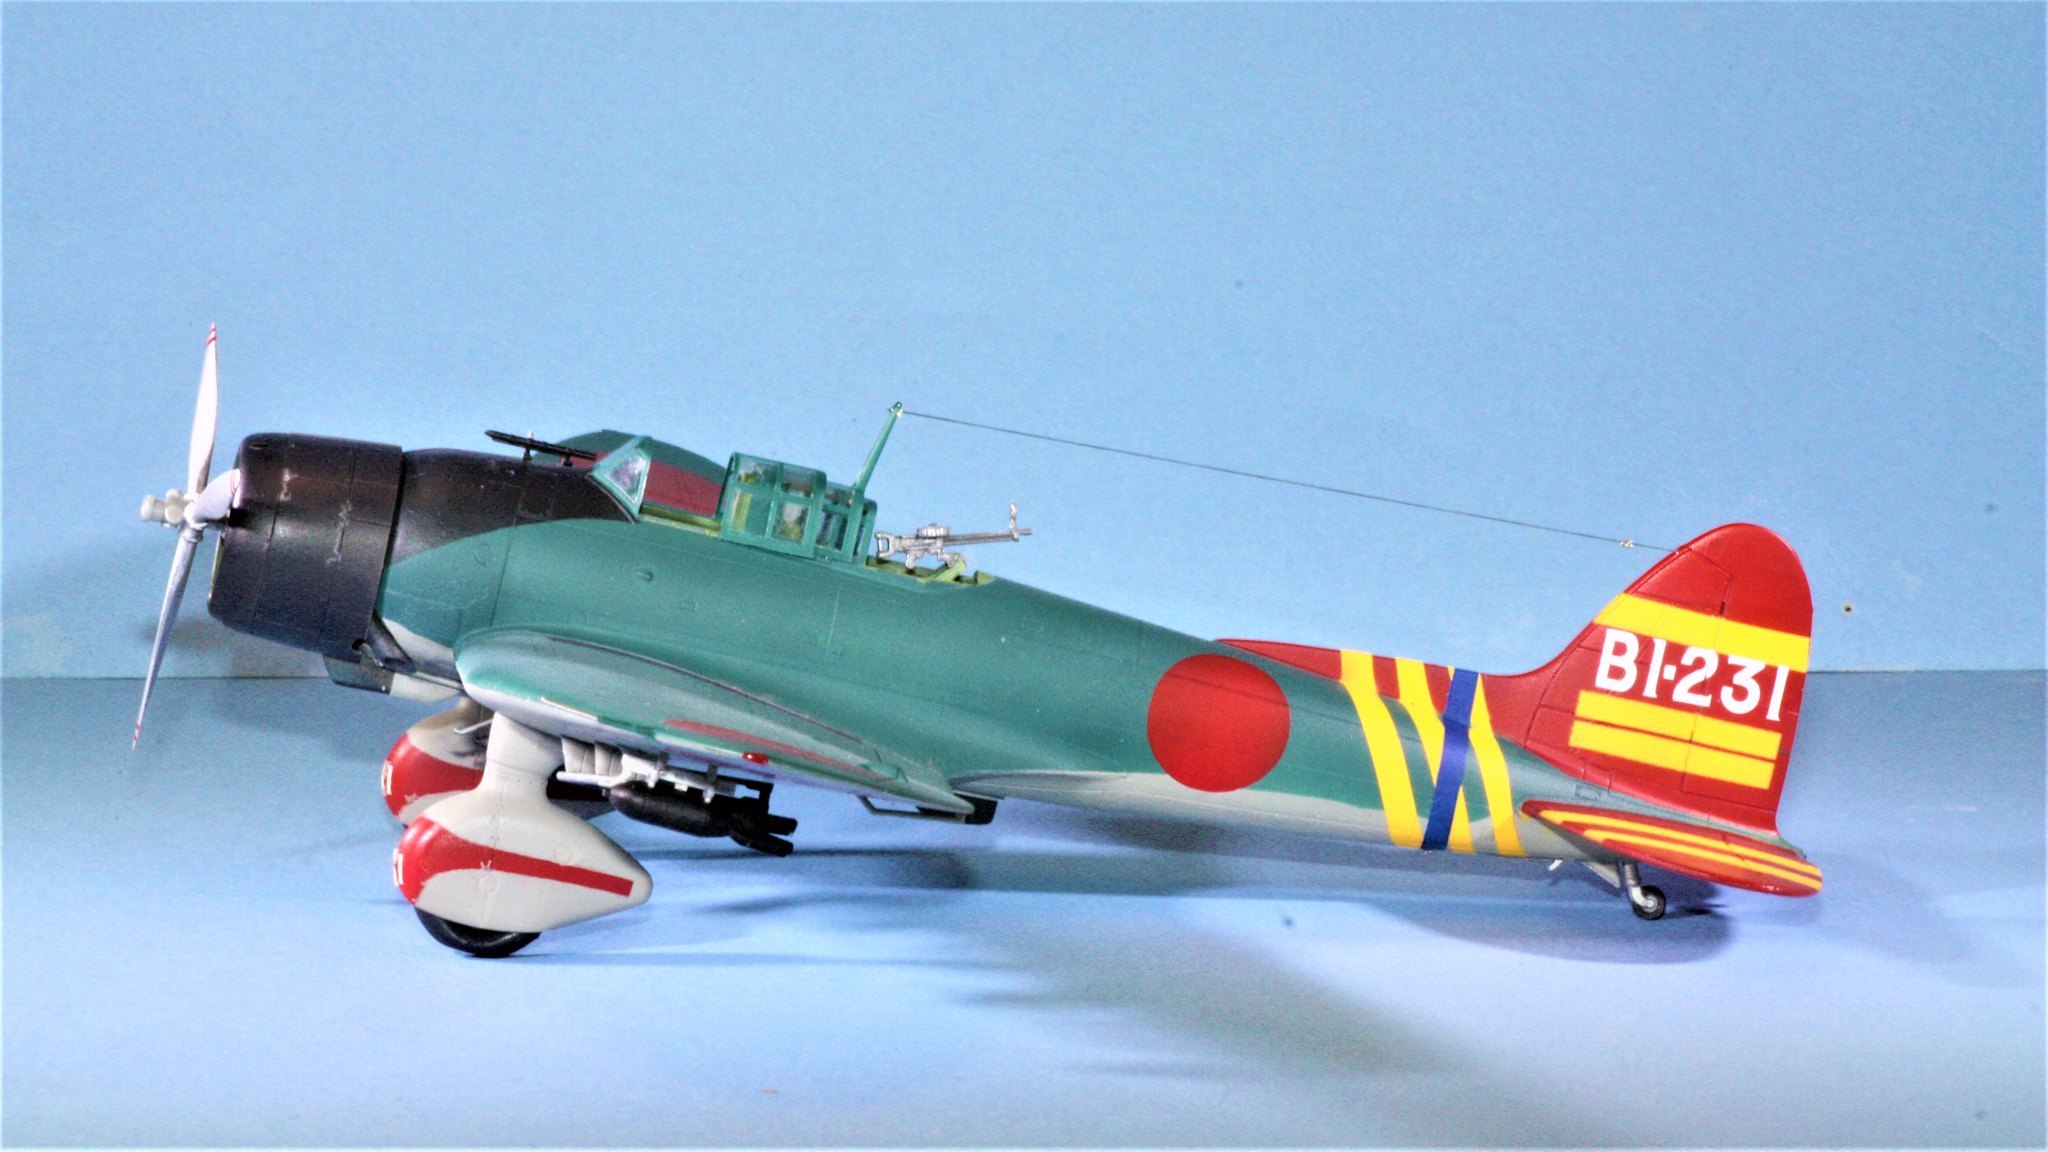
Here is the 14th build in my Year of the Axis Build, Hasegawa's Aichi D3A1 Val, one of my favorite airplanes.  

I still remember when I first visited the Nimitz Museum in Fredericksburg, Texas, and found this rusted hulk of what was obviously an airplane, sitting there in pieces really, and without even needing to read the accompanying signage, knew that I was looking at a Val.  It's an easy airplane to recognize given those huge, elliptical wings (like a Spitfire), and those Stuka-like landing gear boots.

I had built a Val previously.  It was the Nichimo kit that I found in a shop soon after I returned to this hobby in the mid 1990s.  That was the first Japanese kit I ever built, before I ever discovered the joys of Tamiya or the huge inventory of Hasegawa. Sadly, that build was lost in a shelving accident about a decade ago.  I grabbed this Hasegawa release to replace that earlier Val, with every intention of building it in the colorful scheme shown in the boxtop art.

The scheme is of the lead aircraft of the carrier Soryu.  Paints are a mix of Vallejo and Tamiya.  Markings are 99% paint, with Montex Masks and my own personal masks to account for much of the markings.  The only kit decals are in the instrument dials and the number "31" at the front of the gear boots.

I was disappointed with the Montex Masks for this kit.  Yes, they worked great, but the set did not included the fuselage stripes or the red swoosh on the gear boots.  I had to cut all that myself, and it took a bit of time to get it to this level.  Of course, once every thing was finished and I removed those masks, I noticed that the fuselage stripes were not really wide enough and were not placed entirely correctly, either.  But I figured I have three yellow stripes and a blue stripe, that's good enough.

This kit was a joy to build.  No construction issues what-so-ever.  I did have to leave the rear canopy off, as the instructions were not clear as to how to place the rear part of the canopy (diverging from the Hasegawa Kate, which was quite clear as to how to place that part).

I will admit to having a funny feeling while I was putting all the finishing touches on the Val and Kate this week.  I had my TV on to the funeral of President Bush.  I found myself wondering if he might have encountered either of these aircraft during his time flying the Avenger, and I actually felt a little guilty that I was doing these aircraft that represented a "villain" that he and many, many others like him had put their lives on hold for to go fight.  It was a wierd feeling, given how I hold him and those like him in such high esteem for what they did when they were young (and the fact that my own kid actually met President Bush prior to a Texas Aggie football game).  Well, the wierd feeling passed; I'm sure President Bush would have been perfectly fine with me doing these planes.

  • Member since
    April 2003
  • From: USA
Posted by keavdog on Friday, December 7, 2018 1:37 PM

Looks good!  Nice photos as well.  I'm a sucker for planes with wheel pants.  Hmmm, might be a interesting group build.  ;)

Thanks,

John

  • Member since
    December 2002
  • From: Northern California
Posted by jeaton01 on Friday, December 7, 2018 5:58 PM

Nice, Stephen.  I put the rear canopy on mine way up under the center section, I think I must have found some photos somewhere showing that way.

John

To see build logs for my models:  http://goldeneramodel.com/mymodels/mymodels.html


  • Member since
    February 2012
  • From: Olmsted Township, Ohio
Posted by lawdog114 on Monday, December 10, 2018 1:06 AM
Awesome! Nice to know there is Montex available for this kit. I'd bet 41 did encounter a few of these.

 "Can you fly this plane and land it?...Surely you can't be serious....I am serious, and don't call me Shirley"


  • Member since
    November 2009
  • From: SW Virginia
Posted by Gamera on Tuesday, December 11, 2018 11:38 AM

WOW!!! I'd have made a giant mess trying to mask the stripes and wheel spats- yours looks perfect!!! Heart

"I dream in fire but work in clay." -Arthur Machen


  • Member since
    June 2014
Posted by BrandonK on Tuesday, December 11, 2018 3:00 PM

I have this kit in the stash and I love the scheme. I hope when I do mine it looks half as good as yours. Super work.

BK

On the bench:

A lot !! And I mean A LOT!!

2024 Kits on deck / in process / completed   

                         14 / 5 / 2  

                              Tongue Tied

  • Member since
    January 2015
  • From: Katy, TX
Posted by Aggieman on Wednesday, December 19, 2018 9:24 AM

Thanks for everyone's responses to my Val!

  • Member since
    March 2012
  • From: Corpus Christi, Tx
Posted by mustang1989 on Wednesday, December 19, 2018 2:00 PM

That's one heckuva paint jog there bud. Good lookin' Val!!


 Forum | Modelers Social Club Forum (proboards.com) 

  • Member since
    March 2012
  • From: Corpus Christi, Tx
Posted by mustang1989 on Wednesday, December 19, 2018 2:02 PM

Aggieman
This kit was a joy to build. No construction issues what-so-ever.

Typical Hasegawa or Tamiya. I've had really good luck with building either one in terms of fit.


 Forum | Modelers Social Club Forum (proboards.com) 

  • Member since
    March 2003
  • From: Rain USA, Vancouver WA
Posted by tigerman on Wednesday, December 19, 2018 11:17 PM

I have the same kit Aggie. Well done again. I love all these Japanese A/C you're doing. How did you do such a great job on the masking of the anti-glare? I find that a bit daunting. I haven't tried it yet.

   http://i7.photobucket.com/albums/y269/wing_nut_5o/PANZERJAGERGB.jpg

 Eric 

  • Member since
    January 2015
  • From: Katy, TX
Posted by Aggieman on Thursday, December 20, 2018 11:09 AM

tigerman

I have the same kit Aggie. Well done again. I love all these Japanese A/C you're doing. How did you do such a great job on the masking of the anti-glare? I find that a bit daunting. I haven't tried it yet.


Thanks!

Basic math.  I took measurements (that were not precise, mind you) from the origin point where the anti-glare starts beneath the windscreen, and then where it completes near the underside of the fuselage in front of the cowling.  That gave me a rectangular reference that I transferred to a piece of paper.  I plotted the end points on the paper, then drew an arc between the two.  That took a couple of efforts to get to how I wanted it to look.  I then cut the paper along the arc and was able to verify how it looked against the actual model, after which I transferred to Tamiya tape and cut it out with a good knife (and taking my time with the cut so that the blade would not slip and I got what appears to be a smooth arc).

I then flipped the paper over to repeat the process for the other side.

  • Member since
    September 2006
  • From: Bethlehem PA
Posted by the Baron on Thursday, December 20, 2018 12:22 PM

That came out great, Aggieman, and thanks for explaining your techniques, especially for the masking.  That's my kind of modeling-you are faced with a problem, and you have to solve it with the tools you have on hand, and your experience.

The bigger the government, the smaller the citizen.


  • Member since
    November 2003
  • From: Naples, FL
Posted by tempestjohnny on Friday, December 21, 2018 5:06 AM
Great build. I've got the same one on the shelf. Built quite a few years ago. Yours is much better


JOIN OUR COMMUNITY!

Our community is FREE to join. To participate you must either login or register for an account.

SEARCH FORUMS
FREE NEWSLETTER
By signing up you may also receive reader surveys and occasional special offers. We do not sell, rent or trade our email lists. View our Privacy Policy.