SEARCH FINESCALE.COM

Enter keywords or a search phrase below:

Official Natural Metal Finish Group Build II

266068 views
1792 replies
1 rating 2 rating 3 rating 4 rating 5 rating
  • Member since
    June 2010
  • From: Austin, TX
Posted by DoogsATX on Saturday, September 4, 2010 1:54 AM

Julez, the 'Stang is looking all kinds of gorgeous! Masking sucks, but there's nothing like that feeling of peeling the tape away and seeing everything looking just so...

On the Bench: 1/32 Trumpeter P-47 | 1/32 Hasegawa Bf 109G | 1/144 Eduard MiG-21MF x2

On Deck:  1/350 HMS Dreadnought

Blog/Completed Builds: doogsmodels.com


  • Member since
    June 2010
  • From: Austin, TX
Posted by DoogsATX on Saturday, September 4, 2010 2:04 AM

Got back around to the Wildcats while I left the Dauntless' re-flat coat to cure. Assembled the side panel pieces, painted the headrests and painted the various bits that need to be black. Planning touch-ups, drybrushing, and details tomorrow. Might even try to get to the wash.

Also took my first stab at DIY belts using Tamiya tape and some PE bits snipped from Eduard belts. They still need touch-ups, detailing, wash, etc, but even at this early stage I don't think they look too bad at all. Definitely a lot easier to shove into a natural position!


On the Bench: 1/32 Trumpeter P-47 | 1/32 Hasegawa Bf 109G | 1/144 Eduard MiG-21MF x2

On Deck:  1/350 HMS Dreadnought

Blog/Completed Builds: doogsmodels.com


  • Member since
    March 2010
  • From: Brisbane
Posted by Julez72 on Saturday, September 4, 2010 5:11 AM

Doogs, very nice looking work on both officesYes


  • Member since
    September 2009
  • From: Frisco, TX
Posted by B17Pilot on Saturday, September 4, 2010 6:39 PM

Great work all around ya'll

Some WIP was made.  My AA757 is all painted. Got some touch paint to do that slipped through but all in all, not to bad, especially around the curved winglets where the NMF leading edge curves up.


  • Member since
    March 2010
  • From: Brisbane
Posted by Julez72 on Saturday, September 4, 2010 8:10 PM

Hey thats some nice paintwork B-17, very smooth....Great jobYes


  • Member since
    March 2003
  • From: El Dorado Hills, CA
Posted by IBuild148 on Saturday, September 4, 2010 8:40 PM

doogs,

The cockpits are looking good and I do like the seat-beltsYes

IBuildOne48

Teach modeling to youth!

Scalefinishes.com

http://i712.photobucket.com/albums/ww122/randysmodels/NMF%20Group%20build%20II/Group%20Badge/NMFIIGBbadgesmall.jpg


  • Member since
    March 2003
  • From: El Dorado Hills, CA
Posted by IBuild148 on Saturday, September 4, 2010 8:42 PM

SMOOOOOOOOOOOOTH NMF on  this 757. Yes

IBuildOne48

Teach modeling to youth!

Scalefinishes.com

http://i712.photobucket.com/albums/ww122/randysmodels/NMF%20Group%20build%20II/Group%20Badge/NMFIIGBbadgesmall.jpg


  • Member since
    March 2006
Posted by simpilot34 on Sunday, September 5, 2010 12:16 AM

Great work all round guys!!!!!Toast I more than likely won't be catching this build but definately(tentively speaking) catch the next one. Just so many GB's and friends hosting and in these GB's!!!! Still love being in the cheering section!!!

Cheers, Lt. Cmdr. Richie "To be prepared for war, is one of the most effectual means of preserving the peace."-George Washington
  • Member since
    June 2010
  • From: Austin, TX
Posted by DoogsATX on Sunday, September 5, 2010 2:38 AM

More progress tonight! Now that the Dauntless is done and off the bench, I expect the Wildcats to ramp up substantially.


Got the cockpits done tonight. Also got the gear bay trestle assemblies glued together, but those aren't interesting until they're painted...

It's funny...I spent like a quarter or a fifth the time on both these cockpits combined that I spent on the Dauntless cockpit. And I like these better.


On the Bench: 1/32 Trumpeter P-47 | 1/32 Hasegawa Bf 109G | 1/144 Eduard MiG-21MF x2

On Deck:  1/350 HMS Dreadnought

Blog/Completed Builds: doogsmodels.com


  • Member since
    March 2006
Posted by simpilot34 on Sunday, September 5, 2010 2:42 AM

Really nice looking orifices Doogs!!!!Toast

Cheers, Lt. Cmdr. Richie "To be prepared for war, is one of the most effectual means of preserving the peace."-George Washington
  • Member since
    June 2009
  • From: Netherlands
Posted by kermit on Sunday, September 5, 2010 3:38 AM

Julez, B17, Doogs and T-Bolt, great work boys, attaboys all around. Love your work!YesWink

Progress on the Mig is slooooow but steady LOL:

Richard

"Success is the ability to go from one failure to another with no loss of enthusiasm." - Sir Winston Churchill

  • Member since
    October 2007
  • From: Rhode Island
Posted by jmabx on Sunday, September 5, 2010 8:58 AM

Steven - I'm glad you managed to get the undercoat sorted out. Getting a smooth, consistent finish can sometimes be a pain in the a$$ on a big kit... especially one of that size! Wink

Julez - The Mustang is coming along nicely! Paint work looks nice and smooth.

Doogs - The cockpits look amazing! The belts look very realistic. They're just Tamiya tape with PE buckles?

B-17 - I'm really looking forward to seeing how the 757 comes out! I've never built a big airliner but I'm facinated with them. Nice work so far!

Kermit - What gives??? I've never seen you build this slow! Big Smile  The foil looks like it's going down pretty good... keep at it!

Jeremy    Propeller


  • Member since
    June 2010
  • From: Austin, TX
Posted by DoogsATX on Sunday, September 5, 2010 10:38 AM

B-17 - That 757 is intimidatingly good! I'm finally getting to the point where I'm pretty confident I can eliminate centerline seams from the canopy back to the tail on a WWII bird...but a giant cylinder like that? Gives me chills. Looks like you've nailed not only the NMF, but all the prep work under the surface, too!

Kermit - The foil looks great! Can't wait to see the whole thing done up with it! Don't know if I'll ever have the patience to foil an entire aircraft, but I'm thinking of using some BMF for the cowl rings and exhaust plates on my Lavochkin La-5. I still haven't figured out how people apply little slivers of the stuff to already-painted aircraft though. I mean without it sticking to everything else and then having to be pried off of already laid-down paint. Anybody got any tips?

jmabx - Thanks! The belts are just Tamiya tape and Eduard PE buckles. Painted the tape Vallejo Deck Tan and hit the seat with a sludge wash. That's it. Definitely using this technique in the future. 

On the Bench: 1/32 Trumpeter P-47 | 1/32 Hasegawa Bf 109G | 1/144 Eduard MiG-21MF x2

On Deck:  1/350 HMS Dreadnought

Blog/Completed Builds: doogsmodels.com


  • Member since
    September 2009
  • From: Frisco, TX
Posted by B17Pilot on Sunday, September 5, 2010 12:13 PM

DoogsATX

B-17 - That 757 is intimidatingly good! I'm finally getting to the point where I'm pretty confident I can eliminate centerline seams from the canopy back to the tail on a WWII bird...but a giant cylinder like that? Gives me chills. Looks like you've nailed not only the NMF, but all the prep work under the surface, too!

Fortunately you can't see all the fill spots and seam repairs under the paint and there was a lot.  Wink One section decided to break open and a thin layer of super glue solved that just before I was going to paint the NMF.


  • Member since
    June 2010
  • From: Austin, TX
Posted by DoogsATX on Monday, September 6, 2010 2:14 AM

Major construction on the 'cats tonight! Got the fuselages joined, cockpits installed (thanks for the tip about that, Richard!), and the wings built. So far, so good. 

Tomorrow I'm going to focus on getting the lower front fuselage installed. The fit of the gear bay trestles has been giving me headaches. Most of the upper detail that's causing problems won't be visible really anyway, so I'm contemplating some slashing and burning. After the Dauntless, I'm pretty fed up with interior detail that interferes with the fit of the outside of the plane.


On the Bench: 1/32 Trumpeter P-47 | 1/32 Hasegawa Bf 109G | 1/144 Eduard MiG-21MF x2

On Deck:  1/350 HMS Dreadnought

Blog/Completed Builds: doogsmodels.com


  • Member since
    March 2010
  • From: Brisbane
Posted by Julez72 on Monday, September 6, 2010 5:55 AM

Looking good there Doogs, Getting close to the NMF comparison, should be interestingYes

Heaps of work going on in here, what is 7 on the go right now 14 finished and a thousand posts already...And were only about 3 months into it....


  • Member since
    January 2015
  • From: Katy, TX
Posted by Aggieman on Monday, September 6, 2010 10:24 AM

Well, there's a saying about the best laid plans ... I had all kinds of good intentions for this holiday, daughter watching cartoons, wife not dressed for our day yet so voila!  bench time!

But alas, a major kink has derailed my hoped-for progress today.  As I was spraying the B-36 with alclad white aluminum, I realized that the quantity of paint remaining in the bottle was < the quantity of paint required to paint the entire B-36.  Nothing I can do about that save for purchasing more paint and waiting for the delivery service.  I did manage to get all of the upper surfaces painted and had just started on the under surfaces.  I left great swaths unpainted as there's no real reason to paint areas that I know will later be magnesium or dark aluminum or polished aluminum.

And on the good news front, it appears that all my leg work is going to pay off - I didn't see any signs of seams or that pitting that I worked feverishly at eradicating last week.  But it remains to be seen if that's truly the case as I just did a cursory examination while I was painting.  Once it is safe to pick up I believe I will take it outside into the sunlight to do a more thorough examination.

  • Member since
    March 2003
  • From: El Dorado Hills, CA
Posted by IBuild148 on Monday, September 6, 2010 2:14 PM

A little progress made on my Kansas Tornado:

Cockpit masked. Next prime and then the base coat of Alclad Semi Matt Aluminum with some panels done in Dull Aluminum. I am hoping this will achieve a "war weathered" look.

Canopy masked and painted black inside. Today I will prime the outside with gray and tomorrow Tamiya blue.

Guns painted using MM Gun Metal.

IMG_0015.jpg picture by xlt2002ms

Comments and suggestion's welcome.

On another note. There are 2 different props with this kit. Does anyone know which one to use? One on the left or the one on the right.

IMG_0004.jpg picture by xlt2002ms

As for the weapons and fuel tanks would all these be used on a "D" in some manner? I don't mean at the sametime.

IMG_0005.jpg picture by xlt2002ms


IBuildOne48

Teach modeling to youth!

Scalefinishes.com

http://i712.photobucket.com/albums/ww122/randysmodels/NMF%20Group%20build%20II/Group%20Badge/NMFIIGBbadgesmall.jpg


  • Member since
    June 2010
  • From: Austin, TX
Posted by DoogsATX on Monday, September 6, 2010 3:12 PM

IBuild - Loving the Razorback! A few comments and suggestions, if I might...

First, with the Alclad, you may want to check out this article: http://www.clubhyper.com/reference/nmfcb_2.htm. The guy uses Gregg Cooper's base coat/lightened coat/blending coat process and applies it to Alclad. Might be worth trying. I've also read (I think on Swanny's site) that sanding different panels with different grits or in different directions, etc, can change the way the Alclad looks when it goes down, for more variability.

Second, they're actually blast tubes on the P-47, so not necessarily finished in gunmetal. I've seen pics of some that were painted in whatever the plane was, others left bare aluminum, etc.  Because the muzzles were so far back, there was actually very little in the way of gun staining on the leading edges of the wings, so FYI for weathering. Master makes some droolworthy turned brass barrels if you're interested. Direct replacements on the Tamiya kit.

http://ultracast.ca/products/Master/48%20Scale/MAM-48-002/default.htm

Third, the prop. First, THIS POST has some great background on the four prop types the P-47 used (and a good look at the blast tubes in wartime, as well). Now, judging by the way the props look in the manual, I'd venture that's a 13' Curtiss-Electric cuffed paddle prop on the left, and a 12' Curtiss-Electric "toothpick" prop on the right. Judging by the photo of KT:

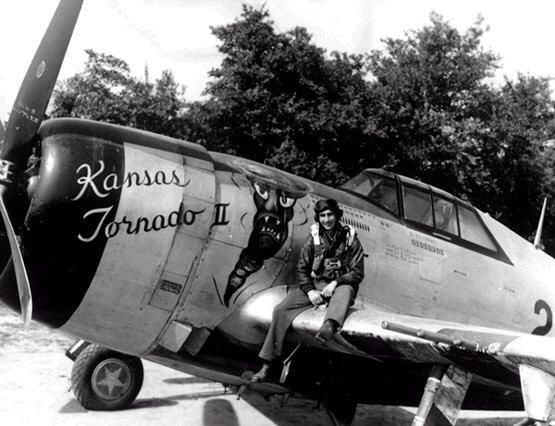
...I don't think either is correct. Sadly we can't see the propeller boss in this image, but going off of the blade shape, lack of cuffs, and the general look where the blades mount to the hub, I'm 99% sure this is a Hamilton-Standard paddle prop. But...there's a good chance that KT arrived from the factory with one of the Curtiss props and scavenged this one in the field. If you want to be a stickler for accuracy, Ultracast makes this prop for the Tamiya kit.

Can you tell I've been reading up on P-47s? Wink

On the Bench: 1/32 Trumpeter P-47 | 1/32 Hasegawa Bf 109G | 1/144 Eduard MiG-21MF x2

On Deck:  1/350 HMS Dreadnought

Blog/Completed Builds: doogsmodels.com


  • Member since
    March 2003
  • From: El Dorado Hills, CA
Posted by IBuild148 on Monday, September 6, 2010 5:38 PM

Doogs,

Thanks for the "bones"!!!

I have bookmarked the link on Alclad's because after reading it it was definitely what I was looking for and will use.

I checked out Ultracast and bought a set of the props and barrels. Never new they existed until now. Thanks for the heads up.

IBuildOne48

Teach modeling to youth!

Scalefinishes.com

http://i712.photobucket.com/albums/ww122/randysmodels/NMF%20Group%20build%20II/Group%20Badge/NMFIIGBbadgesmall.jpg


  • Member since
    July 2008
  • From: USA California
Posted by vetteman42 on Monday, September 6, 2010 10:27 PM

WOW!!!!!!!!!!!!!!! I havent taken a peek in here in a few days and I see the Mancaves have been in full swing. Things have been busy here on the home front and temps in my mancave have been in the 110+ for the last week. However I did get some work done today, nothing worth posting yet though.

Thunderbolt thats a great build you have finished there, from the quality I can see why it took you away from other builds. Very well done indeed ToastToast

The Wildcat cockpits are looking top notch, I have tried PE belts and I too hate them, tape works much better it think, at least for me.

Cant wait for the Jug its gonna be an eye popper me thinks Eats

Oh yes the 757 is getting close, very nice paint work and beautiful work hiding the seems my hat is off to you.

And the MiG-15 oh but she is lookin good, Richard I do believe you have the idea. Ya know sometimes slow is better Big Smile Its gonna be worth it in the end I promise you my friend.

Randy So many to build.......So little time

  • Member since
    January 2010
  • From: Nebraska, USA
Posted by CallSignOWL on Tuesday, September 7, 2010 8:08 AM

howdy!  I've just started construction on the MiG-21!  Smile

The OEZ kit comes with really thick plastic, and a dorsal spine that the previous owner already hacked off--which means I'm going to have to do some cutting on the tail to get the other dorsal spine(s) in the kit to fit.  The kit comes with the option of building an  -MF, -bis, or -SMT. (I think the difference between them is the dorsal spine)  But with the kits -MF spine hacked off, that left me with the -bis because it required less slicing of plastic--remember, the plastic is really thick!  Surprise

here are some preliminary photos! 


and the scheme I will be using:

here is an example of how thick some of these pieces are, and the hack job of the previous owner (it's really rough. I already know I'm going to be using filler....)


OWL

------------------------

Now that I'm here, where am I??

  • Member since
    June 2010
  • From: Austin, TX
Posted by DoogsATX on Tuesday, September 7, 2010 10:54 AM

Cripes, that's thick plastic! Almost looks like a resin kit!

On the Bench: 1/32 Trumpeter P-47 | 1/32 Hasegawa Bf 109G | 1/144 Eduard MiG-21MF x2

On Deck:  1/350 HMS Dreadnought

Blog/Completed Builds: doogsmodels.com


  • Member since
    June 2010
  • From: Austin, TX
Posted by DoogsATX on Tuesday, September 7, 2010 10:57 AM

Moving inexorably toward sanding/filling/priming and then what's sure to be a very LONG painting process.

The lower fuselage gave me some headaches, but I finally got everything to fit. Pretty sure I messed something up on the landing gear, though. It just doesn't look right... Huh?


On the Bench: 1/32 Trumpeter P-47 | 1/32 Hasegawa Bf 109G | 1/144 Eduard MiG-21MF x2

On Deck:  1/350 HMS Dreadnought

Blog/Completed Builds: doogsmodels.com


  • Member since
    October 2007
  • From: Rhode Island
Posted by jmabx on Tuesday, September 7, 2010 2:02 PM

OWL - Those OEZ kits look nice when they are complete. They can be fiddley though, especially when working over someone else's work! It will be a nice challenge for you! Whistling Smile

Doogs - I see the problem with your landing gear and I don't know how you'll solve it without removing the toothpicks! Stick out tongue  Put some small wheels and wheel pants on there and it could be a Cessna hybrid! Propeller  The Cats are looking good!

Jeremy    Propeller


  • Member since
    July 2008
  • From: USA California
Posted by vetteman42 on Tuesday, September 7, 2010 3:22 PM

CallSignOwl Eats

DoogsATX The Cats are looking good, however I cant wait to see how you handle the landing gear problem. Should be interesting Surprise

Randy So many to build.......So little time

  • Member since
    October 2007
  • From: Rhode Island
Posted by jmabx on Tuesday, September 7, 2010 5:00 PM

A little progress here with the P-59. The control sufaces on the kit are posable so I decided to drop the flaps. There were big gaps at the wing seam that you could see if the flaps were to be lowered so I filled them with some styrene sheet and rod.

No before pics but it looks much better! Yes

The nose is clear because there is a large landing light in the center. When test fitting it, it just didn't look right with a blank space behind the lens so I made a landing light out of scrap styrene and glued it inside. Hard to see but it's in there. Sorry no pics of how I made it as I was zooming along. Stick out tongue

The next step will be rescribing some lost panel lines and putting her together. That's all for now!

Jeremy    Propeller


  • Member since
    January 2010
  • From: Nebraska, USA
Posted by CallSignOWL on Wednesday, September 8, 2010 9:32 AM

DoogsATX,  and jmabx,   Those builds are looking great!I cant wait to see more! 

I finished the cockpit, and added in a few details. The Seat was really bare (I didn't include a 'before' picture, but I snapped a shot of the instructions. That was really all the detail!!) I built up the seat cushions using styrene sheet, and added belts made of masking tape. All in all, I think it looks pretty good. Definitely much better that before!  Smile

Much of the detail in this kit is recessed, and that includes the instrument panel. That's the first time I came across that. Most of the IP's I've seen have raised detail....

I added some styrene details on the side wall areas, because it was pretty bare. There was supposed to be a decal that goes there I guess...but no Instrument decals were included on the decal sheet!!  Tongue Tied  Oh well....

Enought talkin'! Here ya go!  Propeller


OWL

EDIT: oops! double picture!  Embarrassed

------------------------

Now that I'm here, where am I??

  • Member since
    June 2010
  • From: Austin, TX
Posted by DoogsATX on Wednesday, September 8, 2010 9:45 AM

OWL - I'm digging that seat! I've actually been thinking about seat cushions a little bit (less so since I got my Vector resin cockpit for the La-5 yesterday and beheld the gorgeous seat) and what to use that could give a bit of texture. Hmm...

On the Bench: 1/32 Trumpeter P-47 | 1/32 Hasegawa Bf 109G | 1/144 Eduard MiG-21MF x2

On Deck:  1/350 HMS Dreadnought

Blog/Completed Builds: doogsmodels.com


  • Member since
    June 2010
  • From: Austin, TX
Posted by DoogsATX on Wednesday, September 8, 2010 10:27 AM

Sadly, very little progress last night. I got the landing gear installed sans tires, so the Wildcats no longer look like beached manatees with little toothpick arms, and got to work sanding the join lines.

One minor point of aggravation is how these kits have you install the wing guns. First, you attach them to the lower wing, but they stick out through the upper wing, which, since the outer gun is more or less flush with the leading edge, makes fitting awkward. Second, their position right above the leading edge seam makes sanding difficult to near impossible. But then I'm typically a fan of being able to install things that protrude at the end of a build.

I'd been hoping to prime the engine and the inside of the cowl, but no dice. They say not to paint when it's raining, and over the last 24 hours we've gotten 11 inches of the stuff.

On the Bench: 1/32 Trumpeter P-47 | 1/32 Hasegawa Bf 109G | 1/144 Eduard MiG-21MF x2

On Deck:  1/350 HMS Dreadnought

Blog/Completed Builds: doogsmodels.com


JOIN OUR COMMUNITY!

Our community is FREE to join. To participate you must either login or register for an account.

SEARCH FORUMS
FREE NEWSLETTER
By signing up you may also receive reader surveys and occasional special offers. We do not sell, rent or trade our email lists. View our Privacy Policy.