SEARCH FINESCALE.COM

Enter keywords or a search phrase below:

ARMOR - Sherman Family Group Build

85533 views
2189 replies
1 rating 2 rating 3 rating 4 rating 5 rating
  • Member since
    November 2003
  • From: savannah ga.
Posted by GA.modelmaker on Sunday, January 25, 2004 8:38 PM
well not to much to report on the m7 priest been to sick to even mess with it. did mange 2night to get a few things done on it but not much. i am still hoping to build the m4a3 sherman with 60lb rocket if i dont get outbid for one again wont get much done on monday got court again and this should be good fireworks are going to burst on monday. by the way we have any lawers on the board whats the plenty for lying under oath? Big Smile [:D]Big Smile [:D]
  • Member since
    March 2003
  • From: Exit 7a NJ Turnpike
Posted by RAF120 on Sunday, January 25, 2004 7:30 PM
Thanks for all the kind words everyone.
I've been working on it most of the day today, so it look totally different. She's been painted, washed and I'm working on dry brushing. I not real happy with the color. I used a different OD paint then I'm use to and after the wash it came out a lot darker than expected.
Knowing what I know about OD paint during WWII, the color will be fine and my Sherman will look great when I'm finished.
Trevor Where am I going and why am I in this handbasket?
  • Member since
    July 2003
  • From: Philippines
Posted by Dwight Ta-ala on Sunday, January 25, 2004 7:24 PM
Now, I understand. Thanks for taking time in scanning those pics.

Thank you very much, Dan.

  • Member since
    March 2003
  • From: Newport News VA
Posted by Buddho on Sunday, January 25, 2004 6:24 PM
Dwight, I apologize for not being clear so I scanned the photo... Cool [8D]


I found another M51 photo too...


Hope this helps, Dan

  • Member since
    July 2003
  • From: Philippines
Posted by Dwight Ta-ala on Sunday, January 25, 2004 6:10 PM
Dan, thanks for the quick response but are those tight covers you are talking about made of canvas? Or is there also a glass cover to it?

  • Member since
    March 2003
  • From: Newport News VA
Posted by Buddho on Sunday, January 25, 2004 5:51 PM
Dwight, the book I had showed a tight fitting full cover.... I covered mine and am thinking of doing the same to the turret mounted 50 cal.

Dan

  • Member since
    November 2005
Posted by Anonymous on Sunday, January 25, 2004 5:39 PM
Whew... Kenneths behind... Ya'lls stuff is lookin great. I haven't gotten much done since it is down to the wire trying to finnish painting my (Sdkfz 171 headache) I don't know what will pop out of my shop at the end of this build, just have to wait.

Roll'on ya'll
  • Member since
    July 2003
  • From: Philippines
Posted by Dwight Ta-ala on Sunday, January 25, 2004 5:36 PM
Wow, nice progress everyone.

I hope I could say the same for me. Anyway I just have one question:

Is the flood/search light of the M-51 with or without glass casing / cover? All the ref pics I have shows them without glass covers.

Any info on this will be greatly appreciated.

  • Member since
    January 2003
Posted by shermanfreak on Sunday, January 25, 2004 5:26 PM
Bob - Optional for the .50 cal .... after glancing over some of the pics of the Kangaroo, few and far between as you well know. Some had them, and some didn't.
Happy Modelling and God Bless Robert
  • Member since
    November 2005
Posted by Anonymous on Sunday, January 25, 2004 5:11 PM
Thank you, Dan, Murry and Mark. Robert thank you , it wasn't easy, but I got some green on my tranny. Looks better that way. Now I need alittle advise. The kit comes with an optional .55 cal anti-tank gun to be mountd above the driver. What do you think?
  • Member since
    February 2003
  • From: USA
Posted by mark956 on Sunday, January 25, 2004 2:48 PM
Thanks for the progress pictuers Trevor and Bob. Excellent work so far.
mark956
  • Member since
    November 2005
Posted by Anonymous on Sunday, January 25, 2004 2:11 PM
Wow.......wow......(*thinking of something different to say...*) ...... wow.

The progress pics I've seen from everyone here are absolutely amazing. I am seriously impressed with everyone's efforts so far.

As for myself, I've gotten *started* by opening the box and oogling over the parts a bit. Not much more than a few parts glued together. I'm trying to finish off a 1/72 F-5 in Canadian aggressor colors before I jump into the Sherman. Almost done that one, so hopefully I'll transfer over to the Sherman factory next week...

Good job to everyone. I'm really enjoying the pics...!!

PS. Kudos to Robert for all of the unbelievable advice and encouragement to all of the builders here. I particularly like the emphasis on 'getting homework done' before working on the Shermans... You're a good man, Robert.

Murray
  • Member since
    January 2003
Posted by shermanfreak on Sunday, January 25, 2004 1:03 PM
Bob - your Kangaroo is coming together very nice.
If I may make one small comment on your interior in regards to the transmission. It would have been painted O.D. much like everything else so it would have a little more green look to it rather than a metal look to it.
The rest of the interior is looking very good.
Happy Modelling and God Bless Robert
  • Member since
    March 2003
  • From: Newport News VA
Posted by Buddho on Sunday, January 25, 2004 12:30 PM
Looks like most of the kits are coming together fine...the interior turret detail and Kangaroo shots look really good!

Regards, Dan

  • Member since
    November 2005
Posted by Anonymous on Sunday, January 25, 2004 12:25 PM
Finally got the hull together, now for the small stuff. Have a couple more pics. I've seen so many Great pics. Y'all are giving this rookie something to shoot for.Smile [:)]
  • Member since
    November 2005
Posted by Anonymous on Sunday, January 25, 2004 12:25 PM
.........i'm chanting...1/72-gotta get small...&...weathering will protect my first 1/72 sherman....in this m-4(a3e8)....for sure i'm leavin out the 2 side above plate thingys that hide the above tracks without them on...the appearence of...buddy your gonna get yourz is better brought out...nuuf said....non-toxic is drying....jeffl
  • Member since
    January 2003
Posted by shermanfreak on Sunday, January 25, 2004 11:54 AM
Trevor - looking great !!! Your timing with these pics is perfect too as we were just discussing the mountings for the .50 on the back of the turret.

Jeffl - spoken like a true addict ...... Jonesin' for plastic !!!!!
Happy Modelling and God Bless Robert
  • Member since
    November 2005
Posted by Anonymous on Sunday, January 25, 2004 11:06 AM
.............hi...great to be back...had a little work thing to take care of.....thats why i like 1/72...this morn i started my hasegawa m-4(a3e8)...feels great...and my hands have stopped shakin from the lack of model building during the last 2 1/2 weeks.....pics to be posted ...with glue drying i'm gonna try to catch-up with a few pages....jeffl
  • Member since
    January 2003
  • From: Utah - USA
Posted by wipw on Sunday, January 25, 2004 10:54 AM
Looking good, Trevor. I don't think mine's going to have an interior. I wouldn't know where to begin!

Bill
Bill ========================================================== DML M4A2 Red Army ========================================================== ========================================================== -- There is a fine line between "hobby" and "mental illness". (Author unknown)
  • Member since
    March 2003
  • From: Exit 7a NJ Turnpike
Posted by RAF120 on Sunday, January 25, 2004 10:50 AM
I went and bothered a friend of mine who could take some pics for me this morning just so I could post them here for you.
This is the hull with a little bit of interior. The turret's white because of the primer and spraying the interior flat white.
As I look at the pictures I just realizsed that I forgot to put on the little PE steps that are on the front of the tranny cover.( you can't see it in this one, but they are missing )

This is a closer look at turret.

This is some of the interior I did for the turret what you can't see is the scratch built radio at the back of the turret. Now I know it's not accurate but it looks better than bare walls.
Trevor Where am I going and why am I in this handbasket?
  • Member since
    January 2003
Posted by shermanfreak on Sunday, January 25, 2004 10:16 AM
Eric - sounds great !!

Bill - it would certainly make it something now would't it !!!
Happy Modelling and God Bless Robert
  • Member since
    January 2003
  • From: Utah - USA
Posted by wipw on Sunday, January 25, 2004 10:11 AM
QUOTE: At least you didn't glue the Panther suspension on the Shermie !!!


Wouldn't that make it kind of an Ersatz in revrese?? lol

Bill
Bill ========================================================== DML M4A2 Red Army ========================================================== ========================================================== -- There is a fine line between "hobby" and "mental illness". (Author unknown)
  • Member since
    February 2003
  • From: USA
Posted by mark956 on Sunday, January 25, 2004 10:04 AM
Very nice work Dan. Thanks for sharing the progress picture.
Thanks for the link Derek.
mark956
  • Member since
    November 2005
Posted by Anonymous on Sunday, January 25, 2004 9:16 AM
More cheek armour (different style).
http://www.2ndrangers.org/scrapbook/tankpics/tank1.htm
  • Member since
    November 2005
Posted by Anonymous on Sunday, January 25, 2004 6:14 AM
QUOTE: Eric - Once again, great build. Are these the final pics you want uploaded to the site?
If so .... e-mail me your build article and I'll tend to the site.


I'll take 4 good pics Robert and email them to you with a little write-up.
  • Member since
    January 2003
Posted by shermanfreak on Saturday, January 24, 2004 10:54 PM
Bill - really good to hear you got around that little problem. At least you didn't glue the Panther suspension on the Shermie !!!

Dan - your M50 is coming along great !!!!! Nice clean build.
Happy Modelling and God Bless Robert
  • Member since
    March 2003
  • From: Newport News VA
Posted by Buddho on Saturday, January 24, 2004 10:43 PM
The latest update photo: I covered the floodlight and behind the gun mantlet with tissue and white glue. The turret and upper hull is almost ready for priming; the front and the right hand side need finishing. As for the 50 cal on the turret, I am thinking of throwing a tarp on it. I found a figure that I might use..too.


Dan

  • Member since
    January 2003
  • From: Utah - USA
Posted by wipw on Saturday, January 24, 2004 10:14 PM
Near disaster strikes!! (I really shouldn't be doing this and the Panther at the same time!!)

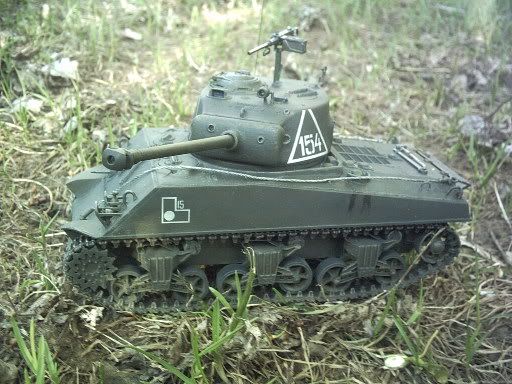
Banged Head [banghead]Banged Head [banghead]Banged Head [banghead]I've been having trouble with the exhaust shroud for my DML Firefly, Robert assured me his fit perfectly, but mine was really a mess. Tonight, I discovered that while comparing my two Firefly Vs together (Both DMLs. Their 2nd version and their new 3rd version), I put the A sprue from the 2nd version in the 3rd version box and vice versa. Duhhhh.Dunce [D)]Dunce [D)]Dunce [D)] So, I've been gluing the new parts onto the old hull. I've had the rear hull plate glued to the lower hull for at least a week, as well as 6 support pieces that go under the bogy mounts. I didn't think I'd be able to get them off, but by putting a pretty healthy amount of liquid cement on the inside of the seams, I managed to get all 7 parts off the wrong hull. The only partial casualty out of the whole thing (other than my wounded pride) is the exhaust shroud for the old kit. I had already modified it by cutting down some of the ribs to make it fit "properly". Now that I've got the right parts sorted out, it should go much smoother. But I will be checking parts a little more closely from now on!!
Bill ========================================================== DML M4A2 Red Army ========================================================== ========================================================== -- There is a fine line between "hobby" and "mental illness". (Author unknown)
  • Member since
    February 2003
  • From: USA
Posted by mark956 on Saturday, January 24, 2004 9:32 PM
Thanks for the update pictures Mike. Very nice.
mark956
  • Member since
    November 2005
Posted by Anonymous on Saturday, January 24, 2004 8:56 PM
Thanks for the help guys - it's gonna get a(nother) plank and some stowage!

Today I did the bogies (didn't mount them yet) and upper hull, tomorrow I start on a quick 'n dirty interior like Mike's.
JOIN OUR COMMUNITY!

Our community is FREE to join. To participate you must either login or register for an account.

SEARCH FORUMS
FREE NEWSLETTER
By signing up you may also receive reader surveys and occasional special offers. We do not sell, rent or trade our email lists. View our Privacy Policy.