SEARCH FINESCALE.COM

Enter keywords or a search phrase below:

Turetless AFV....Jan 1st 2010....now open!

33053 views
185 replies
1 rating 2 rating 3 rating 4 rating 5 rating
  • Member since
    November 2012
Posted by dioramator on Thursday, February 25, 2010 9:40 PM

Hi Guys, mind if I join in?

I have a 1/35 Dragon StuG III Ausf. A, Michael Wittmann 'LAH' Barbarossa 1941. (really long kit name).

I'll be building basically straight out of the box, with Wittman at the helm, and basic grey paint.

this is actually part of a larger diorama project, marching beside the StuG will be the Dragon Wehrmacht Infantry Barbarossa 1941, and I will be building the MiniArt Polish City Building as a backdrop. (I'll try not to bore you with the details of the rest of the diorama for the group build, but they may pop up in WIP photos, every now and again).

I have just washed all the sprues, and they are currently drying as I type.

Brett


  • Member since
    July 2008
  • From: Vancouver, the "wet coast"
Posted by castelnuovo on Friday, February 26, 2010 9:32 PM

Hi dioramator, wellcome to the thuretless club. Welcome Sign I have added you to the list.

Cheers...

  • Member since
    August 2009
  • From: Cary, North Carolina
Posted by M1Carbine on Monday, March 1, 2010 10:51 PM

How we looking on the badges?


Bob

  • Member since
    July 2008
  • From: Vancouver, the "wet coast"
Posted by castelnuovo on Tuesday, March 2, 2010 12:45 AM

They are on the first page, just scroll down. I like them both...I don't know...chose one. Smile

Cheers....

  • Member since
    August 2009
  • From: Cary, North Carolina
Posted by M1Carbine on Tuesday, March 2, 2010 10:24 AM

Ahhhh....Thank you Castelnuovo


Bob

  • Member since
    July 2008
  • From: Vancouver, the "wet coast"
Posted by castelnuovo on Thursday, March 4, 2010 1:11 AM

Finally...Took me 2 months for this. I am teling you, babies and modeling are a hard mix Smile

Cheers...

  • Member since
    December 2006
  • From: t.r.f. mn.
Posted by detailfreak on Monday, March 8, 2010 3:42 PM

I just want to chime in and let everybody know that what I've seen so far looks great. And now for a short update,most of the work has been centered around the lower hull with pieces of the verlinden engine compartment being permanently fitted. The Verlinden engine compartment I purchased used on E-bay and it was not in usable condition. The radiator and fan support was warped and cracked requiring a scratchbuilt replacement. Sorry the photos do'nt show this. The lower hull was primed and the exterior painted in my own blend of dark yellow. any questions or comments are welcome.

[View:http://s172.photobucket.com/albums/w1/g-earl828/]  http://i158.photobucket.com/albums/t104/cycledupes/1000Roadwheels4BuildBadge.jpg

  • Member since
    December 2006
  • From: t.r.f. mn.
Posted by detailfreak on Tuesday, March 23, 2010 8:49 PM

Darn near had to travel all the way to page three to dig this thread back up.whew!Crying

[View:http://s172.photobucket.com/albums/w1/g-earl828/]  http://i158.photobucket.com/albums/t104/cycledupes/1000Roadwheels4BuildBadge.jpg

  • Member since
    July 2008
  • From: Vancouver, the "wet coast"
Posted by castelnuovo on Wednesday, March 24, 2010 4:05 AM

Must have been a hard dig Big Smile. Thanks...I just received my Hetzer from Sprue Bros today. It is 2am, baby is sleaping...hmmmm...perfect time to open the box Confused ,maybe?

Can you spel insomnia Crying Arghhhhh....

  • Member since
    July 2008
  • From: Vancouver, the "wet coast"
Posted by castelnuovo on Sunday, April 4, 2010 5:22 PM

Finally some work done that is not job or baby Smile . Lots mor to go

cheers....

  • Member since
    April 2005
Posted by Thunderbolt379 on Monday, April 5, 2010 6:55 AM

Hi all,

I finally managed to get back to my Trumpeter Strv 103B after a month in which my PhD was at last submitted -- what a job that was!

The oil filter weathering is nearing completions, a little more rust spotting to go, and the drybrushing is done. Here she is with the running gear dismounted for weathering:


Some cleanup, drybrush for bare metal, then decals, small fittings, unmask the periscopes, wash and drybrush the tracks, fit them and the return rollers, make and fit a pair of antennas and this beast will be done -- my first completed later-tool Trumpeter, and a very nice project indeed.

Cheers, Mike/TB379

http://worldinminiature.blogspot.com/

  • Member since
    March 2007
  • From: NJ
Posted by JMart on Tuesday, April 20, 2010 3:23 PM

Castelnuovo – congrats on the finish! Looks good from here, cheers.

Detailfreak – great detailing so far, look forward to the rest.

Mike – Congrats (again!) on your PhD. Love your build so far.


  • Member since
    April 2005
Posted by Thunderbolt379 on Thursday, April 22, 2010 8:10 AM

Thanks Jmart!

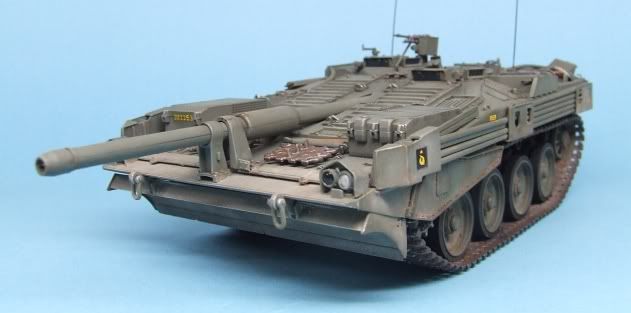
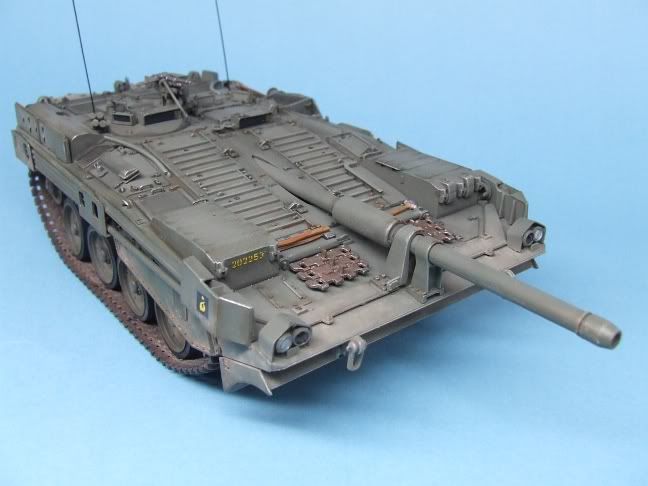
Well, guys, I took a headlong dive the last couple of days and the Trumpeter 1:35 STRV 103B is done!

There are a few things I'd do differently in future, like replace the barrel with a turned AM (I didn't have time or the cash this time, as it is I might invest in a camo net to wrap the barrel with as despite all gluing, filling and sanding, there is a distinct seam down the left side); I might be more careful with some of the accessory painting; and I might drop the dozer blade and take a crack at some mud...

As it is, she was a sweet and friendly build of an unusual subject. The shovels are very flimsy, two of them broke, which is why only one is stowed, and the observant will note the handle is over the cleat instead of under it -- my tweezers have gone missing, when I replace them I'll remove the cleat and reattach it through the handle.

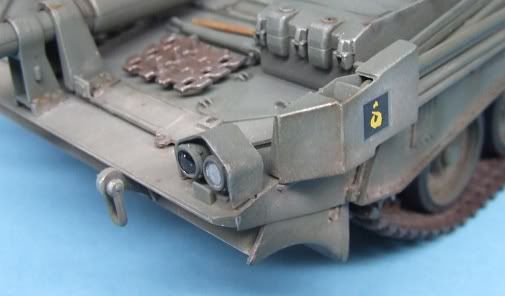
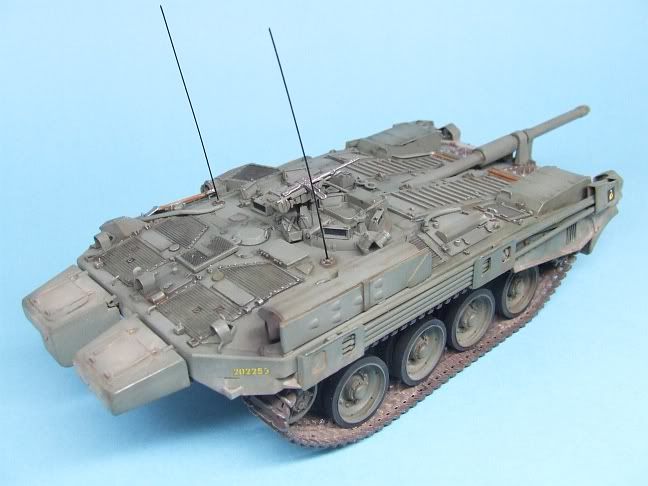
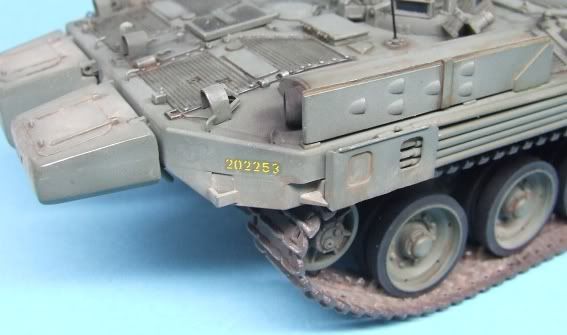
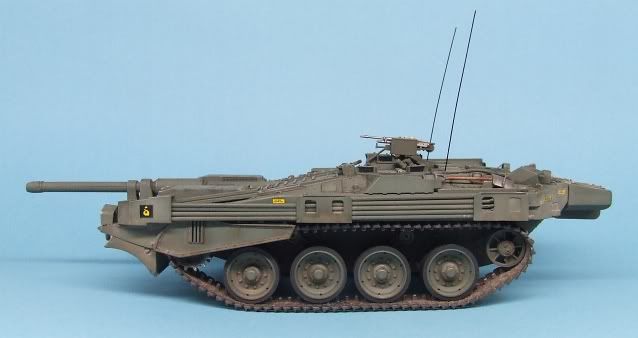
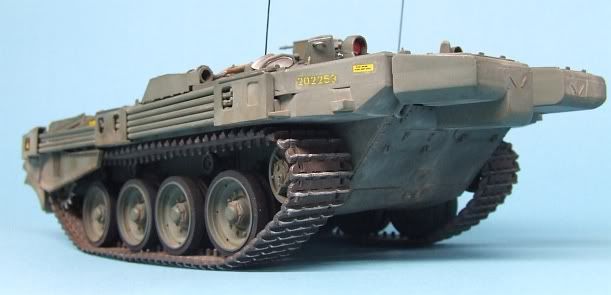
The periscopes were all painted early and masked with slivers of Tamiya tape, a technique which seemed to work very well and which I'll use again in future. The model was painted with Tamiya acrylics, washed with oils, drybrushed with enamels, and dusted with MiG "Dry Mud" pigment. One of the decals disintegrated (one of the four yellow placards), and the "TELEFAX" decal which goes on the stowage compartment at rear top left was totally incooperative, and basically invisible against the paint, so it also is absent. The antennas are my usual .015" steel wire, and very fragile as I didn't drill the receivers deeper with a .020" bit: if they fall off, I'll do that at aclater date. Thier height is 65mm, calculated from the height of antennas in various photos of the real thing, though there is evidence for a shorter version too.

Unlike my previous brush with Trumpeter armour, these tracks actually fit, in fact they were a fraction long. The vinyl did not react with superglue at all, so I stitched the tracks together through adjacent sprocket holes with black thread, then glued the locator flap for good measure.

Anyway, on with the pics:


This is my first completed Trumpeter kit and I'm very happy with it -- highly recommended!

It's been a fun build and interesting to do something very different; comments and suggestions are welcome. Thanks for looking!

Cheers, Mike/TB379

PS: With current workloads I'm not at all sure of getting to the Italeri Jagdpanzer IV L/70... It might have to ride the shelf for a later date, but I'm keeping my options open at the moment!

http://worldinminiature.blogspot.com/

  • Member since
    July 2008
  • From: Vancouver, the "wet coast"
Posted by castelnuovo on Sunday, April 25, 2010 1:26 AM

Good work thunderbolt Toast. I love unusual wehicles, I may buid the s-tank myself one day.

Here are few photos of my humble Hetzer.

The flash was acting up, so no flash on this one.

  • Member since
    April 2005
Posted by Thunderbolt379 on Wednesday, April 28, 2010 8:13 AM

Hi castelnuovo -- that's a bold mud job! To this day I've not plucked up the nerve to smear mud over my paintwork, and that's a leap I must make one of these days!

Well, somewhat surprisingly, I've managed to make a start on the Italeri Jagdpanzer IV /70, picking it up from the point I left it sometime a year or more back, which was lower hull assembled, suspension added, rear hull from the Cavalier set installed, and glacis fittings shaved away ready for the zimmerit. I've resumed swith the rest of the lower hull components, the glacis is fitted and the joints filled, and I've shaved away unneeded detail on the fenders, plus filed the fit of the resin rear plate to allow the fenders to slip into place. The kit is largely "flat-pack" and while this allowed the moulding of a heap of underside detail that Tamiya simply omitted from their early Panzer IV kits, the cost is glaring gaps and comparatively fragile structures -- it's always a trade-off.

I'll get a WIP shot up in the near future, when the filler is sanded and the fenders added.

Cheers, Mike/TB379

http://worldinminiature.blogspot.com/

  • Member since
    April 2009
  • From: Carmel, IN
Posted by deafpanzer on Wednesday, April 28, 2010 10:40 PM

TB-  Hello again!  Well done with your build... I like it very much. Military TV channel was talking about this very tank few weeks ago and I thought it was one real cool tank!  You have made Swedish folks proud if I am correct that they designed the tank?  Looking forward to see your WIP on Jagdpanzer soon...

Castelnuovo- Nice work... I have to get one of those Hetzer kits!  My shelves are running out of its space FAST...

Detailfreak-  I have good news... I LOVE details so keeping posting pictures! Yes


Andy

  • Member since
    April 2009
  • From: Carmel, IN
Posted by deafpanzer on Thursday, April 29, 2010 10:21 PM

Here I am... Tamiya Stug III Ausf. B with tracks from Modelkasten.  I forgot how easy it was to build a Tamiya kit... only took me two nights.  There was not many parts and it much less detailed.  A nice break from my recent build DML 234/1 for 8X8 GB...

This kit has a cool feature... metal springs for the tracks and it was fun!

Only thing I am disappointed with this kit... insufficent and poor interior details.  I wish I ordered an AM kit for this time...

L

Love those wheels... only kdding!

 Plenty of sanding coming up... so many holes and marks had to be patched. 

Weather outlook shows lots of rain over the weekend... it means more time for me on this! (Rubbing hands)  Plan to apply primer and airbrush grey panzer.  Feel free to comment if you have anything to say... thanks for looking.


Andy

  • Member since
    April 2009
  • From: Carmel, IN
Posted by deafpanzer on Tuesday, May 4, 2010 1:23 PM

Guys,

How many of you have done one of those Modelkasten tracks?  WOW!  It took me forever to assemble but it was my first time and it looked great.  It took me about six hours cutting, sanding and gluing the tracks.  Maybe it will be shorter next time...

After being cut and sanded... zillions of parts in an organizer bin. 


Comparison of Tamiya's rubber tracks and Modelkasten plastic tracks... you can see why MK is far superior.  Only thing I wish it didn't take me that long... is there any good tip to speed up the work on MK tracks? 

Andy

  • Member since
    December 2006
  • From: t.r.f. mn.
Posted by detailfreak on Wednesday, May 5, 2010 6:15 AM

tracks look darn good even if they are a job. the set I used did not have seperate guide horns hmmm..keep them updates rollin in Deafpanzer.Yes

[View:http://s172.photobucket.com/albums/w1/g-earl828/]  http://i158.photobucket.com/albums/t104/cycledupes/1000Roadwheels4BuildBadge.jpg

  • Member since
    December 2006
  • From: t.r.f. mn.
Posted by detailfreak on Sunday, May 9, 2010 12:26 PM

Mostly exterior work been done.No permanent assembly yet.engine and fighting compartments not finished.Rear deck zim. done using spot putty and the atak supplied tool.Not to bad for a first attempt.Comments welcome.


[View:http://s172.photobucket.com/albums/w1/g-earl828/]  http://i158.photobucket.com/albums/t104/cycledupes/1000Roadwheels4BuildBadge.jpg

  • Member since
    April 2009
  • From: Carmel, IN
Posted by deafpanzer on Sunday, May 9, 2010 7:02 PM

DF, I regret to inform you that I have fallen in love with you zimm!  I have to try it one day... AM zimm kit I recall?  I see that you haven't painted the tracks... I haven't either because I am not sure if I should apply primer paint to the tracks or not.  Any tip if you have done this before?  Thanks buddy!

Andy

  • Member since
    December 2006
  • From: t.r.f. mn.
Posted by detailfreak on Sunday, May 9, 2010 9:06 PM

I used to use krylon ruddy brown primer but have started using krylon ultra black,which Ibelieve work better. Those MK's are nice but with these mitts I found them easy to pull apart.But they do hold up.bet I fanagled them back together 20 times.Always thought I would like to have a burlap sack full of fruils of alltypes.But then they would fall from the sky and land on me.So think I'll stick to magic tracks..

[View:http://s172.photobucket.com/albums/w1/g-earl828/]  http://i158.photobucket.com/albums/t104/cycledupes/1000Roadwheels4BuildBadge.jpg

  • Member since
    April 2009
  • From: Carmel, IN
Posted by deafpanzer on Thursday, May 20, 2010 11:24 PM

Thanks Detailfreak!  I bought and used Krylon black spray instead of its primer spray.  It worked just GREAT on the MK tracks.  Looks like I owe you one Beer ...

Despite my busy schedule, managed to paint my Stug... Italian Brown as primer.  Black paint for darker shades.  Hopefully I don't overspray so it will work. 

Don't we all love those wheels... too many!  Planning to paint Panzer Gray over the weekend...

I did something dumb... airbrushed for two hours and half... without wearing my mask. Ick! I just completely forgot! Bang Head Good enough my throat was very irritated next day... never again!

Two hours and half just for my kit?  Nope, helping my son with his helicopter that he bought at AMPS show in Auburn.  Just a quick side build to make my son happy... he really wanted that helicopter.  Sorry I tried to get him to buy a tank and I failed.  Sorry buddies!  Shut your eyes if you don't like wingy things... enter at your own risk!  Decals coming up...

You guys have a good one!  Feel free to join my movement against those cheap Revell kits one day...

Andy

  • Member since
    December 2006
  • From: t.r.f. mn.
Posted by detailfreak on Friday, May 21, 2010 9:17 AM

Now just look at what that Wingy thing did to your eyes,man that may be non-revesible..LOLYes

[View:http://s172.photobucket.com/albums/w1/g-earl828/]  http://i158.photobucket.com/albums/t104/cycledupes/1000Roadwheels4BuildBadge.jpg

  • Member since
    April 2009
  • From: Carmel, IN
Posted by deafpanzer on Tuesday, May 25, 2010 12:10 AM

My eyes have recovered since the airbrushing without my mask incident.  I didn't do anything to my Stug over the weekend because my sons kept me busy with their builds.  Finished the helicopter for my youngest son then started a new kit for my oldest son which is an Italeri M48 Patton tank BUT this time he is doing more for himself under my supervision... he's ten years old and I think he is ready to take on.  

Here's my update from my work tonight...

The hardest part is finally over... the wheels!  Used circle template for the job. 

I hope I didn't go too crazy... gave the rubber rims dents and scratches like I have seen in the photos.  Sorry about the photo quality...

I still need to paint the interior before I can start the weathering stage.  Have a good one!

Andy

  • Member since
    December 2006
  • From: t.r.f. mn.
Posted by detailfreak on Tuesday, May 25, 2010 10:05 AM

I'll bet the kids keep you busy.It's nice to know that there's a future generation that's hooked on styrene..The Stug is looking field ready my friend..Any plans for a display base?Yes Just messing around with the wiring on the multiple radio sets on the stug G and also threw together a stug B.The dragon offering,that was the first kit in a long time that I built oob.I will post pics later today.Must go outside and survey yesterdays storm damage.Crying

[View:http://s172.photobucket.com/albums/w1/g-earl828/]  http://i158.photobucket.com/albums/t104/cycledupes/1000Roadwheels4BuildBadge.jpg

  • Member since
    December 2006
  • From: t.r.f. mn.
Posted by detailfreak on Saturday, May 29, 2010 6:02 PM

Well I still have'nt got my *** in gear and taken any new pics as I have'nt made much progress. But I did have to bump us back to the front page.Hey Deafpanzer do you get the impression that we are the only active participants in this G.B.?Whistling

[View:http://s172.photobucket.com/albums/w1/g-earl828/]  http://i158.photobucket.com/albums/t104/cycledupes/1000Roadwheels4BuildBadge.jpg

  • Member since
    April 2009
  • From: Carmel, IN
Posted by deafpanzer on Sunday, May 30, 2010 7:06 PM

Hey DF!  Yup, it has been  just two of us for a while... it is my second GB so far since returning to my hobby so I noticed it is not like the last one.  I guess we will keep each other company until we finish our build. 

I haven't done much at my end either and I hope I can do some work for next two days before I travel to Kansas for 5 days on Tuesday.

Andy

  • Member since
    December 2006
  • From: t.r.f. mn.
Posted by detailfreak on Sunday, May 30, 2010 7:10 PM

Hey Deafpanzer,I'll hold the fort down while your 'e gone.Perhaps I wil have some more progress to show.

[View:http://s172.photobucket.com/albums/w1/g-earl828/]  http://i158.photobucket.com/albums/t104/cycledupes/1000Roadwheels4BuildBadge.jpg

  • Member since
    December 2006
  • From: t.r.f. mn.
Posted by detailfreak on Friday, June 4, 2010 1:07 AM

Ok,new pics. Not so much building as it has been fitting. First two coats of paint on the tracks,some work on the radio's and such .So any questions or comments,fire away.


  ThanksSleep

[View:http://s172.photobucket.com/albums/w1/g-earl828/]  http://i158.photobucket.com/albums/t104/cycledupes/1000Roadwheels4BuildBadge.jpg

JOIN OUR COMMUNITY!

Our community is FREE to join. To participate you must either login or register for an account.

SEARCH FORUMS
FREE NEWSLETTER
By signing up you may also receive reader surveys and occasional special offers. We do not sell, rent or trade our email lists. View our Privacy Policy.