SEARCH FINESCALE.COM

Enter keywords or a search phrase below:

Variable Geometry: the Swing Wing GB

149203 views
1140 replies
1 rating 2 rating 3 rating 4 rating 5 rating
  • Member since
    December 2002
  • From: Bury St Edmunds, Suffolk, England
Posted by Bish on Wednesday, July 21, 2010 10:38 AM

STFD637  I started on the Italeri kit of that aircraft years ago and remeber that problem with the seam. I am guessing it was the same kit as the AMT. I never got around to finishing end when i went on a break from the hobby. 5 years later when i got back to the kit a few parts were missing so i put it ashide and got the Hasa kit instead. Still got my taleri one sat around somehwere. Yours is looking good.

pordoi I have had this MiG 23 along with a hasa MiG 27 and a few other MiG's for years so can't wait to finally get to build it. $60 for a Korpro kit, even with the PE, that is a bit pricey. Is that 1/72nd scale

I am a Norfolk man and i glory in being so


On the bench: Airfix 1/72nd Harrier GR.3/Fujimi 1/72nd Ju 87D-3

  • Member since
    June 2009
  • From: Florida
Posted by STFD637 on Wednesday, July 21, 2010 3:13 PM

Thanks Bish.  It wouldn't suprise me to see Italeri use an old mold for their kit. I think Monogram had the right idea on this kit. The conection is a little more secure....also the rear horizontal stabilizers have the trailing antina are included.

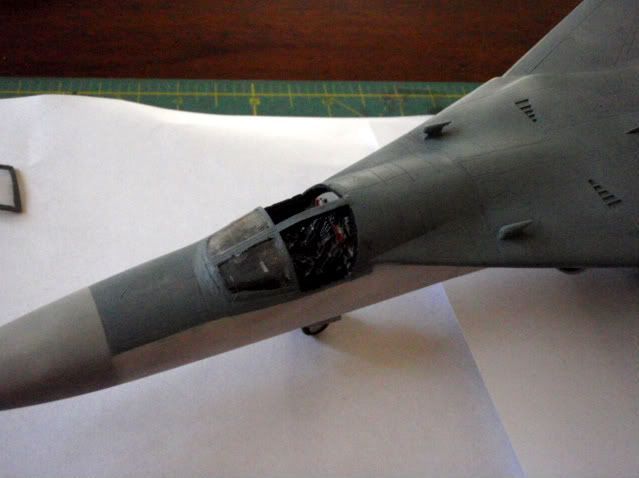
 Well I think I got the final primary painting done on this kit! It took several coats of each paint to get this thing looking the right way. The main colors used are: Tamiya XF-66 [light grey] (top), XF-19 [sky grey] Nose and Leading edge stabilizer, XF-53 [neutral grey] post shading. I had to go back to my saved pics to get the edge under the cockpit just right. I still have to put on a clear coat, wash, and dull coat to finish....plus decal in between. I am thinking that this kit might find it's way on to a diaroma base!

Looking into the cockpit. The top of the kit is XF-66 with XF-53 on the panel line and XF19 "dusting on some edges and panels.

[View:/themes/fsm/utility/Photobucket:550:0]
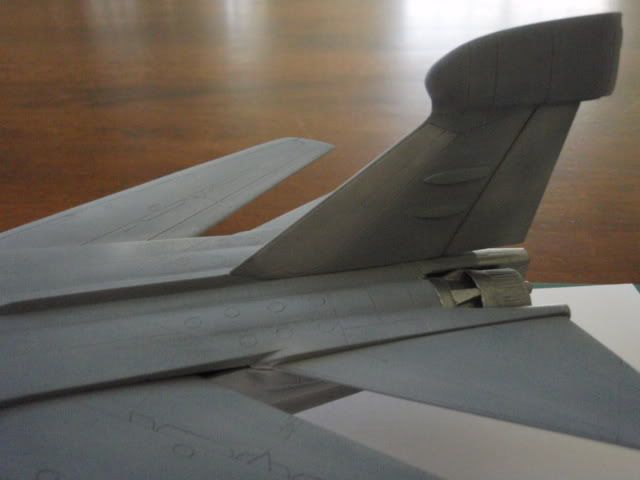
Tail section. The leading edge in XF-19 (sky Grey) the radom "bulb" is XF-53 (neutral grey). It is hard to see the very slight difference in the XF-53 and XF-66.

[View:/themes/fsm/utility/Photobucket:550:0]
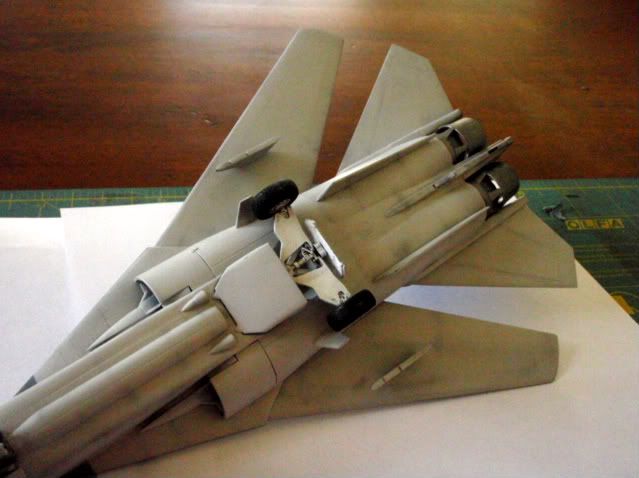
Here is a look at the bottom of the A/C. I was really trying ot catch the different greys that I have seen in my reference pics. In all the bottom of this A/C is "dirty." I still need to add some oil stains and wash to the panels....especially to the engine area.

[View:/themes/fsm/utility/Photobucket:550:0]
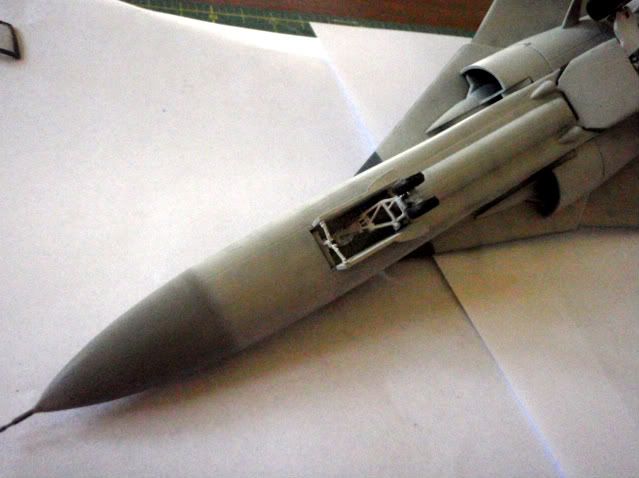
Here is the front area of the bottom. I will need to ago back and "touch up" the landing gear plus add the clear landing light that is included. Over all the bottom was post shaded in XF-53 then "dusted" with XF-19 on some panels to get the different grey color effect.

[View:/themes/fsm/utility/Photobucket:550:0]
I used the sight that I previously linked to for color matches. As far as I can see the colors are pretty darn close. Thanks for looking. Hopr to see some more nice builds.

Travis

"If a lie is told often, and long enough, it becomes reality!"

Travis/STFD637

make an avatar

  • Member since
    October 2008
Posted by eatthis on Wednesday, July 21, 2010 3:27 PM

that pig looks great fella :)

iv thrown some xf19 at the tomcat and tbh it looks pretty close to my (admitedly terrible) eyes il wait till i can get it in sunlight to make the final descision but i might end up leaving it that colour


snow + 4wd + escessive hp = :)  http://www.youtube.com/watch?v=x7egUIS70YM

  • Member since
    March 2010
  • From: Buffalo, NY
Posted by macattack80 on Wednesday, July 21, 2010 4:16 PM

Welcome aboard Eathis and Grimmo Welcome Sign

Travis, The F-111 looks great.  Nice job with the preshading.Yes

Aggieman, the B-1 looks fantastic all painted up in the desert camo.  I see that you kept it as close to the     B-1A as you could as you left the bumps on the engine nacelles.  She looks awesome.  I am liking the nose art decals you came up with.  I would even buy those from you.Big Smile

Kevin

[


  • Member since
    March 2010
  • From: Buffalo, NY
Posted by macattack80 on Wednesday, July 21, 2010 4:19 PM

I haven't had too much bench time lately.  We are short a few people at work so I have to work to cover the shifts.  I did manage to get a little bit more done and snap a few photos.  I got the bomb bays all done minus the SRAM's which are all painted white.  I read somewhere that the tail fins on SRAMS are painted International Orange so I will be doing that.  It will add a little color if anything.

Here is a few pics of the bomb bays all painted up with a wash of artists oils.

[View:/themes/fsm/utility/:550:0]

[View:/themes/fsm/utility/:550:0]

Kevin

[


  • Member since
    March 2010
  • From: Buffalo, NY
Posted by macattack80 on Wednesday, July 21, 2010 4:26 PM

Here are a few pics of the main landing gear attached to the bottom fuselage.  I think the bottom fuselage was warped a little.  It took a lot of "care" to get it to sit right.

 [View:/themes/fsm/utility/:550:0]

[View:/themes/fsm/utility/:550:0]


Kevin

[


  • Member since
    June 2009
  • From: Florida
Posted by STFD637 on Wednesday, July 21, 2010 5:29 PM

Macattack: Nice detail!!!!!Bow Down

Eatthis: I have the "greyish-blue" from Gunze that says it os for the F-4, f-14 and it is pretty darn close to the XF-19, 66 color. If you add in some "shading" it should look good. Just rememeber very A/C is different. I grew up around Navy A/C and everyone was different from the other.

Thanks for the + feedback!!!! I just added the glosscoat to it. Next comes the decals and wash!!!!! That starts tomorrow!.

Travis

"If a lie is told often, and long enough, it becomes reality!"

Travis/STFD637

make an avatar

  • Member since
    October 2007
  • From: Louisville, KY
Posted by pordoi on Wednesday, July 21, 2010 9:05 PM

Bish: The Eduard (Kopro) SU-17/22 kit is 1/48.  Still; $60?  I'll wait for a moment of insanity before I buy.  Maybe tomorrow... Whistling


STDF637 -  the F-111 paint job... nicely done !!!   Inspired to do a dio, eh?  Well, go for it.  I'm watching all the way.


macattack -  great work on the bomb and gear bays.  I'm not that far behind, but encountered another little glitch that will require some time and effort to correct.  Film at 11; or maybe tomorrow.. Smile


eatthis - waiting on the next set of photos, guy!


Don


  • Member since
    January 2015
  • From: Katy, TX
Posted by Aggieman on Thursday, July 22, 2010 5:21 PM

A quick tutorial on decal-making:

Ingredients - decal paper (clear and/or white-backed), decal sealant, color printer, patience

Once you have your decal designs set, insert your decal paper into the printer.  I typically will test print until I am satisfied with the results before using the decal paper.  A word on the decal paper - clear backed is probably better suited to what I'm trying to do here since open areas around the gal's legs will be clear, not white as it would with the white-backed paper.  I used examples of both types for this demo and will determine which to use when it comes to crunch time (actually applying the decals).  I'm a little worried that the gals' eyes will not display any white using the clear however, but they are so small that this detail might not be obvious.

Print your decals.  I used an ink jet but they make paper for use in laser printers as well (otherwise laser printers are beyond the scope of this tutorial).  When using an inkjet, keep in mind that the decal paper is rather slick and you have just applied ink to that surface, so it will still be wet when it comes out of the printer.  Be careful not to touch it in any way.

Then in a well ventilated area, spray on a healthy coat of decal sealant.

Here's where the patience comes in - you will need to let it cure like you would a fine paint job before dipping into water.  The sealant is of paramount importance; if you don't use it and dip an ink jet decal into water, I figure the results would not be funny.  (Ink and water don't mix well).

So that's it.  The decals are on my bend curing right now. 

  • Member since
    October 2007
  • From: Louisville, KY
Posted by pordoi on Friday, July 23, 2010 9:46 AM

Well that's essentially how I did mine.  Only difference was that I didn't use the Testors Decal bonder; instead using a laquer coating.  That's where I must have failed because even though I gave the decal multiple light coats and let it cure for several days, they essentially self destructed and dissolved once placed in water.  Didn't happen immediately, but after about 30 seconds I watched the ink start floating away.  Maybe I'll try again with th Testors spray.

My other concern was color density.  How much of the base color will show through the decals?  Especially if base color is dark.  Is this an issue in your build?


Don


  • Member since
    January 2015
  • From: Katy, TX
Posted by Aggieman on Friday, July 23, 2010 12:27 PM

It was only an issue I did on an AT-6 Texan I built where I painted the airframe dark blue, red and white (Houston Texans NFL colors).  I made a bunch of NFL-related decals including the Texans' bull logo and some had white backgrounds that had some transluscence on the dark colors. 

We're going out of town for the weekend, so the decals will have ample time to cure.  I plan to start decaling next week, so I'll post back on how it looks later.

  • Member since
    October 2008
Posted by eatthis on Friday, July 23, 2010 2:49 PM

how do you get the scale right when making your own decals?


snow + 4wd + escessive hp = :)  http://www.youtube.com/watch?v=x7egUIS70YM

  • Member since
    March 2010
  • From: Buffalo, NY
Posted by macattack80 on Saturday, July 24, 2010 3:50 PM

Hello all,

I have a small update to the Lancer.

I managed to get the fuel tank in and added some radar cross sectiion vanes to the engine intakes with plastic card.  They probably aren't perfect but they look better and should hide the seams in the intakes.

[View:/themes/fsm/utility/:550:0]


[View:/themes/fsm/utility/:550:0]


I plan on doing some weathering/staining to the fuel tank as well.

Kevin

[


  • Member since
    March 2010
  • From: Buffalo, NY
Posted by macattack80 on Saturday, July 24, 2010 3:52 PM

Here are the intakes.

[View:/themes/fsm/utility/:550:0]


[View:/themes/fsm/utility/:550:0]

Thanks for looking


Kevin

Kevin

[


  • Member since
    June 2009
  • From: Florida
Posted by STFD637 on Saturday, July 24, 2010 6:10 PM

Kevin: Great job on intakes and bombay! You really nailed it. Bow Down That is going to be a big bird!!!!!

Travis

"If a lie is told often, and long enough, it becomes reality!"

Travis/STFD637

make an avatar

  • Member since
    October 2007
  • From: Louisville, KY
Posted by pordoi on Sunday, July 25, 2010 3:31 PM

Macattack:

Nicely done.  I like how your Bone is taking shape.  I am planning on adding the radar vanes also; did you just bend plastic card to shape them? 

Also, almost every photo of a B1B model that I've seen on the Web has shown the aux fuel tank mounted in the aft bay.  Yet on one discussion board, a guy who actually maintains active Bones said that they never do this; something about changing the center of gravity too much as fuel was consumed.  Kind of makes sense, no?  The Peters book shows three photos of the aux tank and in each it is mounted in the fore bay (however, the caveat is that these are 3 pics of a single plane).  That said, Peters also states that on extended missions, aux tanks can be mounted in both fore and aft bays which is consistent with the center of gravity point above, as long as fuel can be is consumed equally from both tanks.  Not meant to be a criticism of your placement mac, but rather an interesting piece of information.  I learn something new with every build.

On my Bone, I've completed the tactical munitions dispensers.  Have some photos to post a bit later.


Don


  • Member since
    October 2007
  • From: Louisville, KY
Posted by pordoi on Sunday, July 25, 2010 5:13 PM

OK, a quick update because I've essentially completed the tactical munitions dispensers (TMDs).  These were scratch built from plastic card using photos in the Peters B1-B book as reference and mounted in a modified aux fuel cell that was provided in the Revell kit.


I simplified the design a bit, but I think that the basics are there. 


The wiring is lead wire that is used in making fly fishing flies.  Purchased from Cabelas (www.cabelas.com):  it comes in 6 different diameters and is very pliable.  It is interesting that the front and rear assemblies differ so much but the net effect is to load the maximum munitions in the minimal space.  Since I showed the rear arm assembly in a previous post, here's a closer look at the front arm assembly.


I made two TMDs (hey, there were two halves of the aux fuel tank supplied in the kit  Smile).  One will have a full load of  10 CBU cluster bombs whereas the other will be empty.  After all, I did all the work building the arm assemblies;  at least one has to be visible!  Although I admit that I did do a little more work adding wiring to the empty TMD, since none of the plumbing will be visible once the cluster bombs aere installed.  Here's a pic of both:


I initially purchased a set of 4 resin CBUs from shull24.com.  Really nice resin castings with great detail.  But this was done before I actually thought out what I wanted to do the the B1B bomb bays.  Since the resin CBUs were a somewhat expensive, I found a Hasegawa modern weapons set at the LHS that had 6 additional CBUs, giving me the 10 required to fill out a single TMD.  Hmmm!  The Hasegawa CBUs were a quarter inch longer than the shull24.com resin bombs  Angry.  Right now, I don't know whether they the Hasegawa CBUs are going to fit or not.  Will try a full dry fit this evening.  If not, the I'm looking at cutting the Hasegawa CBUs which will likely require alot of sanding and filling  or biting the bullet and spending the bucks for additional shull resin sets.  Regardless, here are the four resin CBUs dropped into the TMD.


These TMDs are ready for paint.  Although still deciding whether the rotary launcher that will be housed in the 3rd bay should should be completed before the paint marathon begins.  Progress continues.


It's been great seeing everyone's work!  Keep on going gents!


Don 

  • Member since
    January 2015
  • From: Katy, TX
Posted by Aggieman on Sunday, July 25, 2010 7:35 PM

Back in town after a pleasant 3-day visit with family in NE Texas.  We had actually planned to go to Arlington to take our 4-year-old daughter to Six Flags before visiting with our family ... but then we got a bit of a surprise last week that necessitated a change to our plans.  We found out that we are expecting!  It was a surprise given our age (early to mid-40s) and we thought we were done with that part of our lives, but God has perhaps a sense of humor in these matters.  We're excited about the prospect of becoming parents again but we're terrified since we've suffered through 4 previous miscarriages over the last decade (of which 2 of those were actually twins). 

So regarding the scaling for the custom decals, I am not doing anything so technical as determining the exact scale.  I did print the decal on regular paper and then eye-balled it against the airframe before printing the decal.

I plan to try to get the majority of my Bone completed this week but given the doctor's appointment scheduled for tomorrow and the emotional rollercoaster my wife has been on since last Wednesday ... that could all change.

  • Member since
    March 2003
  • From: Virginia
Posted by Wingman_kz on Monday, July 26, 2010 3:07 AM

Congratulations to you and your wife Aggieman. I hope all goes well.

Tony


  • Member since
    October 2007
  • From: Louisville, KY
Posted by pordoi on Monday, July 26, 2010 8:18 AM

Wingman_kz

Congratulations to you and your wife Aggieman. I hope all goes well.

Tony


Ditto  Best of luck to you and your family, Steven.


Don


  • Member since
    October 2009
  • From: Houston, Texas
Posted by Medicman71 on Monday, July 26, 2010 8:27 AM

Congrats Aggieman!!!

Building- (All 1/48) F-14A Tomcat, F-16C Blk 30, He 129


  • Member since
    March 2003
  • From: Virginia
Posted by Wingman_kz on Tuesday, July 27, 2010 12:30 AM


Well, I finally got some color on the Tornado.

Have a lot of touch up to do but it's much easier the second time around. And of course still have to paint the radome, top of the vertical stab and a couple other little things. The paint is MM Acryll and my fine tip Badger Sotar doesn't like it much. I've thinned it much more than ever before and added retarder but tip dry is still ridiculous. Fill the cup about a third of the way and have to flush it well before refilling. Too coarse. But it's on. Big Smile

Still have the underwing stores to paint then it's on to some clear gloss, decals, clear and weathering. I seem to fall flat when it comes to weathering. Hopefully this one will go better. Spent several days last week decaling the F-15. Came up short on No Step decals and got a couple others a little out of place. Revell Parts to the rescue! They should be here this week along with a couple extra canopies. I've sanded and sanded and can't get the mold line out. I have another copy but it's even worse with a big sink mark. Hope the replacements are better...

Tony


  • Member since
    July 2008
  • From: USA California
Posted by vetteman42 on Tuesday, July 27, 2010 12:53 AM

Wingman_kz I really like the color scheme you have chosen, lookin good.

Guys there is some very nice work going on here Toast to all.

Pordoi I havent forgotten this group, just have been overloaded with group builds this year. I am hoping to start my Tomcat sometime next month. Oh BTW its the Revell 1/48 F-14A.


Randy So many to build.......So little time

  • Member since
    January 2015
  • From: Katy, TX
Posted by Aggieman on Tuesday, July 27, 2010 5:44 PM

I like the paint on the Tornado!

I'm calling my Bone done.  The custom decals worked moderately, meaning the clear ones actually didn't work worth a flip so I had to super-impose the white-backed gal over the top of the clear one.  The photo shows that my lighting was not sufficient to allow me to get the second one aligned over the first, but such is life.  I'm going to move on and chalk up the decal as an experiment that didn't quite go as planned.

I didn't do any weathering on this bird, which if you've seen any of my previous work is out of the ordinary for me.  Looking at her hanging on the ceiling, she doesn't really look finished to my eyes, but I don't think modern aircraft get the type of dirty weathering that I like to finish my WWII warbirds with.

In a quick aside, my wife went to the doctor and had a blood test to verify the results of the home pregnancy tests (I was rather doubtful that, statistically, three of those home tests would each reveal a false positive).  We're about 4 weeks along.

Any way, on to the pictures.  The first are while the B-1 was sitting atop my floor freezer, the remainder are of her final resting place on my garage ceiling.

  • Member since
    October 2007
  • From: Louisville, KY
Posted by pordoi on Tuesday, July 27, 2010 6:28 PM

Aggieman:  4 weeks along!  Man, you confirmed this one early.  Again, congrats!!

The Bone in desert camo looks great.  And seeing the size of the finished model, I'm asking myself where am I going to put this thing once my build is finished.  Impressive by size alone!  I particularly like this photo...


Aggieman

http://i75.photobucket.com/albums/i306/Aggieman/Models/B-1B/2010_07_27_2078.jpg


Great job and remember to grab a badge.


Wingman:  this is 1/72?  This aircraft is bigger than I thought.  Nice progress on the painting and a real smart camo scheme.  Yes


Vetteman:  welcome back!!  You are not alone in having other modeling commitments to fulfill.  That's one of the reasons for the extended duration of  this GB; to accommodate as many that wish to participate (and also to allow for my exceedingly slow rate of model building Tongue Tied)  There's plenty of time left for your Tomcat.


And for other prospective Swing Wingers, I just looked through the latest Squadron catalog and page 13 is chocked full of variable geometry aircraft in 1/48!  New Hobby Boss F-111 Pig and Tornado, in addition to already available F-11A/D/E Aardvarks and Tornado IDS.  And Academy's F-14A is also listed.  We're still looking for Russian Swing wingers also, if any of you Cold War afficianados are interested.  Smile    Plenty of opportunities for those who wish to join in or those that might consider adding a second build.   


Don


  • Member since
    December 2002
  • From: Bury St Edmunds, Suffolk, England
Posted by Bish on Tuesday, July 27, 2010 6:34 PM

Pity about the decals, but a bit hats off for giving it a go and the decals themselves have turned out nice. I agree that it does look unfinished, but like you i have noticed that modern aircraft don't seen to get dirty like WW2 ones did. I think its a combination of no exhaust fumes, never going onto grassy surface and haveing more time to clean them. Have you considered putting a light wash into the panel lines, that might help a bit.

saying all that, the paint job looks great, and its a nice looking bird, and the B-1 ain't bad either.

I am a Norfolk man and i glory in being so


On the bench: Airfix 1/72nd Harrier GR.3/Fujimi 1/72nd Ju 87D-3

  • Member since
    October 2007
  • From: Louisville, KY
Posted by pordoi on Tuesday, July 27, 2010 6:57 PM

Bish

Pity about the decals, but a bit hats off for giving it a go and the decals themselves have turned out nice. I agree that it does look unfinished, but like you i have noticed that modern aircraft don't seen to get dirty like WW2 ones did. I think its a combination of no exhaust fumes, never going onto grassy surface and haveing more time to clean them. Have you considered putting a light wash into the panel lines, that might help a bit.

Or maybe another suggestion if you're willing; how about the thin coat of Tamiya Buff to blend in the desert brown and greens; even on the underside gray, this might blend the bottom and top paint schemes. 


Bish

saying all that, the paint job looks great, and its a nice looking bird, and the B-1 ain't bad either.


Ditto  And I thought it was interesting how you placed the rescue arrow relative to the nose art....  but then again, it might just be my interpretation... Devil


Don


  • Member since
    December 2002
  • From: Bury St Edmunds, Suffolk, England
Posted by Bish on Tuesday, July 27, 2010 7:22 PM

pordoi


Ditto  And I thought it was interesting how you placed the rescue arrow relative to the nose art....  but then again, it might just be my interpretation... Devil

 Don


You just have a dirty mind. So i have no idea how i missed it.

Good suggestion with the tamiya Buff. I started doing similar with my armour last year and can make a big differance.

I am a Norfolk man and i glory in being so


On the bench: Airfix 1/72nd Harrier GR.3/Fujimi 1/72nd Ju 87D-3

  • Member since
    October 2007
  • From: Louisville, KY
Posted by pordoi on Tuesday, July 27, 2010 8:04 PM

Bish

You just have a dirty mind.


Who me???  Surprise  Surprise


Bish

Good suggestion with the tamiya Buff. I started doing similar with my armour last year and can make a big differance.


Good stuff, that Buff.  Can be mixed with almost any earth-tone shade to create a weathered look.  It's one of my regulars. 

When are you due to be relieved from the Fauklands, Bish?


Don


  • Member since
    December 2002
  • From: Bury St Edmunds, Suffolk, England
Posted by Bish on Tuesday, July 27, 2010 8:41 PM

I haven't tried it either with tamiya Buff or on an aircraft yet. But i do now give my German armour 3 tone schemes a thined over spray of yellow after all 3 colours are on and it makes a big differance. I am thikning about doing similar to a Ju-88 nightfighter, giving an overspray of light grey to blend in the darker grey motteling, but thats for much later

6 more days and a wake up and its the long flight home and 3 weeks leave Big Smile, so i won't be back to the modelling desk until the end of August. I am just itching to get my hands on some plastic, but i think my other half would be upset if i didn't get them on her first Stick out tongue

I am a Norfolk man and i glory in being so


On the bench: Airfix 1/72nd Harrier GR.3/Fujimi 1/72nd Ju 87D-3

JOIN OUR COMMUNITY!

Our community is FREE to join. To participate you must either login or register for an account.

SEARCH FORUMS
FREE NEWSLETTER
By signing up you may also receive reader surveys and occasional special offers. We do not sell, rent or trade our email lists. View our Privacy Policy.