SEARCH FINESCALE.COM

Enter keywords or a search phrase below:

Variable Geometry: the Swing Wing GB

149202 views
1140 replies
1 rating 2 rating 3 rating 4 rating 5 rating
  • Member since
    June 2009
  • From: Florida
Posted by STFD637 on Wednesday, July 21, 2010 3:13 PM

Thanks Bish.  It wouldn't suprise me to see Italeri use an old mold for their kit. I think Monogram had the right idea on this kit. The conection is a little more secure....also the rear horizontal stabilizers have the trailing antina are included.

 Well I think I got the final primary painting done on this kit! It took several coats of each paint to get this thing looking the right way. The main colors used are: Tamiya XF-66 [light grey] (top), XF-19 [sky grey] Nose and Leading edge stabilizer, XF-53 [neutral grey] post shading. I had to go back to my saved pics to get the edge under the cockpit just right. I still have to put on a clear coat, wash, and dull coat to finish....plus decal in between. I am thinking that this kit might find it's way on to a diaroma base!

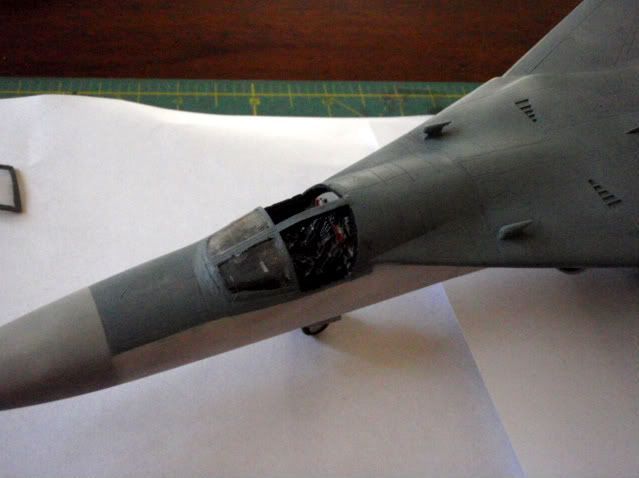
Looking into the cockpit. The top of the kit is XF-66 with XF-53 on the panel line and XF19 "dusting on some edges and panels.

[View:/themes/fsm/utility/Photobucket:550:0]
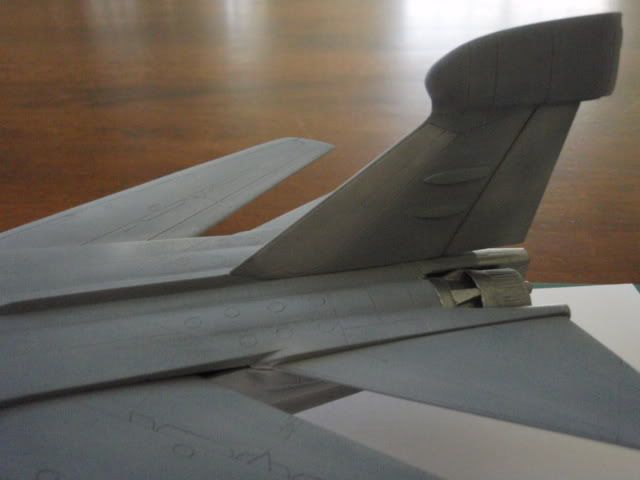
Tail section. The leading edge in XF-19 (sky Grey) the radom "bulb" is XF-53 (neutral grey). It is hard to see the very slight difference in the XF-53 and XF-66.

[View:/themes/fsm/utility/Photobucket:550:0]
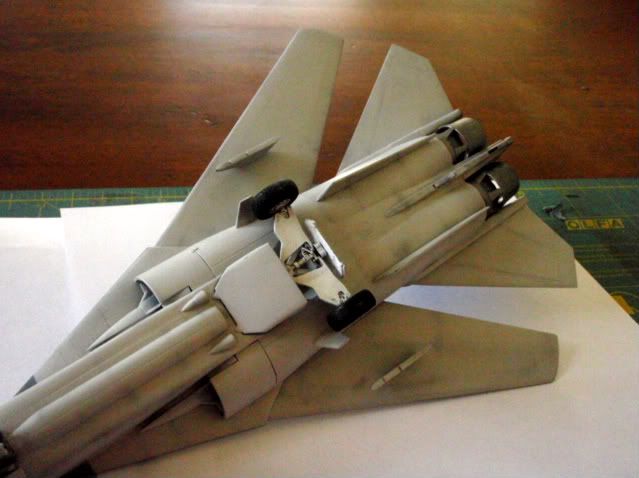
Here is a look at the bottom of the A/C. I was really trying ot catch the different greys that I have seen in my reference pics. In all the bottom of this A/C is "dirty." I still need to add some oil stains and wash to the panels....especially to the engine area.

[View:/themes/fsm/utility/Photobucket:550:0]
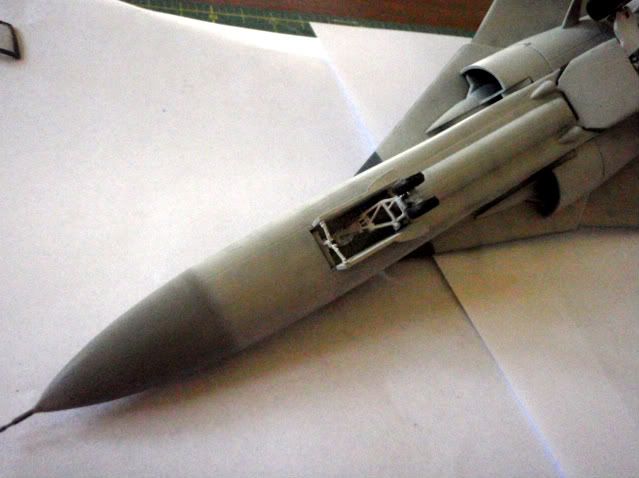
Here is the front area of the bottom. I will need to ago back and "touch up" the landing gear plus add the clear landing light that is included. Over all the bottom was post shaded in XF-53 then "dusted" with XF-19 on some panels to get the different grey color effect.

[View:/themes/fsm/utility/Photobucket:550:0]
I used the sight that I previously linked to for color matches. As far as I can see the colors are pretty darn close. Thanks for looking. Hopr to see some more nice builds.

Travis

"If a lie is told often, and long enough, it becomes reality!"

Travis/STFD637

make an avatar

  • Member since
    December 2002
  • From: Bury St Edmunds, Suffolk, England
Posted by Bish on Wednesday, July 21, 2010 10:38 AM

STFD637  I started on the Italeri kit of that aircraft years ago and remeber that problem with the seam. I am guessing it was the same kit as the AMT. I never got around to finishing end when i went on a break from the hobby. 5 years later when i got back to the kit a few parts were missing so i put it ashide and got the Hasa kit instead. Still got my taleri one sat around somehwere. Yours is looking good.

pordoi I have had this MiG 23 along with a hasa MiG 27 and a few other MiG's for years so can't wait to finally get to build it. $60 for a Korpro kit, even with the PE, that is a bit pricey. Is that 1/72nd scale

I am a Norfolk man and i glory in being so


On the bench: Airfix 1/72nd Harrier GR.3/Fujimi 1/72nd Ju 87D-3

  • Member since
    October 2007
  • From: Louisville, KY
Posted by pordoi on Tuesday, July 20, 2010 7:11 PM

Aggieman
Was not my intent believe it or not, didn't even consider that potential issue Embarrassed but in my defense I'll offer up any National Geographic special on tribal peoples ....


Not necessary, I probably already have them in the stash... Devil

I want to see how you craft your own decals.  Please post a detailed "how to".


Don


  • Member since
    January 2015
  • From: Katy, TX
Posted by Aggieman on Tuesday, July 20, 2010 5:40 PM

Whoa, Aggie..., the MPAA just rated the Swing Wing GB a PG-13!  Stick out tongue 

Was not my intent believe it or not, didn't even consider that potential issue Embarrassed but in my defense I'll offer up any National Geographic special on tribal peoples ....

In any event my wife is an anti-dark-hair gal so she chose Red-Headed Beauty.  I'll save Texas Squaw for the B-36 I'm going to build next.

Update on my progress - I've completed the painting, including touch up of the exterior scheme, the engine exhaust cans and the nose cone.  And I laid down a nice coat of Testor's gloss clear in preparation for decals and light weathering.

My plan next is to tackle the custom decals.  I also have to search through my decal reserves for older style stars-and-bars rather than the gray ones that I believe came with the kit.  If I don't have any I will be making some.  Or failing that ordering some.

  • Member since
    June 2009
  • From: Florida
Posted by STFD637 on Tuesday, July 20, 2010 4:48 PM

You might want to try this site as well:

http://paint4models.com/

It makes the matching of all those different grays the US uses a little easier. I actually have a tone of RLM colors and believe it or not they end up matching up quite well with the FS colors. I use a mix of Tamiya, MM, and Polly Scale.......and the older Gunze that I have.....in acrylic form. Good luck.

Travis

"If a lie is told often, and long enough, it becomes reality!"

Travis/STFD637

make an avatar

  • Member since
    October 2007
  • From: Louisville, KY
Posted by pordoi on Tuesday, July 20, 2010 3:39 PM

Well here is some help but with enamels:

http://www.anft.net/f-14/f14-detail-colours.htm


Tamiya does not offer much selection in modern US colors.  Some additional alternatives are mentioned here:

http://www.arcforums.com/forums/air/index.php?showtopic=139281&st=0&p=1245810&#entry1245810


Hope this is of some help.


Don


  • Member since
    October 2008
Posted by eatthis on Tuesday, July 20, 2010 2:33 PM

help im stuck on paintcodes. i want to do a cat from vf 124 gunfighters its telling me to mix the paint but i always stuff it up when i do that does anybody know of a single colour i should use? (pref tamiya)


snow + 4wd + escessive hp = :)  http://www.youtube.com/watch?v=x7egUIS70YM

  • Member since
    October 2008
Posted by eatthis on Tuesday, July 20, 2010 2:03 PM

iv nearly done the cockpit im splitting my time between this and the spitfire atm


snow + 4wd + escessive hp = :)  http://www.youtube.com/watch?v=x7egUIS70YM

  • Member since
    October 2007
  • From: Louisville, KY
Posted by pordoi on Tuesday, July 20, 2010 12:56 PM

Hey Travis, really nice F-111.  Congrats for toughing it out through the rough parts of the build.  The fuselage seam looks fine to me. 


Whoa, Aggie..., the MPAA just rated the Swing Wing GB a PG-13!  Stick out tongue 


Eatthis:  first glimpse of the F-14 looks good.  I look forward to seeing your progress.


Don

  • Member since
    October 2008
Posted by eatthis on Monday, July 19, 2010 8:23 PM

the b1 and the f111 look fantastic!

this is as far as iv got so far


the back row are all 1/72 scale

front row are both 1/32 scale

nimrod (anti sub build)

vulcan (iv got 2 on the go im using them to learn and i like vulcans)

sr71 (eyes in the sky build)

f14d (for the cats build 2011)

the 1/32 spit is for the bob build


snow + 4wd + escessive hp = :)  http://www.youtube.com/watch?v=x7egUIS70YM

  • Member since
    January 2015
  • From: Katy, TX
Posted by Aggieman on Monday, July 19, 2010 7:47 PM

Wowsers!  Good looking F-111! 

I remember the first time I ever saw one of those.  Long time ago coming home from a vacation that took us out west, driving straight across New Mexico, I hear something and look up from whatever I was reading at the time.  I see this plane streaking from south to north very low across the desert.  Went kaboom right over our heads as we drove beneath it.  Loud and fast.  Probably came out of Holloman AFB.  It was quite a site to behold (for as long as it lasted).

For my Bone, I was thankful that my paint job went as well as it did.  I covered the entire underside in light gray and the top side in TAC tan, and fortunately the 1 bottle of each did the job.  Not much left in either, though, but I bought a second bottle of the gray and there is some touchup that I will need to get to before too long.  But tonight I've spent some time working on the nose art.

My desire was to draw a picture of my wife or somehow incorporate a real photo of my wife (short of getting her to actually pose, which was not going to happen).  Those efforts failed miserably.  I was once artistic, even to the point of enrolling at Texas A&M as an architecture major (long story there, but the short of it was I found out the average starting salary for an architect and said sayonara!)  So I scrounged the net for decent pictures, keeping in mind that my wife is most accurately described as a strawberry blonde gal.  I found a couple of pictures that were acceptable but had a couple of things that I kept going back to - 1, call me a dirty old guy, but I really wanted a gal with no clothes, and 2, the gals that fit the bill for 1 were inevitably not red-heads!  Argh!

So I picked the two I liked the best and put them in designs for the following nose art:

1.  Red-Headed Beauty

2.  Texas Squaw

For the Bone I'm probably going with Red-Headed Beauty as this build is solely intended for my wife.  But Texas Squaw will then end up on my next build, another heavy, this time a B-36 Peacemaker.  Ultimately I'm going to let my wife decide which will represent her.

  • Member since
    June 2009
  • From: Florida
Posted by STFD637 on Monday, July 19, 2010 5:36 PM

Aggieman: I feel your pain. It has been in the 100+ with the heat index for the last week and a half. On top of that we have been missing the afternoon T-storms that are supposed to help cool stuff off!  I have been looking for the "TAC tan" in acrylic for the last couple of weeks. I picked up the Mid green, Dark green, light gray last week.

Well there have been a few days where I wanted to launch this model on about 4-5 rockets I have left over from the 4th! Now I finally feel is is coming along. I have added 2 coats of each color with sanding in beteween. The kit has 4 different gray colors from the nose to tail! I have a few more "fixes" to get it looking good! Then it will be on to the decals and weathering! Here are the pics:

Here is that seam that was giving me so muchj trouble. I think it is about as good as I can get it!

[View:/themes/fsm/utility/Photobucket

Here the kit has been preshaded with a earth brown. Just an experiment

Photobucket:550:0

Well this is what the kit looks like with the 1st coat of Gray (Tamiya XF-66). I have sanded some of the "rough" spots behind the cockpit.

[View:/themes/fsm/utility/Photobucket:550:0]

OK. So the Dark earth didn' twork as well as I hoped. Here i went over the bottom with Tamiya Neutral gray. I did the same to the top panel lines.

[View:/themes/fsm/utility/Photobucket:550:0]

In all the pics I found there is a spectrum of "gray" on this aircraft......and of course everyone is a little different. All of the pics I found showed a "fine" line between the top gray and bottom gray. This is despite the decal sheet references showing a "feathered" line.

Thanks for looking.

Travis

"If a lie is told often, and long enough, it becomes reality!"

Travis/STFD637

make an avatar

  • Member since
    October 2007
  • From: Louisville, KY
Posted by pordoi on Monday, July 19, 2010 1:18 PM

Aggie, you have to take those cooler days as they come.  You did well with the tri-color desert paint job.  I figured that this kit would rip through the paint; for my version, I looked for ModelMaster Gunship Gray in the quart size ... Whistling


Bish, hooray for the MiG-23.  Finally a Russian swing wing in the bunch.  Front page is updated.  I almost pulled the trigger on the new Eduard SU-17/22 (actually the old Kopro spruced up with PE and resin parts) this weekend at the LHS, but just couldn't quite swallow the $60 price tag.  Maybe if I make more progress on the Bone, I'll be less reluctant next time.


Don


  • Member since
    December 2002
  • From: Bury St Edmunds, Suffolk, England
Posted by Bish on Monday, July 19, 2010 9:39 AM

Some great work going on here guys. I am really looking forward to getting home in a couple of weekes and getting back to the model desk at the end of August. I have been able to find a book on the P.1101 at Hannats so going to get that in Sept in time for my build.

Seeing as this build lasts till the end of April stick for down for a 2nd build. A Hasagawa 1/72nd MiG 23. Its 3rd in line on my build list anyway, after my B-24 and P.1101. And seeing as no one has entered a MiG yet it would be a shame not to have one.

I am a Norfolk man and i glory in being so


On the bench: Airfix 1/72nd Harrier GR.3/Fujimi 1/72nd Ju 87D-3

  • Member since
    March 2003
  • From: Virginia
Posted by Wingman_kz on Monday, July 19, 2010 2:31 AM

I wondered how long it was going take to get a Tomcat in here. And a big one at that. Can't wait to see it.

Nice paintwork Aggieman! Looks good. Acryll seems to cover pretty well so I hope you didn't have to use too many bottles of paint. Big Smile

No pics tonite, and if I already mentioned this forgive me, but I did finally join the front and rear fuselage sections and fill the area around the vertical stabliizer. The fuselage joint on the underside is pretty smooth but on top the front is a little taller than the rear. Not too much difference but will take a little work. A little scribing and a few rivets and it should be ok. Hopefully I can get it cleaned up and some primer on it tomorrow. Did a little decaling on the F-15 tonite. Practice, practice.

Tony


  • Member since
    October 2009
  • From: Houston, Texas
Posted by Medicman71 on Sunday, July 18, 2010 5:03 PM

pordoi

 Medicman71:
Sorry I haven't been able to start on my Tomcat yet. Working a lot lately, getting ready to move, and vacation has set me back a lot. I will get to it soon though.


No worries, mate.  We've got members of the GB building now; others said from the start that they wouldn't be able to begin until later in the year.  Plenty of time to get your move settled and get business taken care of.  But stop in from time to time and have a look at the active projects.  some good things going on.


Don


Oh I am! I'm loving the Bones , Spark Varks, and Tornados being built. But not worry there seems to be a few Cats lurking out there.

And Aggieman I feel your pain with this heat since i'm down the street from ya. To bad i'm at work today or i'd be painting like crazy too.

Building- (All 1/48) F-14A Tomcat, F-16C Blk 30, He 129


  • Member since
    October 2008
Posted by eatthis on Sunday, July 18, 2010 4:26 PM

pordoi


 eatthis:


im gonna do my revell 1/32 tomcat :)


YesYes  Alright!  F-14 in large scale.  First page is updated.


Don


iv made a start on it filing flash off dry fitting parts etc and it feels really well made :)


snow + 4wd + escessive hp = :)  http://www.youtube.com/watch?v=x7egUIS70YM

  • Member since
    January 2015
  • From: Katy, TX
Posted by Aggieman on Sunday, July 18, 2010 3:33 PM

Unexpected bench time today - the wife took the daughter to a birthday party that my presence was not expected - and a nice thunderstorm to bring down temperatures results in a mammoth painting session.

I got the entire exterior scheme painted.  Masked off the demarcation between upper and lower surfaces with silly putty and 3M painters tape but free-handed all the upper surfaces.  She is a paint hog in case you hadn't already guessed.  She is now sitting out there curing, and she'll be out there for many days while I work on the nose art and do family-oriented things like Circus and a min-vacation to Dallas this weekend.

Stabilizers and engine pods:

Main airframe:

The paint is all model master acrylic - TAC light gray, TAC tan, TAC dark green, and Panzer brown.

  • Member since
    January 2015
  • From: Katy, TX
Posted by Aggieman on Saturday, July 17, 2010 10:02 AM

I hope it eventually cools down for you Aggieman. 

It's SE Texas - it is ALWAYS hot here this time of year.  As for cooling down, that won't happen until around November.  But this year seems to have been extraordinarily hot although I'm thinking that the temperature hasn't really been any hotter than normal.  Maybe I'm just getting to be such an age where I can't tolerate the heat as much as I could when I was younger.

  • Member since
    October 2007
  • From: Louisville, KY
Posted by pordoi on Saturday, July 17, 2010 7:20 AM

eatthis

im gonna do my revell 1/32 tomcat :)


YesYes  Alright!  F-14 in large scale.  First page is updated.


Don

  • Member since
    October 2008
Posted by eatthis on Saturday, July 17, 2010 3:13 AM

im gonna do my revell 1/32 tomcat :)


snow + 4wd + escessive hp = :)  http://www.youtube.com/watch?v=x7egUIS70YM

  • Member since
    March 2003
  • From: Virginia
Posted by Wingman_kz on Saturday, July 17, 2010 12:19 AM

Nice work Don!

Tony


  • Member since
    March 2010
  • From: Buffalo, NY
Posted by macattack80 on Friday, July 16, 2010 7:01 PM

Nice scratchbuilding on the bomb bays there Don.  Looks fantastic. 

I am still plugging away at the bomb bays too.  I managed to get all 16 SRAM's together and seams cleaned up.  The main landing gear bay needs to have a oil wash applied and sealed and that should be all set.  I will do some more work tonight and get some photos.

I hope it eventually cools down for you Aggieman. 

Kevin

[


  • Member since
    January 2015
  • From: Katy, TX
Posted by Aggieman on Friday, July 16, 2010 6:24 PM

Thanks for the photos on the wings.

That's some awesome work you have going on that scratch-built bomb bay!

I took the day off to see the last day of my daughter's vacation Bible school then got to spend a good bit of time at the bench.  Got the entire airframe assembled and all the seams (there are lots of them) sanded, scraped, and filled.  Filler is now curing awaiting a final sanding session.  Probably won't get any more bench time this weekend, though.

  • Member since
    October 2007
  • From: Louisville, KY
Posted by pordoi on Friday, July 16, 2010 5:07 PM

Macattack got it right; the B1-B has air filled cushions that seal the wing gap when the wings are extended.  The Revell piece is inserted to fill the gap when extended and removed to allow the wings to be displayed swept.  The real thing looks like this:


Updating my progress:

   Spent the past week or so building the rear assemblies of a tactical munitions dispenser (TMD) that will carry cluster bombs.  Each TMD is capable of carrying 10 bombs mounted five each on two arm assemblies mounted in a shell that can be inserted directly into the B-1B bomb bays.  Here are photos of the real thing:


I simplified the design a bit and came up with this arm assembly:


Each assembly consists of 51 pieces of plastic strip/card.  They sit in the shell that was constructed from the two halves of the auxillary fuel tank that is supplied in the kit.  Right now, I have only 4 CBU cluster bombs from shull54.com (will have a complete load of 10 in the final build), but here's a look at how they will ultimately look attached to the arm and inserted into the shell.  Attached here with blue tac.


Working on the front arm assemblies now.  As you can see from the pics, they are quite different.  More photos when I finish them.  The plan is to have one bay fully loaded with cluster bombs and the second empty but with the TMD installed.  Will have to add some wiring to that bay.  Then it's on to the rotary launcher, which looks to be a real joy to scratch build.


Don

  • Member since
    March 2010
  • From: Buffalo, NY
Posted by macattack80 on Friday, July 16, 2010 3:44 PM

i think that Revellogram wants the modeler to remove the wing gloves when the wings are displayed swept back and place them in when the wings are forward.  I believe there are a few more moving parts in that area of the real aircraft to fill the hole all the time.  Kind of like the F-14.  Here is a link to a photo.

http://www.cybermodeler.net/aircraft/b-1/images/bone_walk_20.jpg 

Kevin

[


  • Member since
    January 2015
  • From: Katy, TX
Posted by Aggieman on Friday, July 16, 2010 2:08 PM

Question:  Regarding the B-1, what does one do with those pieces that go into the wing slots?  The instructions only say to install without glue, and test fitting reveals they will stay in place, but then the wings are fully extended (taking up much more real estate for storage/display purposes).  If I leave those parts off, it appears there will be a huge gaping hole there.  Obviously a real B-1 does not leave that area open.  Any suggestions?  I've not found any photos of that area on the Bone.

  • Member since
    October 2007
  • From: Louisville, KY
Posted by pordoi on Wednesday, July 14, 2010 7:23 PM

Medicman71
Sorry I haven't been able to start on my Tomcat yet. Working a lot lately, getting ready to move, and vacation has set me back a lot. I will get to it soon though.


No worries, mate.  We've got members of the GB building now; others said from the start that they wouldn't be able to begin until later in the year.  Plenty of time to get your move settled and get business taken care of.  But stop in from time to time and have a look at the active projects.  some good things going on.


Don


  • Member since
    October 2009
  • From: Houston, Texas
Posted by Medicman71 on Wednesday, July 14, 2010 10:51 AM

pordoi


Medicman:  Thanks for the heads up on the B1 article in Combat Aircraft.  Is this issue 11 volume 6 or 8?  Both seem to have reference to B1s.


It's the June 2010 Volume 11, No 6 issue.

Sorry I haven't been able to start on my Tomcat yet. Working a lot lately, getting ready to move, and vacation has set me back a lot. I will get to it soon though.


Building- (All 1/48) F-14A Tomcat, F-16C Blk 30, He 129


  • Member since
    October 2007
  • From: Louisville, KY
Posted by pordoi on Wednesday, July 14, 2010 7:32 AM

Welcome, Matt.  you're added to the list.  Look forward to following your build.


Don


JOIN OUR COMMUNITY!

Our community is FREE to join. To participate you must either login or register for an account.

SEARCH FORUMS
FREE NEWSLETTER
By signing up you may also receive reader surveys and occasional special offers. We do not sell, rent or trade our email lists. View our Privacy Policy.