SEARCH FINESCALE.COM

Enter keywords or a search phrase below:

60th Anniversary Korean War Group Build- extended for the duration

764946 views
3335 replies
1 rating 2 rating 3 rating 4 rating 5 rating
  • Member since
    September 2003
  • From: Australia
Posted by Helo H-34 on Wednesday, July 18, 2012 6:14 AM

Cliff , nice score on the M40 and Howitzer . The big scale armour is alway's impressive when built .

I really like the A-Team van as well , a nice bit of TV nostalgia there .

Andy , sorry to hear about the heat , I can understand how difficult it can be trying to work on models when it's just to dam uncomfortable .

Australia Post also frown upon customers trying to use their own (recycled supermarket) box's for postage ; I've noticed plenty of times if I buy a box from the Post Office they practially fall over themselves wanting to help with the address lables and postage , go in with your own box and they just shove the form at you and tell you to come back when it's filled out correctly .

Anyway , I hope your sending all your resin "Milicast" armor builds back home . being quite expensive to buy I wouldn't be leaving them behind .

Good luck with the dio , I'm sure it's going to look great as does all your builds . I still look at your Korean War First Aid Station dio often , it's copied into the computer ....awesome stuff .

John .


  • Member since
    September 2003
  • From: Australia
Posted by Helo H-34 on Wednesday, July 18, 2012 6:16 PM

Last night I was looking around ebay to see what other Airfix aircraft kits were available that have the wing fold option and were used in the Korean War .

I saw an Airfix F6F Hellcat and a Frog TBM Avenger with both kits having the option of wing folds . So I bought these two ancient kits and I'm now thinking of building the Hellcat as the overall orange F6F-5K Drone aircraft ;

Gregbbear kindly traded me a canopy to suit the TBM-3R Avenger , so I'm hoping the Frog kit will be suitable

While searching around and looking at aircraft with wing folds , I suddenly remembered that I had started a Fujimi AD-4D Drone controller build and I went searching through the storage box's and found the kit

Here's a pic from the Warbird Douglas Skyraider book of a AD-4D Skyraider

I have already cut the wings to fold on the Fujimi kit and I'll use the Airwaves PE set . I also forgot I had made a rear consol panel for the two crew and there's a couple of woodern ECM pods that I forgot I had made as well .

There's also a partially started Monogram AD-5N but I didn't cut the wings . I think I have another Monogram kit in the stash somewhere and I would like to start again and do one like this next pic

I just seem to have a thing for wing folds of late .

John .

BTW , I don't know what happened to my Korean War Group Build Badge and I can't remember what to do in how to add it to my posts ?

  • Member since
    July 2004
  • From: Sonora Desert
Posted by stikpusher on Wednesday, July 18, 2012 6:29 PM

Is the F6F drone orange or red? Compare the red in the national insignia and the red on the piece of equipment in the background. In any case those should be some cool builds!


F is for FIRE, That burns down the whole town!

U is for URANIUM... BOMBS!

N is for NO SURVIVORS...

       - Plankton

LSM


  • Member since
    December 2010
  • From: Yangju, Gyeonggi-Do, Korea
Posted by the_draken on Wednesday, July 18, 2012 6:36 PM

Actually, it was neither.  The TARGET drones were an orange red colour, but the 'guided weapon' drones were over all gloss sea blue.  I found this picture, but it's not the one that I've saved on my home computer.  

www.flickr.com/.../6157990448

I'm using the academy kit for my F6F-5K, putting a 2000 pound bomb under one wing and the radio relay pod on the other.

________________________________________________________________________________

Andy Hill (the_draken) landrew.hill(at)live.com <*> ASE Master Auto Tech, Imaca certified.  >^.^<

PADI OWSI Certified, BA Poli Sci (NDSU), BS Secondary ED-Social Studies MSUM (Sigma *** Laude)

  • Member since
    November 2009
  • From: SW Virginia
Posted by Gamera on Wednesday, July 18, 2012 9:29 PM

John: That orange Hellcat is cool. From what I can tell the plane is slightly more orange than the red in the national insignia.

"I dream in fire but work in clay." -Arthur Machen


  • Member since
    September 2003
  • From: Australia
Posted by Helo H-34 on Thursday, July 19, 2012 4:22 AM

I was thinking of just using some Gunze H-14 Orange for the Hellcat build although I realise Andy is correct about the gloss sea blue for the radio controlled drones but the overall orange is certainly different .

Another idea I had was trying to build one each of the Skyraider variants used during the Korean War and I went searching for a 1/72 AD-4W . All I could see so far was that RVHP produced a AD-4W/AEW-1 resin conversion but I couldn't find any available . So after reading some more through the WarbirdTech Douglas Skyraider book I discovered that the Royal Navy sold 12 AEW-1's to Sweden in the 1960's .

The Swedish stripped the aircraft and converted them into Target Towing Tugs.

Hannats actually have a 1/72 all resin/white metal Swedish Target Towing Skyraider

I have a spare vacuform belly radome and I guess I just need to make some of those small fin lets for the tail planes .

I ordered the Magna Models Skyraider kit , hopfully my idea will work out and I can build a AD-4W version .

John .

  • Member since
    April 2005
  • From: Australia
Posted by taxtp on Thursday, July 19, 2012 6:41 AM

I've been fancying those colourful Hellcats for some time. Hasegawa marketed their 1/72 kit with decals for them at one stage, and I have some aftermarket decals in the stash for some more. If needs be, I can drag out the brand and item number. I think some were involved in the atom bomb tests, from memory.

Cheers

Tony

I'm just taking it one GB at a time.

  • Member since
    December 2010
  • From: Yangju, Gyeonggi-Do, Korea
Posted by the_draken on Monday, July 23, 2012 9:09 AM

I'm danged near finished with the Thunderjet diorama.  If you don't recall, I'm using the Tamiya 1/72 "Thunderbirds" kit, Verlinden WWII aircraft Maintenance Area, Hasegawa Fuel Truck, and Airfix WWII USAAF Groundcrew.  I had taken pictures on Friday and forgot to post them, so you're getting a whole lot at once!

I'm not officially done, I forgot to paint one dood's head, need to touch up one of the bomb carts, and need a fuel hose for the truck to the dood on the wing.

\

I used Aeromaster Thunderjets over Korea Pt II for the decals, supplemented by the Academy kit decals for stencils.  I'm hoping that the Academy decals will at least stay in place until I leave Korea in a month and a half.  I hand built the maintenance stand from Evergreen plastic and added some .50 cal boxes and 50 Gal. drums from Milicast.  One thing that I'm kinda pleased with myself about is the weathering on the fuel truck; I included the spillage down the sides of the tanks.

Now I just have to find some black wire that's the sufficient od to use as fuel hose...  Tongue Tied

________________________________________________________________________________

Andy Hill (the_draken) landrew.hill(at)live.com <*> ASE Master Auto Tech, Imaca certified.  >^.^<

PADI OWSI Certified, BA Poli Sci (NDSU), BS Secondary ED-Social Studies MSUM (Sigma *** Laude)

  • Member since
    November 2009
  • From: SW Virginia
Posted by Gamera on Monday, July 23, 2012 10:13 AM

Nice work Draken Andy, almost there not much left to go!

The decals on the the F-84 look good to me.

SP: BTW Said I wouldn't start anything new but I got bored and started work on the M40. She's at maybe 30% right now. Don't know if I should toss her in here or not. 

"I dream in fire but work in clay." -Arthur Machen


  • Member since
    September 2003
  • From: Australia
Posted by Helo H-34 on Monday, July 23, 2012 8:39 PM

Andy the F-84 dio is coming along really well , i can't wait to see the finished pic's .

Cliff , I would like to see the M40 build progress , you should post some pic's buddy .

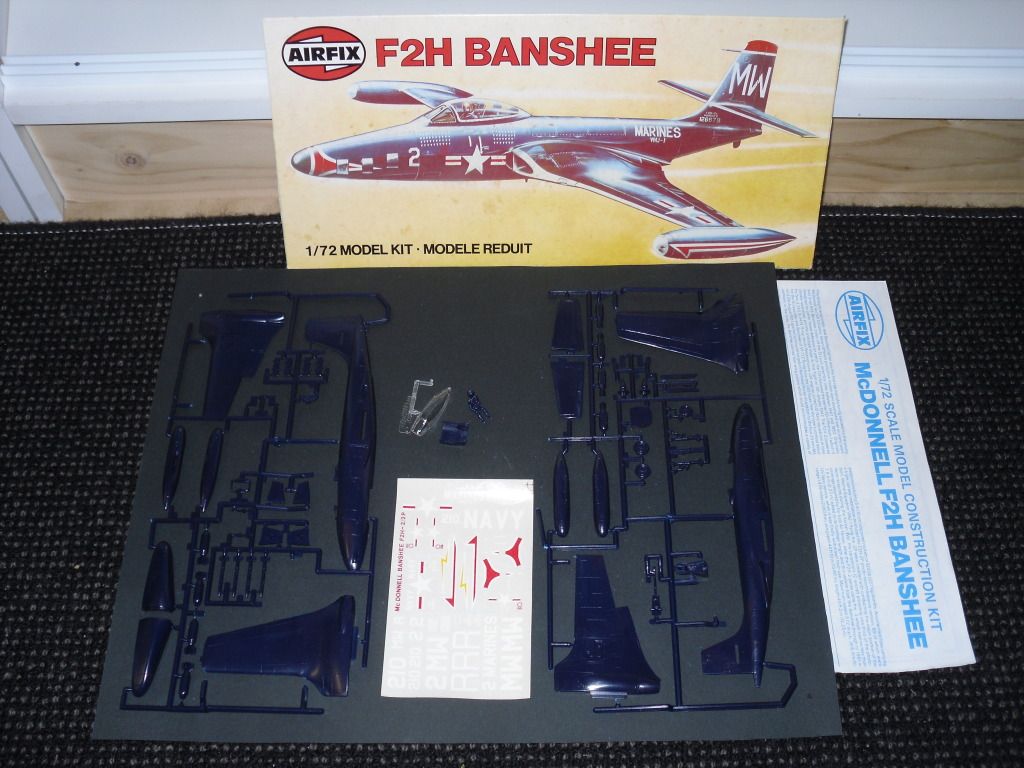
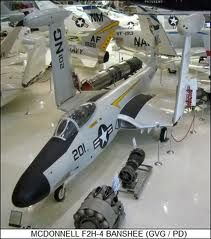
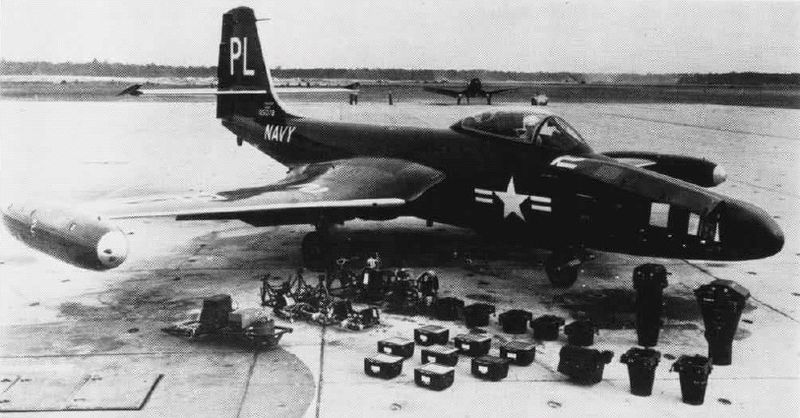
As for me I decided to make a start on a couple of Photo Recon birds using the Airfix F2H-2P banshee and the Hasegawa F9F-2P Panther kits

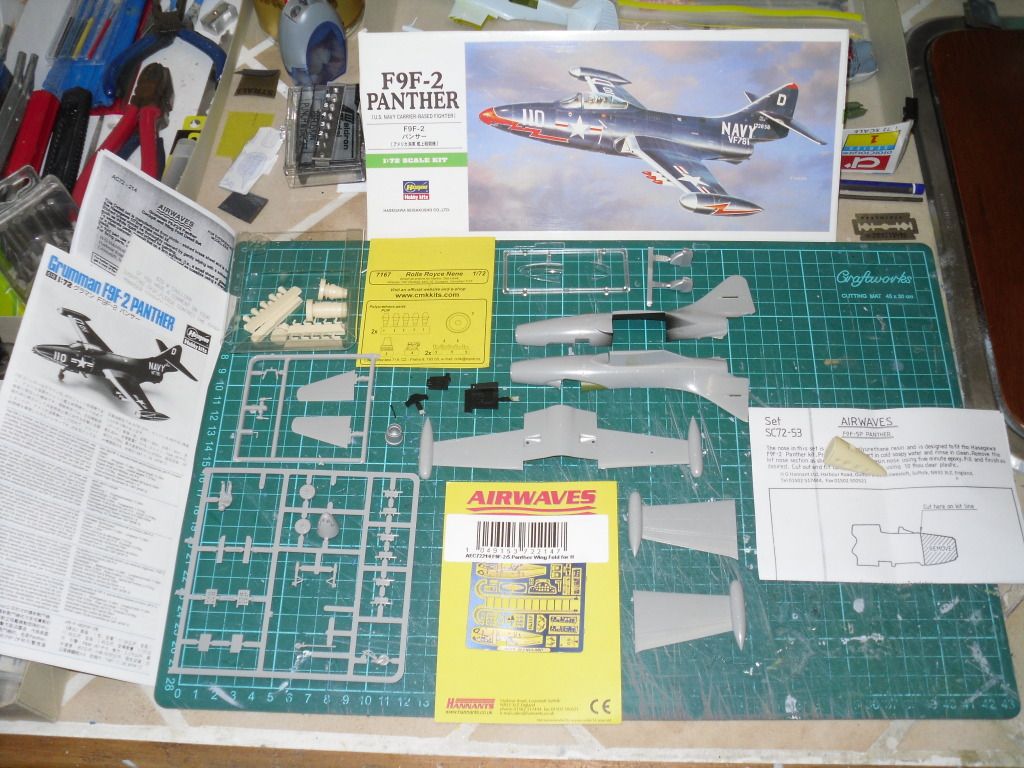
Airwaves make a nice PE set for a wing fold for the Hasegawa F9F-2 Panther along with a resin  photo recon nose , CMK have a nice resin engine for the Panther as well .

I wanted to fold the wings on the F-2H-2P Banshee as well , so I decided to start with Aifix kit first seeing there was going to be a fair bit of scratch building involved .

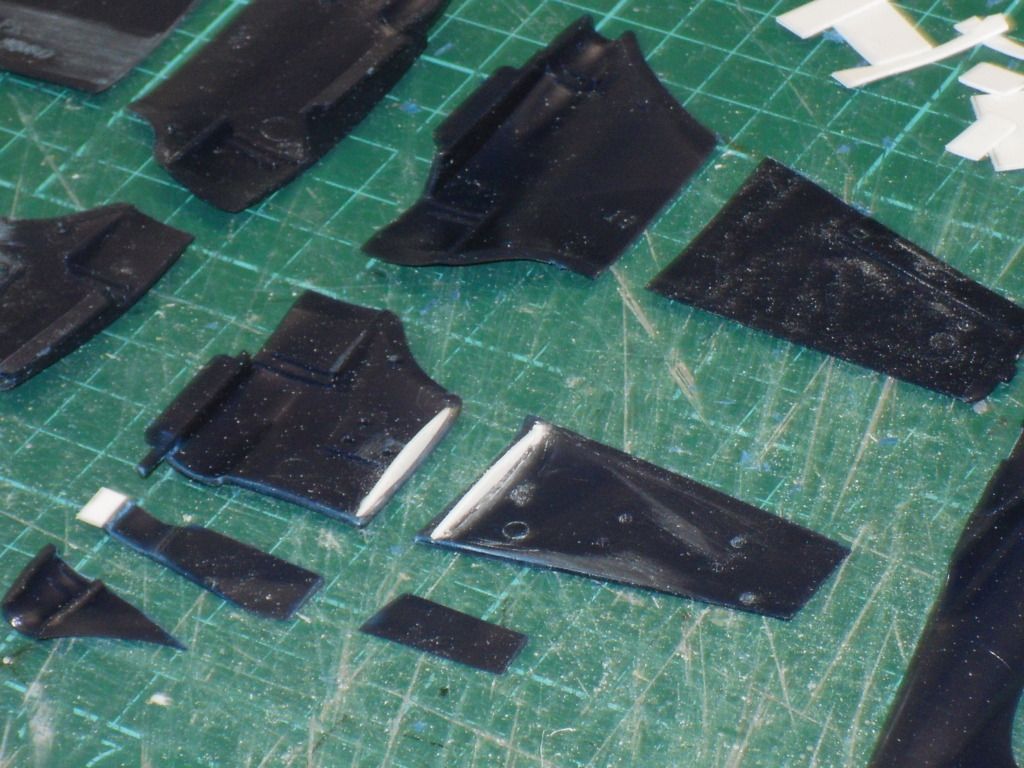
Here's the Banshee wings cut in half along with the rear wing flaps

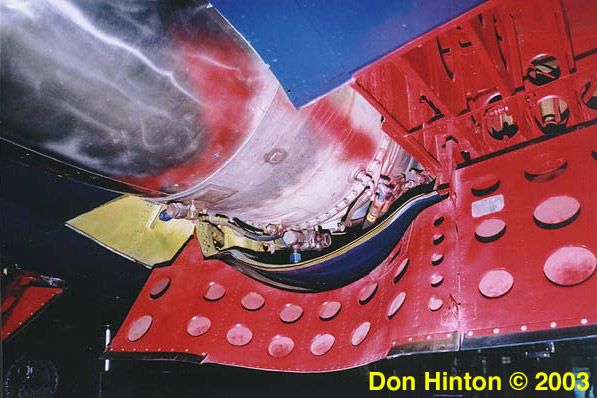
I found some nice reference pic's on the net of the F2H-2P Banshee which are helping a lot

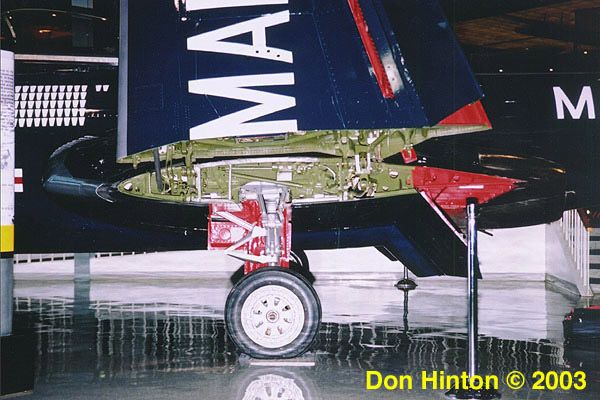
The lower wing flaps fit around part of the rear engine section

I cut my wing flaps as the in the pic above

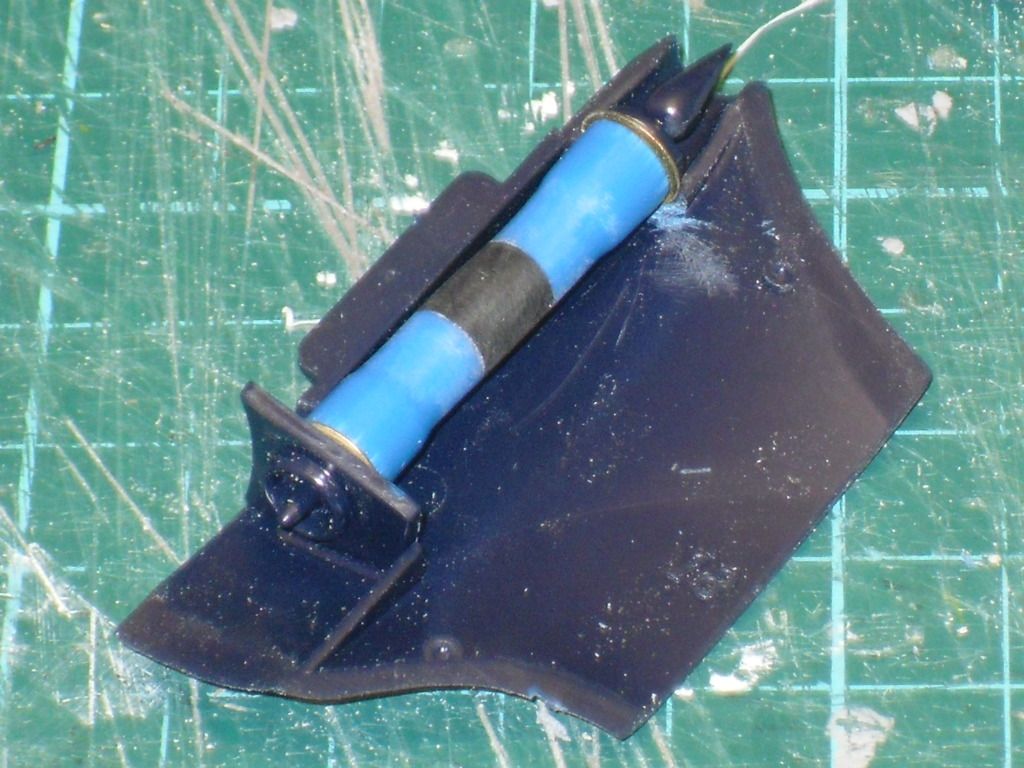
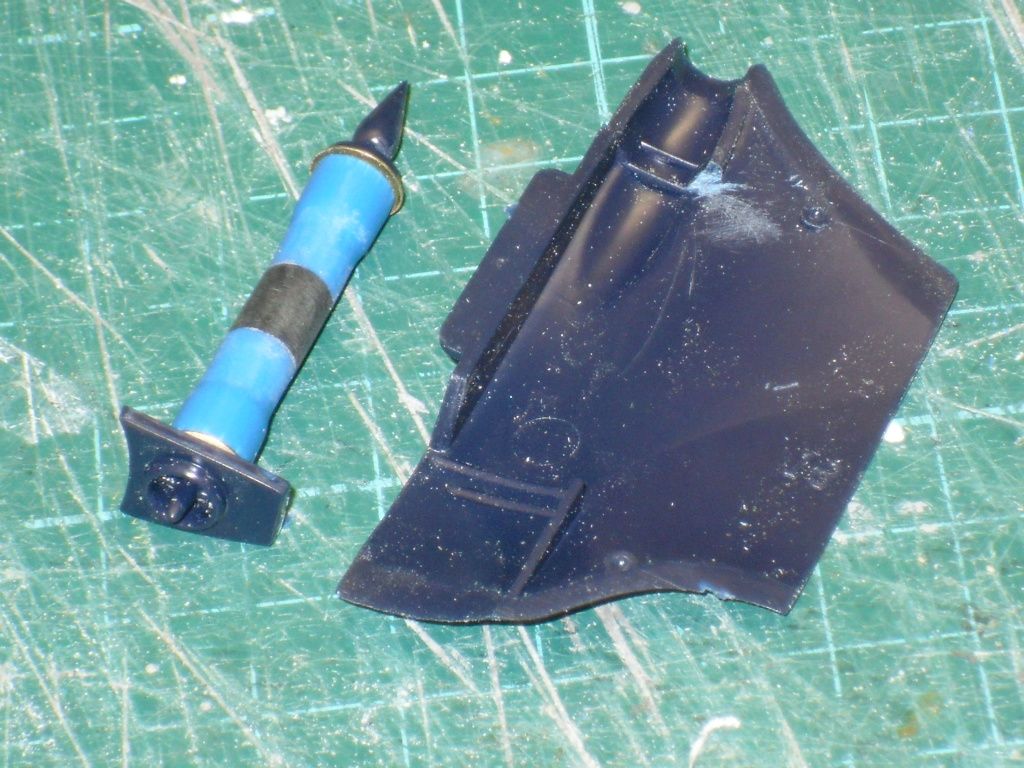
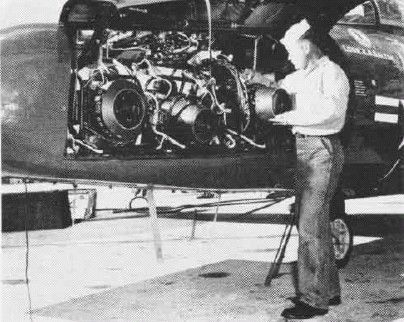
Next I decided to make a couple of engines for the Banshee and I cobbled together these bits and pieces

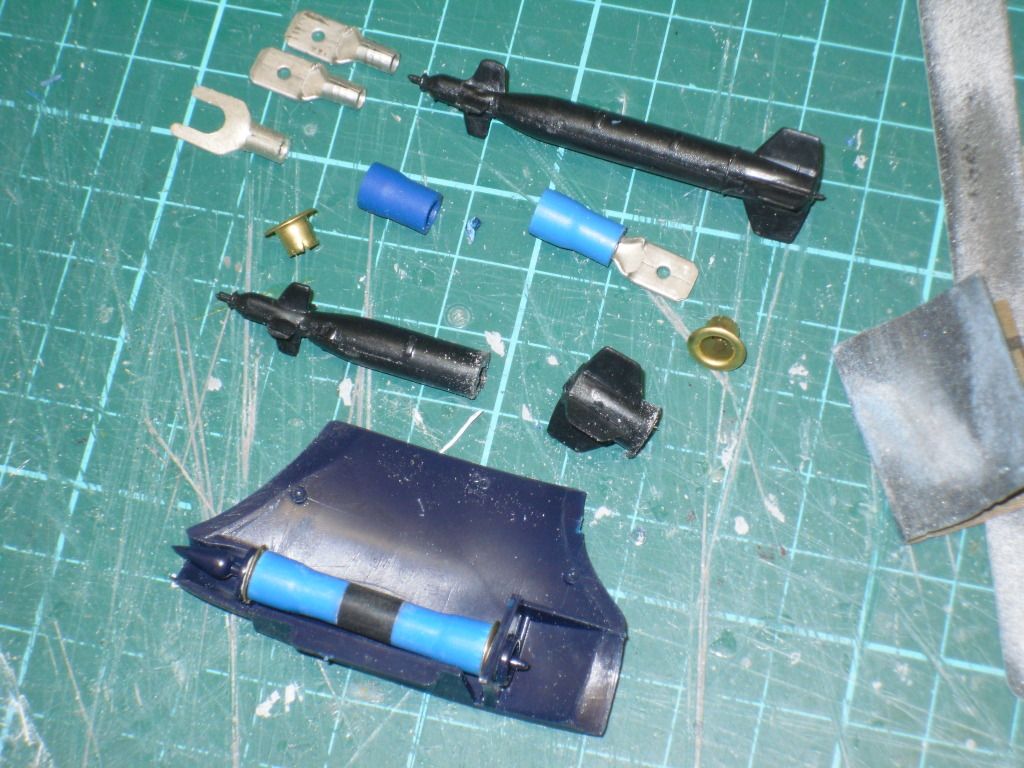
It seems to look the part and will probably look better when painted with some metalic gray and a little wiring added

Finding reference pic's on the net of the engine hasn't been easy and there's not much info in Squadrons Banshee in action book on the F2H-2P , particualary nice engine pic's , so a lot of my scratch building is guess work


I'm also thinking of opening up the camera bay section on the nose of the Banshee but again good quality pic's of the camera's and their mount is difficult to find

Well that it's so far , I'm thinking of leaving one of the engines out sitting on a stand , depicting an engine overhaul . I guess I'll have to cut some more of the lower wing section panels where the engine would fit . Am I right in thinking that the engine would fit in place from underneath the wing ???

John .


  • Member since
    September 2003
  • From: Australia
Posted by Helo H-34 on Tuesday, July 24, 2012 7:12 AM

I guess I'll be riding on Andy's coat tails a little , as I'll do a dio with my F2H-2P and F9F-2P Recon aircraft as well .

I did some preliminary cutting with the Panther today

It appears I've made the cuts in the right places as the resin bits are fitting quite nicely ;

Camera nose ...

I borrowed the crane from the AJ-1 Savage dio and after fitting all the little bits of resin on I set the engine up with some metal chain (thanks to Pepper Kay) and hooked her up to the crane

There's a nice resin exhuast piece for the tail section

Hopfully my dio will look something like this next pic , which Pepper Kay kindly sent me a while back

I'll need to make a support trolley for the tail section of the F9F-2P panther to sit on but so far everything has quite well .

Amazon books had the Steve Ginter 'Early Banshee' book and I ordered a copy . I'm hoping for some great pic's on the Camera housing and nose section and some detail engine shots . The book should arrive this Thursday as I paid for the express delivery option .

I'm happy with my progress on both builds so far , looking at Andy's dio I'll have to search around for some more ground crew figures and 44 gallon drums for my scene as well .

John .

  • Member since
    November 2009
  • From: SW Virginia
Posted by Gamera on Tuesday, July 24, 2012 8:13 AM

John: Great work there! Love the engine you concocted for the Banshee, good idea and really nice work.

Preisler of Germany has a line of 1/72nd figures you might be able to use, they used to have a great set of USAAF ground crew, WW2 but they ought to work for Korea. Set PR72502 about half way down. Some of the others might be usable too. Never ordered from this company but I'm sure someone can get them in Australia.

I'll see about getting some photos of the M40 up when I get more done. Really nice kit so far but AFV Club kits are well.... fussy. And injection pin marks galore. Not that I'm trashing AFV Club but Tamiya puts the marks on the side of the parts that won't show, AFV Club in some cases puts the marks on the outside of parts with the smooth side hidden! Hmm Really don't understand that. 

"I dream in fire but work in clay." -Arthur Machen


  • Member since
    December 2010
  • From: Yangju, Gyeonggi-Do, Korea
Posted by the_draken on Tuesday, July 24, 2012 10:12 AM

The Airfix WWII USAAF groundcrew set works out great!  There's a maintenance stand in the Revell P-70/A-20 kit with a figure, and the ground crew and tug in the Revell F-16A kit is appropriate as well.  Just cut the sound suppressors off of the ears of one of the figures.  The Hasegawa USAF groundcrew is actually okay for some figures, and some Airfix kits come with ground grew figures both WWII land or sea based!  I think it's one of the Dauntless kits that comes with the deck handlers.

________________________________________________________________________________

Andy Hill (the_draken) landrew.hill(at)live.com <*> ASE Master Auto Tech, Imaca certified.  >^.^<

PADI OWSI Certified, BA Poli Sci (NDSU), BS Secondary ED-Social Studies MSUM (Sigma *** Laude)

  • Member since
    September 2003
  • From: Australia
Posted by Helo H-34 on Tuesday, July 24, 2012 8:16 PM

Cliff and Andy , thank's for the tip on where to sorce some ground crew figures . Those Priesler figures look pretty good and I'll check some of my Airfix kits and see what's inside those box's .

I mentioned a couple of pages back that I ordered the Magna Models AD-4 Skyraider resin kit

It just arrived along with some Airwaves PE .

Overall it doesn't look too bad a kit

The Falcon Vacuform belly radome I already had put together and I'll use this to build the AD-4W Version

The PE should help spruce things up a lot

Cliff , sorry to hear about all those mold marks on the outside of many of the M40 parts . Stuff like that can really turn you off building the kit .

John .


  • Member since
    November 2009
  • From: SW Virginia
Posted by Gamera on Tuesday, July 24, 2012 8:42 PM

John: wow that's a limited run kit alright! Wink

And oh no worries about the M40 mold marks, they're easy to fix it's just you're putting parts together and then BLAM you have to stop, put some putty on the part, and then wait all night for it to dry to sand it. Makes for slow progress. I've tried using superglue as instant gap and hole filler but I've never warmed to the stuff. My only complaint is why put the marks on the visible side rather than the back of the part?

Cliff

"I dream in fire but work in clay." -Arthur Machen


  • Member since
    April 2005
  • From: Australia
Posted by taxtp on Wednesday, July 25, 2012 5:25 AM

Good luck with the SPAD John, it looks liek a handful to me.

Cheers

Tony

I'm just taking it one GB at a time.

  • Member since
    July 2004
  • From: Sonora Desert
Posted by stikpusher on Wednesday, July 25, 2012 7:09 PM

John I added your three most recent builds to the front page.Very nice work (as usual!)

Draken, your Thunderjt is looking very swee. I cant wait to see the finished build.

As for me, I pulled the H-13 out and have been fine tuning some parts and will have another go at the OD base color soon


F is for FIRE, That burns down the whole town!

U is for URANIUM... BOMBS!

N is for NO SURVIVORS...

       - Plankton

LSM


  • Member since
    September 2003
  • From: Australia
Posted by Helo H-34 on Friday, July 27, 2012 6:14 PM

Thank's for updating the front page Stik .

I haven't had much bench time these past couple of day's but the Steve Ginter "Early Banshees" book arrived late yesterday and it's chock full of awesome diagrames and photo's of the engine and camera bay section for the 2P version which I'm building

Last night I started adding little bits of plastic and wiring to one of the engines

I haven't done anything like this before , so It's been a little difficult going , especially trying to find suitable bits and pieces to use to make the engine look something like the real thing . I also made some little attachment arms for the Banshee wing fold .

With the F9F-2P Panther , I've only cut and fitted some sheet plastic to the rear tail section and two pieces just aft of the cockpit

A seller on ebay had these great decals for the F2H Banshee and I bought them .

My timing could not have been better as a number of Airfix and MPC F2H Banshee kits have come up for auction these past few days on ebay and I bought and won 5 more kits . Looks like I'll be building a fleet of Korean War F2H-2B/2P Banshee's

Hopfully I can make some more progress this weekend .

John .

  • Member since
    November 2009
  • From: SW Virginia
Posted by Gamera on Saturday, July 28, 2012 11:22 AM

John: Nice find there on the decals, and the piping you've added to your scratch-built engines looks good! They're really starting to look like turbojets now.

SP: I promised myself that I wouldn't start on anything else this year esp with Tigerman's Big Kitty GB coming up so soon. Still I cannot help myself, I've gotten about half way though completing the AFV Club M40 SPG. If you would put me down with that, I'm building her in a Korean War scheme. And I pulled the M46 out the other day and looked her over. I think I can salvage the mucked up PE and hopefully get her done too before much longer.  

"I dream in fire but work in clay." -Arthur Machen


  • Member since
    July 2004
  • From: Sonora Desert
Posted by stikpusher on Saturday, July 28, 2012 1:45 PM

Gamera, I put you down for the the M46 and the M40 on the roster Whistling Just call me hopeful Wink

This morning airbrushed on a new shade of OD on my H-13. Polly Scale US Olive Drab, which to my eye looks much better than their ANA-319 shade which was too light and too green. This one is richer and brownerSmile But I gotta say that the Polly Scale paints and the loaner Grex airbrush were not the best combo... Angry It took me twice as long timewise during this session as anticipated to get this much sprayed on....Black Eye


F is for FIRE, That burns down the whole town!

U is for URANIUM... BOMBS!

N is for NO SURVIVORS...

       - Plankton

LSM


  • Member since
    November 2009
  • From: SW Virginia
Posted by Gamera on Saturday, July 28, 2012 7:51 PM

Thanks SP, I'm sorry about putting aside the M46 but I was so ticked off at the PE I had to shove the thing back in the box and walk away. I'm not using any PE on the M40 except the engine screens that came with the kit.

Nice work on the H-13. I've been using a GREX airbrush for years now and am very happy with mine. Is it just a learning curve there with a loaner brush or is it acting up on you?

"I dream in fire but work in clay." -Arthur Machen


  • Member since
    December 2010
  • From: Yangju, Gyeonggi-Do, Korea
Posted by the_draken on Saturday, July 28, 2012 8:33 PM

Heya Stick!

In case you weren't aware, I've got some detail shots of a flying H-13 on my photo bucket page:

http://s1193.photobucket.com/albums/aa345/the_tunnan/Aircraft%20and%20equipment%20-%20Photos/?action=view&current=PICT0356.jpg

Hope that this helps!  Big Smile

________________________________________________________________________________

Andy Hill (the_draken) landrew.hill(at)live.com <*> ASE Master Auto Tech, Imaca certified.  >^.^<

PADI OWSI Certified, BA Poli Sci (NDSU), BS Secondary ED-Social Studies MSUM (Sigma *** Laude)

  • Member since
    July 2004
  • From: Sonora Desert
Posted by stikpusher on Saturday, July 28, 2012 10:33 PM

Thanks Draken, that looks like an earlier variant of the H-13 with the single fuel tank like on the MRC kit instead of the twin saddle tanks as on the Revell kit. But if I need a look, I will refer back to your pics. Thanks again Wink

Gamera, I think it was a combination of a bit of learning curve with the Grex, and some issues with the paint itself. The paint I am using is one of my older bottles of Polly Scale, and I in the past I have had issues with older bottles of different colors. We shall see during the next session.

Well after doing the OD today and having a look at the stretcher "shelves", I realized that I could install them without interfereing with any future work and make it easier to paint them... so I did. The cockpit bubble it just placed on for the pics and not glued on yet in case you are wondering about the gaps there.

anyways here are a few shots of the stretcher shelves in place...

and a close up of one

Thats all for my H-13 for today/tonite here...


F is for FIRE, That burns down the whole town!

U is for URANIUM... BOMBS!

N is for NO SURVIVORS...

       - Plankton

LSM


  • Member since
    April 2005
  • From: Australia
Posted by taxtp on Saturday, July 28, 2012 11:20 PM

With all that tail boom frame work, that thing looks like hard work. Good job.

cheers

Tony

I'm just taking it one GB at a time.

  • Member since
    September 2003
  • From: Australia
Posted by Helo H-34 on Sunday, July 29, 2012 12:19 AM

I agree with Tony's thoughts and great work so far Stik .

I was wondering what would be the correct colour for the cockpit interior on both the F2H-2P Banshee and the F9F-2P Panther . Airfix suggest black for the Banshee cockpit and Hasegawa offer light gray as the interior colour ? I'm not sure what to do ... Perhaps Black on the tub and seat and interior green for the fuselage inside walls . What do you guy's think .

John .

  • Member since
    September 2003
  • From: Australia
Posted by Helo H-34 on Sunday, July 29, 2012 2:13 AM

I found a pic on google images of the F2H-2P cockpit

And I failed to read the Airwaves PE instruction sheet correctly as it states in section 2 that the cockpit is 'predominantly black'

So , black it is for both ...Wink

John .

  • Member since
    November 2009
  • From: SW Virginia
Posted by Gamera on Sunday, July 29, 2012 8:49 AM

SP: She looks good, and yeah that tail boom looks like a nightmare to get everything aligned halfway straight. I know what you mean about using old paint, sometimes it seems to be both too thick and too thin at the same time.

Though I'll warn you about the GREX, keep using it and you'll end up buying one of your own! I've used five different airbrushes and the GREX is far and away my favorite.

John: Sorry, I don't have a clue but the black looks 'right' to me!  

"I dream in fire but work in clay." -Arthur Machen


  • Member since
    November 2009
  • From: SW Virginia
Posted by Gamera on Wednesday, August 1, 2012 9:21 AM

SP: Could you put me down with a Tamiya 1/35th Jeep as well? I need something simple to get me motivated again so I grabbed the Jeep out of the stash. It's the newer kit and I can't recommend it enough! While dealing with fussy fit and injection pin holes galore in the AFV Club M40 the Tamiya Jeep just falls together. After a few days of work the kit is pretty much assembled. I'm going to try to get the primer coat shot on her soon and some photos posted. 

BTW: Yes the M46 is the DML/Dragon kit. Some may remember I started on her months ago and when I ripped a bunch of PE off handling her I had to either shove the kit back in the box or toss her across the room Angry I think the PE can be salvaged. Funny I don't mind doing stuff no matter how complex or hard but I hate to redo stuff for the second or third time. When it's fixed I want it to stay fixed. Guess it's a character flaw Tongue Tied

"I dream in fire but work in clay." -Arthur Machen


  • Member since
    July 2004
  • From: Sonora Desert
Posted by stikpusher on Wednesday, August 1, 2012 2:28 PM

Ok, I will add the Jeep. Tamiya kits are perfect for that motivational boost to get you back on track. But hey, I think that Patton will rally be sweet when it's done. Looks real good to me now!


F is for FIRE, That burns down the whole town!

U is for URANIUM... BOMBS!

N is for NO SURVIVORS...

       - Plankton

LSM


  • Member since
    July 2004
  • From: Sonora Desert
Posted by stikpusher on Wednesday, August 1, 2012 8:34 PM

A minor update with my H-13. I got another coat of OD onto the stretcher shelves and some of teh fiddly bits that have yet to be attached. There certainly seems to be issues with Polly Scale and the Grex airbrush. Even with it really thinned (4 parts paint to 1 part thinner)  and spraying very thin transluscent layers, the paint was still drying in the tip, clogging, and not co operating. However this is not the case with Tamiya paint and the Grex. Too bad that Tamiya has a weak color selection (and an upcoming price increaseNo ).


F is for FIRE, That burns down the whole town!

U is for URANIUM... BOMBS!

N is for NO SURVIVORS...

       - Plankton

LSM


JOIN OUR COMMUNITY!

Our community is FREE to join. To participate you must either login or register for an account.

SEARCH FORUMS
FREE NEWSLETTER
By signing up you may also receive reader surveys and occasional special offers. We do not sell, rent or trade our email lists. View our Privacy Policy.