SEARCH FINESCALE.COM

Enter keywords or a search phrase below:

Mighty 8th GB 1-Nov-2010 - 31-Oct-2011

142357 views
1358 replies
1 rating 2 rating 3 rating 4 rating 5 rating
  • Member since
    September 2003
  • From: AandF in the Badger State
Posted by checkmateking02 on Wednesday, September 28, 2011 3:49 PM

I agree there's a world of difference between theory and practice.  After reading what B17pilot said, and checking both online and with Freeman's books, I haven't been able to find a single photo that shows the upper wing division/group insignia on any 96th aircraft.  It's more than possible the 96th just didn't follow the order.

I found a photo at this site, maybe you've seen it too.

http://www.nationalmuseum.af.mil/photos/media_search.asp?q=b-17&page=16

It shows a 96th Fort with the wing/division/group device on the tail, none on the wing, and the old style national insignia on fuselage and wing (the one without the white bar).

In my own defense, I built my "Ole Puss" before the internet caught on, back in the mid 1990's--so ignorance is my only excuse; that and the tender mercies of the decal instructions.  You at least have now the knowledge of the modern world to choose from!


  • Member since
    December 2002
  • From: Bury St Edmunds, Suffolk, England
Posted by Bish on Wednesday, September 28, 2011 12:31 PM

OWL, can see the pic now. I have 2 sets Eagle Strike decals of Bodney P-51's, both in 72nd scale, they do like nice sets. And DoogsATX used a set of their 1/48th decals as well, but i think it was a different set. Will look forward to see how you tackle the Blue nose.

I am a Norfolk man and i glory in being so


On the bench: Airfix 1/72nd Harrier GR.3/Fujimi 1/72nd Ju 87D-3

  • Member since
    December 2002
  • From: Bury St Edmunds, Suffolk, England
Posted by Bish on Wednesday, September 28, 2011 12:28 PM

Ok, that this is interesting. I asked the same thing on the Too many props GB and got a slightly different answer from B17pilot. I am sure superscale got the national insignia wrong, but not so sure about the wing BG code. I also found a pic in one of my books thats dated April 11th 44, 6 days before ole puss was lost. It shows 96th BG B-17G's with the code on the tail but not on the upper wing. The order being issued is one thing, being carried out is another.

Maybe the 96th just didn't get round to it, but its a long time from June 43 to April 44. A bit of a mistery. But i do like the BG code on the wing, doesn't look right without it. As i doubt anyone has a pic of ole puss from above, whos to say which is right. So i think i might just add it.

I am a Norfolk man and i glory in being so


On the bench: Airfix 1/72nd Harrier GR.3/Fujimi 1/72nd Ju 87D-3

  • Member since
    September 2003
  • From: AandF in the Badger State
Posted by checkmateking02 on Tuesday, September 27, 2011 5:44 PM

And, Bish, if you have use for one of the Hasegawa antique sheets, I'd be glad to send you one.  I have a couple with all decals complete, including not only "Ole Puss," but also "Miami Clipper," "Miss Ouachita," and "Stuff."  Unfortunately, they are not as thin and refined as aftermarket decals, being a little thick; still I think they applied all right, if I remember.  I built these "F's" back in the '90's, so the memory of each build is kind of vague now.

If interested, you can send me your address in a PM.


  • Member since
    September 2003
  • From: AandF in the Badger State
Posted by checkmateking02 on Tuesday, September 27, 2011 5:39 PM

[View:/themes/fsm/utility/:550:0]

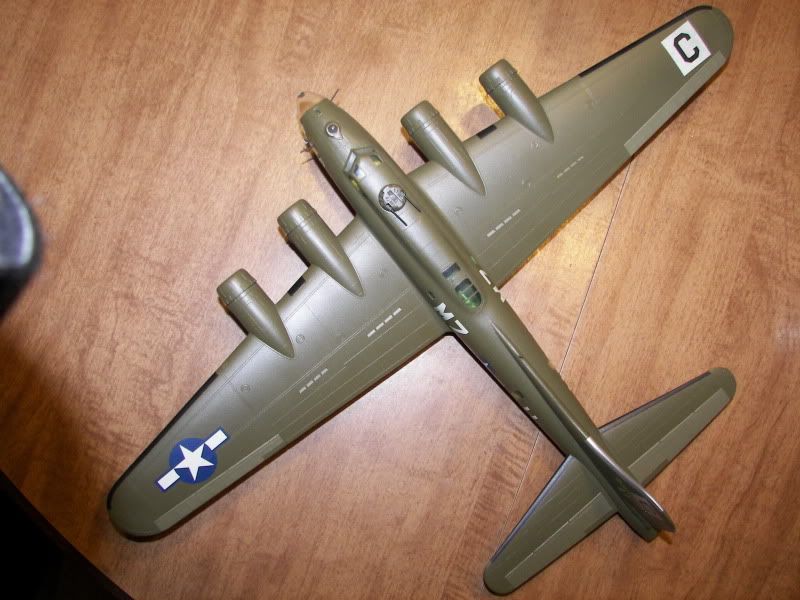
According to Roger Freeman, The Mighty Eighth:  Warpaint and Heraldry, VIII Bomber Command required Group markings from 20 June, 1943.  They were to be carried on the tail fins and wings of heavy bombers.  A geometric shape designated Bomb Wings (a 6 1/2 foot square for 4th Bomb Wing; the letter within indicates Bomb Group--in this case a "C").

Freeman also clearly shows the U.S. insignia carried on the top of the left wing.  The would put the underside insignia on the bottom of the right wing--just as you've said.  The instructions are incorrect in saying the U.S. AAF insignia goes on the top of the right wing. As Freeman notes, "the upper right wing surface" was to the wing/division and group designators.

Reading further, Freeman says that the Bomb Wings became Bomb Divisions in September, 1943, and while the designs stayed the same, new dimensions were issued:  the square became 4 feet high by 5 ft wide.  On the wing, the square was to be 4 3/4 ft chordwise and 6 ft spanwise.

In practice, he says, most times the square was 5 ft high by 4 ft wide, or even just "a true" 4 ft square.

So there you go; you're right; they're wrong.


  • Member since
    December 2002
  • From: Bury St Edmunds, Suffolk, England
Posted by Bish on Tuesday, September 27, 2011 2:56 PM

I was able to finish the gun mount part, i just have to add the braceing. I will do that when i get back next week and see what i can find online over the weekend. I am guessing that the supports would not got that far into the fuselage. I think if it was bolted the bolts would show on the outside, so my guess is they were welded. I guess its going to be all guess work.

Some good news, the decals arrived today, only took 8 days. They are very nice, the nose art isn't 100% accurate, the eyes are not very big and the white object on the left of the cats chest is missing, but in this scale, i its not taht notacable. I do have one question. As i understand it, when the 8th started putting BG letters on their aircrfat, they went on the tail and top of the right wing. The national insignia was on the bottom of the right wing and top of the left. The decal instructions say the national insignia is on top and bottom of the right wing, and has no BG letter for the wing. In fact, none of the 3 aircraft on the sheet have the 3rd BG letter. I can't find any evidence of this in any pics. What did your kit come with. I have a spare BG letter so that won't be a problem.

I am a Norfolk man and i glory in being so


On the bench: Airfix 1/72nd Harrier GR.3/Fujimi 1/72nd Ju 87D-3

  • Member since
    December 2002
  • From: Bury St Edmunds, Suffolk, England
Posted by Bish on Tuesday, September 27, 2011 2:06 PM

I was able to finish the gun mount part, i just have to add the braceing. I will do that when i get back next week and see what i can find online over the weekend. I am guessing that the supports would not got that far into the fuselage. I think if it was bolted the bolts would show on the outside, so my guess is they were welded. I guess its going to be all guess work.

Some good news, the decals arrived today, only took 8 days. They are very nice, the nose art isn't 100% accurate, the eyes are not very big and the white object on the left of the cats chest is missing, but in this scale, i its not taht notacable. I do have one question. As i understand it, when the 8th started putting BG letters on their aircrfat, they went on the tail and top of the right wing. The national insignia was on the bottom of the right wing and top of the left. The decal instructions say the national insignia is on top and bottom of the right wing, and has no BG letter for the wing. In fact, none of the 3 aircraft on the sheet have the 3rd BG letter. I can't find any evidence of this in any pics. What did your kit come with. I have a spare BG letter so that won't be a problem.

I am a Norfolk man and i glory in being so


On the bench: Airfix 1/72nd Harrier GR.3/Fujimi 1/72nd Ju 87D-3

  • Member since
    September 2003
  • From: AandF in the Badger State
Posted by checkmateking02 on Monday, September 26, 2011 6:33 PM

Bish, you have far more ambition than I!!  Go with it.  I had enough trouble just determining where the canopy center was in order to drill a hole to receive the gun.  Then I masked the canopy in the proper shape and painted it--no framing.

I also used Squadron clear pieces, since the kit parts are often too thick--and the Hasegawa's cone is predrilled for the Memphis Belle configuration--not useful at all for the single setup.

Now that you mention it, I don't know if I've ever seen clear pictures how the framework was attached to the fuselage.  I seen photos of crew looking out of the nose but the anchor points don't show.

When I did consider a project like you've undertaken (but quickly dismissed the whole idea!), I did think about drilling holes in the front of the fuselage and seating the frame into them, then gluing the other ends somewhere near the gun itself.  If carried through, I'd probably have used stretched sprue for its flexibility.  But the prospect of a clear nose and the visibility of glue when I smeared it all over caused me to retreat to the "painted-on-look."

I hope you have all kinds of success with this procedure.  I'm sure you'll pull it off well.

But maybe this has motivated me to do the repairs necessary to bring "Ole Puss" back up to speed.


  • Member since
    December 2002
  • From: Bury St Edmunds, Suffolk, England
Posted by Bish on Monday, September 26, 2011 2:57 PM
Check, ye, i have seen those with the twin guns as well. But looking at the ole puss, its deffinatly a single gun. Another thing i noticed is that some of these mounts seemed to be rounded at the top, other straight. I have gone for rounded, though i am not 100% sure thats right for my aircraft. But many of the pics are side on, or at a slight angle, not many are head on. But no, no need to slap your head, theres no AM set for this, at least i haven't found one. I spent all lunch time and all this evening scratching it. I cut a triangle hole in the front of the nose. Then i added a rim with lead foil and used the same for the gun mount. The framing is a bit thick, and i have scratched the clear plastic a bit. Also, because i the way i added the inside, i had to fill in the sides, but its bloody awkward to tidy it up. Now i have to sort out the support frames. I plan on useing wire, but have no idea where this attached to the fuselage as i have found no pics of the inside of one of these. So i will see what i can find at the weekend. This aircraft is going to be sat on a shelf for a while before i do a dio for it. I think i will get a couple of vac form noses and do it again, useing the lessons from this. Plus the thinner vac form plastic should make it easier. Waht i have now isn't perfect, but its not to bad for someone who doesn't scratch that much. I will post some pics when i get home on Thurs. OWL, your more than welcome. Afraid your pics ain't showing up for me at the moment, probably my conection. I will add you to the front page when i get home.

I am a Norfolk man and i glory in being so


On the bench: Airfix 1/72nd Harrier GR.3/Fujimi 1/72nd Ju 87D-3

  • Member since
    January 2010
  • From: Nebraska, USA
Posted by CallSignOWL on Sunday, September 25, 2011 7:58 PM

hmm! The image didnt work and it wont let me edit my post. The pic was suposed to be this.

(The Flying Scot is the middle plane)

------------------------

Now that I'm here, where am I??

  • Member since
    January 2010
  • From: Nebraska, USA
Posted by CallSignOWL on Sunday, September 25, 2011 7:54 PM

Bish, Im starting another Blue Nose for the NMF GB, and was wondering of you'd have me as well. The plane is "The Flying Scot/Vicious Virgie" from Bodney. The kit is Tamiya's P-51B in 1/48 scale.


OWL

------------------------

Now that I'm here, where am I??

  • Member since
    September 2003
  • From: AandF in the Badger State
Posted by checkmateking02 on Sunday, September 25, 2011 7:36 PM

Well, it's hard to keep all these Forts straight, with all the variations and field modification.

You're right about some "F's" having two guns in the nose.  "Memphis Belle" carried two, so did "Delta Rebel No. 2," but they were offset to each side of the center, and didn't seem to cover directly in front very well.  That's maybe why later modifications put the gun at the apex of the cone.

The Fighting Colors book shows a couple of Forts that seem to mount twin guns in the apex of the nose, but most seem to carry just the one.

Do I understand that someone makes a PE set with the necessary hardware for the nose mount?  It has never ocurred to me to even look, so maybe there's another head around that needs slappin'.


  • Member since
    December 2002
  • From: Bury St Edmunds, Suffolk, England
Posted by Bish on Sunday, September 25, 2011 3:32 PM

You raise a good point. For the side windows, i have PE parts that just go around the holes, and they seem to match the pics. I was just going to do the same for the forward gun.But of course a front gun was a field mod.

 And i get the impression that some 17F had 2 guns added, others just one. From that colour plate, it seems to be just the one. Pity the photo of the nose art isn't zoomed out a fraction more.

Would you believe it. Just going through my Sqadron B-17 in action looking at 17F noses to see how those guns are fitted. I have had this book for months, and what do i find. A pic that i have looked at loads of time showing the left forward gun position. But before, i had only looked at the gun. And now i have just noticed its 'ole puss II', showing most of the nose showing what looks like braceing for the forward gun. I think i can do that with wire.

Now to go and slap my self around the head Bang Head

I am a Norfolk man and i glory in being so


On the bench: Airfix 1/72nd Harrier GR.3/Fujimi 1/72nd Ju 87D-3

  • Member since
    September 2003
  • From: AandF in the Badger State
Posted by checkmateking02 on Sunday, September 25, 2011 12:26 PM

I will be interested to see how you go about adding the machine gun to the nose.  Are there aftermarket parts, or will you be scratching this?

I just painted a sort of triangular shape on the nose cone, then drilled a hole to accept the gun; pretty crude--not the most detailed or proper way to procede.


  • Member since
    December 2002
  • From: Bury St Edmunds, Suffolk, England
Posted by Bish on Sunday, September 25, 2011 2:04 AM

Thanks for that. It is a bit confuseing that the Nose Art doesn't have a II, and that other site does say both Ole Puss nose arts are almost identical. Will try and get this bit later is i can find it at a good price. And i am really glad i saw this before i fitted the nose as it will be easy to add that forward MG.

I am a Norfolk man and i glory in being so


On the bench: Airfix 1/72nd Harrier GR.3/Fujimi 1/72nd Ju 87D-3

  • Member since
    September 2003
  • From: AandF in the Badger State
Posted by checkmateking02 on Saturday, September 24, 2011 9:24 PM

[View:/themes/fsm/utility/:550:0]

Here's the page.  I see they don't call it "Ole Puss II."

The book is short, but pretty nice; lots of drawings of gun positions, manufacturing variations and nose art.


  • Member since
    December 2002
  • From: Bury St Edmunds, Suffolk, England
Posted by Bish on Saturday, September 24, 2011 2:10 PM

I just found an image of the book on Amazon, i notice the plate has a .50 cal in the nose. That should be easy to add as i don't have to add the gun, just the mount for it. Be nice to see some more pics if you can.

I am a Norfolk man and i glory in being so


On the bench: Airfix 1/72nd Harrier GR.3/Fujimi 1/72nd Ju 87D-3

  • Member since
    September 2003
  • From: AandF in the Badger State
Posted by checkmateking02 on Saturday, September 24, 2011 1:22 PM

Bish

Thanks guys.

check, i have the In Action book and its not in there. I am waiting for the Walk around book to come back out, it may be in there. Luckly the Academy kit seem to be the right one with the correct forward gun positions and astrodome.

Bish, the profile is in Fighting Colors, B-17 Flying Fortress in Color, by Steve Birdsall, put out by Squadron/Signal Publications in 1986.  "Ole Puss" is on the cover, along with "Little Miss Mischief" and "Shoo Shoo Shoo Baby."  The profile is repeated on page 12.

It doesn't have any information you don't already know, but when my wife gets home from work, I can ask her to scan it and post it.  I don't know how to run this scanner thing.

There were a lot of books coming out in the mid '80's for the Fort, a 50th anniversary, since the Model 299 was completed and tested in 1935.


  • Member since
    December 2002
  • From: Bury St Edmunds, Suffolk, England
Posted by Bish on Saturday, September 24, 2011 12:28 PM

Thanks guys.

check, i have the In Action book and its not in there. I am waiting for the Walk around book to come back out, it may be in there. Luckly the Academy kit seem to be the right one with the correct forward gun positions and astrodome.

I am a Norfolk man and i glory in being so


On the bench: Airfix 1/72nd Harrier GR.3/Fujimi 1/72nd Ju 87D-3

  • Member since
    September 2003
  • From: AandF in the Badger State
Posted by checkmateking02 on Saturday, September 24, 2011 10:17 AM

It's coming along nicely, Bish.

I think one of Squadron's books on the B-17 had a colour profile of "Ole Puss." 

Hasegawa's kit decals from that series were kind of heavy-handed; aftermarket decals will probably look better, anyway.  Plus, there is no astrodome on Hasegawa's kit. I had to vacu-form one.  I hadn't done it before, and remember a lot of failures before I got one good enough to use.

I'm looking forward to seeing your finished product. 


  • Member since
    February 2003
  • From: Northern Virginia
Posted by hutchdh on Friday, September 23, 2011 6:49 PM

Looking good, Bish....Hutch

Hutch

 On the Bench: 1:48 HobbyBoss Ta152-C; 1:48 & 1:72 Hasegawa F-104G NATO Bavaria

In queue: 1:48 Academy F-4B & a TBD Eric Hartmann bird

Recently completed: 1:32 Trumpeter P-51B

  • Member since
    December 2002
  • From: Bury St Edmunds, Suffolk, England
Posted by Bish on Friday, September 23, 2011 6:39 PM

Ok, a second attempt at painting the OD. I am much happier this time, and looking at that nose art of ole puss II, it doesn't look very faded anyway.

Going to give the top a coat of future on Monday as its more of a flat finish than gloss. Just ot a few small bits to finish, wheels, undercarrage legs, guns. Then its just a case of waiting until the decals turn up.

I am a Norfolk man and i glory in being so


On the bench: Airfix 1/72nd Harrier GR.3/Fujimi 1/72nd Ju 87D-3

  • Member since
    December 2002
  • From: Bury St Edmunds, Suffolk, England
Posted by Bish on Friday, September 23, 2011 6:29 PM

Well would you believe it. I never knew Hasegawa did this kit. I have seen that site you posted, taht was all i needed to be sure this one was a real aircraft. The decal sheet i ahve ordered has the same number. Though its interesting that it call is ole puss, not ole puss II

http://modelingmadness.com/scotts/decals/super/ss72547.htm

So i will compare the decals with the photo when they arrive. But there doesn't seem to be a II on the nose art, so it should be ok.

I am a Norfolk man and i glory in being so


On the bench: Airfix 1/72nd Harrier GR.3/Fujimi 1/72nd Ju 87D-3

  • Member since
    September 2003
  • From: AandF in the Badger State
Posted by checkmateking02 on Sunday, September 18, 2011 4:37 PM

Hi, Bish:

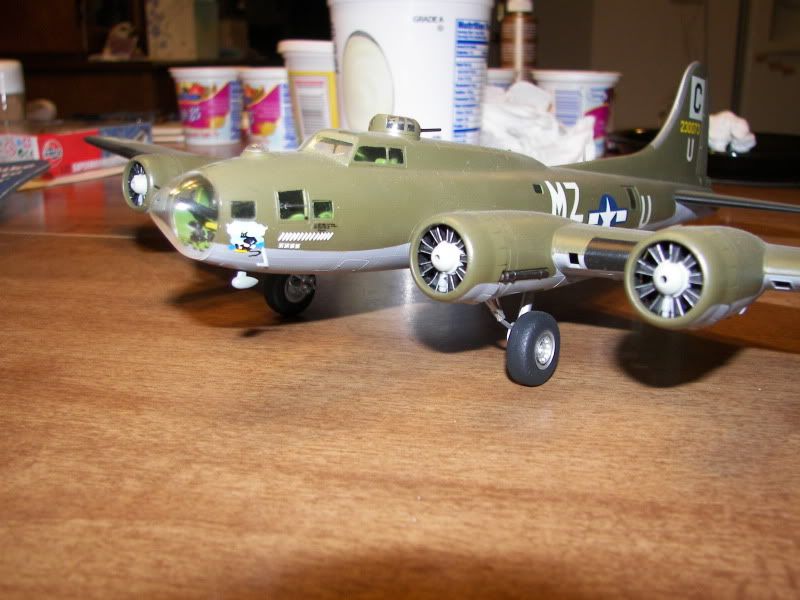
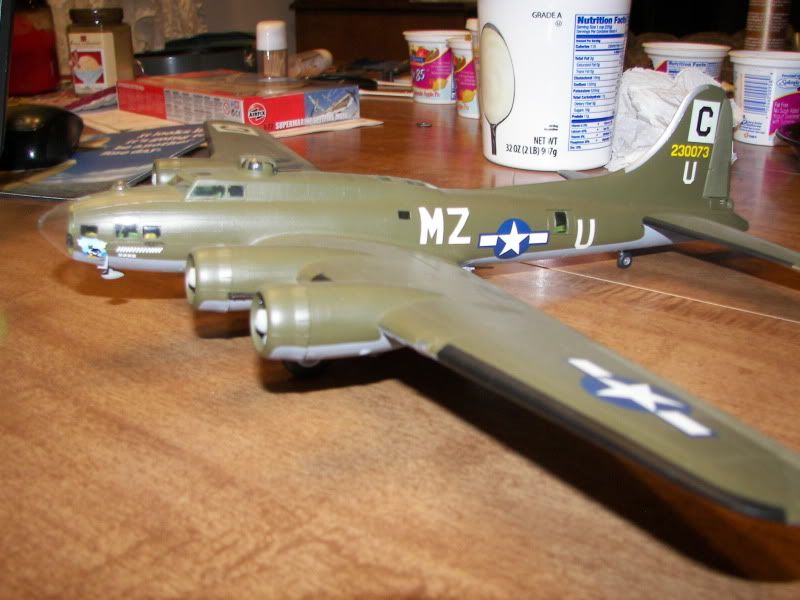
I am ashamed to say that it took so long to click in my brain that you were interested in th 96th Bomb Group and looking for decals.  Only after reading your post about "Ole Puss II" did I realize that Hasegawa put out this plane over 20 years ago, and it was sitting built up in my hobby room.

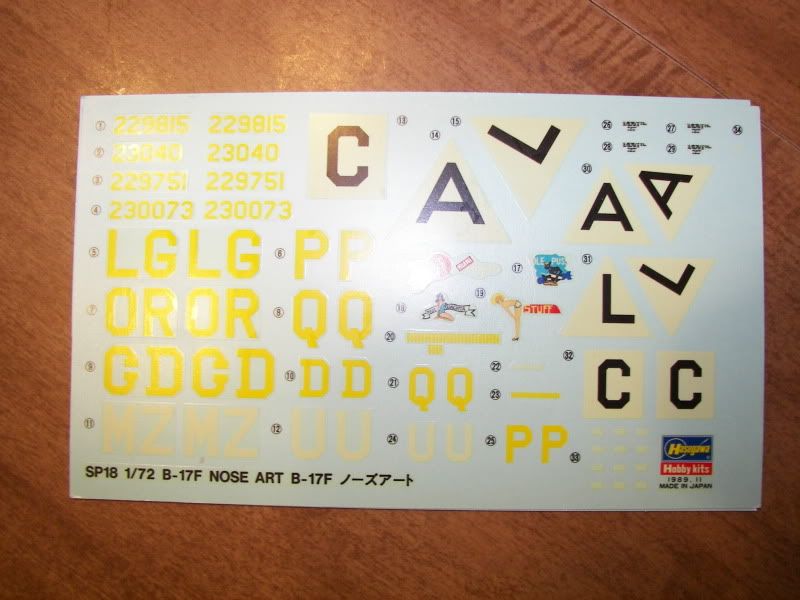
Back then, Hasegawa boxed up both their "F" and "G" models with several options for decals, and I bought enough kits to build all of them.  The point is, I have extra sheets for "Ole Puss II," and would have sent them to you, if my brain had been working.  If you have a need, now or in the future, please let me know and they are yours, since I don't expect to do a second model of this plane. 

Again, I apologize for my oversight.

Below is a photo of the decal sheet--you can see the copyright is 1989, a real antique; also a couple of photos of the plane, which has taken a bit of damage over the years--props off; nose gun fell back into the bombadier's compartment, supercharger and tail guns fell off.  She's almost ready for the salvage yard, too.

I'm still planning on doing "Our Gal Sal," and hope I can finish it by the time the build ends--unless, of course, you want to give us an extension?

[View:/themes/fsm/utility/:550:0]
[View:/themes/fsm/utility/:550:0]

[View:/themes/fsm/utility/:550:0]

 [View:/themes/fsm/utility/:550:0]

According to this website, Hasegawa did get the serial number right.

http://www.usaaf-noseart.co.uk/white-puss.htm


  • Member since
    November 2003
  • From: Nashville, TN area
Posted by bobbaily on Friday, September 16, 2011 10:07 AM

Bish-glad to read that you found your decals.  Always good when things come together.

Looking forward to seeing more pics once the decals are on.


Cheers


Bob


  • Member since
    December 2002
  • From: Bury St Edmunds, Suffolk, England
Posted by Bish on Friday, September 16, 2011 9:21 AM

Jusdt a quick update. Firstly, excuse my absence not just from this thread but from the forum as a whole. I haven't been able to conect frfom my room in camp for the last couple of weeks, and i can't see that changeing soon.

On the modelling front i have been in limbo. I haven't wanted to do anything to the B-24 in case i was able to get the decals for the 17, but i haven't been in the right frame of mind to do to much to the 17 as i wasn't sure if i would get the decals. But i have just had an invoice from the guy and have just bought those decals. Hopefully they should be with me in 2 weeks, just in time to finish this up. I have re painted the undewrside this week and next week i am going to re do the OD completly. It should all be ready for decalling by the time they get here. So i should have some pics up of the fresh paint job by next weekend.

And little, thanks again.

I am a Norfolk man and i glory in being so


On the bench: Airfix 1/72nd Harrier GR.3/Fujimi 1/72nd Ju 87D-3

  • Member since
    December 2002
  • From: Bury St Edmunds, Suffolk, England
Posted by Bish on Sunday, September 11, 2011 1:56 AM

Thanks for the heads up on the Klear Doogs.  Deffinatly going to get some for my next NMF.

I am a Norfolk man and i glory in being so


On the bench: Airfix 1/72nd Harrier GR.3/Fujimi 1/72nd Ju 87D-3

  • Member since
    June 2010
  • From: Austin, TX
Posted by DoogsATX on Saturday, September 10, 2011 10:53 PM

Thanks guys!

Bish - I used Alclad's Klear Kotes to seal the decals. Matte on the wings, Light Sheen on the fuselage. Really like the stuff...too bad it's mineral spirit based, which makes it kinda crappy for more aggressive weathering with oils and such...but for NMF its great.

On the Bench: 1/32 Trumpeter P-47 | 1/32 Hasegawa Bf 109G | 1/144 Eduard MiG-21MF x2

On Deck:  1/350 HMS Dreadnought

Blog/Completed Builds: doogsmodels.com


  • Member since
    November 2003
  • From: Nashville, TN area
Posted by bobbaily on Saturday, September 10, 2011 9:00 AM

Great build Doogs.  I really like the weathering & panel shading.  Well done!

Bob


  • Member since
    December 2002
  • From: Bury St Edmunds, Suffolk, England
Posted by Bish on Saturday, September 10, 2011 3:34 AM

Doogs, a beut as always. You have done an amazing job on this, and i love the look you have got on the panel lines, just perfect.

Afraid i couldn't get on line last week so am haveing to catch up on everything. Just in case i missed it, do ypou mind if i ask again about sealing your decals. Did you use anything to seal them on the NMF and if so what did you use.

I am a Norfolk man and i glory in being so


On the bench: Airfix 1/72nd Harrier GR.3/Fujimi 1/72nd Ju 87D-3

JOIN OUR COMMUNITY!

Our community is FREE to join. To participate you must either login or register for an account.

SEARCH FORUMS
FREE NEWSLETTER
By signing up you may also receive reader surveys and occasional special offers. We do not sell, rent or trade our email lists. View our Privacy Policy.