SEARCH FINESCALE.COM

Enter keywords or a search phrase below:

Automotive Group Build Nov 11, 2010 - June 10, 2011

25563 views
141 replies
1 rating 2 rating 3 rating 4 rating 5 rating
  • Member since
    April 2005
  • From: Australia
Posted by taxtp on Sunday, December 5, 2010 6:43 AM

Hi Greg,

I'm with you on the colored plastic thing, why do they do it ? I always end up priming heavily to hide it. I do most of my modelling late at night, when my eyes are tired, and dark coloured plastic is starting to give me some trouble. Nonetheless, your Mustang is coming along, I can see a that you are spending some time on the details too.  I like the way they build up with the chassis and roll cage, I might have to go there.

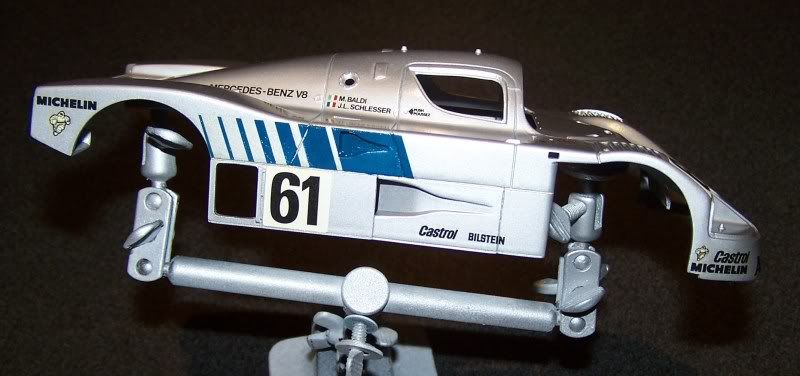
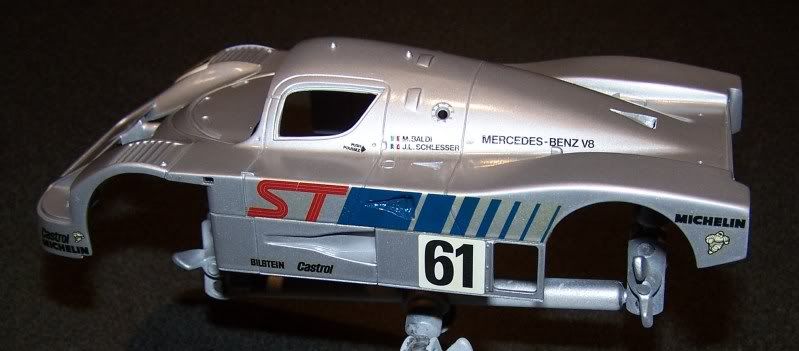
In the meantime I decalled the Merc today. After several glitches with earlier builds of these Hasegawa Group C cars, I'd sworn off their decals and determined to use aftermarket where ever possible. That strategy has been working well, until, , I got sucked in again. They've all gone on perfectly, but for some reason the blue stripes on the sides became really rough in texture. I thought they were breaking up, but they didn't.. After multiple iterations of heat, pressure, Super Set , Sup Sol and bad language, I think I've got them down flat enough that I can put a few coats of clear over them and polish it out where necessary. However, you can make out how bad it is within the NACA duct, I'll have to get those out and paint it I think. It happened on both sides, and only to the blue part of the decal...go figure. All other decals were just fine. You may also notice that the bottom edge of the blue decal is a little uneven, but its right on a panel line and can be trimmed and tidied up easily enough.

As far as those blue stripes goes, the silver C9s raced at many venues with out it. To my eye, the car is more aesthetically pleasing without it too. However, the research I've  done so far is indicating that Suzuka was the only race where the car had the front centre panel as depicted in the Hasegawa kit, and silver liverie. It also had those blue stripes. Think I'm stuck with it.

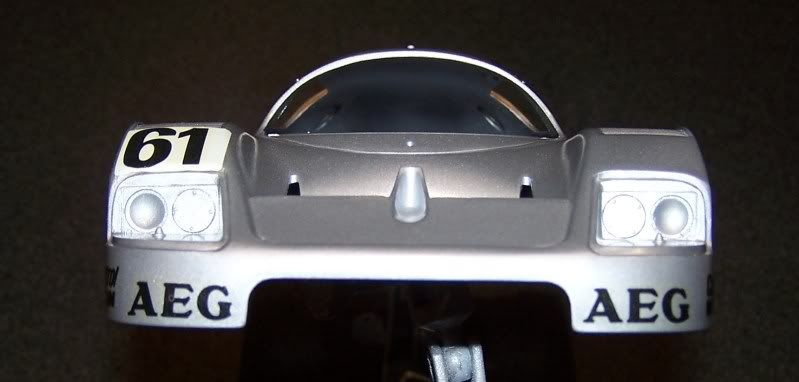
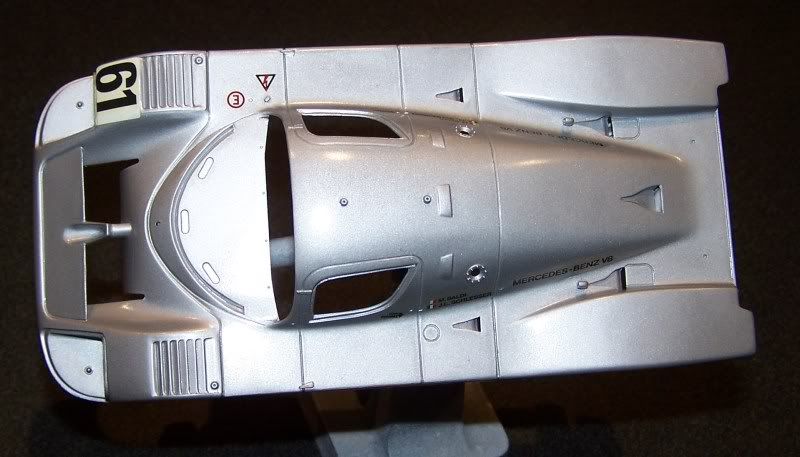
This version raced a few times in 1988 in AEG Circuit Board liverie too. If you want to see the difference, compare the front centre panel of the car on the Tamiya box lid above, with this front centre panel below. On the Tamiya kit, the front panel is larger, and that air scoop (I guess that's what it is) is situated in the middle of the panel, immediately above the red AEG (it's a little hard to see). On the Hasegawa kit, the panel is smaller, the air scoop juts out above it. It raced like this at a few races in 1988, and only at Suzuka in 1989. I have to check my Revell Kouros C9 as well, because it was based on the Hasegawa kit, so may well have the smaller panel. However, the car raced with Kouros liverie in 1987, and I haven't found any photos showing the car being raced in this configuration during 1987. I may have to stick my Kouros decals onto a Tamiya body.

BTW, there is a Studio 27 decal sheet, featuring the Kouros liverie, and also one where Michelin was the major sponsor. It was discontinued so long ago though, I haven't been able to find one.

Here is the rest of the progress shots.


I haven't picked up that version of the Tamiya C9 kit as yet, getting one at half price would be ideal. However, in line with my earlier comment, I do have the Studio 27 decal sheet for it on order.

I'm just taking it one GB at a time.

  • Member since
    October 2009
  • From: Texas
Posted by Gregbbear on Saturday, December 4, 2010 10:45 PM

Got some more done on my Mustang.  Not a lot, but photographable.....

Back to the P-38!

Cheers,

Greg

- yat yas!


  • Member since
    October 2009
  • From: Texas
Posted by Gregbbear on Saturday, December 4, 2010 1:50 PM

Yes, I have actually done something on this hunk of red plastic.  Some of the assemblies are simplified to the point, it would require major surgery to get them right.  Nice kit though, except for the red plastic!  Can you tell I hate colored plastic?

Tony, looking good on the C9.  I like that Tamiya gloss aluminum.  It is one of the few spray can paints I have had great success with.  I built the Tamiya version years ago.  It was a great kit.  I have another one that is in the stalled stage.  I did pick up the new Tamiya one half off recently.  I'm thinking about building them together.....

Better get back too it.

Cheers,

Greg

- yat yas!


  • Member since
    March 2008
  • From: Toledo, Ohio
Posted by phoneguy on Saturday, December 4, 2010 6:57 AM

I forgot about that one.  I was planning on watching the movie to see what exactly i have to do.  I think the hand was in the other car tho, not the gto.

On the Bench:

B-29 Superfortress

1/48th A-6E Bomber

Welcome to Wal-Mart:  Get your stuff and get the HECK Out! 

Shut up, I'll Keel U!


  • Member since
    April 2005
  • From: Australia
Posted by taxtp on Saturday, December 4, 2010 3:13 AM

Hi Everyone,

Here are a couple of photos of the body, which I've painted with Tamiya aerosol gloss aluminium now. This is the colour recommended in the Tamiya kit instructions.. The photos of the chassis didn't work out, I'll post some more next time. It's just flat black at this stage, not too exciting.

Cheers

Tony

I'm just taking it one GB at a time.

  • Member since
    September 2015
  • From: The Redwood Empire
Posted by Aaronw on Friday, December 3, 2010 10:18 PM

Are you going to include the raising light up finger in the back window? I haven't seen the movie in a longtime, but that stands out.

As long as it has wheels and goes vroom it should be good. Big Smile

  • Member since
    March 2008
  • From: Toledo, Ohio
Posted by phoneguy on Friday, December 3, 2010 6:19 PM

I'm gonna try to find a 68 gto.  I have two 72's.  May have to bash them and redo the hood, and front end to make it like the 68.  I would like to do it like the "My Science Project" gto tho.  The 72's are made by mpc and are in 1/25th scale.  will let you know more if i can find one or have to do alterations.  Hope that is still within the guidelines.  let me know please.


On the Bench:

B-29 Superfortress

1/48th A-6E Bomber

Welcome to Wal-Mart:  Get your stuff and get the HECK Out! 

Shut up, I'll Keel U!


  • Member since
    September 2015
  • From: The Redwood Empire
Posted by Aaronw on Friday, December 3, 2010 10:09 AM

I wouldn't call that lazy, just different priorities, and really which will be more noticable once it is on display. I think that is one of the (many) reasons I like 1/72 for aircraft, not a ton of hidden detail and they are small and cheap enough to allow me to build several of the same kit if there are many different paint schemes.

  • Member since
    April 2005
  • From: Australia
Posted by taxtp on Friday, December 3, 2010 6:37 AM

Hi Everyone,

Here is a quick status update on the Sauber Merc C9. The chassis and wheels have been sprayed flat black and the body has been sprayed Gloss Aluminium. I think I may put down a coat of gloss or two prior to decalling just to ensure good smoothness and also allow for some good old fashioned polishing if required later on.

I hope to photograph tomorrow once the paint is dry.

I too have both the Tamiya and Hasegawa kits,and also the Revell re-pop of the Hasegawa one. The bodys make an interesting comparison, I'll try to photograph that too.

For my money, the Tamiya kit is superior by quite a long way, but I'm saving it for one of those rare occasions when I feel like going for full detail. There is a lot of aftermarket available for it too.

For some reason, my current interest is attracted more to the variations in liveries of these racing cars rather than reproducing the full engine bay, cockpit and brake detail. I think that reason might be called the 'lazy streak', or maybe 'short span of attention'.

Cheers

Tony

I'm just taking it one GB at a time.

  • Member since
    September 2015
  • From: The Redwood Empire
Posted by Aaronw on Friday, December 3, 2010 2:15 AM

Phoneguy, a GTO would be fine, just let me know the scale and kit.

  • Member since
    April 2005
  • From: Australia
Posted by taxtp on Thursday, December 2, 2010 9:15 PM

Hi Phoneguy,

I'm not running the show here, but I would love to see another participant come on board.

Cheers

Tony

I'm just taking it one GB at a time.

  • Member since
    March 2008
  • From: Toledo, Ohio
Posted by phoneguy on Thursday, December 2, 2010 6:14 PM

Would you accept a 68 GTO from the movie "My Science Project"?  I Have a couple of 72's that I have been wanting to build like the 68.  I'll sned pics when I can this weekend.  Let me know.  Thanks


On the Bench:

B-29 Superfortress

1/48th A-6E Bomber

Welcome to Wal-Mart:  Get your stuff and get the HECK Out! 

Shut up, I'll Keel U!


  • Member since
    October 2009
  • From: Texas
Posted by Gregbbear on Thursday, December 2, 2010 12:13 AM

Tony, your 962 came out great.  That and the C9 are a couple of my all time favorites.  I have built the Tamiya versions, but not the Hase, although I have both in the stash.  You have great taste in cars for sure!

I should have some wip pictures by tomorrow of my mustang.

Cheers,

Greg

- yat yas!


  • Member since
    September 2015
  • From: The Redwood Empire
Posted by Aaronw on Wednesday, December 1, 2010 8:07 PM

Very nice group of racers you have going there.

I've been falling behind a bit in my duties here, work and cold weather have kind of put a damper on my enthusiasm. I've got the front page updated and hope to get more done on my projects.


Squid, I grew up in the SF Bay Area back when the phone company was simply Pacific Bell or more typically THE phone company. I really don't recall their trucks though, except for the current white trucks.

  • Member since
    September 2007
  • From: Truro Nova Scotia, Canada
Posted by SuppressionFire on Wednesday, December 1, 2010 5:58 AM

Good work everyone!

Sorry I have not been model building the last few weeks so no WIP's from me. Probably early 2011 before I hit the Mercury. Have a 1/72 scale Hetzer that needs finishing and a street scene base to go along with it.

Did flip through the pages and it is very inspiring to say the least!

Keep on trucking... er model car building buddies!

http://i6.photobucket.com/albums/y211/razordws/GB%20Badges/WMIIIGBsmall.jpg


  • Member since
    April 2005
  • From: Australia
Posted by taxtp on Wednesday, December 1, 2010 5:51 AM

Hi Everyone,

I've spent several days preparing the body and chassis for primer. Apart from a lot of cleaning up of ejection marks, sinkholes, rough edges and the usual stuff, I've fixed in some side panels, added the rear suspension and a few other odds and sods to the chassis, and fared in the rear panels of the body, which just didn't fit too well. Cyanoacrylate is used exclusively as the filler. The body has already received it's first coat of Tamiya grey primer, after I took these photos, but it's still wet.

The ejection pin marks and Hasegawa logo still visible on the last photo of the chassis are completely hidden once the model is put together, so I just haven't bothered.

cheers

Tony

I'm just taking it one GB at a time.

  • Member since
    April 2005
  • From: Australia
Posted by taxtp on Friday, November 26, 2010 10:59 PM

Here I go again, this time it's Hasegawa Sauber MercedesC9 from the 1989 WSPC season, the first 'Silver Arrow' after their 33 year exile from motor racing. The team went on to win seven out of eight races and took the constructors and drivers championships with Jean-Louis Schlesser crowned champion.

The kit decals show it as raced at Suzuka in the first race of the season, that's good enough for me. The race was won by Schlesser and Mauro Baldi in the Mercedes.

Here's what you get:

Progress photos to come once I've started.

Cheers

Tony

I'm just taking it one GB at a time.

  • Member since
    April 2005
  • From: Australia
Posted by taxtp on Thursday, November 25, 2010 11:02 PM

HI Mr Squid,

Thank you very much for your kind words.

Actually I set out at the start of this year to build a succession of car kits, just so that I could refine my techniques and then establish some consistency in my finishing approach and therefore results.

That Porsche is the 9th car kit I've completed this year, and it's probably starting to reflect what I was trying to achieve, although, to be honest, it is far from perfect, and is only a curbside.

It's interesting that I've been able to finish 9 this year, but I've only got 27 in total (including these 9) since I started building car kits in 1990. That being said, there have been a few figures, aircraft, ships, AFVs, and other assorted stuff too.

If you look at the photo of my car cabinet above,  one of the Silk Cut Jaguars near to the Porsche was built in 1990, all of the other Group C cars have been completed this year.

I'm going to decide on my next car build in the next few days. At the moment I am leaning towards another Group C car, or otherwise a quick build of a Heller 1/43 F1 Car. They did five of them originally, but I've worked out that you can actually complete 9 different cars by doing some simple conversions. I've got some of these planned in 1/20 (for example I converted a Lotus 99T to a 98T a little while ago) but it would be fun to knock some of these over as quick little 1/43 builds. The detail in these kits is so poor that  it's about all they're good for.

Cheers

Tony

I'm just taking it one GB at a time.

  • Member since
    March 2007
  • From: Atlanta, Ga.
Posted by MrSquid2U on Thursday, November 25, 2010 4:15 PM

Tony,

 I came back just to appreciate your Porsche build again and better soak in the details and mods you made.


It is truly one clean, fine build.


I'm envious- wish I had one that good.Toast


  • Member since
    April 2005
  • From: Australia
Posted by taxtp on Wednesday, November 24, 2010 2:23 PM

Thanks very much Bob and Mr Squid.

I'm just taking it one GB at a time.

  • Member since
    March 2007
  • From: Atlanta, Ga.
Posted by MrSquid2U on Wednesday, November 24, 2010 1:08 PM

Tony,

 That is an excellent CLEAN build there! Mighty impressive collection (that section?) too. I think you are safe from the "boots" now!Stick out tongue


  • Member since
    November 2003
  • From: Nashville, TN area
Posted by bobbaily on Wednesday, November 24, 2010 7:39 AM

Very nice build Tony.  Good work.

Bob


  • Member since
    April 2005
  • From: Australia
Posted by taxtp on Wednesday, November 24, 2010 7:07 AM

Well here it is, a 1/24 Hasegawa Joest Racing Porsche 962C. It's got Studio 27 decals, modified to represent a 962C short tail as raced at the Silverstone 1000 in 1988. The Studio 27 set is for a long tail, as raced at Le Mans in the same year. The tyre sponsorship is Dunlop ratehr than Goodyear, these decals were sourced from other kits. The driver line up is different, so I made these decals using Microsoft Word and some clear decal paper. The banner across the windscreen is made from red decal stock and some lettering I pinched from another kit. The wheels are from another kit too. I've also added an antenna, some racing harnesses, the little fins on the front corners of the car, but that is about it. The only other additional work was to polish out the windscreen, as it was too scratched.

Aaron - I've completed my two builds listed on page one, I'll come back with another one shortly.

Cheers

Tony

and here is one of the Group C section of the cabinet

I'm just taking it one GB at a time.

  • Member since
    April 2005
  • From: Australia
Posted by taxtp on Tuesday, November 23, 2010 5:46 PM

Mr Squid,

I am acutely conscious of the the boots and have been continuing work.

To be honest, I could put up a photo now and call it finished. However there are three small items still requiring some effort.

1. Add an antenna from piano wire.

2. Black wash or marker pen in the panel lines

3. I noticed the other night that this car carried some little finlets at front corners, as did many other 962Cs. The Studio 27 photo etched set actually has them. They need to be white. One side is primed and sprayed, the other side should get done tonight. Then I have to fix them to the body, which may be a little delicate, so I'll do it as the very last thing.

Cheers

Tony

I'm just taking it one GB at a time.

  • Member since
    March 2007
  • From: Atlanta, Ga.
Posted by MrSquid2U on Tuesday, November 23, 2010 4:29 PM

Tony?

 Do I hear those boots sneaking up to prod you to post pics?Devil

Thanks gents for the kind words. I do appreciate them and should have pics later tonite.Hmm


BTW: Aaron, I wanted to mention that growing up in the Bay Area IIRC PacBell although I forget what it was called then, used lil utility vans painted kinda close to that green of yours? Too Cool!


  • Member since
    March 2010
  • From: New Zealand
Posted by Scorpiomikey on Tuesday, November 23, 2010 2:01 PM

Nice updates everyone, sorry for the lack of updates on my part.

Progress so far, the chassis is pretty much done. Il now working on the body shell which is being a PITA cos of the red. (red and white dont mix well together) Ill get there tho, and ill post photos this weekend.

"I am a leaf on the wind, watch how i soar"

Recite the litanies, fire up the Gellar field, a poo storm is coming Hmm 

My signature

Check out my blog here.

  • Member since
    April 2005
  • From: Australia
Posted by taxtp on Monday, November 22, 2010 11:20 PM

I like both of those updates, the truck will be good Aaron. That is some serious detailing, done the hard way without aftermarket, Mr Squid.

I've found that there is more work than I thought to complete my Porsche. I'd forgotten that the banner across the top of the windscreen is different for this car, so I've used a number of decals from other sources to achieve it.

It's getting close now, but probably a couple more days are required. I'm resisting posting a photo until it is finished.

Regards

Tony

I'm just taking it one GB at a time.

  • Member since
    October 2009
  • From: Texas
Posted by Gregbbear on Sunday, November 21, 2010 1:33 PM

That is some cool detail that you are adding!

Aaron, I like the forrest truck idea.  That ought to be pretty interesting.

I am half way through a 96 hour stretch at work, and I forgot my darn car!  The model one, that is, otherwise I'd still be walking!  I'm still following, even if I'm not building at the moment though.

Cheers,

Greg

- yat yas!


  • Member since
    March 2007
  • From: Atlanta, Ga.
Posted by MrSquid2U on Sunday, November 21, 2010 12:41 PM

GeekedAaron,

 The "smiley bits" are components to the shocks on the front end. I can agree with ,"Out of sight, out of mind". But on this lil roadster pickup those things are all exposed.Wink


  • Member since
    September 2015
  • From: The Redwood Empire
Posted by Aaronw on Sunday, November 21, 2010 11:47 AM

What are the tiny bits you have arranged like a smiley face? I assume they go into the wheel and brake assembly which follows but can't make them out in there.


Nice progress so far, I'm typically a "if I can't see it I'm not doing it" builder but I do enjoy watching people go hog wild on the details.  

JOIN OUR COMMUNITY!

Our community is FREE to join. To participate you must either login or register for an account.

SEARCH FORUMS
FREE NEWSLETTER
By signing up you may also receive reader surveys and occasional special offers. We do not sell, rent or trade our email lists. View our Privacy Policy.