SEARCH FINESCALE.COM

Enter keywords or a search phrase below:

The group build to end all group builds - THE GREAT WAR

156470 views
1091 replies
1 rating 2 rating 3 rating 4 rating 5 rating
  • Member since
    April 2008
  • From: Philadelphia PA
Posted by smeagol the vile on Thursday, June 2, 2011 4:29 PM

that tank is so sexy


  • Member since
    March 2006
Posted by TD4438 on Thursday, June 2, 2011 4:29 PM

That unditching beam is a nice touch.I shoulda put one on mine!

  • Member since
    April 2005
  • From: Piscataway, NJ!
Posted by wing_nut on Thursday, June 2, 2011 9:17 PM

That tank is looking fan-freakin-tasic.

OK... I am changing horses in the middle of the stream.  Seems the Unimono is just fishing line... more or less.  But which size of the Unimono are using?  The .004 or the .007?  4lb line is .008 and 2 lb is .004... about the same is invisible thread. But that seems too thin.

Marc  

  • Member since
    December 2010
  • From: Memphis TN
Posted by Heavens Eagle on Thursday, June 2, 2011 10:36 PM

Since we are on the subject of flying wire thicknesses, an actual reference to wire size will be more helpful that a bunch of guessing.  I made up this reference photo from some info on the Hannover flying wires and sizes.  The original drawing (scanned from Windsock 23 Pg 27) gives some idea how the thicknesses of flying wires were used depending on load.  I also have given diameters of given wires for 48th and 32nd scales to ten thousandths of an inch.  Thus you can adjust your line diameter to get close or give an effect of the different thicknesses. Toast


One more thing, over at Hobby Lobby they have very fine mono-filament thread in the sewing department. There are 2 colors clear, and black.  This thread is .004" in diameter and is fairly strong for the thickness.  Also over in the beading department they have 32 gage wire that is .0095" in diameter. that is in brass, copper, and silver colors.  I also have some 2 lb fishing line that is .006" diameter that I have had for years.

A little variance might be a good thing.  Some very much thinned silver or steel color paint will work quite well to color the cables too.

Here is a 20 year old example.  It is pre WW2 but it gives a good example This Hasegawa 1/72 He 51 flying wires are all made from stretched sprue and are VERY thin and delicate.  Silvered with a very thinned paint they look more like polished aluminum which in this case they were.  They weren't cables on the plane but wire.


And finally I have decided to just build the German Hannover CL.IIIa in 1/48th scale.  The upper wing will have to be rebuilt from scratch but that is part of what I am wanting to attempt.  Will post some photos later of how this kit scales out to drawings.

  • Member since
    August 2005
  • From: Oshawa, Ontario
Posted by u-69 on Thursday, June 2, 2011 11:20 PM

wing_nut

That tank is looking fan-freakin-tasic.

OK... I am changing horses in the middle of the stream.  Seems the Unimono is just fishing line... more or less.  But which size of the Unimono are using?  The .004 or the .007?  4lb line is .008 and 2 lb is .004... about the same is invisible thread. But that seems too thin.

Hi Marc;

I'm not sure about that - 2 or 4lb line diameters would depend on the  material & manufacturing processes used... ~ I would guess ~  the fishing line I have here is 4lb @.008in, I measuerd the mono [it says "size 4"] it's .004in.

So I guess as far as diameter goes, 'it does not matter' [I hadn't bothered to measure till now] but I can say 2 things for the mono... 

1. mono was easier to work with than the line & held both glue & ink better, fishing line was s***
2. the mono only cost $1.86 -- I bought the cheapest fishing line I could find and it was over $12.00 

I did not know the mono also came in a larger diameter - might be a good idea to pick up both sizes then decide [I know I am gonna look for it!!] cause the .004 stuff looks like it will even be fine in 1/48 & 1/72 - keeping in mind that it stands out quite a bit more when you color it... 

Anyway - to get an idea, here is my Pfalz done up with the .004 mono & silver sharpie.

-sean


BigBlock Studios web design:
http://www.bigblockstudios.ca

My Models:
http://www.onetofortyeight.com

  • Member since
    April 2005
  • From: Piscataway, NJ!
Posted by wing_nut on Friday, June 3, 2011 7:08 AM

DoogsATX

Marc - That thing gets prettier with every pic! How are you finding rigging the control horns? I'm concerned about knocking or pulling them off. Those and the ailerons. And the rudder. And the landing gear...

Sorry doogs, missed that first time around.  The rudder doesn't have control horns but there is a shaft at the front edge that goes down into the fuselage.  I assumed that meant the cables is inside for that part. 

For the elevator horns, I glued a tiny piece of tubing to each end.  Since I was using the wire it was easy to get it straight and glue one end into the holes made in the tail.  The other end had an eyelet with a long tail fed through the tube on the horn.  The tail was pulled to take up and slack there may he been in the wire, glued and the excess clipped.

The ailerons only have 1 cable that runs down into the lower wing so I drilled a hole through the lower wing.  The cable will be pulled taught through the hole, clipped flush with the bottom of the wing and a small disk punch of matching decal color to cover the spot.

Marc  

  • Member since
    June 2010
  • From: Austin, TX
Posted by DoogsATX on Friday, June 3, 2011 10:00 AM

Thanks Marc. Weird that there are no control horns on the rudder. The Pup has two, way down by the tail skid. They dump back into the fuselage after a pretty short distance, but that extra bit of leverage seems like it would be kind of a big deal. 

I'm still worried about tugging on the fiddly bits, not to mention "double-rigging" most of the control horns, but I think I'm finally developing a workable plan.

u-69 - you sold me on the uni-mono. The monofilament fishing line I was working with for the cockpit rigging was already quite thin, but did not take color well at all, be it paint or sharpie. 

Pupdate - Construction is very nearly complete. I have to finish painting the padded windscreen, attach it and the MG, and one small PE bit. And paint the metal border of the step up. I'm debating whether I want to add dirt and such now, or wait until after rigging. 

Here's where it's at now. The struts aren't glued...and honestly the fit is so snug I'm debating not gluing them at all. If I do, it'll be with Gator's Grip so they have a bit of elasticity.


On the Bench: 1/32 Trumpeter P-47 | 1/32 Hasegawa Bf 109G | 1/144 Eduard MiG-21MF x2

On Deck:  1/350 HMS Dreadnought

Blog/Completed Builds: doogsmodels.com


  • Member since
    August 2005
  • From: Oshawa, Ontario
Posted by u-69 on Friday, June 3, 2011 10:24 AM

Here's where it's at now. The struts aren't glued...and honestly the fit is so snug I'm debating not gluing them at all. If I do, it'll be with Gator's Grip so they have a bit of elasticity.

I haven't been gluing them recently either - the rigging will hold the wing in place & if for some reason you have to take the wing off down the road.... 

-sean

BigBlock Studios web design:
http://www.bigblockstudios.ca

My Models:
http://www.onetofortyeight.com

  • Member since
    March 2007
  • From: Carmel, CA
Posted by bondoman on Saturday, June 4, 2011 12:28 AM

Wingnut- may I add another model, and start it first?

The 1/350 SMS Dresden, sole survivor of the Battle of the Falkland Islands.

Actually, I've started her. Hope to post some pictures by Sunday afternoon.

  • Member since
    April 2005
  • From: Piscataway, NJ!
Posted by wing_nut on Saturday, June 4, 2011 6:58 AM

Man, I gotta start paying attention...

Welcome to the GB Heavens Eagle.  That little chart is handy.  Could have used that a few weeks ago.

I will update the roster bondman.  Let's see some pics when you get the chance.  Who makes the kit?


Well, I went to the fly tying store and ask for Unimono thread.  They did not have it but they did have an actual thread made by Uni.  It came in gray and thought I'd give it a try.  It looked thin but held next to the Ultra Wire and some invisible thread it looked just about right.  The invisible thread looks to thin for 1/32 and scale to only 1/8".  The Uni thread may be as thin but it "looks" thicker. 

I did the LG last night and it looks great. Pics to follow.  And easy to work with?  OMG! Once the thread is looped back through the tube just a tug on the loose end and the tube slides up almost by itself and gets nice and snug. 

Marc  

  • Member since
    June 2010
  • From: Austin, TX
Posted by DoogsATX on Saturday, June 4, 2011 7:00 AM

Marc - I'm going to make it official - put me down for another Pup, please! This one's going to be a night trainer with the RFC and a really wild scheme (for the Brits):

I was going to build something else, but I've made enough mistakes and learned so many lessons with this Pup that I know I could give another a much better go.

This one'll probably be a slow build...but we're going to be moving in probably early December, and rigging strikes me as something I could do without much of a bench, once the rest gets packed away...


On the Bench: 1/32 Trumpeter P-47 | 1/32 Hasegawa Bf 109G | 1/144 Eduard MiG-21MF x2

On Deck:  1/350 HMS Dreadnought

Blog/Completed Builds: doogsmodels.com


  • Member since
    March 2007
  • From: Carmel, CA
Posted by bondoman on Saturday, June 4, 2011 11:56 AM

This is the thread I use. Uni Caenis. I miked it at abt .002 in. I'm still on my first spool, but next time I'll buy a couple (cheap!). Comes in a couple of days.

http://www.jsflyfishing.com/cgi-bin/item/TW-030020-0000/57000/UNI-Products-Caenis-Thread.html

  • Member since
    April 2006
  • From: ON, Canada
Posted by jgeratic on Saturday, June 4, 2011 4:11 PM


Well the second figure is very close to being done.  Here are a couple pics before adding the helmet and rifle.  Still need to make the straps for those two items and have an Aber fret on order for that purpose.


While waiting for that to arrive, been looking at my stash of unbuilt kits.  So Marc, can you put me down for Eduard's 1/72 scale Fokker DrI.

regards,

Jack

  • Member since
    April 2005
  • From: Piscataway, NJ!
Posted by wing_nut on Saturday, June 4, 2011 6:07 PM

Roster updated.

Doogs that is a very cool scheme.

Jack, I am glad you said you needed to add the helmet.  For a sec there I though his head got blown off but he just had not hit the ground yet.  Great work on that guy.

BMan, thanks to the link I know why the thread I decided to go with looks good.  it is 70 denier which works out to .07"... same as the Ultra Wire.

Sean... going back a few posts for you about a bug. The answer is... OH YEAH BABY!Stick out tongue Especially now that I think I have the rigging material all worked out.

Marc  

  • Member since
    April 2005
  • From: Piscataway, NJ!
Posted by wing_nut on Sunday, June 5, 2011 7:42 AM

LG cables and the nose cables replaced.  Whatcha think?

Marc  

  • Member since
    August 2005
  • From: Oshawa, Ontario
Posted by u-69 on Sunday, June 5, 2011 10:14 AM

Lokos great Marc...  but more importantly - 'what do you think?'

-sean

BigBlock Studios web design:
http://www.bigblockstudios.ca

My Models:
http://www.onetofortyeight.com

  • Member since
    April 2005
  • From: Piscataway, NJ!
Posted by wing_nut on Sunday, June 5, 2011 11:11 AM

Well when I wad done and I sat back clapping and grinning like Peewee Herman... I may not have been very objective.

But in the light of the new day... I am still clapping and grinning like Peewee HermanStick out tongue


In the vent anyone wants to give this stuff a go... it can also be tightened with heat like stretched sprue.  It just does not shrink as much as sprue.

Marc  

  • Member since
    March 2006
Posted by TD4438 on Sunday, June 5, 2011 9:35 PM

I think it's looking mighty fine,wing.

Portholes,turrets and hull painted.


  • Member since
    April 2005
  • From: Piscataway, NJ!
Posted by wing_nut on Sunday, June 5, 2011 9:45 PM

Jeez TD, you are on a tear with that thing.  Looking' good so keep going.

Marc  

  • Member since
    March 2006
Posted by TD4438 on Sunday, June 5, 2011 10:04 PM

Actually,I'm going far slower than I used to!

  • Member since
    April 2005
  • From: Piscataway, NJ!
Posted by wing_nut on Monday, June 6, 2011 7:10 AM

Any faster and the friction will soften the plastic. Wink


Here is a pic of the new rigging material.  If you try it the only ting I suggest is a tiny drop of CA on the cut end that will be threaded through the brass tube.  Make it stiff and poking it through is a snap.

I scratched  the handle and linkage for the radiator,  The handle was turned with a Dremel the shape filed. With that last detail for upper wing it is ready to be mounted.

Marc  

  • Member since
    June 2010
  • From: Austin, TX
Posted by DoogsATX on Monday, June 6, 2011 10:01 AM

Marc - the rigging looks great! 

I've got a decent start on rigging the Pup. Have the control horn-to-elevator connections rigged, as well as the rudder control horns-to-fuselage. I was going to go ahead and rig up the rest of the tail, but got to thinking I'd probably be placing it on bottles and other stabilizers while I rig the front, so I'm leaving the rest until later.

Up front, I've rigged the center support line for the landing gear. Next time I build the Pup, I'll add the eyebolt for this line BEFORE I put the landing gear together. Tough to add after the fact, and in fact I had it rip free on me twice.

Was hoping to get a bit more done last night, but opted for sleep instead. Sinuses have been killing me, and after nearly 11 hours of sleep I'm still exhausted. Stupid sinuses.

On the Bench: 1/32 Trumpeter P-47 | 1/32 Hasegawa Bf 109G | 1/144 Eduard MiG-21MF x2

On Deck:  1/350 HMS Dreadnought

Blog/Completed Builds: doogsmodels.com


  • Member since
    October 2009
Posted by PANZERWAFFE on Monday, June 6, 2011 8:59 PM

JACK - Another GREAT looking figure so far.  My hats off to you with the excellent facial features!

TD - Very intresting the reddish deck color, looks great.

MARC - Awesome looking radiator and linkage.  The rigging looks right on the money too.

Well have been packing for the up coming move so not much done.  Have completed one track and the second one is close.  Have to say I'm really liking the Model Cellar tracks, will purchase them again for the Whippet.  Hope to have pics soon, maybe Tongue Tied

Rob

  • Member since
    June 2010
  • From: Austin, TX
Posted by DoogsATX on Tuesday, June 7, 2011 2:05 AM

Pupdate - rigging has begun!

On the Bench: 1/32 Trumpeter P-47 | 1/32 Hasegawa Bf 109G | 1/144 Eduard MiG-21MF x2

On Deck:  1/350 HMS Dreadnought

Blog/Completed Builds: doogsmodels.com


  • Member since
    June 2010
  • From: Austin, TX
Posted by DoogsATX on Wednesday, June 8, 2011 9:58 AM

Biggest lesson I've learned with the Pup so far - plan for the rigging from the outset.

Wingnut Wings is pretty good about placing the rigging holes in the wings and such, but time and again I've found myself drilling into already-painted surfaces. Elevators. Ailerons. The cockpit framing.

The latest? The struts.

Spent part of last night drilling out miniscule holes in the strut brackets. Talk about stressful. Zero margin for error. I ended up using my trusty old Iwata .3mm airbrush needle as a punch, then using the divot to locate the drill. Somehow I managed not to destroy a single strut, but I'm going to need to go back and repaint the brackets tonight.

Unfortunately, I'm SOL on the rear cabane struts, as they're molded directly to the cockpit framing, already installed, and I fear not sturdy enough to drill through. Not exactly sure what I'm going to do there yet, but I'll figure it out.

Oh well. Lesson for the next Pup. DRILL ALL HOLES BEFORE PAINTING!

On the Bench: 1/32 Trumpeter P-47 | 1/32 Hasegawa Bf 109G | 1/144 Eduard MiG-21MF x2

On Deck:  1/350 HMS Dreadnought

Blog/Completed Builds: doogsmodels.com


  • Member since
    April 2005
  • From: Piscataway, NJ!
Posted by wing_nut on Wednesday, June 8, 2011 11:18 AM

The rigging looks great doogs.  Pre-drilling the holes is one of the thing I did right.  Still had to find them under the decal when that part was done.


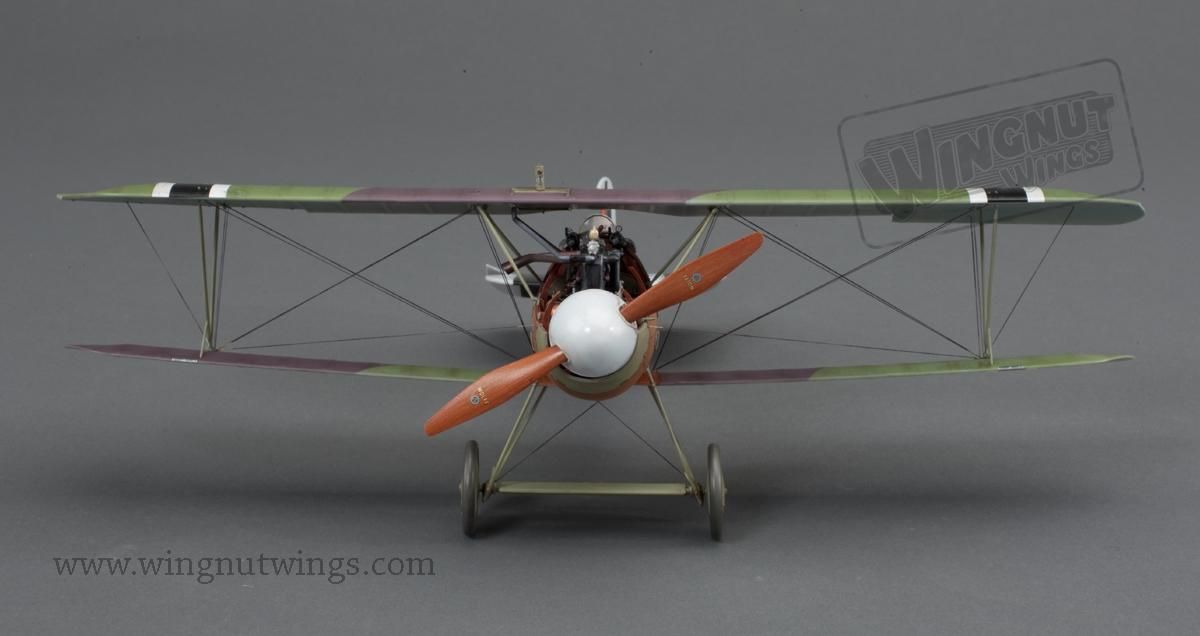
I did a test fit of the upper wing and have a big problem.  The wing practically rests on the fuselage.  No way the guns will fit underneath.  I immediately went the the WNW site to look and the finished model pics and my eye went right to this one...

This photo is being used for discussion purposes only

My lower wing are flat and maybe even a tiny bit of anhedral.  The weight of the upper wing pushes them down even more.  The fit everywhere else in the kit was so good and the wing joint so tight I just figured it was right. 

Having used a tiny bit of CA, thankfully not the Tenax, and the tight fit of the wing it must not have penetrated to deep and i was able to work the wings off with zero damage.

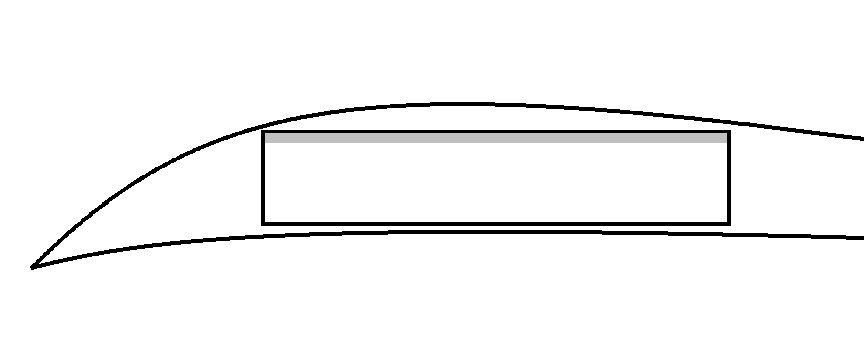
I looked at the wing root and came up with what seemed to be a logical course of action.

First I trimmed the top edge of the hole in the wind slot indicate by the gray line.

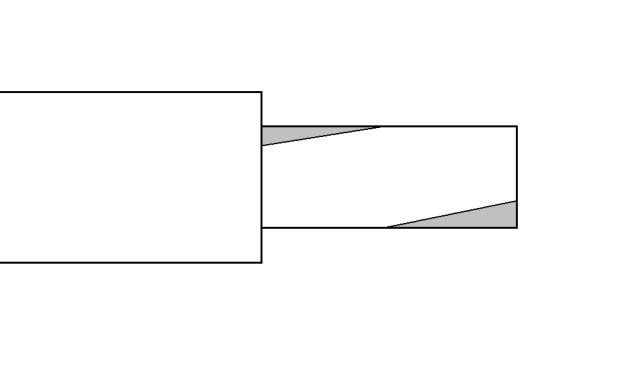
Then I trimmed the gray areas away on the tab on the wing.  My though was to allow that tab room to rotate on its axis and still keep it as solid as possible.

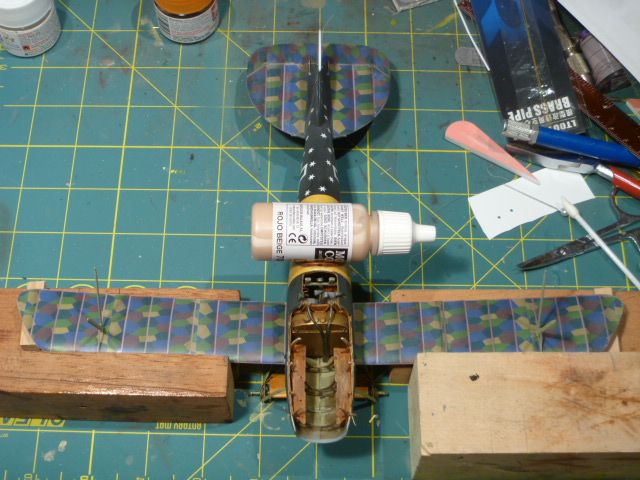
It all looked good in the dry fit so I made a jig taping 2 blocks of wood to the cutting mat, with 2 blocks standing at the front edge to press the wing leading edge against to keep them straight.  The fuselage is set along a line to keep every saqure... note how the rudder lines up.  Small block under the tips to hold the dihedral.  The LG was off the mat about 3/16" so I weighted the fuselage to push it down.  The wing was glued in with some slow cure CA to have a bit of work time to get it all set up.

The last thing I did was to redo the nose cables while in the jig and got them real tight to help add some support.   No photo of the result but it looks pretty good.


Marc  

  • Member since
    June 2010
  • From: Austin, TX
Posted by DoogsATX on Wednesday, June 8, 2011 11:35 AM

Marc - EPIC save! That's the kind of thing where, if I encountered it, I would have said screw it rather than pull the friggin' wings off!


On the Bench: 1/32 Trumpeter P-47 | 1/32 Hasegawa Bf 109G | 1/144 Eduard MiG-21MF x2

On Deck:  1/350 HMS Dreadnought

Blog/Completed Builds: doogsmodels.com


  • Member since
    April 2005
  • From: Piscataway, NJ!
Posted by wing_nut on Wednesday, June 8, 2011 11:42 AM

Thanks.  In the midst of my panic all i could think was that it was about to become a crash dioWhistling

Marc  

  • Member since
    December 2002
  • From: NYC, USA
Posted by waikong on Wednesday, June 8, 2011 11:44 AM

Marc, you are a better man than me!  LIke Doogs, I would've just left it and remember to never look at it straight on.  Taking wings off, that's major - good one.

My website: http://waihobbies.wkhc.net


  • Member since
    August 2005
  • From: Oshawa, Ontario
Posted by u-69 on Wednesday, June 8, 2011 11:53 AM

Marc;

Did you check with the fuselage struts in place? My Alb looked the same - no dihedral on the bottom wings until the rigging was in place. 

What you did will work [and I'm glad you worked it out without damage] but I think you just might have gone through that for nothing.


-sean

BigBlock Studios web design:
http://www.bigblockstudios.ca

My Models:
http://www.onetofortyeight.com

JOIN OUR COMMUNITY!

Our community is FREE to join. To participate you must either login or register for an account.

SEARCH FORUMS
FREE NEWSLETTER
By signing up you may also receive reader surveys and occasional special offers. We do not sell, rent or trade our email lists. View our Privacy Policy.