SEARCH FINESCALE.COM

Enter keywords or a search phrase below:

The group build to end all group builds - THE GREAT WAR

155894 views
1091 replies
1 rating 2 rating 3 rating 4 rating 5 rating
  • Member since
    December 2010
  • From: Memphis TN
Posted by Heavens Eagle on Thursday, February 2, 2012 1:03 AM

Went to the Misterkit site, and apparently he has a broken link to the paints page.   HOWEVER!  If you go up to the address line and manually change the page1.html  to page2.html it will allow you to see the paint listings.  

  • Member since
    February 2006
  • From: Smithers, BC, Canada
Posted by ruddratt on Friday, February 3, 2012 9:56 PM

OK, time to get this GB back to page 1, and I'm gonna do it with another update on the Hanriot, It's shaping up nicely. Got most of the weathering done with the help of some Tamiya weathering powders and panel line accent washes. The woodgrain on the struts (as well as on the prop and the tail skid, right now uncured raw umber oil paint) will get a shot of Tamiya clear orange once it's dry. The gun needs a bit more highlighting, and lots of fiddly bits still need to be added here and there. The pics you see are "after the fall" - yep, it slipped out of my clumsy fingers and hit the floor, but fortunately the damage was restricted to the windscreen, the gun, and three struts (which were a bit of a pain to get re-aligned, but she's good to go now).

Mike

 "We have our own ammunition. It's filled with paint. When we fire it, it makes pretty pictures....scares the hell outta people."


  • Member since
    February 2006
  • From: Smithers, BC, Canada
Posted by ruddratt on Friday, February 3, 2012 10:21 PM

Question for you fellas. I went and took another look at Marc's site with the pics from this GB. Not only am I blown away by the quality of the work, but the pics themselves are amazing! When you guys take your pics, do you use the highest resolution setting available on your cameras? I've been using the next highest (2048 I think) and I'm still not totally pleased with their quality. Should I go even higher?

Mike

 "We have our own ammunition. It's filled with paint. When we fire it, it makes pretty pictures....scares the hell outta people."


  • Member since
    December 2010
  • From: Memphis TN
Posted by Heavens Eagle on Saturday, February 4, 2012 12:21 AM

When I first started taking photos of my Hannover build, I was using a small Nikon that took 10 Mega pixel photos.  The problem is that it has no real way to focus it or adjust settings to get a better depth of field.  When you focus a camera there is a plane where things are in focus and items closer and further away will be fuzzy.  The best depth of field comes with a pin hole camera believe it or not.

When you do extremely close up photos the depth of field is usually quite thin.  The only way to get it where more is in focus is to use a camera with an adjustable aperture that can be closed way down.  This gives a bit of a pin hole effect and allows more to be in focus.  It also requires a LOT of light!

I ended up going back to my fancy old Olympus 5 mega pixel SLR camera.  I can set the focus where I want it and see that it is in focus.  I also usually adjust the aperture as small as possible, use manual focus, and the built in flash with a piece of mylar in front to diffuse the light a little.  This gives a lot of depth to the photo especially in Macro mode.  The little point a click cameras with everything automatic just don't work as well for that kind of stuff.  The 5 mega pixel Olympus weighs in at about 3.5 pounds with the battery pack and all, but it works so much easier and better than the Nikon.  I can also add some additional macro lenses and get it to go even closer.

As to the resolution, 5 m is plenty for what I am doing in the posts on here.  A 5 mega pixel photo can do a very sharp crisp 8 x 10 photo at the photo lab.  Much more than what is needed in internet posts.  Best way is experiment with your camera.  Get a photo viewing program and experiment.  After all it isn't like you have to go and develop film and get prints to see what worked like in the old days.

One other thing, is a decent photo editing program.  Adobe has Photoshop, and there are a number of other programs out there.  Sometimes a photo is "almost" there and it just needs a little tweak in some way to make it much better.

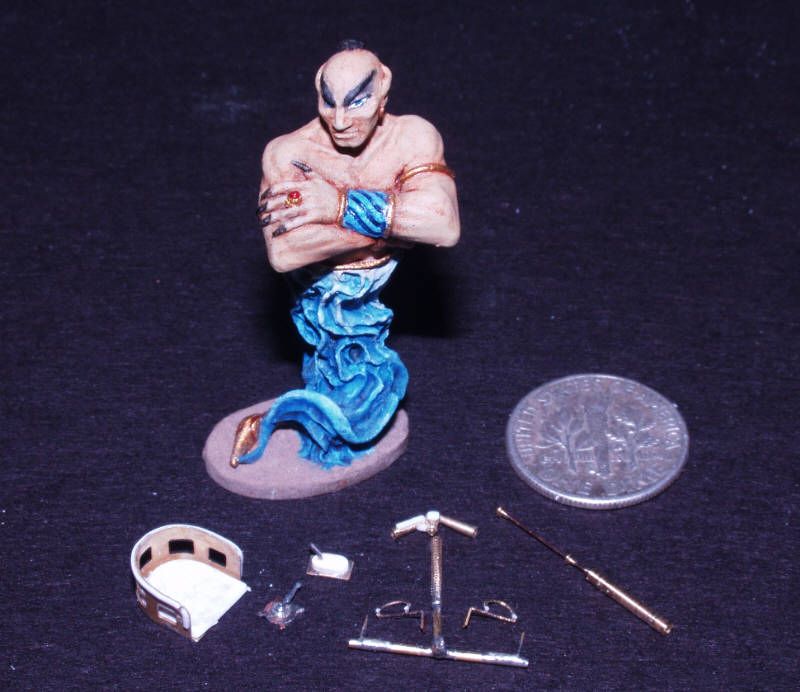
Here is an example:  A painted miniature with small parts from my Hannover build on a black background. The dime gives you some idea of the actual size of everything.  Original size of the photo was 2560 x 1920 pixels.  After cropping and resizing for posting, it is 800 x 692 pixels.  Both photos look pretty much the same on the computer though the large one is 2.7 meg and the small one is 75k.  The sizing was done on my photo editor of choice Corel Picture Publisher.

  • Member since
    February 2006
  • From: Smithers, BC, Canada
Posted by ruddratt on Saturday, February 4, 2012 1:28 AM

Paul, thanks for getting back to me on that! Great pic too! Yes I can do both aperture and shutter priority with my camera, and have tried that in the past, with mixed results - some good, some not so good. Also, looks like the amount of light I'm using may be another issue. I set up a photo booth that's lit by 2 CFL bulbs of 150w each (incandescent equivalent) with color temps of 6500k (very close to natural daylight). May have to boost the wattage a bit.  I do have the ability to control the intensity of the flash, but there's a lot of different levels, so like you said, it looks as though I've got a bit of practicing to do.

Mike

 "We have our own ammunition. It's filled with paint. When we fire it, it makes pretty pictures....scares the hell outta people."


  • Member since
    December 2010
  • From: Memphis TN
Posted by Heavens Eagle on Saturday, February 4, 2012 10:36 AM

Yes it does take some practice.  I finally added a card reader to my computer (instead of a USB dongle) to make it easier.

What I do if there is a particular shot I want, is shoot a number of shots.  Then load them into my machine.  I have a folder on the desktop called "Photo temp transfer" that I move all the photos into.  Then I use my favorite viewer program to preview them.  The program I use is Firehand Ember.  Unfortunately I think the guy that was developing it passed away suddenly in 06.  It lets me look at all the photos in large thumbs, lets me do some quick minor tweaking if they are too dark, etc.  I delete all the junk photos that are fuzzy or not usable then move the remainder to where I want them.  Either for use in posts, or to storage.  Have quite an organized file system to keep things findable.

I believe Firehand or some versions of it can still be found at some sites on the net.  Very useful tool.

  • Member since
    April 2006
  • From: ON, Canada
Posted by jgeratic on Saturday, February 4, 2012 11:10 AM

Paul - thanks for taking the time to share your digital photography knowledge - I too wish I could take better photos.  Ernest's latest photo postings of the completed Whippet were really crisp and wish I could get mine to that level. 

Maybe I need a new camera as the current one is only 3.1m and the largest resolution is 2048.  Although I don't think larger pictures will help as I usually resize them 50%-60% (after cropping) when posting to the net.  I do use the macro setting built in the camera, as well as the timer, tripod, no flash but I will manually adjust the light exposure to +1/3.  ISO speed is set to 50, from what I understand higher settings will increase "noise" in the pixels.  Anything else I should look at?

I do have Corel paint but I only use it to resize and crop.  I try and steer away from using all the manipulating features to "fix" photos as it tends to make the image look different/better than the real thing.  But if this is what people are doing to get that extra edge, maybe I should reconsider?

regards,

Jack

  • Member since
    December 2010
  • From: Memphis TN
Posted by Heavens Eagle on Saturday, February 4, 2012 6:04 PM

Hey igeratic1 it is probably not just the resolution of your camera.  The older camera's were not as crisp on taking color photos as many of the newer ones.  The better and more expensive cams usually had better chips in them.  Now the technology has improved quite a bit and even the inexpensive cams can take fairly nice photos.  The main problem with macro and close up photos though is that it tends to push things to the edge.  Higher resolution photos can allow you to get more to work with and to crop down to what is needed a little easier.

The photo editing programs though are also a big part of what makes things work well.  I did a quick show and tell here to illustrate how much some of my photos are manipulated to get the desired results.

As a side note, am thinking about building up the 1/32 scale Seimens Schuckert D.III by Roden.  Will know more in two or three weeks.  Working on a kit for a different build right now.


  • Member since
    July 2006
  • From: San Francisco Bay Area
Posted by bufflehead on Saturday, February 4, 2012 8:39 PM

Jack, thanks for commending my digital photos.  Paul's tips are spot on and it seems you have all the necessary equipment to take great photos.  I'm using an older Nikon Coolpix 5000 which is a cross between a digital SLR and a point&shoot digital camera, its 5.1 megapixels. 

For taking model photos I put in aperture priority and set it to the smallest aperture (usually between f/7.2 -f/8) which allows the camera to determine the shutter speed.  Flash is turned off, set in macro mode, and I use the built in timer, on a tripod.  Lighting is simply three 75W, 5000K lights bulbs, two on pivoting table lamps, one in a economy clamp lamp that I use when I a third light source overhead.   Drafting vellum is used over the lamps to help diffuse the light.

Like Paul, I do find the need to edit most of my photos simply because I can't quite get the contrast/brightness settings on my camera right.  I'm too lazy to figure it out and I can use computer software for this simple task.  I use Irfanview, which is a free program that I find easy to use, since most of my editing is contrast/brightness adjustments, resizing and sharpening the pic.   Also, sometimes my camera mutes the colors so I have to use Irfanview to restore the color.  My camera quality is set to "BASIC" which produces photos in 2560 x 1920 resolution, which I then resize to 1024 x 768.  One feature I almost always use for final photos is "Sharpen" in Irfanview.  In Photoshop I think its called "Unsharp Mask".  This really cleans up all the edges in the photo and give it that extra "pop"

That's it, nothing special really.  I keep thinking I should buy a nice digital SLR for this work, but when I really think about it my older Nikon does the job!!

Ernest

Last Armor Build - 1/35 Dragon M-26A1, 1/35 Emhar Mk.IV Female


Last Aircraft Builds - Hobby Boss 1/72 F4F Wildcat & FW-190A8


  • Member since
    February 2006
  • From: Smithers, BC, Canada
Posted by ruddratt on Sunday, February 5, 2012 9:53 AM

Lots of great photo tips here, and I plan on trying as many of 'em as I can. Planning on getting busy with the HD.1 today, and getting as much done on it before the game starts.

Mike

 "We have our own ammunition. It's filled with paint. When we fire it, it makes pretty pictures....scares the hell outta people."


  • Member since
    April 2006
  • From: ON, Canada
Posted by jgeratic on Sunday, February 5, 2012 11:04 AM

Ernest - thanks for responding to the camera questions.  Check, yes I always have f8 locked for these model pics.  I think I may have found my major problem with macro shooting.  I've been approaching the object too close  in order to fill in the view finder.  Consulting my guidebook, it states macro shots are in the 2 inch to 1.5 foot range.  So backing up a bit I think should increase the overall focus, yes? 

I have taken both your suggestions to photo editing and applied them to one of my original postings here.  Top is original and bottom is the photoshopped one.  In order started first with gamma correction, contrast, and unsharpen mask.  The photo still had too much yellow so I increased the blue just a hint.

regards,

Jack

  • Member since
    February 2006
  • From: Smithers, BC, Canada
Posted by ruddratt on Monday, February 6, 2012 10:32 AM

I checked my camera's settings yesterday for AP mode and found the setting at f2. No wonder they looked the way they did. Set it to f8, upped the resolution to 2560, reduced the flash power by -2/3, and man what a difference! Can't thank you fellas enough for the great info.

Final pics for the HD.1 should be up this week as it is nearing completion, and I guarantee they will look way better than the previous ones I've taken.

Mike

 "We have our own ammunition. It's filled with paint. When we fire it, it makes pretty pictures....scares the hell outta people."


  • Member since
    February 2006
  • From: Smithers, BC, Canada
Posted by ruddratt on Tuesday, February 7, 2012 10:25 AM

OK guys, I'm calling this one done. Really a neat little kit, and what must have been a tiny aircraft in it's day (my 1/48 D.VII dwarfs it). Anyway, I hope you enjoy the pics (and thanks to all the advice here, I'm pretty happy with 'em Yes ). Next, it's on to my Eduard DR.I.

Mike

 "We have our own ammunition. It's filled with paint. When we fire it, it makes pretty pictures....scares the hell outta people."


  • Member since
    March 2006
Posted by TD4438 on Tuesday, February 7, 2012 10:29 AM

That is one beautiful bird,rud!Well done.Toast

  • Member since
    April 2006
  • From: ON, Canada
Posted by jgeratic on Tuesday, February 7, 2012 11:57 AM

Mike - very nice build. I particularly admire the tonal shades on the buff, and the translucent look of the green on the underside of the upper wing. Toast

regards,

Jack

  • Member since
    April 2005
  • From: Piscataway, NJ!
Posted by wing_nut on Wednesday, February 8, 2012 8:28 AM

Superb.  A fine addition to the completed list.


Marc  

  • Member since
    December 2002
  • From: NYC, USA
Posted by waikong on Wednesday, February 8, 2012 11:54 AM

Mike, thumbs up!  I especially like the shading for the wing spars.

My website: http://waihobbies.wkhc.net


  • Member since
    February 2006
  • From: Smithers, BC, Canada
Posted by ruddratt on Wednesday, February 8, 2012 7:20 PM

Many thanks for chiming in fellas. Glad you like it! It was a blast to build, and an honor to share it with you.

Mike

 "We have our own ammunition. It's filled with paint. When we fire it, it makes pretty pictures....scares the hell outta people."


  • Member since
    July 2006
  • From: San Francisco Bay Area
Posted by bufflehead on Wednesday, February 8, 2012 8:31 PM

Jack - The photos of your figure really show the difference between the original photos and the edited versions!  Digital cameras can do some weird things to color/contrast/brightness/saturation, etc.....that's why digital photo editing software is very popular!  I'm glad the tips helped out!

Mike - Wow!  I don't think I can even come close with my Pfalz D.III !  That's a beautiful looking aircraft!  The painting, shading and fading are outstanding!  So what are these Tamiya weathering powders and washes you mentioned?  Are they hard to use?

Ernest

Last Armor Build - 1/35 Dragon M-26A1, 1/35 Emhar Mk.IV Female


Last Aircraft Builds - Hobby Boss 1/72 F4F Wildcat & FW-190A8


  • Member since
    February 2006
  • From: Smithers, BC, Canada
Posted by ruddratt on Wednesday, February 8, 2012 10:36 PM

Ernie, many thanks for the comments buddy!  Believe me, after seeing the work you did on that Whippet, I am eagerly awaiting some progress on that Pfalz (it's gonna be a stunner I'm sure!). If you're looking to add some extra details and beef it up a bit, go to Wingnut Wings site and have a look at the instruction sheet for their 1/32 Pfalz - it's a great reference!

I read about those Tamiya weathering powders here on FSM and figured I'd give 'em a try. They are awesome! They come in a compact case, each consisting of 3 different shades, with an applicator (which I would not recommend using) - not sure how many sets there are total - maybe 10? What I love about them is they are almost impossible to overdo - the effect is so subtle, and no flat coat is really needed to seal 'em in, but if you decide to, the effect is not diminished at all, unlike standard pastels. Pretty cool stuff ! The washes come in jars similar to, but a fair bit larger than their liquid cement containers, and three colors are available - black, brown, and gray. They are enamel washes and flow beautifully, and can also be mixed in smaller containers to vary the colors if you like. They are a blessing to someone like me who at times has some issues in controlling my wash consistencies.


Mike

 "We have our own ammunition. It's filled with paint. When we fire it, it makes pretty pictures....scares the hell outta people."


  • Member since
    July 2006
  • From: San Francisco Bay Area
Posted by bufflehead on Thursday, February 9, 2012 10:16 PM

I am SUCH a bufflehead!! Dunce There was something about your description of the Tamiya weathering powders that seemed familiar so I rummaged around in one my drawers and, sure enough,  it turns out I have a set!!   Never used it though, still unopened from when I bought it probably 5 yrs ago!   The one I have has SAND/LIGHT SAND/MUD colors and it does have the applicator with the sponge tip on one end and a soft brush on the other.  BTW why do you not recommend using the applicator?  

Ernest

Last Armor Build - 1/35 Dragon M-26A1, 1/35 Emhar Mk.IV Female


Last Aircraft Builds - Hobby Boss 1/72 F4F Wildcat & FW-190A8


  • Member since
    February 2006
  • From: Smithers, BC, Canada
Posted by ruddratt on Friday, February 10, 2012 3:58 AM

I tried the applicator, both sides, and was not as happy as I was with the results from using a shader (looks like a wide flat brush, very soft, but with a rounded tip that comes in lots of different widths). Plus, I found the shader easier to control, and was able to put the shading just where I wanted it and even vary the widths without having to change applicators. The nice, feathered demarcation was a bonus.

Mike

 "We have our own ammunition. It's filled with paint. When we fire it, it makes pretty pictures....scares the hell outta people."


  • Member since
    August 2007
  • From: back country of SO-CAL, at the birth place of Naval Aviation
Posted by DUSTER on Friday, February 10, 2012 4:12 PM

Mike, Great job on the Hanriot.

Thanks too for your photo questions, 'cause the answers were enlightening and very clear for us of the Kodak Brownie era.


As a small aside, when you next do a photo shoot , consider the idea of a more contrasting background color.

As an example, a middle blue such as Bafflehead's shots above.  That color usually will allow the contrast of the the model and background to be clearer.  The use of other colors can be an advantage in bringing out the model depending on its overall color scheme - dark model= lighter background- light model = darker background -retaliative to each other.

Regardless, a clear image in focus, as your last shots show, will always be the best to show your work, its just a practice sort of thing,

Steve

Building the perfect model---just not quite yet  Confused

  • Member since
    February 2006
  • From: Smithers, BC, Canada
Posted by ruddratt on Friday, February 10, 2012 6:28 PM

Steve, thanks for the comments. Glad you like it! Yes Funny how you mention the background colors - after seeing Ernest's pics of his Whippet and many others, have seriously been considering changing my background colors to the blue backdrop.

On a side note, being my day off today I had planned on getting started on my DR.I, but got sidetracked when I went outside to clear a path in the snow for the dog and underestimated the thick layer of ice underneath. Lost my footing and went down HARD on my right shoulder. Came darn close to separating it. In fact, when my wife helped me off with my coat (I couldn't do it on my own), I felt a 'pop' - the pain was so intense I almost blacked out. Figuring maybe it's just badly bruised, but if the pain has not diminished by tomorrow, a trip to the local hospital may be in order.

Mike

 "We have our own ammunition. It's filled with paint. When we fire it, it makes pretty pictures....scares the hell outta people."


  • Member since
    December 2010
  • From: Memphis TN
Posted by Heavens Eagle on Friday, February 10, 2012 7:06 PM

MIKE!

Do take care on that stuff! Hope the shoulder gets better on its own.  Moved to Memphis from Tulsa a few years ago.  Tulsa gets a fair amount of ice storms and some snow storms.  I know how to deal with those no problemo.  The folks in Memphis see one snowflake and go into panic mode.  (since they can't hardly drive on dry sunny pavement it is probably a good thing)

Us older (farts) I mean folks don't heal as fast as when we were younger. Dead

  • Member since
    July 2006
  • From: San Francisco Bay Area
Posted by bufflehead on Saturday, February 11, 2012 12:19 AM

OHHH NOOOO!  Black Eye Man I hope the injury is not serious Mike!  We hate to hear bad things happening to our forum buddies! Boo Hoo  Take care of that shoulder and don't worry about the DR.I....we'll still be here when you're all better! 

Ernest

Last Armor Build - 1/35 Dragon M-26A1, 1/35 Emhar Mk.IV Female


Last Aircraft Builds - Hobby Boss 1/72 F4F Wildcat & FW-190A8


  • Member since
    July 2006
  • From: San Francisco Bay Area
Posted by bufflehead on Saturday, February 11, 2012 5:52 PM

Guys, I got busted by Marc!! I set aside the Pfalz because I needed to complete an A13 British tank for the Blitzkrieg in the West GB and Marc saw my recent build photos!  OOOPS!!  Embarrassed  sorry......

To make it up to everyone on this GB I'm posting pics of some the Great War builds from today's Hobby Expo 2012 in Petaluma, Ca.  I was there for 3 hrs this morning and just got home.   Most of these are WWI aircraft, but a 1:72 Mk.I tank made it to the show!

A little guy:

A VERY nice Albatross!

and a close-up:

Braille scale armor!

So while I was there I came across this kit for only $10!

And this one for the same price!!

Both 1:48 and both nicer kits than the Glencoe with more detail and PE included!  Yippee!! 

Marc, I'm going to build both for this GB so am I forgiven?Angel


Ernest

Last Armor Build - 1/35 Dragon M-26A1, 1/35 Emhar Mk.IV Female


Last Aircraft Builds - Hobby Boss 1/72 F4F Wildcat & FW-190A8


  • Member since
    February 2006
  • From: Smithers, BC, Canada
Posted by ruddratt on Saturday, February 11, 2012 9:05 PM

Hey Ernest, even if Marc doesn't forgive ya (and I'm sure he will), I do! Those are some great pick-ups, and I can't wait to see what you do with 'em! I've built 'em both, and they go together real nice. Some rivet counters have issues with some of the outlines of the D.VII, but it builds into a nice replica and the bottom line is it LOOKS like a D.VII, so the heck with 'em! If you want to do a D.VII other than the markings with the kit, give me a shout - I've got a few sheets kicking around that may be of interest to you. Not sure if the D.VII comes with the cooling jackets for the guns, but if it does, like most Dragon kits they will need some major annealing to roll 'em round. There are also lots of aftermarket sets if you need 'em for the guns, but the one's Marc told me about are real sweet! I picked up two sets for my DR.I's.......

http://www.ultracast.ca/products/Master/48%20Scale/MAM-48-035/default.htm

Those show picks......WOW!!! That's some great work on display (but I like your tank better!)! Thanks for posting those! Yes

...and thanks fellas for the well-wishes. The shoulder is doing a lot better - still very sore, but nothing like yesterday. Man, that was scary! Am hoping to break plastic on a DR.I tonight.


Mike

 "We have our own ammunition. It's filled with paint. When we fire it, it makes pretty pictures....scares the hell outta people."


  • Member since
    December 2010
  • From: Memphis TN
Posted by Heavens Eagle on Saturday, February 11, 2012 10:56 PM

Glad you are doing better Mike!

Yes those machine gun upgrades are nice.  Sprue Brothers carries them too, the Spandau as well as the Parabellum though it looks as if they are out of them at the moment.  They also carry the 1/32 ones as well.

Am really planning on starting on a 1/32 Roden Seimens Shuckert here soon, will probably get some Spandau upgrades for the guns on it.

  • Member since
    February 2006
  • From: Smithers, BC, Canada
Posted by ruddratt on Sunday, February 12, 2012 3:11 AM

Thanks Paul! I did have a few anxious moments there.

Those guns really are sweet, ain't they? The guns that were included with my DR.I were among the the nicest I've seen from Eduard, so for a while there I was torn as to which one's to use, but the AM one's eventually won out.I'll save the Eduard one's for another project.

...and man am I pumped to see how you do on that Roden kit! When do you figure on getting started? (I'm a pushy old fart, ain't I?)

Mike

 "We have our own ammunition. It's filled with paint. When we fire it, it makes pretty pictures....scares the hell outta people."


JOIN OUR COMMUNITY!

Our community is FREE to join. To participate you must either login or register for an account.

SEARCH FORUMS
FREE NEWSLETTER
By signing up you may also receive reader surveys and occasional special offers. We do not sell, rent or trade our email lists. View our Privacy Policy.