SEARCH FINESCALE.COM

Enter keywords or a search phrase below:

Search and Rescue Group Build 2011

19166 views
135 replies
1 rating 2 rating 3 rating 4 rating 5 rating
  • Member since
    July 2010
  • From: Tornado Alley
Posted by Echo139er on Wednesday, July 27, 2011 7:05 PM

Okay folks here is the badge for the GB.  Feel free to use it now if you so wish.  We do ask that you please not link off this post.  Copy and save the image onto the host of your choice.

If you want a larger image PM me and I'll send one your way.


Tags: USCG Jayhawk
  • Member since
    March 2010
  • From: New Zealand
Posted by Scorpiomikey on Wednesday, July 27, 2011 11:22 PM

Can i join with a walrus?

"I am a leaf on the wind, watch how i soar"

Recite the litanies, fire up the Gellar field, a poo storm is coming Hmm 

My signature

Check out my blog here.

  • Member since
    February 2011
  • From: Mobile, AL
Posted by RotorHead10 on Wednesday, July 27, 2011 11:25 PM

Walrus' are okay, as long as they're OOB   Cool

http://i301.photobucket.com/albums/nn48/MikeTheModeller/GB_Badges/Phantom2011_1.jpg

  • Member since
    February 2011
  • From: Mobile, AL
Posted by RotorHead10 on Wednesday, July 27, 2011 11:26 PM

...unless you have me on some inane boat, aircraft, or vehicle nickname than to that I say " Well played, Sir."

http://i301.photobucket.com/albums/nn48/MikeTheModeller/GB_Badges/Phantom2011_1.jpg

  • Member since
    October 2008
  • From: italy
Posted by bsyamato on Thursday, July 28, 2011 5:55 AM

not 100% sure about the subject but sign me with hss-1 seabat italeri 1/72, was used by italy navy (marina militare italiana) as asw tasks but as Sar used too.

A badge for the group?

  • Member since
    July 2010
  • From: Tornado Alley
Posted by Echo139er on Thursday, July 28, 2011 8:08 AM

bsyamato

not 100% sure about the subject but sign me with hss-1 seabat italeri 1/72, was used by italy navy (marina militare italiana) as asw tasks but as Sar used too.

A badge for the group?

The badge is on the second post of this thread

  • Member since
    October 2008
  • From: italy
Posted by bsyamato on Thursday, July 28, 2011 8:16 AM

joeviz


 bsyamato:


not 100% sure about the subject but sign me with hss-1 seabat italeri 1/72, was used by italy navy (marina militare italiana) as asw tasks but as Sar used too.

A badge for the group?


The badge is on the second post of this thread

i need new glasses (and don't use) and seen it on the feeler probably? too much work causes brain disturbes Tongue Tied last night i was out of work about 1:00 am

  • Member since
    January 2003
  • From: Hancock, Me USA
Posted by p38jl on Thursday, July 28, 2011 8:17 AM

ok,, I will Lurk for a bit. .. got some stuff to finish up.. but it will be a PBY...

[Photobucket]

  • Member since
    January 2011
  • From: The Great North Woods, Maine
Posted by Chazzer on Thursday, July 28, 2011 8:37 AM

Just gonna watch fer now. I was a Firefighter/Medic  for 29 years. I'll do some research and get back to you.

ChazzerBlack Eye

  • Member since
    July 2010
  • From: Tornado Alley
Posted by Echo139er on Thursday, July 28, 2011 8:40 AM

RotorHead, are you building the SH-60B OOB or are you planning on converting it to a Jayhawk?  

  • Member since
    October 2009
  • From: Houston, Texas
Posted by Medicman71 on Thursday, July 28, 2011 10:34 AM

p38jl

ok,, I will Lurk for a bit. .. got some stuff to finish up.. but it will be a PBY...

Ditto I don't have anything in the stash that would work for this one. But ya never know.

Building- (All 1/48) F-14A Tomcat, F-16C Blk 30, He 129


  • Member since
    February 2011
  • From: Mobile, AL
Posted by RotorHead10 on Thursday, July 28, 2011 2:59 PM

joeviz,

nope, going OOB with the NAVY version.  I've never built one.  Thought it would be a good first one


http://i301.photobucket.com/albums/nn48/MikeTheModeller/GB_Badges/Phantom2011_1.jpg

  • Member since
    March 2010
  • From: New Zealand
Posted by Scorpiomikey on Sunday, July 31, 2011 3:34 PM

Ok im building the 1:72 Airfix Walrus (that my dad built when he was 12 lol)

"I am a leaf on the wind, watch how i soar"

Recite the litanies, fire up the Gellar field, a poo storm is coming Hmm 

My signature

Check out my blog here.

  • Member since
    October 2009
  • From: Houston, Texas
Posted by Medicman71 on Tuesday, August 2, 2011 10:12 AM

Ok I have a question. Do FAC's or Fast FAC's count? I know they don't do the acctual resuce but they do help in the location and overwatch of the acctual rescue. Just curious.

Building- (All 1/48) F-14A Tomcat, F-16C Blk 30, He 129


  • Member since
    July 2010
  • From: Tornado Alley
Posted by Echo139er on Tuesday, August 2, 2011 10:20 AM

I don't see why not.  Its no different than using a USCG Falcon on site.  Falcons are, in part, a SAR asset.

my 2 cents

  • Member since
    October 2009
  • From: Houston, Texas
Posted by Medicman71 on Tuesday, August 2, 2011 10:34 AM

Cool. Cause I have a O-2 Skymaster like the one that was used in "Bat 21".

Building- (All 1/48) F-14A Tomcat, F-16C Blk 30, He 129


  • Member since
    October 2009
  • From: Houston, Texas
Posted by Medicman71 on Tuesday, August 2, 2011 3:23 PM

Medicman71

Cool. Cause I have a O-2 Skymaster like the one that was used in "Bat 21".

Acctually I can't use that as it's too far built to count. I do have an OV-10 Bronco, an A-10 Warthog, and soon to have a N/AW-10 Two seater if thoes count at all. If not that's cool.

Building- (All 1/48) F-14A Tomcat, F-16C Blk 30, He 129


  • Member since
    February 2011
  • From: Mobile, AL
Posted by RotorHead10 on Wednesday, August 3, 2011 11:11 PM

Quick shot of the flight control mixing assembly with boost and pilot assist servos. 


[View:/themes/fsm/utility/110802_020516:550:0]

http://i301.photobucket.com/albums/nn48/MikeTheModeller/GB_Badges/Phantom2011_1.jpg

  • Member since
    October 2008
  • From: italy
Posted by bsyamato on Thursday, August 4, 2011 6:17 AM

great scratch Yes but the picture is too blurry Sad try to get picture less close (if your camera don't have macro option), and crop the wished zone with a free program like xnview, a good picture cataloguer/viewer

it's a sin to not see a good scratch work as this Crying

  • Member since
    February 2011
  • From: Mobile, AL
Posted by RotorHead10 on Monday, August 8, 2011 7:13 PM

Yeah tried to use my camera on my phone....didn't work too well.  Promise better pics soon.  Just moved into a new townhome so my hobby/mancave is still WIP. 

http://i301.photobucket.com/albums/nn48/MikeTheModeller/GB_Badges/Phantom2011_1.jpg

  • Member since
    October 2008
  • From: italy
Posted by bsyamato on Tuesday, September 13, 2011 12:22 PM

What happened here? No wips??

i'm still waiting the shipping of my hss-1 with other kits Crying

  • Member since
    July 2010
  • From: Tornado Alley
Posted by Echo139er on Tuesday, September 13, 2011 1:56 PM

bsyamato

What happened here? No wips??

i'm still waiting the shipping of my hss-1 with other kits Crying

I know right.  This GB is off to a very slow start.  

I am trying to get some bench time believe me.  I am itching to get building my H-60J.  Its going to be a while before I can get to it though. Sad

  • Member since
    October 2008
  • From: italy
Posted by bsyamato on Tuesday, September 13, 2011 4:56 PM

hope this gb will fly soon, thre's lots of intresting and unusual build that could see in Sad

hope to see soon the h-60j on Yes


  • Member since
    October 2008
  • From: italy
Posted by bsyamato on Saturday, September 17, 2011 9:44 AM

day for supplies yesterday! 

heres first pictures of the italeri seabat ,the kit is really nice and good low price.

I builded two years ago the british version of same kit, then i will have no surprises from this. Only critique is on decal sheet, really poor of stencils and the absence of the fuselage seats, on the other kit variant was included Sad

alredy glued pilots seats , the two office walls and the main rotor

mainly this build will be an oob, after the amodel ka-18 and the airfix scout this one will be a relaxing build Cool


  • Member since
    October 2008
  • From: italy
Posted by bsyamato on Monday, September 26, 2011 5:03 PM

the first updates on the seabat: Not spended too many hours to do a perfect finish paint in, i planned to close all door, then when all closed will be hard to see great thing from out

just some retouch and a black washing before to close halves

that's all for this night folks 

  • Member since
    October 2008
  • From: italy
Posted by bsyamato on Tuesday, September 27, 2011 6:49 PM

more updates on seabat

the cockpit finished i think

a mummy

and without bandages (naturally i night passed on)


and the more problematic piece: almost if you want to see all outtakes opened. 

all was covered with tiny flashes

that's all

  • Member since
    February 2011
  • From: Mobile, AL
Posted by RotorHead10 on Tuesday, September 27, 2011 7:50 PM

Some nice work going on there!  Sorry I've been vacant fellas.. working night shift from 3 to midnight takes a toll after a while.  Got a baby on the way as well.  Think that cockpit looks good, you should see the sweet baby crib going up.  Promise to be more active.  Think I'm going to start fresh with a new kit.  Just don't know which one.  That skunk model CG 60 looks good.  Only thing I don't get, is it seems people go overboard with panel lines.  139er, if you want some more good exterior shots let me know, and I'll get them to you.

http://i301.photobucket.com/albums/nn48/MikeTheModeller/GB_Badges/Phantom2011_1.jpg

  • Member since
    July 2010
  • From: Tornado Alley
Posted by Echo139er on Tuesday, September 27, 2011 8:21 PM

Welcome back rotorhead, thanks for the pic offer.

i could use some pics of the over head both the cockpit and crew space.

I am hoping I get a long stretch of bench time in a couple of weeks. I will post WIPs then. 

  • Member since
    July 2010
  • From: Tornado Alley
Posted by Echo139er on Wednesday, September 28, 2011 12:36 PM

Oh, and congrats on the future costie!

  • Member since
    October 2008
  • From: italy
Posted by bsyamato on Thursday, September 29, 2011 6:28 PM

RotorHead10 don't care about absence Yes what do you mean with "Got a baby on the way as well" , you turned into father?


brief update

this afternoon i used the putty and sanded lots, tomorrow counting to strike the first paint layer


  • Member since
    February 2011
  • From: Mobile, AL
Posted by RotorHead10 on Tuesday, October 4, 2011 9:32 PM
Yep. Got a little boy coming. Late November. So I've been wrapped up in baby stuff lately. Just need to find some time to get building

http://i301.photobucket.com/albums/nn48/MikeTheModeller/GB_Badges/Phantom2011_1.jpg

  • Member since
    October 2008
  • From: italy
Posted by bsyamato on Wednesday, October 5, 2011 5:36 PM

RotorHead10
Yep. Got a little boy coming. Late November. So I've been wrapped up in baby stuff lately. Just need to find some time to get building

my best wishes for the coming little boy Toast 


  • Member since
    March 2007
  • From: NJ
Posted by JMart on Sunday, October 9, 2011 7:10 PM

Some nice helo work; do you still accept entries?

Soon I will start the Airfix 1:72 RAF 63ft Rescue Launch. Will that build qualify?  cheers


  • Member since
    July 2010
  • From: Tornado Alley
Posted by Echo139er on Monday, October 10, 2011 7:41 AM

Jmart, jump on in!  We'd love to have your launch.  I have seen some great builds of that kit.

RororHead has been a bit busy but he will soon catch up and add you to the list.  In the mean time welcome aboard the SAR build.

  • Member since
    October 2008
  • From: italy
Posted by bsyamato on Tuesday, October 11, 2011 5:21 PM

i dd some disaster Whistling an high weight fairey gannet sitting on the seabat rotor ... and modified the rotor blades number:

in mind to modify the rotor details but not in this way Indifferent no pain at all, two metal rods and some drill will resolve.

Jmart nice to hear a yellow seaking coming Toast (or will not yellowed?)


  • Member since
    July 2010
  • From: Tornado Alley
Posted by Echo139er on Sunday, October 16, 2011 10:31 PM

medicman, I say yes.  They assist in guiding resources to people in peril.

  • Member since
    July 2010
  • From: Tornado Alley
Posted by Echo139er on Sunday, October 16, 2011 10:40 PM

I was finally able to get started on the HH-60 Jayhawk.


Below is the halves prepped with light blue crew interior and black cockpit base colors.

The crew deck's non-skid and the cockpit are pictured below.

light coat of flat paint was added, a second light coat will be added before weathering.

a light brownish dusting was added to the deck to represent used deck.


Thank you for looking... More to come!

Tags: USCG Jayhawk
  • Member since
    February 2011
  • From: Mobile, AL
Posted by RotorHead10 on Monday, October 17, 2011 6:55 PM
Uh-Oh. Your pics didn't show up. At least on my PC they didn't. Also if you havent started yet, hold off on cutting the tail. The only time we'll ever fold the tail is for Heavy Maintenance. As far as blades being folded, that went the way of the dodo about 10-12 years ago. get some pics of a navy h-60 rotorhead, then look at the coast guard rotorhead. very large difference. The coast guard removed ALL of it's blade fold stuff. Hence a "streamlined" rotorhead. I'll get you some pics in a few minutes...i'm on lunch

http://i301.photobucket.com/albums/nn48/MikeTheModeller/GB_Badges/Phantom2011_1.jpg

  • Member since
    February 2011
  • From: Mobile, AL
Posted by RotorHead10 on Monday, October 17, 2011 6:58 PM
i digress!!!! that cockpit looks amazing!!! hope my photos played a part in that!!!

http://i301.photobucket.com/albums/nn48/MikeTheModeller/GB_Badges/Phantom2011_1.jpg

  • Member since
    October 2008
  • From: italy
Posted by bsyamato on Tuesday, October 18, 2011 4:29 AM

yep, i see the good work of Echo!!!! instead i can see your pictures post before RotorHead, i see the message picture unavaible.

Echo (joeviz was not good as nickname?) some mods on the kit? This is the first skunk work kit i see Yes

The seabat actually stopped for others projects on deadlines, but need to get control on the layers i did on, also i see some exterior details is missing on the kit, some tubes etc.

  • Member since
    July 2010
  • From: Tornado Alley
Posted by Echo139er on Tuesday, October 18, 2011 10:39 AM

Thank you Rotorhead and bsyamato.  I think the cockpit was actually the easy part. LOL

Rotorhead, thank for the heads-up.  I had no idea the tail, or rotors are no longer folded; I came pretty close to cutting the tail off.  I would love some pics of the rotor head since that is where I am headed next.

Thank you again!

  • Member since
    March 2007
  • From: NJ
Posted by JMart on Tuesday, October 18, 2011 8:11 PM

Echo – Great job on the cockpit. Learning a lot of good info on helos…

Bsyamato – I will be building the airfix close to the box art colors… what do you mean ‘yellowed”?

Rotorhead – Don’t forget to add me to the roster! I hope to start work in a few once work slows down a bit and I clear some benchspace.

This is a review of the kit; any input and suggestions are more than welcome!

http://www.users.globalnet.co.uk/~pinniger/shipkits/reviews/airfix_raf.html

EDIT - I think I now know what you meant by "yellowed":

http://www.modelshipgallery.com/gallery/misc/hms/raf-72-md/md-index.html

this type?


  • Member since
    October 2008
  • From: italy
Posted by bsyamato on Wednesday, October 19, 2011 5:09 AM

JMart sometimes i'm totally out of head Propeller dunno why but i read airfix and raf and automatically i read in my mind "sea king" and the rescie raf seaking are totally in yellow ... Bang Head

  • Member since
    July 2010
  • From: Tornado Alley
Posted by Echo139er on Wednesday, October 19, 2011 9:32 AM

bsyamato, I have not decided on any any mods yet.  I have several in mind but I will decide once I get to that portion of the build.

As for my new name.  I felt I had to change it to de-associate myself from another user of the same name in a different forum.

  • Member since
    February 2011
  • From: Mobile, AL
Posted by RotorHead10 on Tuesday, December 6, 2011 9:25 PM
just bumpin the thread. seeing how everyone is progressing. getting back on the tablw soon as i find time between diaper duty!

http://i301.photobucket.com/albums/nn48/MikeTheModeller/GB_Badges/Phantom2011_1.jpg

  • Member since
    May 2006
Posted by thunder1 on Thursday, December 15, 2011 11:00 AM

General Aviation Co.

Grumman Albatross 1958

USCG Helos

Sorry I'm a little late in this Group build, I just came across it...I just finished up a USCG HH-52 yesterday, I will post a picture of it as soon as I can...I think I took some build photos of it if so I'll include those also.

The photos of the aircraft and helos are old builds, I figured to send something along for the moment.

Mike 

  • Member since
    October 2008
  • From: italy
Posted by bsyamato on Thursday, December 15, 2011 11:13 AM

Great builds there Bow Down i love the yellow s58!

Which are the first sea plane? is the first time i see Hmm

  • Member since
    July 2010
  • From: Tornado Alley
Posted by Echo139er on Thursday, December 15, 2011 12:56 PM

NICE!!  Great job!

  • Member since
    May 2006
Posted by thunder1 on Friday, December 16, 2011 4:10 PM

Thanks for the nice comments. The first picture is of a USCG General Aviation PJ1, referred to as the "Flying Lifeboat" it dates back to the early 1930's and served the Coast Guard well for 10 years.  The model is of vacuform construction and the kit dates back to 1978. I think the company name was "Rareplanes", it was built many moons go. I note that vessels are included in this build. As I seldom take pictures of my model builds(even built ones don't get photographed) I'm including a couple of pics of old builds. Perhaps it will inspire a builder to attempt a similar project.

German Rescue Ship ARKONA

USAF Crash Boat

  • Member since
    February 2011
  • From: Mobile, AL
Posted by RotorHead10 on Saturday, December 17, 2011 6:10 PM
great builds and thank you for posting the kits. where did you come across an h-52? thats apretty rare find.

http://i301.photobucket.com/albums/nn48/MikeTheModeller/GB_Badges/Phantom2011_1.jpg

  • Member since
    May 2006
Posted by thunder1 on Monday, December 19, 2011 9:14 AM

Here are the pics of my latest builds. The HH-52(I took my re enlistment oath on a H-52) is my favorite CG "egg beater", its a classic air frame. The model is not a state of the art kit, I threw out the bulk of the parts and used the rotor assembly from a 1:72 Revell Chickasaw. THe rest of the parts(including decals) came out of the scrap box. I would only recommend this kit to a seasoned builder, Its overpriced and crude.  For your info, ITC models offered a 1:48 scale model of the H-52 'way back in the early 1960's and marketed the kit as a Vietnam US Army gun ship, very in-accurate!! They turn up on Evilbay from time to time and usually get  big bucks. The Douglas Dolphin is a Vacuform kit from the 1970's. Like the 52,  a piece of work kit, no decals, no banel lines or detail, no beaching gear, crude props and motors, for the diehard SAR builders like me.  PS,  I'm not trying to  "over burden" this group build, all I build is Search and Rescue related stuff I could fill this topic up with a lot of photos of completed builds but I won't as I don't want to "wear out my welcome".

Mike 

  • Member since
    February 2011
  • From: Mobile, AL
Posted by RotorHead10 on Monday, December 19, 2011 6:30 PM
the more the merrier!

http://i301.photobucket.com/albums/nn48/MikeTheModeller/GB_Badges/Phantom2011_1.jpg

  • Member since
    March 2010
  • From: New Zealand
Posted by Scorpiomikey on Monday, December 19, 2011 6:50 PM

Um, i entered this and forgot, woops.

Heres my entry anyway lol.

C&C welcome.

"I am a leaf on the wind, watch how i soar"

Recite the litanies, fire up the Gellar field, a poo storm is coming Hmm 

My signature

Check out my blog here.

  • Member since
    September 2007
  • From: Truro Nova Scotia, Canada
Posted by SuppressionFire on Monday, December 19, 2011 8:25 PM

Room for one more?

1/72 scale Revell of Germany UC-64A Norseman

Chose the SAR version on floats, the markings are of one of two airplanes bought by the Government of Saskatchewan for SAR operations. The first non-military ones in North America! CF-SAM (Canadian Flight-Saskatchewan Air Medical) program was so successful a 60 cent stamp was issued with the aircraft pictured on it. 

The kit is a re-release with new box art and decals for three versions. The other two have the option of skis or wheels. The sprues are very basic and I plan on many modifications to bring the kit to contest standards.

To date I have done some 'general thinner', started to detail the Wright R-1340-83H1 engine and replaced the kits plastic floor with hardwood.

The instructions have mentioned the aircraft sits in a museum in Moose Jaw Saskatchewan. I E-mailed the facility for some reference photographs and received a reply with some pictures and a few diagrams. A week later a CD arrived in the mail with 100's of photographs! Needless to say any inaccuracies in my build will NOT be from lack of reference material. 

My target completion date is around the timeline of this GB. So... if you can squeeze me in I will attempt to complete on time!

WIP's to follow...

http://i6.photobucket.com/albums/y211/razordws/GB%20Badges/WMIIIGBsmall.jpg


  • Member since
    October 2008
  • From: italy
Posted by bsyamato on Tuesday, December 20, 2011 5:32 AM

Other great subjects thunder1 YesYes


Scorpiomikey

Um, i entered this and forgot, woops.

LOL Big Smile


  • Member since
    September 2007
  • From: Truro Nova Scotia, Canada
Posted by SuppressionFire on Tuesday, December 20, 2011 9:18 AM

bsyamato

Other great subjects thunder1 YesYes

Ditto

Well I uploaded a few hundred reference photographs to my computer from the CD. I must say David Sampson at the museum out did himself! Other than tearing the skin off I have every conceivable angle and view of the aircraft.

Here is what the beast (Two ton truck) looks like, hopefully my model will as well:


http://i6.photobucket.com/albums/y211/razordws/GB%20Badges/WMIIIGBsmall.jpg


  • Member since
    October 2008
  • From: italy
Posted by bsyamato on Tuesday, December 20, 2011 9:49 AM

Nice shot of the norseman suppressionfire Yes just waith for the host reply.

Actually no norseman in the stash but post some more picture , the colors are great on this one Big Smile

  • Member since
    September 2003
  • From: Australia
Posted by Helo H-34 on Tuesday, December 20, 2011 5:48 PM

Is it too late to join in ?

I was looking to start a 1/72 Linberg HH--3E in a couple of days time ...

I was going to use some Wolfpak decals "Alaskan Air Command" ;

The build will be pretty much OOB , I'll just add a cabin floor and cut the side door open .

                         John .

  • Member since
    July 2010
  • From: Tornado Alley
Posted by Echo139er on Tuesday, December 20, 2011 6:00 PM

It is never to late!  Welcome, Helo!

  • Member since
    September 2007
  • From: Truro Nova Scotia, Canada
Posted by SuppressionFire on Tuesday, December 20, 2011 6:23 PM

bsyamato

Actually no Norseman in the stash but post some more picture , the colors are great on this one Big Smile

'Green & Gold!' Fans of the CFL (Canadian Football League) know Saskatchewan Roughrider fans are nothing short of fanatical! How else can a Province with the smallest population host a pro football team? 

I was saving the pictures for later, because you asked here are a few more:


http://i6.photobucket.com/albums/y211/razordws/GB%20Badges/WMIIIGBsmall.jpg


  • Member since
    October 2008
  • From: italy
Posted by bsyamato on Wednesday, December 21, 2011 4:44 AM

Nice shots again Yes

where's my seabat Hmm 

  • Member since
    September 2003
  • From: Australia
Posted by Helo H-34 on Tuesday, December 27, 2011 5:51 AM

I've made a start on my Alaskan Air Command  1/72 HH-3E  ;

I cut open the side fuselage door and glued some 2mm plastic strip around the opening to make up for the saw cut and filing .

Next I cut the top off an old CD case to use as the cabin floor ;

I found a spare instrument  consol panel to replace the rather ordinary one Lindberg supply along with some control sticks for the cockpit .

I then made some troop seat backs from masking tape and attached it to some plastic strip ;

The seat bases are from the UH-1 Huey spares box .

I then glued the rotors to the hub and painted them along with the tail rotors and some green tint on the canopy . The cabin seats I painted red and I found some pilots to use which I'll give them a fresh coat of paint . The sponsons are glued and clamped as well as the external fuel tanks .

I glued the fuselage windows in place and next I'll start glueing the interior bits into position , take a pic and close up the fuselage halves .

I'm aiming to complete this little project by New Years , it would be a nice change for me to start and finish a build in a week to ten days instead of having projects dragging on for months , like my other on-going builds.

Thank's for looking ;

                               John .

  • Member since
    September 2003
  • From: Australia
Posted by Helo H-34 on Tuesday, December 27, 2011 11:12 PM

A little more progress ...

All the interior bits are glued in place and I'm ready to close up the fuselage halves .

                               John .

  • Member since
    October 2008
  • From: italy
Posted by bsyamato on Wednesday, December 28, 2011 3:39 AM

Helo magnific detail work Yes

It's the same lindberg kit i have? it's a snap fit?

  • Member since
    September 2003
  • From: Australia
Posted by Helo H-34 on Wednesday, December 28, 2011 11:59 PM

Yes , it is the snap-fit kit .

I glued my fuselage halves together , I needed a little tamiya putty across the top of the fuselage ;

Other than that the fit is not too bad .

                    John .

  • Member since
    September 2003
  • From: Australia
Posted by Helo H-34 on Friday, December 30, 2011 1:23 PM

Some more progress , she's starting to look like a helicopter ;

There is a small gap under the front canopy where it meets the fuselage , that I will have to fix with some plastic strip ;

I was looking around the net for pic's of my Alaskan HH-3E and saw a photo of an Alaskan CH-3E with those fixed main landing gear struts . I wondered how difficult it would be to try and scratch build some as an alternative to the large sponsons /main landing gear ;

I think it looks okay for a first try , it may work out on a second build , so I'll think about it for a while .

Anyway I'll fix the gap under the canopy on my current build .

                                  John .

  • Member since
    September 2007
  • From: Truro Nova Scotia, Canada
Posted by SuppressionFire on Friday, December 30, 2011 9:48 PM

Helo H-34,

You are a modeling machine! Excellent work detailing the non existent interior of the Snap-tite kit. 

I managed some progress at a club 'Build afternoon & dinner' Will post some WIP's before 2012!

http://i6.photobucket.com/albums/y211/razordws/GB%20Badges/WMIIIGBsmall.jpg


  • Member since
    October 2008
  • From: italy
Posted by bsyamato on Saturday, December 31, 2011 5:41 AM

so omany details on this old kit helo YesYes great start on scratching new gears.

  • Member since
    September 2007
  • From: Truro Nova Scotia, Canada
Posted by SuppressionFire on Saturday, December 31, 2011 8:10 AM

'Its not the beginning of the end yet it is the end of the beginning' ~ W.C.

To me progress is not in leaps and bounds but in small tweaks and added details. Here is what has been done thus far:

The WASP radial engine was molded in one part. After some debate I decided it could be improved. The cooling fins, fuel line and push rods were scraped off using a #11 & #22 hobby blade. Thin wire was wrapped around each with a exit hole foe the fuel line at the top. The fuel manifold was drilled to accept the lines yet I found the holes were not lining up so they were just cut to mate. The push rods are yet to be added. Small bolt heads were added around the inner housing by adding them with stem through pre drilled holes.

The plastic floor was replaced with wood. Bent staples are CA glued from underneath to become seat mounts. The walls were thinned anticipating frame work yet the reference pictures show thicker insulated walls. Sheet styrene was fit to the wall, windows cut and to be filed to a closer tolerance.

The plan is to drop windows in after painting using the interior sheet as a sill, it will eliminate masking as the windows were to be replaced with thinner material. Because of the simple flat shapes it should be a easy fit. I know its not the usual procedure yet somewhat of a new approach.

http://i6.photobucket.com/albums/y211/razordws/GB%20Badges/WMIIIGBsmall.jpg


  • Member since
    September 2003
  • From: Australia
Posted by Helo H-34 on Saturday, December 31, 2011 2:59 PM

Suppressionfire , excellent work on the engine detail and I think your idea about making sills for the fuselage windows to sit against is awesome . I will definitly remember that technique for the future , it certainly will save time not having to mask them prior to airbrushing .... "Great Tip" Yes

I came across of a couple of pic's last night while looking around the net and stumbled onto this site ;

http://www.rotorheadsrus.us/documents/231.html

CH-3E 69-05811 Blair Lakes , Alaska 1974

CH-3E 67-14718 NKP Thialand 1969-1970

Mmmm ; "Crazy Legs" . Maybe two more builds on the horizon !

                      John .


  • Member since
    September 2007
  • From: Truro Nova Scotia, Canada
Posted by SuppressionFire on Sunday, January 1, 2012 7:12 PM

Helo H-34,

Thanks, like the Kung-Fu master asked:

'What is the best technique?'

No technique! ~ Bruce Lee

Always think outside the box, the next great technique is just imagination & effort away. Of course it didn't happen without a picture and excellent results.

The proof being in the pudding I have never tried nor heard of 'window sill' technique, will see eventually if its worth the effort.

Speaking of out host with the most... Ask him to update the roll call on page 1 if ya' see him @ the LHS!


http://i6.photobucket.com/albums/y211/razordws/GB%20Badges/WMIIIGBsmall.jpg


  • Member since
    September 2003
  • From: Australia
Posted by Helo H-34 on Monday, January 2, 2012 3:37 AM

I got the HH-3E all masked and started some preliminary airbrushing ;

A little silver on the landing gear struts . wheels and wheel wells , which is what Wolfpak's decal and painting instructions suggest . Also a couple of coats of flat black on the canopy frame lines , so when you look through the canopy you will see the black on the inside looking out .

I also tried mixing some Tamiya Acrylic X-6 Orange and X-7 Red (50%/50%)  for the International Orange color . It looks okay on the stick , so I'll give it a go tomorrow on the nose and tail boom .

                     John .

  • Member since
    October 2008
  • From: italy
Posted by bsyamato on Monday, January 2, 2012 6:05 AM

nice updates helo, the lindberg kit now looks more serious than from the box (i search for mine but probably was destroyed and gone in the recycle bin) Big Smile

Suppression even me think to a similar mod on radial engines but never try till now. Your result is really good and nice wood on dancefloor Cool

  • Member since
    September 2003
  • From: Australia
Posted by Helo H-34 on Wednesday, January 4, 2012 3:03 PM

My paint mix of 50/50 Tamiya X-6 and X-7 for the International Red/Orange worked out nicely ;

The next day I masked and gave the HH-3E a few light coats of ADC Gray (Gunze H-61) ;

Today I'll mask for the flat black around the engine exhaust and lower canopy frame lines .

                      John .

  • Member since
    September 2003
  • From: Australia
Posted by Helo H-34 on Thursday, January 5, 2012 5:04 AM

I have completed the rest of the painting on the Alaskan Air Command HH-3E ;


Decals will be next .

                    John .


  • Member since
    September 2003
  • From: Australia
Posted by Helo H-34 on Saturday, January 7, 2012 7:49 PM

I haven't started the decals on the HH-3E as yet , instead I decided to do some preliminary work on the next CH-3E "Crazy Legs"  build .

As with the fist build I cut open the cabin door and drilled out the two fueling points on the left fuselage ;

Then I cut some sheet plastic the same size as the cockpit bulkhead and drilled and filed some openigs for shelves ;

The equipment rack should look okay once it's painted along with rest of the fuselage interior ;

Next I started on the fixed landing gear struts . I used some spare support strut brackets cut from an old Revell Seaking kit ;

I also added some old H-34  landing gear struts cut to size as extra suppot pieces ;

The fixed style landing gear seems to look the part ;

It was a lot of trial and error and it  took me a lot longer to do than I first thought but I'm happy with the results ;

Next I'll cut some plastic for the rear cabin floor and work on the rear cabin seats as well .

               John .


  • Member since
    September 2003
  • From: Australia
Posted by Helo H-34 on Sunday, January 8, 2012 4:54 AM

Decals are on the HH-3E first build ;

Tomorrow I'll give her a couple of coats of clear flat , then glue on the last bits and post finish pic's .

              John .

  • Member since
    October 2008
  • From: italy
Posted by bsyamato on Sunday, January 8, 2012 5:22 AM

Great progress helo Yes the scratched landing on the second looks good

  • Member since
    September 2003
  • From: Australia
Posted by Helo H-34 on Sunday, January 8, 2012 7:59 PM

Here's some pic's of my completed HH-3E Alaskan Air Command SAR Helicopter .

I enjoyed the build , in fact it's the first time in a long time that I actually finished a build just several weeks after starting it . All my other on-going builds seem to drag on for months , so I'm quite pleased with my efforts and I hope build (2) "Crazy Legs" goes as good as this one .

                            John .

  • Member since
    September 2007
  • From: Truro Nova Scotia, Canada
Posted by SuppressionFire on Monday, January 9, 2012 5:40 AM

Helo H-34

Another impressive build! Excellent results and considering the simplicity of the kit good use of scratch building.

Progress is slow on CF-SAM yet looking forward to getting more time to build. Aside from monthly 'build nights' at our club I have been requesting more to get extra build time in.

Jason

http://i6.photobucket.com/albums/y211/razordws/GB%20Badges/WMIIIGBsmall.jpg


  • Member since
    May 2006
Posted by thunder1 on Monday, January 9, 2012 10:03 AM

Nice, clean (and quick)  build of an unusual subject. Bravo Zulu!

  • Member since
    October 2008
  • From: italy
Posted by bsyamato on Monday, January 9, 2012 4:26 PM

my occasionally ridiculous update compared to the great Helo finished HH-3E Embarrassed

A red was used on another kit and take advantage to paint the relative seabat red parts .... enamels costs Whistling

not founf actually a correct color for the high visible red but i have the impression that another thinned layer on the same red (under color was white) can approach to the definitive acceptable color

heres the real from airliners.net


  • Member since
    September 2003
  • From: Australia
Posted by Helo H-34 on Wednesday, January 11, 2012 12:34 AM

Bsyamato , your H-34 Seabat build is coming along nicely  Yes

As for me , I decided to buy a couple of those inexpensive  1/72 Starfix HH-3E kits to use some of the cockpit pieces in the Lindberg CH-3E build as Starfix supply some nice cyclic sticks , foot pedals , seats and pilots .
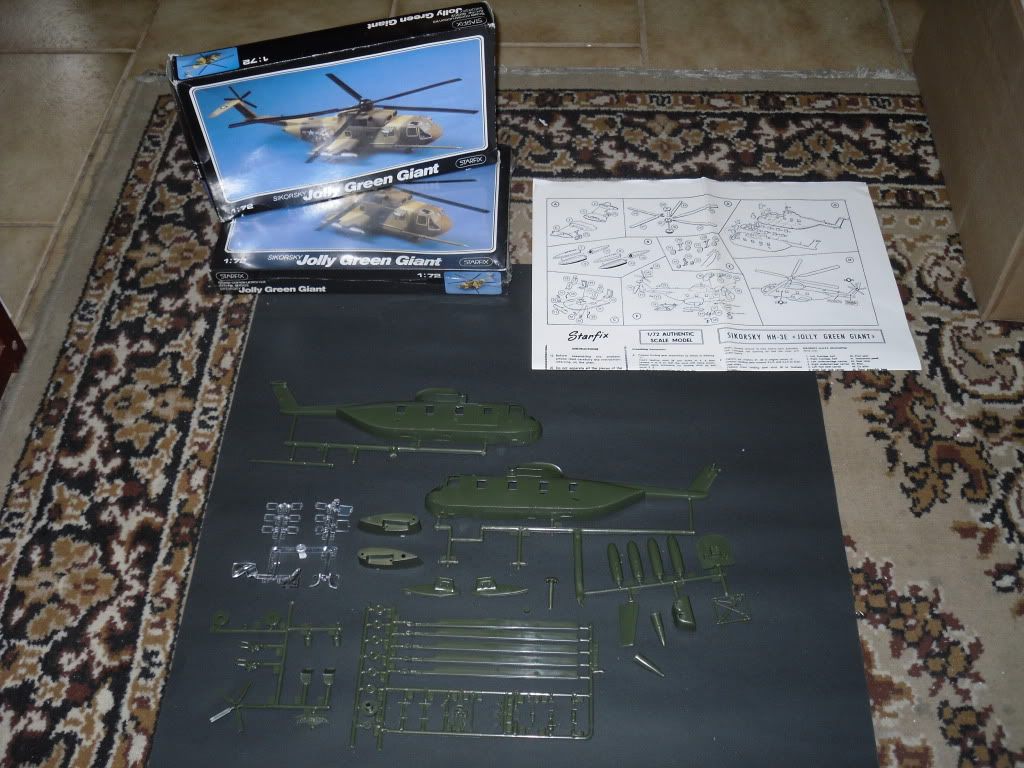
One of the main reason for purchasing these two kits is that they come with a nice under fuselage hoist for external sling loads ;
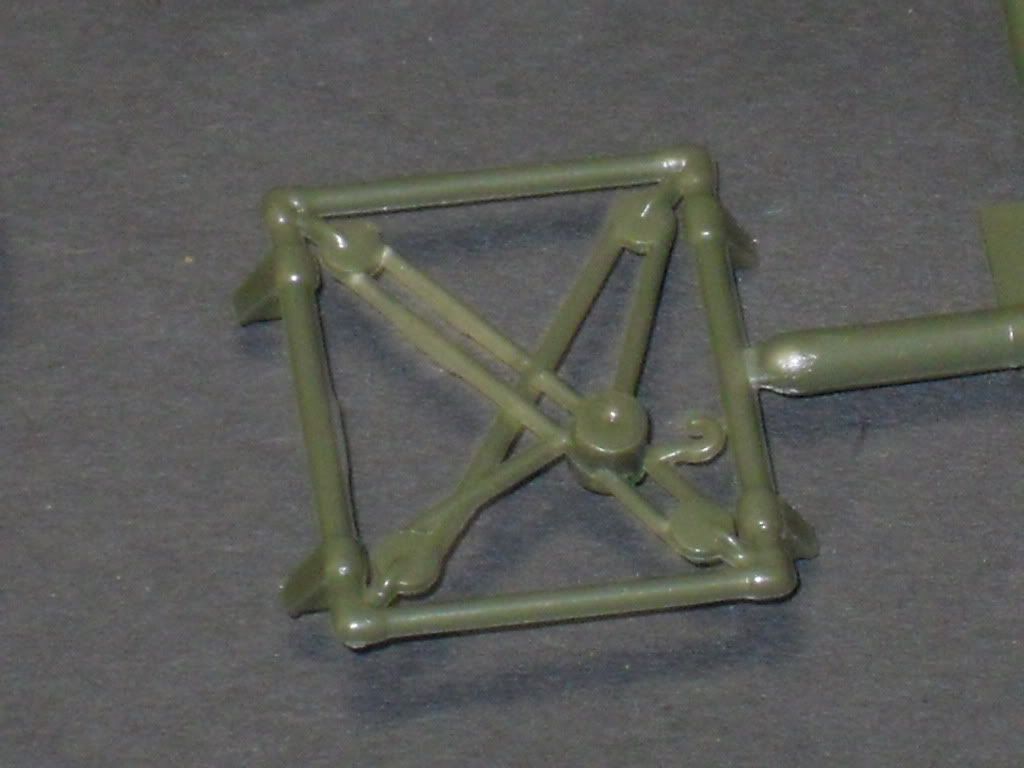
The Carzy Legs CH-3E is fiited with one of those hoists , so my thinking was to add it to my Lindberg 2nd build .

However last night I was eyeballing the Starfix kit and started thinking about what I would need to do to fix some of the main inaccuracies and perhaps use the Starfix HH-3E as the base kit for my CH-3E Crazy Legs build .

The Starfix HH-3E main rotor housing is much nicer than Lindbergs kit but there is no bulge on the left side of the rotor housing to depict the APU unit . This could be fixed with a little Tamiya putty and sanded to shape ;
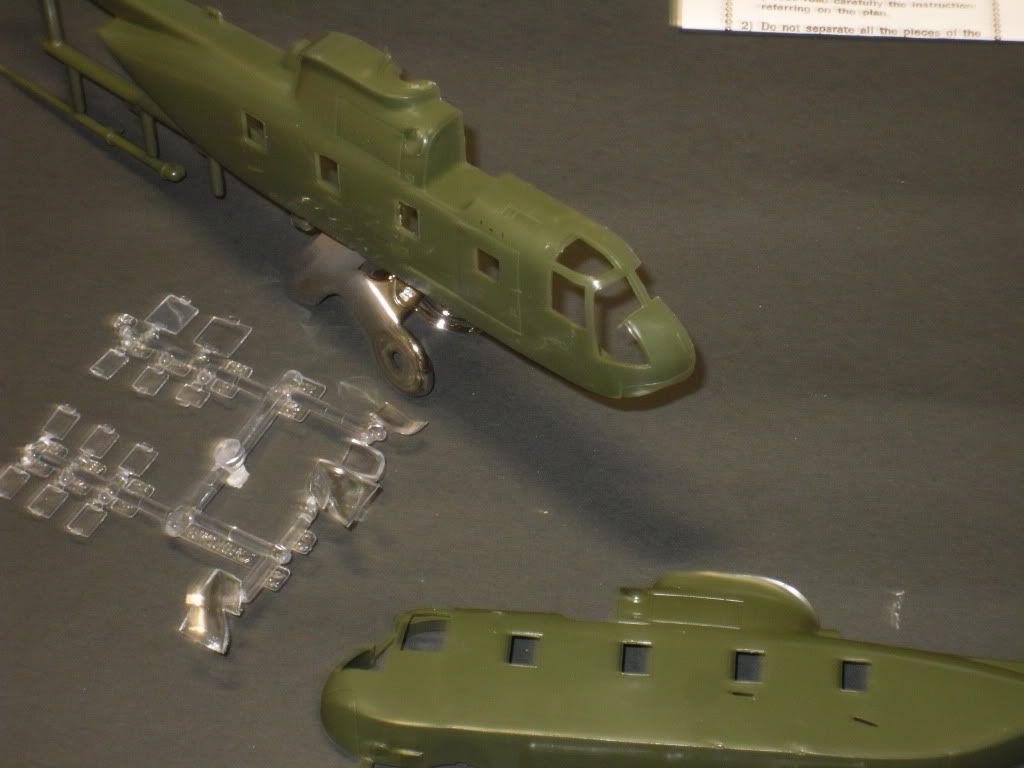
One of the biggest issue's is the size of the two overhead cockpit tinted window's , Starfix made theirs too narrow in width . So I two spare Lindberg canopies and decided to have a go at carefully cutting out the overhead canopy window's and file the opening bigger on the Starfix fuselage ;
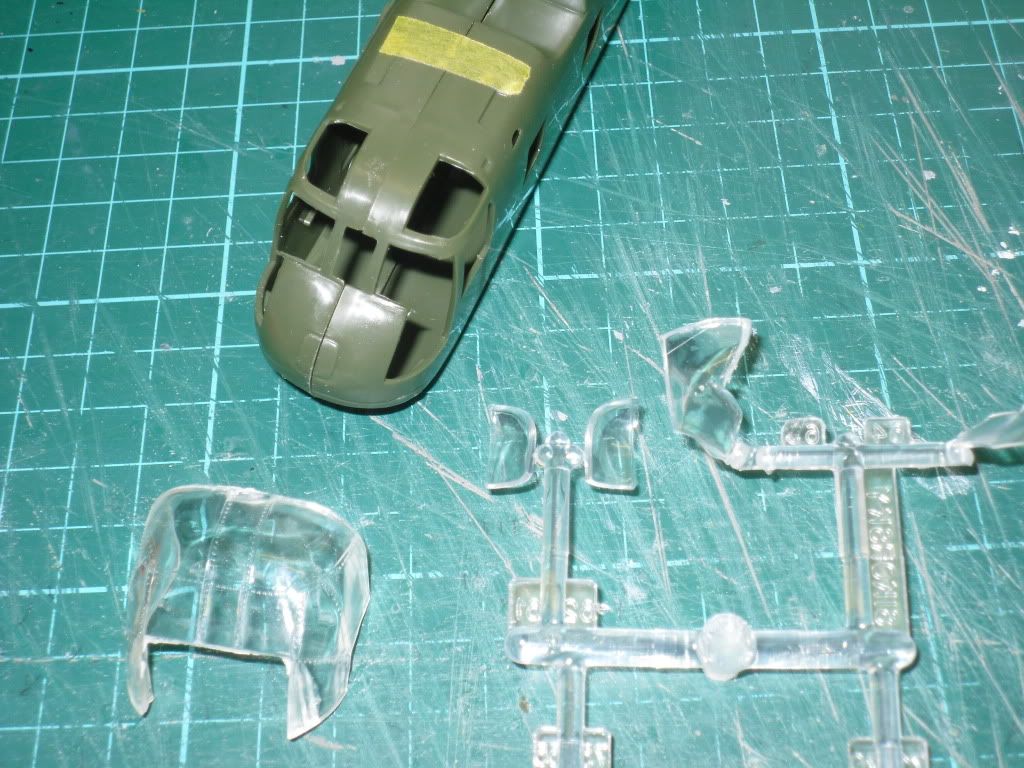
 This seemed to work out okay ;
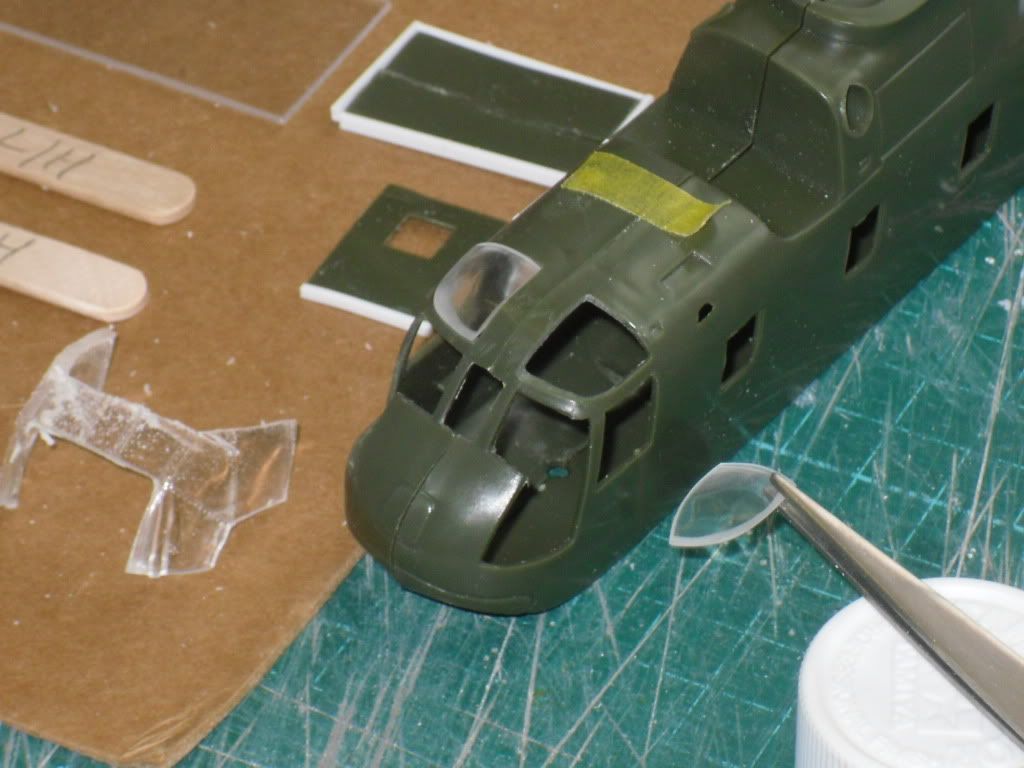
So now I have decided to use the Starfix HH-3E kit as my CH-3E Crazy Legs build ;
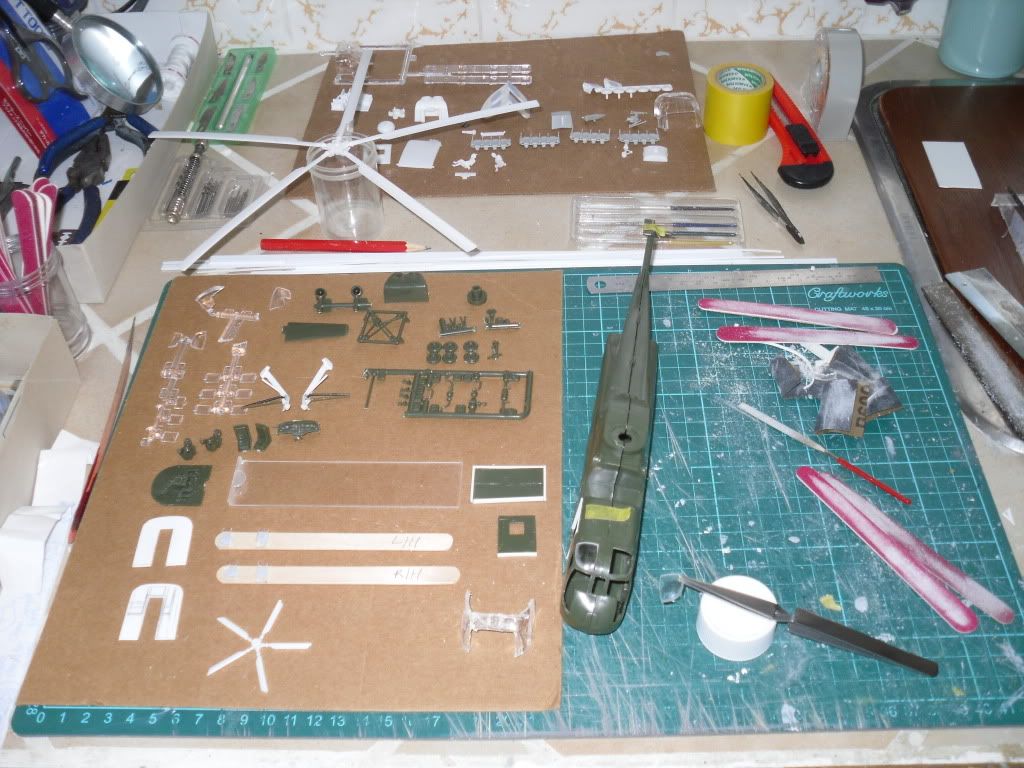
Next I cut open the side fuselage door and then glued some plastic strip to the opening to make up for the saw cut and filing . I also decided to cut open the pilots side cockpit window's to pose them open  ;
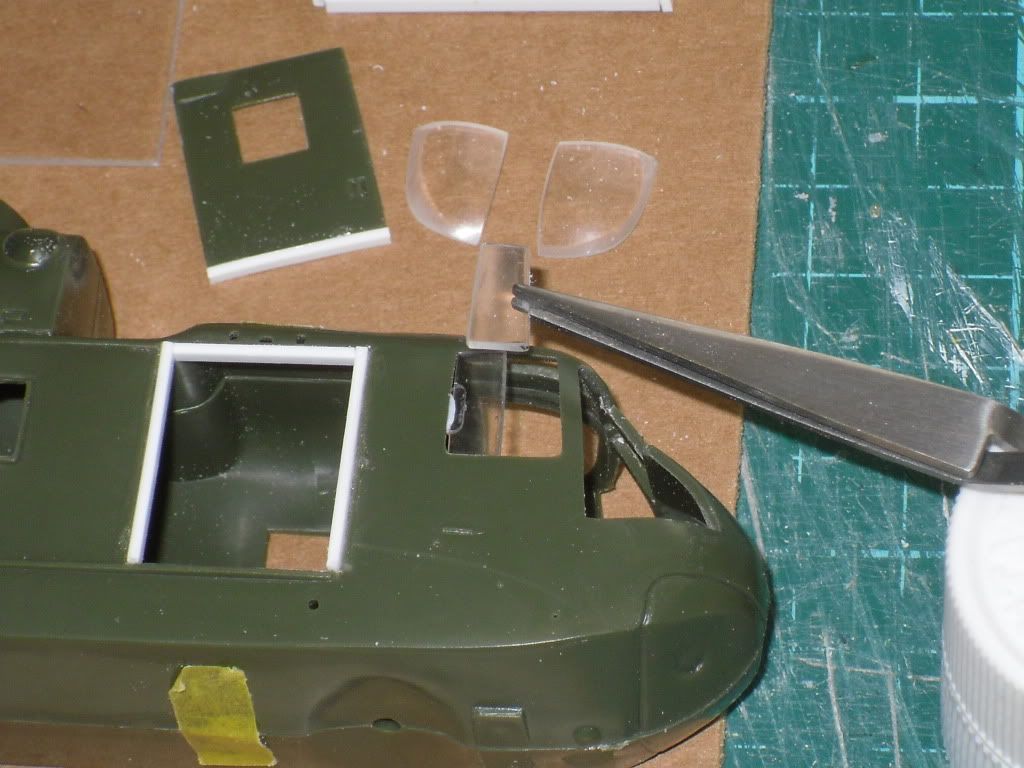
While doing this I suddenly discovered that I made a mistake on my first Alaskan HH-3E build in that Lindberg didn't mold a frame line down the middle of the pilots side window's , so I'll have to go back and re-mask those side window's and airbrush for a center frame line .

Anyway I continued on with the Starfix kit and cut open the rear ramp and I made some cockpit bulkheads for the interior ; One behind the pilots ( Starfix didn't supply one ) and the other I'll file some openings for shelves to depict the equipment rack . The one I had made already for the Lindberg fuselage is 2mm too wide for the Starfix kit , so I'll just make another .
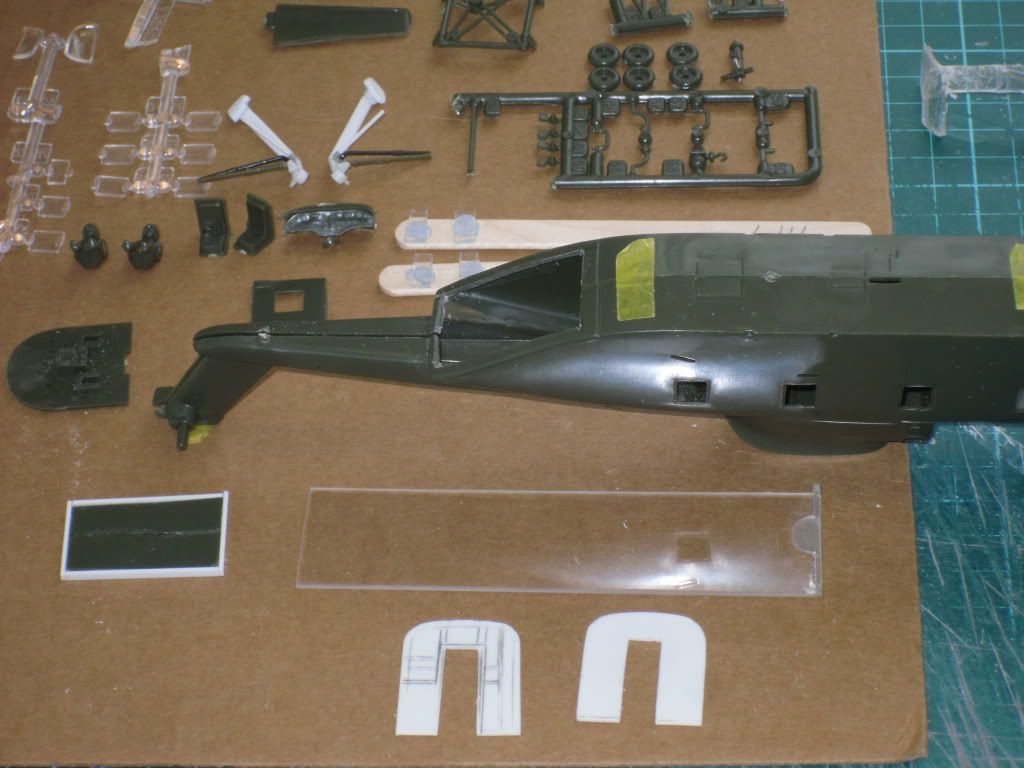
That's about it so far , my apologies for swapping and changing things so much but hopfully it should all work out .

John .

  • Member since
    October 2008
  • From: italy
Posted by bsyamato on Wednesday, January 11, 2012 4:42 AM

Never hear about starfix Indifferent you're buildin half of the gb kits LOL Big Smile

If i found where's my lindberg copy could try to use for an italian hh-3F conversion but not found where i suppose was Sad i fear  thrashed it 

  • Member since
    September 2003
  • From: Australia
Posted by Helo H-34 on Saturday, January 14, 2012 7:20 AM

Hi guy's ;

I've made a little more progress on Crazy Legs ; Starfix don't offer any type of front landing gear boxing or wheel well , just a slight recess in the underside fuselage halves ;

 I found an old H-53 Front landing gear boxing in the spares box and decided to use that , so I cut a notch in both fuselage halves to accommadate the landing gear boxing ;

It looked a little too long at first , so I shortened it and filled in the gap with some plastic strip .

The I extended the cockpit floor and glued the bulkhead in place , then I filed out  the equipment rack bulkhead and added some plastic strip for shelves ;

Everything seems to dry fit okay ;

Tomorrow I'll try and get some interior painting done on the fuselage halves and cockpit pieces ;

So I'm going along nicely .

John .

  • Member since
    September 2003
  • From: Australia
Posted by Helo H-34 on Wednesday, January 25, 2012 3:57 PM

I'm making slow but steady progress on the CH-3E "Crazy Legs" builds ; yeah now I'm doin' two .

After swapping and changing my mind so many times , I decided to build the Lindberg kit as well as the Starfix kit side by side .

The Lindberg build will be finished in the same paint scheme of the Alaskan Air Command HH-3E and the Starfix build will have the SEA camouflage from the Vietnam War .

Anyway the starfix kit doesn't have an APU unit molded to the left upper rotor housing , so I copied some pic's into the computer that a fellow FSM member , jeaton , posted a while back in the helicopter section of some walk around pic's he took of a USAF HH-3E ; http://yolo.net/~jeaton/Helicopters/hh3/hh3.htm

Working froma couple of pic's I printed out ;

I had a go at trying to scratch build something similar by laminating some 6.5mm x 1.5mm plastic strip together

Then I tried to file the little piece to a similar contour and shape ;

I guess it looks kinda okay , so after that I had a go at using the Trumpeter rivet maker and followed some pencil lines I drew on the Starfix smooth fuselage ;

This worked out okay too , so then it was onto painting the cockpit pieces and the masking tape / plastic strip seat backs and UH-1D Huey seat bases , glue the fuselage windows in place and then glue the interior pieces in place as well ;

Close up of the cabin seats and cockpit ;

Back to the APU unit , you can see in the next pic hoe different the fuselage pieces are on the Lindberg kit with the molded in APU and the Starfix kit ;

Quite a bit of difference between the two kits , which made it a little difficult making the APU for the Starfix fuselage as it is not as rounded at the top of the cabin roof section as it blends into the rotor housing like on Lindbergs kit .

Next I'll glue the fuselage halves together and I'll make another set of fixed landing gear struts for the Starfix kit .

John .

  • Member since
    October 2008
  • From: italy
Posted by bsyamato on Wednesday, January 25, 2012 4:02 PM

The famous "rivet counter" Big Smile LOL!

(need one again Zip it! )

Great updates Helo and good mods on the fuselage  YesYes


  • Member since
    September 2007
  • From: Truro Nova Scotia, Canada
Posted by SuppressionFire on Wednesday, January 25, 2012 6:31 PM

Agreed excellent work improving the kits!

Anyone see our host around? Seems he is MIA and not stopping in to update the entry page.

Looking forward to getting some work done and posted, hope to set up on the kitchen table a few times...

http://i6.photobucket.com/albums/y211/razordws/GB%20Badges/WMIIIGBsmall.jpg


  • Member since
    February 2011
  • From: Mobile, AL
Posted by RotorHead10 on Thursday, January 26, 2012 4:50 PM
I am so sorry you guys. Most of my FSM participation is off my mobile device as I am sans internet in my apt. I am committed to rhis board and the purpose it serves. To share techniques with extraordinary builders and to expand members' knowledge of the capabilties of SAR. Balancing a the board, work, and being a semi-new father have taxed me. From here on in I will commit to myself and my fellow modelers to keep this GB running straight and true. Much thanks to all who are participating and who have taken the time to help me along. Chris

http://i301.photobucket.com/albums/nn48/MikeTheModeller/GB_Badges/Phantom2011_1.jpg

  • Member since
    October 2008
  • From: italy
Posted by bsyamato on Friday, January 27, 2012 9:10 AM

Don't worry abour Rotorhead Yes Just update the rooster when yuo have the opportunity Cool

Again best wishes for the new come Toast

too few updats about seabat, i planned bad this project and comes really slow even withouth significant mods on

Main colors on

the yellow stripe on and started to paint gears and minor pieces. Also cleared some paint mistake on clear parts with a toothpick


Corrected also the paint on the nose... i extended too much the red area Whistling


  • Member since
    October 2008
  • From: italy
Posted by bsyamato on Tuesday, January 31, 2012 7:22 PM

First clear layer on, after a strike of weathering shading

  • Member since
    October 2008
  • From: italy
Posted by bsyamato on Friday, February 3, 2012 5:21 PM

more seabat updates

decals on , the sheet was poor but great quality

and panel lines washing, again to fix some other line

gears already painted, now remains rotors

  • Member since
    September 2007
  • From: Truro Nova Scotia, Canada
Posted by SuppressionFire on Friday, February 3, 2012 7:22 PM

bsyamato,

Difficult colors to pull off well, your helicopter is looking great!

The bottom photo looks a shade lighter than the rest, is this the lighting or a step you took in the painting process? Regardless the highlights and panel definition looks perfect.

http://i6.photobucket.com/albums/y211/razordws/GB%20Badges/WMIIIGBsmall.jpg


  • Member since
    September 2003
  • From: Australia
Posted by Helo H-34 on Friday, February 3, 2012 9:17 PM

Excellent progress Bsyamato Yes

The red , yellow and gray colors have come out quite well . Nice job also on getting those nose numbers to contour around the nose engine doors , I struggled with a single number 3 on an early U.S. Navy SeaBat I built a while back , so I know how difficult it can be .

As for me , sadly not much progress on the Crazy Legs builds other than glueing the fuselage halves together ;

Hopfully I can some more done this weekend .

John .

  • Member since
    October 2008
  • From: italy
Posted by bsyamato on Saturday, February 4, 2012 9:33 AM

Thanx guys for comments Bow Down 

Suppressionfire about colors no change was made between top page and last pictures, i only weatherend the grey (better i darkened the panel lines borders with drybrush) ,differences was made by different camerea manual setting.

Helo the nose number effectively was a nightmare, i did 3 or 4 attempt, used really hot water to dip and on last i attempt I risked spoiling the decals turnred too soft and elastic ,then with hands and the cutter removed totally and re-dip in the water, 2 layer of microsol perfected the adhesion.

The red looks so good because under i used 3 or 4 white layers Indifferent these colors like yellow ,white and red are even a pain to paint.

waiting for more updates here

the two pellican (italian name of the hh-3) looks very domesticated from the raw kits they comes YesYes

  • Member since
    October 2008
  • From: italy
Posted by bsyamato on Saturday, February 4, 2012 5:10 PM

final laps

fixed the broken main rotor (newbee mistake i performed Embarrassed )

painting rotors and matt layer on the copter

tomorrow will finally glue the gear and minor parts

  • Member since
    October 2008
  • From: italy
Posted by bsyamato on Monday, February 6, 2012 9:14 AM

some update

Then... i lost the finished blades control disc of main rotor Bang Head unexpected scratchbuild needed

tail rotor will also receive metal rods to replace original parts.

painting some missed detail from italeri as external tubes with brass rods and the tail light scratched from clear sprue

Hope not need to replace other parts Tongue Tied

  • Member since
    October 2008
  • From: italy
Posted by bsyamato on Tuesday, February 7, 2012 9:58 AM

more updates here

compass cutter work

first fitting test

and the two rotors fixed!

just waiting the CA glue dry and refine after

Metal rods painted and fixed on fuselage

this is the bottom pieces from the kit someone knows where's the correct position to glue it? i found few and not clear picurer of this helicopter for a correct fix

just to show seabat with rotors Big Smile

few pieces left to finish

  • Member since
    January 2003
  • From: Hancock, Me USA
Posted by p38jl on Tuesday, February 7, 2012 10:03 AM

thats looking better and better all the time ! Yes

[Photobucket]

  • Member since
    September 2007
  • From: Truro Nova Scotia, Canada
Posted by SuppressionFire on Tuesday, February 7, 2012 8:30 PM

bsyamato,

compass cutter work`...

Agg! I remember the days before I purchased a punch set. Turning styrene in a drill for round bits and toiling with sanding sticks.

Trust me once you use a punch set you will never manually cut a round disc again!

One of the best modeling tool investments I made for $30.

Anyhow the rotors are looking great! Sometimes its the journey that is half the fun.

*My affliction scratch building puts the journey at 90% of the fun!Bang Head

http://i6.photobucket.com/albums/y211/razordws/GB%20Badges/WMIIIGBsmall.jpg


  • Member since
    October 2008
  • From: italy
Posted by bsyamato on Wednesday, February 8, 2012 3:42 AM

thanx Chris Toast

Suppression in this case the compass was better because needed the center of the disc , a punch see is also needed for litter discs but the two tools are complementary.

Punch set and the rivet (counter Whistling) maker are two tools i'm considering to buy soon.

I'm surfing on web about the under details missing (antennas radar sensors and others things on the italian seabat but really few pictures are around Surprise

  • Member since
    October 2008
  • From: italy
Posted by bsyamato on Friday, February 10, 2012 6:40 PM

so... more updates and more wall head hitting Bang Head this afternoon painted and added other details included the rescue hook. This night returned on the workbench after billiards session i picked the seabat and the hook was not here where i glued it! the only scientific explain is an alien abduction Alien so tomorrow another scratched piece is needed Angry

then pictures with wheels , rescue hook lifter and other details painted

At the end glued also the bottom tubes. Some italian seabat shows more details added on the fuselage but not found clear pictures to perfect complete these pieces, so i leave the copter withouth for the moment.

I hope this weekend to finish the good copter Cool

I feel like want a third version in future of the 58 kits Stick out tongue

  • Member since
    September 2003
  • From: Australia
Posted by Helo H-34 on Friday, February 10, 2012 9:02 PM

bsyamato your Seabat is really coming along well now .

Excellent work fixing the rotors and overall she is looking great .

It's no big deal but Italeri have the tail rotors going in the wrong direction ; I've never worried about it in the past when I built my H-34's , however a modeller over in the helicopter forum section back in 2010 built an awesome Vietnam H-34 and he explained that instead of cutting the four tail rotor blades and turning them over to face the other way an easier method is to just cut the pin off one side of the tail rotors and do the same with the small raised piece on the other side and swap them around . This is much better than cutting off the individual tail rotor blades and struggling to get them glued back into position facing the other way . Cutting the pin is definitly easier .

Embarrassingly I started a whole fleet of H-34 and Wessex builds but the whole project has stalled , I finished  7 kits and have another 20 builds glued toghether with  about  24 H-34 and Wessex kits in the stash with a ton of after market decals , resin and PE . Perhaps sometime this year I can finish off the 20 builds I have already started .

Any great on-going work on your Seabat my friend Yes

John .

  • Member since
    October 2008
  • From: italy
Posted by bsyamato on Saturday, February 11, 2012 6:03 AM

Thanx for comments Helo Toast

After posted last picture i remember that Paul boyer posted an h-34 and he replied me about the wrong tail rotor on italeri's h-34 Lightning too late.

The solution to reverse the whole rotor is good but not resolving the control shafts points, they are in correct way Sad

Probably for now i leave it so. If will found the necessary references for the others missing details will fix it too.

I see your great collection when searched references for my hu-5 Yes theres lots of great subject between ,really liked all . Will check on helicopter section for updates !


  • Member since
    September 2007
  • From: Truro Nova Scotia, Canada
Posted by SuppressionFire on Saturday, February 11, 2012 8:32 AM

bsyamato,

Looking good into the tail stretch.

I am sure the missing part will appear after toiling for hours scratch building a replacement. Its how Murphy's law applys to model building.

I hope to post some progress WIP's this weekend.


http://i6.photobucket.com/albums/y211/razordws/GB%20Badges/WMIIIGBsmall.jpg


  • Member since
    October 2008
  • From: italy
Posted by bsyamato on Sunday, February 12, 2012 9:34 AM

Big Smile LOL i think the same ! not first time, waiting for norse updetes !


I can call the Seabat finished for now, will add later some more pictures with the wessex hu5 and... when the buran and blizzard from the east will leave Italy will take some honest outdoor pictures LightningLightning actually two weeks without sun and the only weather avaible are cloud with wind or rain, or both mixed with lightings Super Angry 

as i see after take pictures the right whell need some more retouch Whistling

I'm not sure but will try to get some yellow one copter to add here between some month .. probably a sea king Surprise


  • Member since
    September 2007
  • From: Truro Nova Scotia, Canada
Posted by SuppressionFire on Sunday, February 12, 2012 8:01 PM

CF-SAM Updates:

Making progress in the interior. The triangle braces will have one more larger tube installed after the interior is sprayed with Krylon Almond. The braces are to be brush painted black.

The dash is coming along as with the cabin floor. Here you see it stained with some aluminum on the floor as per reference photographs.

Made a replica of the interior cargo door to simulate the corrugated aluminum interior door skin. Will use tin foil or lead.

Paint at last! Just the completed engine in Testors enamel spray can. Will detail paint then Future coat before a enamel semi gloss black wash.


http://i6.photobucket.com/albums/y211/razordws/GB%20Badges/WMIIIGBsmall.jpg


  • Member since
    October 2008
  • From: italy
Posted by bsyamato on Monday, February 13, 2012 10:23 AM

Great updates Suppression Toast like this mix of media including wood !

The engine is the scratched one?

Good things ,this afternoon some hour of sun allow to snap some good pictures, here the sesabat with some hu5 support


some more here withouth filling the post too much 

Finished Seabat

  • Member since
    September 2007
  • From: Truro Nova Scotia, Canada
Posted by SuppressionFire on Monday, February 13, 2012 11:20 AM

bsyamato,

Excellent photographs and helicopters, models always look best in natural light.

Photo with the clouds into the sun looks real, just the cement ledge tips off they are models.

Thanks for checking out the progress!

The engine is based on the kit. All detail (or lack there of) was carved / filed off. I don't have a exact count yet its close to 50 multimedia parts added to the engine. A few times more than the entire kit!


http://i6.photobucket.com/albums/y211/razordws/GB%20Badges/WMIIIGBsmall.jpg


  • Member since
    September 2003
  • From: Australia
Posted by Helo H-34 on Monday, February 13, 2012 3:12 PM

Excellent finish pic's of your Seabat , bsyamato and I really like the HU-5 Wessex as well ...Toast

Suppressionfire , absolutly awesome WIP pic's . The work on the fuselage interior is amazing along with the scratch built engine , outstanding work Sir...Bow Down

John .

  • Member since
    October 2008
  • From: italy
Posted by bsyamato on Tuesday, February 14, 2012 5:04 AM

Thanx for comments guys Bow Down on last pictures the wind starter to rotate the seabat rotor (not fixed), a sense of fear pervaded me Tongue Tied

Now i'm counting about nine helicopter (and one building for airfix group ,the ancient scout kit) ,time to get a "family picture ... just to see the impression fro the larger (mh-53E) to the litter (ka-18) LOL

SuppressionFire

bsyamato,

.. just the cement ledge tips off they are models.

this is about my "i will do a moveble piece of diorama to show my finished models" but never do for some reason (mostly because when finish a model i procede to the next/s) aargh!!

Great on the about 50 added pieces to the engine Toast


  • Member since
    October 2008
  • From: italy
Posted by bsyamato on Thursday, February 16, 2012 5:21 AM

SuppressionFire

bsyamato,

...

I am sure the missing part will appear after toiling for hours scratch building a replacement. Its how Murphy's law applys to model building.

...

Hmm rule confirmed!!! the rotor control appeared in the box used box for seabat pieces Bang Head the only place i not search ,now rescued (lol) and placed in the spare box pieces . Murphy wins


  • Member since
    September 2007
  • From: Truro Nova Scotia, Canada
Posted by SuppressionFire on Thursday, February 16, 2012 10:52 AM

I can relate to extensive searches for MIA parts only to find then the one place I did not look!

The wooden stick used as a handle for a 1/144 scale Me 262 broke as I was spraying it (outdoors with a rattle can) The plane dropped (flew) about 8 feet into the snow, noticed the tail rudder was gone! Searched the snow for 20 minutes and when back at the bench it was sitting there! Guess it fell off before the paint session?Hmm

http://i6.photobucket.com/albums/y211/razordws/GB%20Badges/WMIIIGBsmall.jpg


  • Member since
    October 2008
  • From: italy
Posted by bsyamato on Friday, February 17, 2012 10:51 AM

LOL Big Smile

Then the rule is this

-The piece you lost will appear only when you don't need it more, and in all cases only when all areas where he is not was carefully sifted! -

Yes

  • Member since
    February 2011
  • From: Mobile, AL
Posted by RotorHead10 on Tuesday, February 21, 2012 9:47 AM
+1 true. My tail rotor pitch change beam didnt show up on my Hobbyboss Jayhawk until completion....bsyamato great looking Seabat! Once I am done building my son's 1/72 B-1B...I am going ti start Academys1/35 UH-60 in a medevac role.

http://i301.photobucket.com/albums/nn48/MikeTheModeller/GB_Badges/Phantom2011_1.jpg

  • Member since
    October 2008
  • From: italy
Posted by bsyamato on Tuesday, February 21, 2012 10:21 AM

1/35!!! Indifferent

  • Member since
    February 2011
  • From: Mobile, AL
Posted by RotorHead10 on Tuesday, February 21, 2012 11:32 AM
Yep. Just like my old ball coach used to say....go big or go home!

http://i301.photobucket.com/albums/nn48/MikeTheModeller/GB_Badges/Phantom2011_1.jpg

  • Member since
    September 2007
  • From: Truro Nova Scotia, Canada
Posted by SuppressionFire on Thursday, February 23, 2012 5:05 PM

Well its been a while and I am happy to say  made a bit of progress!

Painted the radial engine in enamel. The push rods flat black. The center a mix of Russian interior blue, blue and flat black. Never had a copper color so I mixed gold with a dab of red & brown.

The center was repainted after some surface flaws were removed. Wanting a enamel wash to 'pop' some details I coated the engine in Future after painting was complete. Just the wash is left after the Future cures a few days.

The interior is progressing as well! Scratch built the pilots gauges, added detail to the control stick and drilled holes in the roof for a light & vents. Also scratch built a cargo lift bar above the open door. Once a few more details are worked out the interior will be sprayed Krylon flat almond.

http://i6.photobucket.com/albums/y211/razordws/GB%20Badges/WMIIIGBsmall.jpg


  • Member since
    October 2008
  • From: italy
Posted by bsyamato on Friday, February 24, 2012 4:33 AM

Cool looking engine!! waiting tor the interiors.

  • Member since
    September 2007
  • From: Truro Nova Scotia, Canada
Posted by SuppressionFire on Saturday, February 25, 2012 2:17 PM

bsyamato

Thanks, wish I had more quality time to make progress...'

Here is the stamp(s) I located 3500 miles away in Vancouver BC:

...Trying to locate a model of the Fokker Super Universal Stick out tongue


http://i6.photobucket.com/albums/y211/razordws/GB%20Badges/WMIIIGBsmall.jpg


  • Member since
    September 2007
  • From: Truro Nova Scotia, Canada
Posted by SuppressionFire on Sunday, March 18, 2012 6:55 PM

bsyamato,

Interior progressing well, will post some pictures when computer returns from repairs tomorrow!

Having a lucky run getting bits of time on the project, now some paint is down momentum is gaining.


http://i6.photobucket.com/albums/y211/razordws/GB%20Badges/WMIIIGBsmall.jpg


  • Member since
    September 2003
  • From: Australia
Posted by Helo H-34 on Sunday, March 18, 2012 7:45 PM

Glad to hear your still making steady progress SuppressionFire .

My CH-3E "Crazy Legs" builds have stalled but only for the moment , hopfully I can get  some more done soon .

John .

  • Member since
    October 2008
  • From: italy
Posted by bsyamato on Monday, March 19, 2012 6:08 AM

Waiting for updates guys Toast suppression hope nothing bad on the computer.

Hope i could get another build here before the GB end, again lots of time then think i'll score somethin Cool

  • Member since
    September 2007
  • From: Truro Nova Scotia, Canada
Posted by SuppressionFire on Monday, March 19, 2012 3:23 PM

bsyamato,

Bad bill from the repair shop thats all... nothing $120 couldn't handle!Bang Head

Anyhow here is more:

http://i6.photobucket.com/albums/y211/razordws/GB%20Badges/WMIIIGBsmall.jpg


  • Member since
    July 2010
  • From: Tornado Alley
Posted by Echo139er on Sunday, September 23, 2012 3:53 PM

I finally got some bench time last night and this morning. I made some progress to the project. I am hoping I can do more tonight.

This is what I have so far.


By the way. All those rough parts you see on the nose look worse that what it really is. 

Despite the good reviews this kit got, it has to be one of the most difficult for me. The fit is horrible. There is a lot of sanding and putty work to get this guy to fit okay

Comments, suggestion... all welcomed!!

Tags: USCG Jayhawk
  • Member since
    October 2008
  • From: italy
Posted by bsyamato on Monday, September 24, 2012 3:53 AM

Excellent work Suppression Toast i see just now!

Some gaps there Echo Big Smile

where's your avatar?

  • Member since
    July 2010
  • From: Tornado Alley
Posted by Echo139er on Monday, September 24, 2012 8:56 AM

Yeah, I am little disappointed with this kit.  The reviews were so great.  Oh well... 

Tags: USCG Jayhawk
  • Member since
    October 2008
  • From: italy
Posted by bsyamato on Tuesday, September 25, 2012 6:20 AM

if fuselage are not yet glued try this trick i used on the condor, probably can help

Lower fuselage was not so perfect on alignement, so i glued plastic strips alternated on the two bottom sides

  • Member since
    July 2010
  • From: Tornado Alley
Posted by Echo139er on Wednesday, September 26, 2012 7:20 AM

Okay. So I tackled the seams/gaps with squadron white putty. Wet sanded with 1K grit to a smooth even finish.

Due to the misalignment (step) this will not be wining any awards ANYWHERE!  

Rescribed the panel lines. Only one goof but good enough for Govt. work. So here is where I am so far.


^--- The black line you see is not a shadow. It's whats left of a black mark from a sharpie.


Thank you for looking and as always comments are constructive criticism always welcomed.

Tags: USCG Jayhawk
  • Member since
    October 2008
  • From: italy
Posted by bsyamato on Thursday, September 27, 2012 10:04 AM

LOL! fortunately i don't build 1/48 kits.

At the end seems you win with the canyons Toast

  • Member since
    July 2010
  • From: Tornado Alley
Posted by Echo139er on Monday, October 8, 2012 9:39 AM

MORE PROBLEMS WITH THIS KIT!!!  GRRRR!  Bang Head

This will put a hold on progress for a while.

Tags: USCG Jayhawk
  • Member since
    July 2010
  • From: Tornado Alley
Posted by Echo139er on Monday, October 8, 2012 9:40 AM

This is a dry fit (Elmer's glue) by the way...

Tags: USCG Jayhawk
  • Member since
    July 2010
  • From: Tornado Alley
Posted by Echo139er on Tuesday, October 9, 2012 7:41 AM

  • Member since
    October 2008
  • From: italy
Posted by bsyamato on Thursday, October 18, 2012 6:00 AM

YesYes 

  • Member since
    July 2010
  • From: Tornado Alley
Posted by Echo139er on Saturday, December 8, 2012 6:22 PM

I have not been on here for a while.  I am back to post my finished entry for this group build.  


JOIN OUR COMMUNITY!

Our community is FREE to join. To participate you must either login or register for an account.

SEARCH FORUMS
FREE NEWSLETTER
By signing up you may also receive reader surveys and occasional special offers. We do not sell, rent or trade our email lists. View our Privacy Policy.