SEARCH FINESCALE.COM

Enter keywords or a search phrase below:

Japanese GB 2011-2012

204132 views
2250 replies
1 rating 2 rating 3 rating 4 rating 5 rating
  • Member since
    July 2003
  • From: Pennsylvania
Posted by jay12472 on Tuesday, December 27, 2011 2:24 PM

SAR nice job on the nmf

Wabash nice job on the IP also interesting on glueing the wings like that

Jason


  • Member since
    November 2009
  • From: SW Virginia
Posted by Gamera on Tuesday, December 27, 2011 5:38 PM

SAR: Looking pretty cool, crossing my fingers the salt chipping works out for you. I haven't tried it myself so far but will have to one of these days.

WW: Great job on the cockpit there, nice that the George has a enough window glass to see most of the work you've put into her.

"I dream in fire but work in clay." -Arthur Machen


  • Member since
    August 2007
  • From: n/w indiana
Posted by some assembly required on Tuesday, December 27, 2011 7:48 PM

thanks guys, the first attempt didnt go too great- i tried on the yellow wing edges and it was so so. i have to say trey makes it look easy!

  • Member since
    August 2009
  • From: Borlando Fla home of the rat
Posted by TREYZX10R on Tuesday, December 27, 2011 10:09 PM

The NMF looks real nice SAR ,with the salt just take your time and have fun with it. I did a lot of trial and error on scraps and the real problem I had was getting heavy handed with it. Cheers Trey

  • Member since
    August 2007
  • From: n/w indiana
Posted by some assembly required on Wednesday, December 28, 2011 8:06 AM

cool, thanks for the kind words. with the salt weathering i thought i didnt put enough on Boo Hoo but i also used tamiya paint. for the main top coat it will be MM, so maybe the enamel will react differently.

  • Member since
    November 2008
  • From: Crawfordsville, Indiana
Posted by Wabashwheels on Saturday, December 31, 2011 12:53 PM

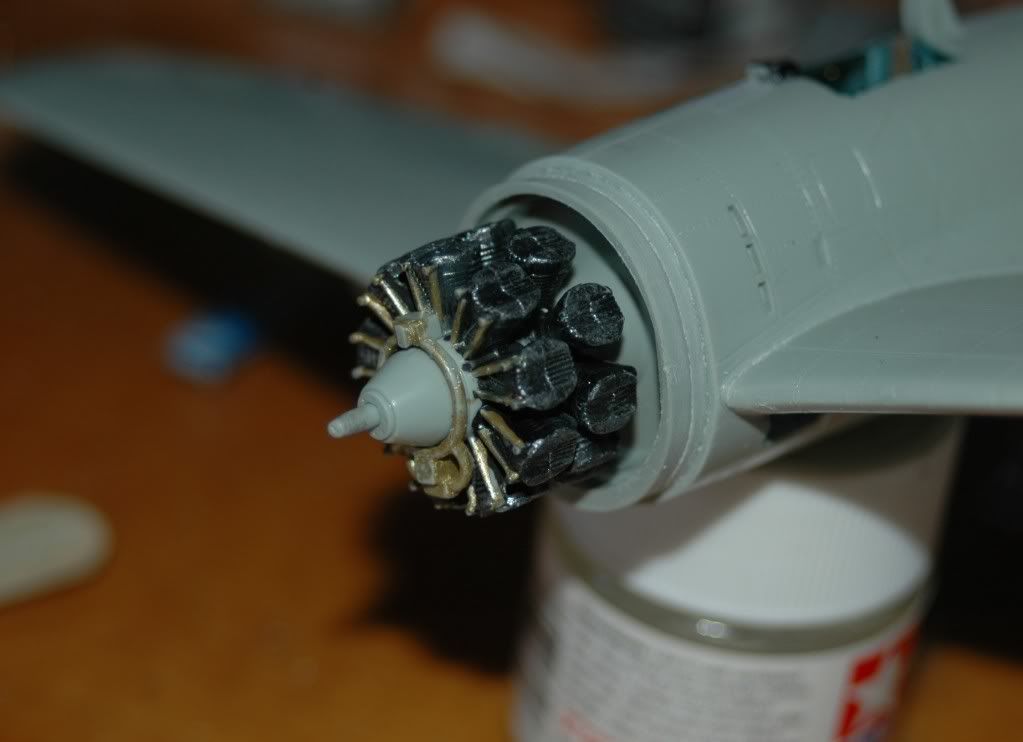
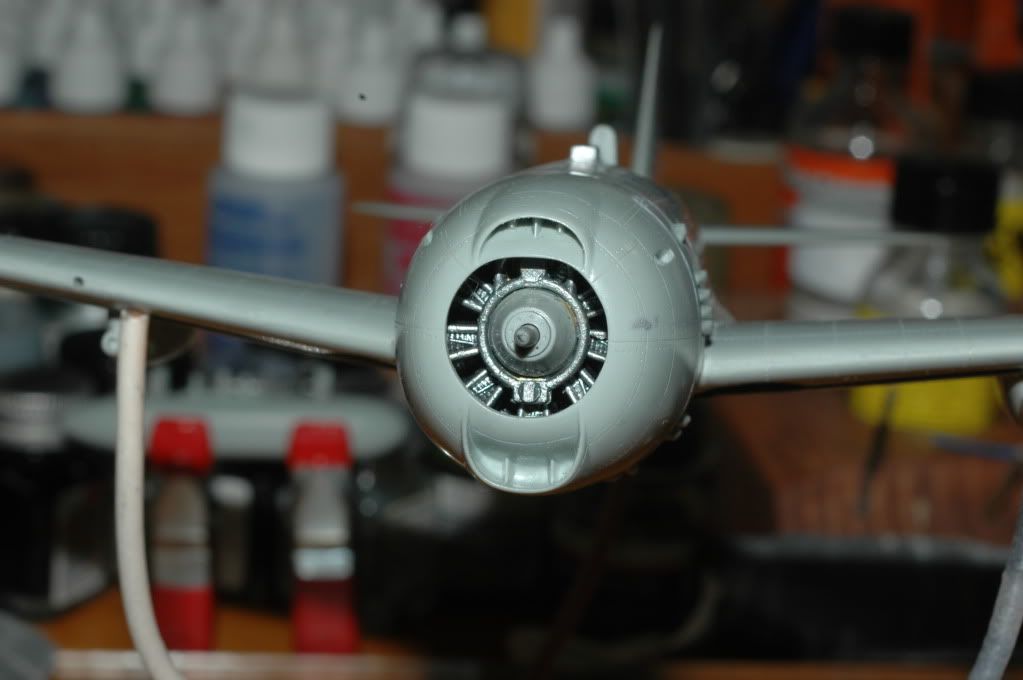
I was able to get a little more done on the Otaki "George" this week. You know, for a low priced kit the Otaki gives you some very nice detail and excellent fits.  I put together the engine, painted and dry brushed on some highlights.  As you can see, it is nicely molded.  It's a shame that it will barely be seen in the final product.  I prefer the way Otaki makes the propeller shaft/propeller connection.  The shaft is locked in the engine assembly.  And the propeller will slide on the shaft, fitting snugly, allowing the prop to spin easily.  I think it is a better design than the Tamiya rubber washer method.

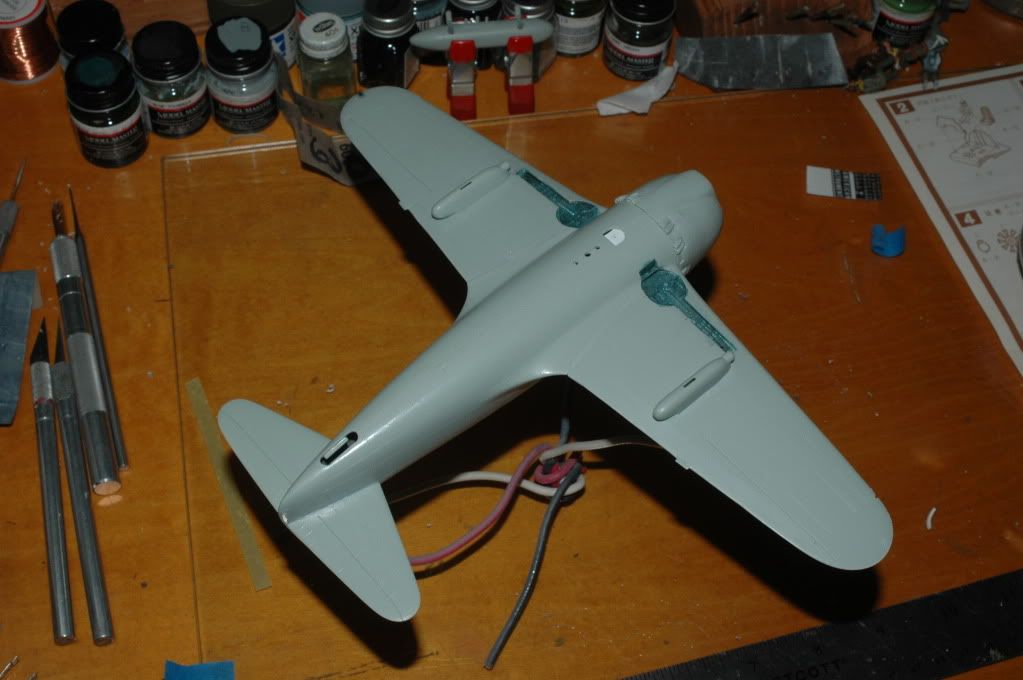
I "welded" together the fuselage with Tenax7R.  I love that stuff.  It simply creates a joint that will not split down the road.  It turns two pieces of plastic into one.  It truly is a weld.  I showed last week that the way the wings joined, I preferred to attach them before joining the fuselage halves.  I won't say that it makes joining the fuselage halves easier, but it does make for great control in joining each wing.  With that method, I needed no filler at the wing roots.  I did run a bead of Mr. Surfaced down the wing root joint to smooth the joint.

The fuselage join went equally well.  I like to work the Tenax in short sections, usually working from the tail forward.  I feel that with the quick drying time of the Tenax, I get a better weld working the short distances. I will work from the inside wherever possible, because it reduces the risk of a runaway glue stream during the capillary process.  A sidenote with Tenax: If I accidentally run the liquid glue out onto the surface of the model, I don't touch it.  If you try to wipe it up, you mar the plastic.  If you let it just set and dry, it leaves a mark, but it is easily erased with a light sanding.  Again, kudos to Otaki.  The fuselage fit was great.  No filler needed for the seams.  Rear stabilizers went on with the same results.

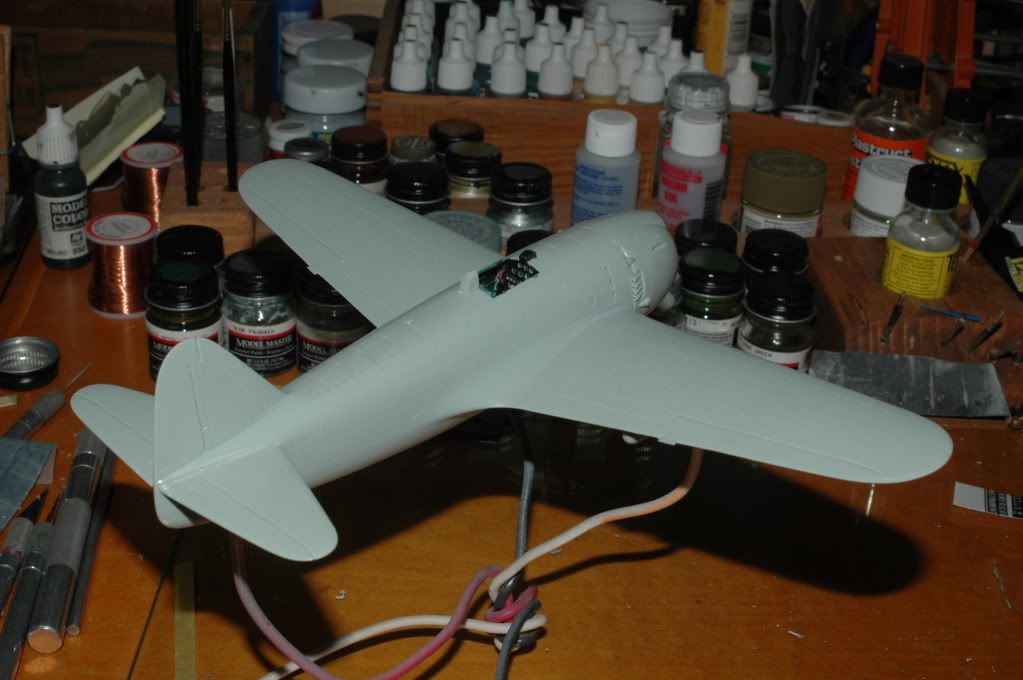
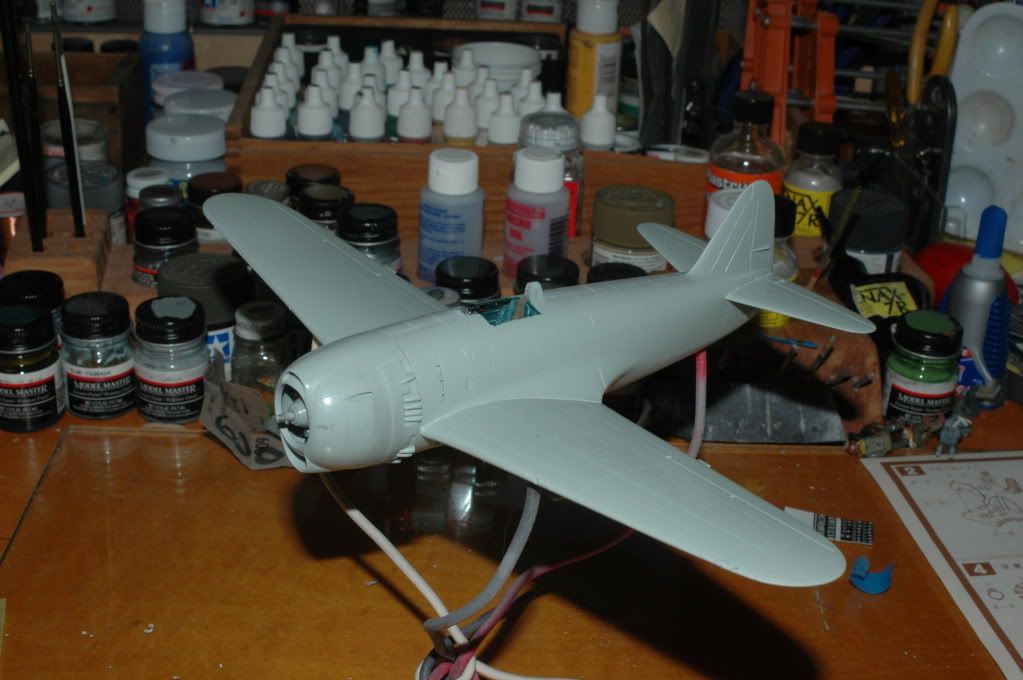
The kit directions are in Japanese, so that leaves me out in the dark.  But they do have fairly good illustrations, so assembly was no real problem.  Besides, I have Hasegawa and Tamiya  Georges and was able to glean a lot of information on parts and colors from those kits.  Seen in the pic below is a large white spot between the wheel bays.  It was a hole not shown on the Otaki instructions, and was not included in my other resources.  So I chose to fill it.  What you see there is a strip of styrene glue to the inside of the fuselage.  I'll fill up the hole and sand it smooth. I ave also attempted to revive some of the rivet holes along the fuselage seams.  They appear that the riveter was drunk, and I hope that they don't show up in the finished model.  Rick


  • Member since
    July 2003
  • From: Pennsylvania
Posted by jay12472 on Saturday, December 31, 2011 6:15 PM

great job so far

Jason

  • Member since
    August 2007
  • From: n/w indiana
Posted by some assembly required on Saturday, December 31, 2011 6:28 PM

nice clean build. a true mark of a great modeler.Yes oh and BTW after seeing this build im gonna start looking at otaki stuff!!

  • Member since
    November 2009
  • From: SW Virginia
Posted by Gamera on Saturday, December 31, 2011 10:58 PM

WW: Super job! Gotta agree it's a shame you can't see more of the engine after all the work you put into it. Love those Otaki kits.

"I dream in fire but work in clay." -Arthur Machen


  • Member since
    July 2004
  • From: Sonora Desert
Posted by stikpusher on Saturday, December 31, 2011 11:16 PM

Gamera

WW: Super job! Gotta agree it's a shame you can't see more of the engine after all the work you put into it. Love those Otaki kits.

Yes indeed. They are a great canvas for AMS/Gizmology and quite a bargain for the buck. If you like to soup up your cockpits and engines, and must have recessed recessed surface detail, they are the kits for you. Their early kits such as theZero and Oscar are so so, but later kits such as the Hellcat, Mustang,  and Corsair have held up well over the years.


F is for FIRE, That burns down the whole town!

U is for URANIUM... BOMBS!

N is for NO SURVIVORS...

       - Plankton

LSM


  • Member since
    August 2007
  • From: n/w indiana
Posted by some assembly required on Sunday, January 1, 2012 12:14 PM

Ok heres where im at with my George- ive used liquid mask and the salt method. i tend to prefer the salt method because the liqiud mask looks too uniform.im onto decaling next then panel shading and flat coat. wish me luck!!

  • Member since
    October 2008
  • From: italy
Posted by bsyamato on Sunday, January 1, 2012 12:38 PM

Some updates there Cool

Wabashwheels unusual way for wings but george looks great!

And good george too Someassempblyrequired Yes chipping seems good

no updates from me Surprise

  • Member since
    August 2009
  • From: Borlando Fla home of the rat
Posted by TREYZX10R on Sunday, January 1, 2012 9:29 PM

Wabash the George is looking great ,nice engine detail !

SAR I'm liking the chipping a lot ,nicely done Sir!.

  • Member since
    March 2011
  • From: St Louis, Mo
Posted by MSgtMJ62 on Monday, January 2, 2012 5:04 AM

My Ki-46-III pilot.  Not sure how to get more of the face done.

Wings are on the 'jig' with MJG inplace.  The 'jig' is from the neighbors 'plastic' fencing of his deck thanks to mother natures tornado job on Good Friday (it wasn't one).  I saved a few of the railings after we removed the tree from his deck.  I now have plenty of jig material and plastic stock.


The HR office. :)

And the Customer Service officer.

Mike

  • Member since
    November 2009
  • From: SW Virginia
Posted by Gamera on Monday, January 2, 2012 10:56 AM

stikpusher

 Gamera:

WW: Super job! Gotta agree it's a shame you can't see more of the engine after all the work you put into it. Love those Otaki kits.


Yes indeed. They are a great canvas for AMS/Gizmology and quite a bargain for the buck. If you like to soup up your cockpits and engines, and must have recessed recessed surface detail, they are the kits for you. Their early kits such as theZero and Oscar are so so, but later kits such as the Hellcat, Mustang,  and Corsair have held up well over the years.

Nice to see I'm not the only one to love those great old kits. I think the only one I have left is a Spitfire Mk IX I did back when the only kit in 1/48 was the Otaki one.

SAR: Pretty darn cool! I'm going to have to get off my butt and try that sometime.

Mike: Super job on the cockpit and the crew.

"I dream in fire but work in clay." -Arthur Machen


  • Member since
    August 2007
  • From: n/w indiana
Posted by some assembly required on Monday, January 2, 2012 3:59 PM

thanks guys! ive got all the decals on and have a curious result. usuing solvaset the decals wrinkled and shrunk down tight, but even after 24 hrs i still have a crinkle effect in some of my insigna. odd... pics to come soon as its safe to touch.

  • Member since
    November 2009
  • From: SW Virginia
Posted by Gamera on Tuesday, January 3, 2012 7:44 AM

SAR: Ack! Hope they settle down, I've had pretty much the same thing happen to Hasegawa decals- they're supposed to crinkle when wet but flatten out as they dry. When using anything but the most mild setting solution the Hasegawa ones crinkle and stay crinkled. Hope you didn't get this problem since I don't know of any way to fix it other than removing the decals. Dead

"I dream in fire but work in clay." -Arthur Machen


  • Member since
    August 2007
  • From: n/w indiana
Posted by some assembly required on Tuesday, January 3, 2012 9:33 AM

no such luck. i was hoping that they would flatten out overnight. thanks though about the tip on usuing a milder solution. we'll see how i can make this work to my advantage...

  • Member since
    April 2005
  • From: Monster Island-but vacationing in So. Fla
Posted by carsanab on Wednesday, January 4, 2012 11:40 AM

well its taken a while and after some struggles with painting...(Testors rattle cans BITE THE BIG ONE!!!!.... Bang Head) there is progress on my Oscar and Ohkas....both have decals down....and I have started to weather the Oscar....using silver prisma color pencil as usual....really like that technique...the Ohka was painted with Mr Hobby colors..mixed red with orange, nice stuff but tricky to get a nice smooth finish...next step...washes...and fiddly bits....

Oscar showing the clean wing on the right and chipping with colored pencil on the left

Ohka with Oscar in the backround....among other "artifacts"...Whistling

 Photobucket

  • Member since
    March 2010
  • From: Democratic Peoples Republic of Illinois
Posted by Hercmech on Wednesday, January 4, 2012 2:28 PM

GRL,

Love the Ohka and man that mug is awesome...Wink


13151015

  • Member since
    July 2003
  • From: Pennsylvania
Posted by jay12472 on Wednesday, January 4, 2012 7:53 PM

great job love the chipping on the oscar  and the orange color on the ohka

Jason


  • Member since
    October 2008
  • From: italy
Posted by bsyamato on Thursday, January 5, 2012 3:38 AM

MSgtMJ62 nice work!

Carsanab the two subject are great YesYes only the black paint on the oscar give a look like an adhesive Indifferent

chippin with pencil looks good 

  • Member since
    November 2009
  • From: SW Virginia
Posted by Gamera on Thursday, January 5, 2012 8:54 AM

SAR: If all else fails you can soak the decals with Micro Set, I think that's right- it's the one in the blue bottle for a few mins. to soften them and they'll roll right up without damaging your paint. I've gotten to the point that if I'm using decals from a company I'm unfamilar with I'll cut out one I won't be using and apply it to an old model as a test run before I use the rest of them. Solvaset and any other decal setting solution can be thinned with water if you think it might be too powerful.  Good luck!

Big-Z: Very nice work! I've got one of those silver pencils but never used it for anything but small stuff. Really like how the wing on the Ki-43 is coming out - I may have to try out the pencil on a spare model myself. And the orange Ohka is really eye-catching.  

"I dream in fire but work in clay." -Arthur Machen


  • Member since
    April 2005
  • From: Monster Island-but vacationing in So. Fla
Posted by carsanab on Thursday, January 5, 2012 9:29 AM

Thanks all....what I like about the pencil is not only that its erasable but it really looks like the paint has been rubbed and worn away...not just chipped...and its easy to control. Sharpen to a fine point and it really highlights those panel lines....Ive got half the Oscar done...hopefully by the end of the week I should have both complete.

Carlos

 Photobucket

  • Member since
    August 2007
  • From: n/w indiana
Posted by some assembly required on Thursday, January 5, 2012 9:52 AM

thanks guys for the input onmy decals, carsnab -that is exactly the look im going for. could you take a pic of the pencil and how you get such good results. thanks.Beer

  • Member since
    April 2005
  • From: Monster Island-but vacationing in So. Fla
Posted by carsanab on Thursday, January 5, 2012 11:20 AM

some assembly required

thanks guys for the input onmy decals, carsnab -that is exactly the look im going for. could you take a pic of the pencil and how you get such good results. thanks.Beer

will do..... tonight when I get home I will post a couple..

 Photobucket

  • Member since
    February 2011
  • From: Bent River, IA
Posted by Reasoned on Thursday, January 5, 2012 12:28 PM

carsanab

well its taken a while and after some struggles with painting...(Testors rattle cans BITE THE BIG ONE!!!!.... Bang Head) there is progress on my Oscar and Ohkas....both have decals down....and I have started to weather the Oscar....using silver prisma color pencil as usual....really like that technique

Oscar showing the clean wing on the right and chipping with colored pencil on the left

http://i164.photobucket.com/albums/u3/carsanab/chips.jpg


Where did you get the pencil from, a hobby store?  That looks Cool!

Science is the pursiut of knowledge, faith is the pursuit of wisdom.  Peace be with you.

On the Tarmac: 1/48 Revell P-38

In the Hanger: A bunch of kits

  • Member since
    November 2009
  • From: SW Virginia
Posted by Gamera on Thursday, January 5, 2012 12:47 PM

I hope Big-Z doesn't mind if I butt in here but this is what I use and I think he's refering to the same thing.

Prismacolor Pencils

I'm not totally sure which type mine are- the Softcore I think though. I picked mine up at Michael's - I'm sure most art stores should stock them. I've used them for small areas like paint chipped off a prop but never to the extent that Carlos has here. I like them, they are very easy to control since it's well just like using a pencil.

"I dream in fire but work in clay." -Arthur Machen


  • Member since
    October 2008
  • From: italy
Posted by bsyamato on Thursday, January 5, 2012 12:51 PM

what's about the new avatar Cliff? after the dead of old tyrant want to take the son's place Cool LOL

i'm sure put the ame picture somewhere in the forum 

  • Member since
    November 2009
  • From: SW Virginia
Posted by Gamera on Thursday, January 5, 2012 1:16 PM

Bsyamato: I stole it from Manny when he posted it over on the 'Who Took It' thread. I needed a new avatar and even as evil as the North Korean dictatorship is I have to admire their uniforms Heart

"I dream in fire but work in clay." -Arthur Machen


JOIN OUR COMMUNITY!

Our community is FREE to join. To participate you must either login or register for an account.

SEARCH FORUMS
FREE NEWSLETTER
By signing up you may also receive reader surveys and occasional special offers. We do not sell, rent or trade our email lists. View our Privacy Policy.