SEARCH FINESCALE.COM

Enter keywords or a search phrase below:

Japanese GB 2011-2012

204629 views
2250 replies
1 rating 2 rating 3 rating 4 rating 5 rating
  • Member since
    June 2010
  • From: Austin, TX
Posted by DoogsATX on Friday, January 27, 2012 11:42 AM

carsanab

part of the problem I had with the Oscar was the lack of a good primer...I usually use Tamiya...but it wasnt available...I tried the Testors....what garbage...So I didnt use any....of course I got to the LHS couple of weeks ago and there it was ...cans of Tamiya primer...oh well....for the next one...BS...if you can get it in Italia...I would recommend it!!!!

Just curious...what Testors primer did you use? I use the good old gray enamel primer (bottle not rattlecan) frequently and with great results. 

On the Bench: 1/32 Trumpeter P-47 | 1/32 Hasegawa Bf 109G | 1/144 Eduard MiG-21MF x2

On Deck:  1/350 HMS Dreadnought

Blog/Completed Builds: doogsmodels.com


  • Member since
    April 2005
  • From: Monster Island-but vacationing in So. Fla
Posted by carsanab on Friday, January 27, 2012 11:54 AM

the only thing they had was the rattle cans....my experience with Testors rattle cans has been horrible....they splatter and go on really thick.....except for their dull coat....that one works well..

 Photobucket

  • Member since
    October 2008
  • From: italy
Posted by bsyamato on Friday, January 27, 2012 2:53 PM

Tamiya primer is avaible but i use mainly humbrol 140 grey high thinned as primer (when i have it) or others good quality grey. Depending to the main color other ways i don't use primer. On the ki-27 not used primer for the too fine surface details.

Time to go on the cave and cut some sprue Hmm


  • Member since
    August 2009
  • From: Borlando Fla home of the rat
Posted by TREYZX10R on Friday, January 27, 2012 2:58 PM

They both look great Carlos,very cool colors on the Ohka ,I like it a lot! Nicely done Sir!!!

  • Member since
    October 2008
  • From: italy
Posted by bsyamato on Saturday, January 28, 2012 12:45 PM

few zero updates

Scratchbuild the seat for second time Bang Head (yes i scratched one and lost!), also repaired the broken control rod, this time with metal parts

need more sanding to smooth the angles

Added this piece to the cockpit floor as main wellsl ceiling

that's was on the zero


  • Member since
    November 2009
  • From: SW Virginia
Posted by Gamera on Saturday, January 28, 2012 5:54 PM

Hmmm, I don't use much primer unless I'm doing NM. Normally just spray the underside paint over the entire plane to check for flaws.

Bsyamato: Very nice! The seat looks great! The whole cockpit is coming together nicely.


Big-Z: Roster updated!


"I dream in fire but work in clay." -Arthur Machen


  • Member since
    February 2011
  • From: Sedona AZ
Posted by AZKevin on Saturday, January 28, 2012 11:54 PM

Very nice looking seat. 

I have tried building them from scratch (with some sucess) from soda can aluminum, punching the holes with a Waldren Punch & Die set, and then folding them ala' photo etch (I actually use a photo etched seat as a pattern), but your seat looks better - I think I'll try using plasctic card next time.  Thanks for the example!!  Do you use .010 card stock??


Kevin A. Lawton

Dept. of History

Dept. of Quaternary Sciences

Northern Arizona University

Flagstaff, AZ

  • Member since
    October 2008
  • From: italy
Posted by bsyamato on Tuesday, January 31, 2012 7:27 PM

late Night update Dead

seat on

i'm not happy with decals ip ..

then i drilled something

don't fit perfect but will fix it after

going to search the bed


  • Member since
    November 2009
  • From: SW Virginia
Posted by Gamera on Wednesday, February 1, 2012 9:37 AM

Bsyamato: Looks great! When I try to get something curved like the seat in sheet plastic it always wants to pop apart.

Kevin: Hmmm, soda can aluminum - sounds like a good idea to me.

"I dream in fire but work in clay." -Arthur Machen


  • Member since
    March 2010
  • From: Democratic Peoples Republic of Illinois
Posted by Hercmech on Wednesday, February 1, 2012 10:06 AM

Bsyamato, 

Looking good...like how you are trying to tackle that IP


13151015

  • Member since
    October 2008
  • From: italy
Posted by bsyamato on Thursday, February 2, 2012 4:41 AM

Gamera

Bsyamato: Looks great! When I try to get something curved like the seat in sheet plastic it always wants to pop apart.

Kevin: Hmmm, soda can aluminum - sounds like a good idea to me.

Thanx guys Toast

Herc think the ip need some better trimming, at least will cut the decals to show the instruments propertly

used tamiya green cement to old the curved back surface, i totally forget to use the same piece to scratch the two sides and the back Tongue Tied ...

Will try also with aluminium with the mary seats if they will not satisfy me. Pilot seat seems not so bad.

I forget about but i ruined the clear insert on the mary fuselage.... need to repair these pieces


  • Member since
    August 2011
  • From: Perth, WA
Posted by NeedBeer on Sunday, February 5, 2012 3:04 AM

Hi Guys

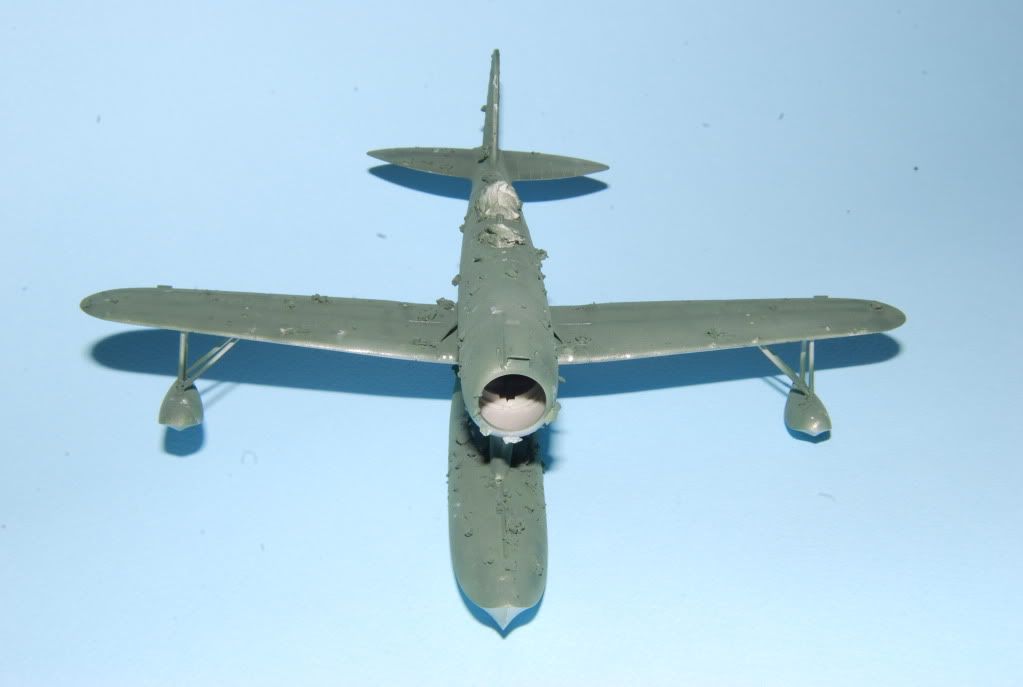
I've been quite for a while on this GB. Did the first coat on the Pete a couple of months ago then got side tracked with various other unrelated projects like work, family, summer vacations, etc, not to mention clogging up the nozzle on my new airbrush which has taken over a month to resolve

Put a light coat of IJN Green over the metallic surface with salt (my first attempt at this method). Was hoping to do the second coat with the top wing attached but thats proving to be problematic. The struts on the wings are fine but then struts attaching to the fuselage are too short & there's not so much bend in the top wing so it looks like I'll have to trim & modify the wing struts, maybe scratch build new ones

Here are the pics so far ........
WiP

1/24 Hawker Hurricane Mk I

1/48 F-22 Raptor; F-22 Idolmaster,  DH Vampire, Saab Gripen 

1/72 C-130 Hercules; Vulcan 

1/350 Bismarck


  • Member since
    October 2008
  • From: italy
Posted by bsyamato on Sunday, February 5, 2012 8:36 AM

great lloking pete Yes not familiar with salt tecnicque but sems good

  • Member since
    July 2007
  • From: Southern New Jersey
Posted by troublemaker66 on Sunday, February 5, 2012 10:25 AM

NeedBeer

Hi Guys

I've been quite for a while on this GB. Did the first coat on the Pete a couple of months ago then got side tracked with various other unrelated projects like work, family, summer vacations, etc, not to mention clogging up the nozzle on my new airbrush which has taken over a month to resolve

Put a light coat of IJN Green over the metallic surface with salt (my first attempt at this method). Was hoping to do the second coat with the top wing attached but thats proving to be problematic. The struts on the wings are fine but then struts attaching to the fuselage are too short & there's not so much bend in the top wing so it looks like I'll have to trim & modify the wing struts, maybe scratch build new ones

Here are the pics so far ........

http://i1234.photobucket.com/albums/ff412/NeedBeer/Jap%20Group%20Builds/DSC_0385.jpg

http://i1234.photobucket.com/albums/ff412/NeedBeer/Jap%20Group%20Builds/DSC_0379.jpg

http://i1234.photobucket.com/albums/ff412/NeedBeer/Jap%20Group%20Builds/DSC_0359.jpg

Had to do a double take at 1st...looked at the 1st pic and said to myself "why`s he building a Kingfisher ?"...lol. Kinda looks like one from that angle.  I love the salt weathering technique for my Japanese A/C...good luck with yours...you have a great start.

Len

Len Pytlewski

  • Member since
    August 2009
  • From: Borlando Fla home of the rat
Posted by TREYZX10R on Sunday, February 5, 2012 10:09 PM

Sweet Pete so far Needbeer!yea I too thought 'Kingfisher' what? lol

  • Member since
    March 2010
  • From: Democratic Peoples Republic of Illinois
Posted by Hercmech on Monday, February 6, 2012 7:25 AM

Needbeer...oooooh a floatie thing.Yes


13151015

  • Member since
    November 2009
  • From: SW Virginia
Posted by Gamera on Monday, February 6, 2012 7:38 AM

NB: Some very nice work there so far. I know what you mean, it's either leave the top wing off to paint and try to make sure everything lines up or attach it and then try to paint and mask at with everything in the way Black Eye

Good luck with the salt technique, I tried it a few times and never seemed to get the amount of salt just right. Either I got no masking or way too much. Please keep us posted here, I'd like to learn what works for you.


Went to spray the final flat coat on the Zero last night and spilled some on the model which promptly turned white. Sanded most of it off and working to fix the mess. Sorry guys I got so ticked off I put the thing back in the box and had to walk away. I'll see about cleaning the rest up tonight.

"I dream in fire but work in clay." -Arthur Machen


  • Member since
    April 2005
  • From: Monster Island-but vacationing in So. Fla
Posted by carsanab on Monday, February 6, 2012 9:48 AM

its a floatie thingie!!! Gotta love it!!!...looking good Yes

C

 Photobucket

  • Member since
    October 2008
  • From: italy
Posted by bsyamato on Monday, February 6, 2012 9:57 AM

carsanab

its a floatie thingie!!! Gotta love it!!!...looking good Yes

C

LOL

i'm about finishing two kits so i can get back to zero too

  • Member since
    February 2011
  • From: Sedona AZ
Progress on Ki-78
Posted by AZKevin on Sunday, February 12, 2012 7:58 PM

Hello Everyone,

Long-time-no-see.  

I finally finished the Eduard 1/48 F6F-3 in the markings of Lt. Arthur Van Haren (9 kills).  I gave it to the family and it's on it's way to the Pima Air and Space Museum in Tucson AZ.  The model will be placed in the display cabinet with other memorabilia when Lt. Arthur Van Haren into the Hall of Fame.

So I'm back to work on the AZ Models 1/72 Ki-78 Ken.

Upper surfaces are IJA green.  Underside is IJA grey (I think it should be natural metal - according to the painting diagram).  I'm doing this one following the top color plan.

The tail is Tamiya red and I.D. stripes are Model Master deep yellow.  There were no decals for the blue fuselage stripe so it was masked and sprayed with MM Blue Angel Blue.  Taping that thin blue line over top of that large intake on the fuselage side was a lesson in patience!!  Still need to touch up some scratches.

I still have to fix the spinner and prop - something is off center.  Could be the prop, spinner, or mounting hole in fuselage.  I think I'll probably cut off the mounting peg on the prop and fill the hole in the fuselage and just glue everything on center.


Not too happy with the wheel wheels (brush painted), but I was too lazy to tape them off and spray the metallic blue (maybe next time).  I also had to add the retraction arms from copper wire since there were no parts in the kit other than the landing gear leg and wheels.

That's it for now.  Next up:  fix the prop/spinner (paint it red brown or 'propeller color'), attach gear doors, canopy, clear coat and then decals.

More soon Big Smile

Kevin A. Lawton

Dept. of History

Dept. of Quaternary Sciences

Northern Arizona University

Flagstaff, AZ

  • Member since
    August 2009
  • From: Borlando Fla home of the rat
Posted by TREYZX10R on Sunday, February 12, 2012 9:03 PM

Kevin its looking sharp!

  • Member since
    November 2009
  • From: SW Virginia
Posted by Gamera on Sunday, February 12, 2012 11:09 PM

Kevin:

Great job! Very impressive getting that blue stripe just right.


Sorry guys, I've let things here kinda get sluggish. My Zero is coming along slowly and my camera is under repair so I can't post photos of what I have got done.

Cliff

"I dream in fire but work in clay." -Arthur Machen


  • Member since
    March 2010
  • From: Democratic Peoples Republic of Illinois
Posted by Hercmech on Monday, February 13, 2012 9:00 AM

Kevin Looking great so far!


13151015

  • Member since
    April 2005
  • From: Monster Island-but vacationing in So. Fla
Posted by carsanab on Monday, February 13, 2012 9:30 AM

nice job Kevin....just one question...is it me or does the landing gear seem a bit long....it seems to stand high...besides that....nice finish..Yes

 Photobucket

  • Member since
    October 2008
  • From: italy
Posted by bsyamato on Monday, February 13, 2012 10:13 AM

Just last night thinkin about this GB was for too long time silent Embarrassed

Nice updates AZ Toast

Edit:

Surfing between my flickr contacts i found this special awesome diorama about a buning Zero with his soul going in the sky Indifferent

http://www.flickr.com/photos/56187898@N07/5387506928/in/photostream


  • Member since
    February 2011
  • From: Sedona AZ
Posted by AZKevin on Monday, February 13, 2012 10:31 PM

carsanab,

  I agree it does look pretty tall.  Hopefully when I add the tail wheel it won't look that tall.. I did find a few pictures in my research (what little I was able to find) and the photos show that it was a pretty tall airplane to start with (at least it appears so to me - especially the photo with the two gentlemen in front of the Ki-78.

Not to be insulting or appear racist, but if the average Japanese male was, say, 5'6" at the time, it appears the landing gear is somewhere over about 5' in height.  But that may just be the angle of the photo.  I do know that the J7W Shinden was an extremely tall airplane.  I haven't been able to find any info on the diameter of the prop.  Maybe it is tall to give a large prop ground clearence (?).  Just a guess.


Kevin A. Lawton

Dept. of History

Dept. of Quaternary Sciences

Northern Arizona University

Flagstaff, AZ

  • Member since
    November 2009
  • From: SW Virginia
Posted by Gamera on Tuesday, February 14, 2012 8:08 AM

Bsyamato: Very cool find there, not sure what the story behind the diorama is but I like the idea. There's a great deal of emotion in the pilot watching his plane go up in flames there. Wonder what the modeler used for the flames?

Kevin & Big-Z: If I were to throw my two cents in yeah I'd too figure the tall landing gear was to give clearance to the large prop.

"I dream in fire but work in clay." -Arthur Machen


  • Member since
    October 2008
  • From: italy
Posted by bsyamato on Wednesday, February 15, 2012 10:24 AM

Dunno what media the modeler used Confused the photographer take the picture probably in a japanesw model contest (one of zero pictures have a plate with probably all the explains .. but are in japanese !!)

Workin a little on my zero

Added engine details

drilled some hole to glue in the spark plug wires

will cut excess after, all these pieces fixed with CA

painted some cockpit details and washed with a mix of black and brown enamels

all for now is 

  • Member since
    April 2005
  • From: Monster Island-but vacationing in So. Fla
Posted by carsanab on Wednesday, February 15, 2012 10:31 AM

nice wires.....I really like engines that area spruced up!!! Toast

C

 Photobucket

  • Member since
    November 2009
  • From: SW Virginia
Posted by Gamera on Thursday, February 16, 2012 8:36 AM

carsanab

nice wires.....I really like engines that area spruced up!!! Toast

C

Ditto, wired my first engine in 1/48th scale late last year and it was a lot of work, my hat is off to you for doing it in tiny 1/72nd - you have better eyes and hands than I. Wink

"I dream in fire but work in clay." -Arthur Machen


JOIN OUR COMMUNITY!

Our community is FREE to join. To participate you must either login or register for an account.

SEARCH FORUMS
FREE NEWSLETTER
By signing up you may also receive reader surveys and occasional special offers. We do not sell, rent or trade our email lists. View our Privacy Policy.