SEARCH FINESCALE.COM

Enter keywords or a search phrase below:

Weekend Madness 2012

10114 views
167 replies
1 rating 2 rating 3 rating 4 rating 5 rating
  • Member since
    July 2003
  • From: Huntington, WV
Posted by Kugai on Sunday, November 18, 2012 2:06 AM

corvettemike

I wouldn't use the built one, he's been a stand alone on a base for a long time now. I'll figure something out, I'd try the Tamiya 1/48 M8 Greyhound but I build so dang slow due to my disabled back (sitting for long periods kills me). 99% even though I hate to spend the $$$ I'll probably do the Mobieus Dark Knight Batman. My LHS is getting a shipment on Thurs after next and I need boxes so I'll grab it then.

The 3 remaining in the vignette would be good, since you haven't started them, so if you decide on that idea then Yes.

Had some setbacks dealing with the cockpit, but it did help me decide on the paint scheme.  Since the decals for the consoles proved that the film was discolored as well, I decided to go with the Top Gun "MiG-28 variant" idea using decals from a Foxhound kit that vanished.  Instead of the all-black look, I'll add some touches from the Russian planes I've seen, such as the green radome and tail marking, along with one of the belly colors used on the recent MiGs and Sukhois.

Pics coming once I get a little more work done.

http://i712.photobucket.com/albums/ww122/randysmodels/No%20After%20Market%20Build%20Group/Group%20Badge/GBbadge2.jpghttp://i6.photobucket.com/albums/y211/razordws/GB%20Badges/WMIIIGBsmall.jpg

  • Member since
    April 2005
  • From: Australia
Posted by taxtp on Sunday, November 18, 2012 3:12 AM

I'm 90 minutes from my deadline, and I know I can't finish in time. I haven't been able to get back to the bench since my morning update. Lots of family time today, whish is a good thing anyway.

Still no upper surface green etc. My problem now is drying time. I need to spray the green let it dry, clear coat, let it dry, apply decals, let then dry, flat coat, let it dry, finish weathering and attach undercarriage etc.

I had planned to get the green down in the early afternoon, but it's just after 8pm and I've still got to finish masking.

I'll keep going, maybe I can still finish tonight.

Cheers

Tony

I'm just taking it one GB at a time.

  • Member since
    May 2005
Posted by pyrman64 on Sunday, November 18, 2012 3:39 AM

Ernest: Looks good.  Wish I was that far along.  Uhm....looks like you're missing the forward lifting lugs on the front-sides of the turret.

Tony: I know what you mean, I was thinking of a 3-tone camo, which will take 4-5 hours to do, including drying time.  Then I'll have to let it sit for a day before putting on the turret, national and unit markings from Archer Fine Transfers.

Greg H

"There is many a boy here today who looks on war as all glory, but, boys, it is all hell." Gen. Wm T. Sherman (11 April 1880, Columbus, Ohio)

  • Member since
    July 2003
  • From: Huntington, WV
Posted by Kugai on Sunday, November 18, 2012 4:20 AM

Okay, here's more WIP.

Cockpit with paint, followed by decals and sludge was done...

 IMG_0278.jpg

 IMG_0279.jpg

Fuselage, wings, and tail assembled...

 IMG_0280.jpg

And close-up of the cockpit before and after adding the Interior Blue-Green for that "russian" touch...

 IMG_0281.jpg

 IMG_0283.jpg

More to come soon.

http://i712.photobucket.com/albums/ww122/randysmodels/No%20After%20Market%20Build%20Group/Group%20Badge/GBbadge2.jpghttp://i6.photobucket.com/albums/y211/razordws/GB%20Badges/WMIIIGBsmall.jpg

  • Member since
    May 2005
Posted by pyrman64 on Sunday, November 18, 2012 5:36 AM

Kugai: coming along nicely.  I always thought the F5/F20's were cool looking aircraft.

Greg H

"There is many a boy here today who looks on war as all glory, but, boys, it is all hell." Gen. Wm T. Sherman (11 April 1880, Columbus, Ohio)

  • Member since
    April 2005
  • From: Australia
Posted by taxtp on Sunday, November 18, 2012 6:01 AM

Good progress on the Tigershark, Kugai. That will be interesting when its done.

I've finally got it masked and got the green down. I was going to stuff about trying to mix up some Kawanishi Green, then tanked it and went for Tamiya IJN Green, as per the instructions. It's certainly a dark green.

I'm going to try and mask the stripes on the prop and get the sprayed tonight, but that will just about see me out. At least all the colour is sprayed then.

I'll try to get the clear coat done before work in the morning and come back tomorrow night for decals et al.

It might mot be to schedule, but at least its in the spirit of it.

Cheers

Tony

I'm just taking it one GB at a time.

  • Member since
    April 2005
  • From: Australia
Posted by taxtp on Sunday, November 18, 2012 7:06 AM

Here's the midnight photo. That's it for tonight.

The green is darker than this shows.

Cheers

Tony

I'm just taking it one GB at a time.

  • Member since
    July 2006
  • From: San Francisco Bay Area
Posted by bufflehead on Sunday, November 18, 2012 3:36 PM

Looks like there's more progress going on with Kugai and Tony!  Gan we get it done on time?!?

Last pics on the M5A1 before paint.  All the parts installed except MGs and antenna, lots of small gaps that needed filing with Mr. Surfacer 500.  Once cleaned up its hitting the paint booth  to get sprayed with exciting U.S. Olive Drab!

Oh, when I was removing the tracks I remembered that Tamiya did a crap job with the M3/M5 vinyl tracks....the guide honrs are positioned wrong!  The guide horns (teeth) should link each rubber pad to the next, but with Tamiya they're just at the side of the pad without linking to anything!  In real life this would just fall apart!  So I stole the tracks from an Academy M3A1 since I have some workable AFV Club tracks for that kit.  

I tried the Academy tracks and they not only fit the sprockets and suspension, they fit much better overall than the Tamiya kit tracks!!  YAY!

Ernest

Last Armor Build - 1/35 Dragon M-26A1, 1/35 Emhar Mk.IV Female


Last Aircraft Builds - Hobby Boss 1/72 F4F Wildcat & FW-190A8


  • Member since
    April 2005
  • From: Australia
Posted by taxtp on Sunday, November 18, 2012 5:24 PM

Those tracks do look a lot better Ernest. Lucky that you had a set that you could use. It's coming along pretty well, hope you make it.

I did get the clear coat done before work this morning, and also managed to paint the wheel wells also.

All set to do the decaling tonight.

Cheers

Tony

I'm just taking it one GB at a time.

  • Member since
    July 2006
  • From: San Francisco Bay Area
Posted by bufflehead on Sunday, November 18, 2012 5:43 PM

Thanks Tony!  I would have used the kit tracks, but why waste a perfectly good set from another kit?!

and she's got paint on!!  Straight Tamiya XF-62 Olive Drab.   Its dark, but its only the base coat.  In a couple of hours it will look totally different!

Ernest

Last Armor Build - 1/35 Dragon M-26A1, 1/35 Emhar Mk.IV Female


Last Aircraft Builds - Hobby Boss 1/72 F4F Wildcat & FW-190A8


  • Member since
    July 2003
  • From: Huntington, WV
Posted by Kugai on Sunday, November 18, 2012 6:30 PM

Good to see that everyone's moving along.  I've got a little over 4 and a half hours left and, as usual, it will be close.

On to the WIPs...

Final assembly and primer...

 IMG_0285.jpg

 IMG_0284.jpg

Flanker Medium Blue on the belly...

 IMG_0289.jpg

And getting the final colors lined up.  Tamiya Flat Green on the nose and to be added to the tailfin to add more to the "MiG" look, Tamiya SG Black will be the topside color to tie it in to the look of the Top Gun movie MiGs.

 IMG_0290.jpg

So, from here I'll at least have time for the decals.  We'll see how that goes before I commit to a sludge wash on the belly and maybe some weathering powder on the engine nozzle.

http://i712.photobucket.com/albums/ww122/randysmodels/No%20After%20Market%20Build%20Group/Group%20Badge/GBbadge2.jpghttp://i6.photobucket.com/albums/y211/razordws/GB%20Badges/WMIIIGBsmall.jpg

  • Member since
    July 2003
  • From: Huntington, WV
Posted by Kugai on Sunday, November 18, 2012 9:14 PM

Got the painting done except for a little touching-up and have started the decals.

 IMG_0291.jpg

 IMG_0292.jpg

I'm going to give these a little more time to dry and see if the film clears up a bit.  Hopefully I won't have to add the extra step setting solution, since that would add more drying time and delay adding the dullcote.

http://i712.photobucket.com/albums/ww122/randysmodels/No%20After%20Market%20Build%20Group/Group%20Badge/GBbadge2.jpghttp://i6.photobucket.com/albums/y211/razordws/GB%20Badges/WMIIIGBsmall.jpg

  • Member since
    April 2005
  • From: Australia
Posted by taxtp on Sunday, November 18, 2012 9:38 PM

Great work guys, keep up the intensity. Every step is that bit closer to completing.

Cheers

Tony

I'm just taking it one GB at a time.

  • Member since
    July 2003
  • From: Huntington, WV
Posted by Kugai on Sunday, November 18, 2012 10:18 PM

40 minutes to go for me.  Looks like I'll have my traditional "last shot of dullcote at the bell" thing going and have to give a few minutes to dry before posting pics.  Got the wash done and cleaned up, so just a little weathering powder on the engine to go and then the dullcote.

http://i712.photobucket.com/albums/ww122/randysmodels/No%20After%20Market%20Build%20Group/Group%20Badge/GBbadge2.jpghttp://i6.photobucket.com/albums/y211/razordws/GB%20Badges/WMIIIGBsmall.jpg

  • Member since
    July 2003
  • From: Huntington, WV
Posted by Kugai on Sunday, November 18, 2012 11:11 PM

Okay, here it is, with a few minutes to spare, posted after midnight only because of relaying through PB.

 IMG_0296.jpg

 IMG_0297.jpg

 IMG_0298.jpg

How are everyone else's projects coming along?

By the way, some of you may have noticed the parts for the old TIE interceptor kit in the background.  As I mentioned, one of the boys wanted to participate this week and the other will be later.  While I had parts for the GB drying etc. I was helping by doing a parallel build to show him the steps on my copy of the same kit instead of just verbally giving instructions on how to start using the techniques he was interested in trying, so that almost ended up being a 2-fer on the GB.

He didn't get it done in the 48 hours, but given that he hasn't even really tried much in the way of painting a kit let alone doing any masking before this project, I'd say he didn't do badly at all.

http://i712.photobucket.com/albums/ww122/randysmodels/No%20After%20Market%20Build%20Group/Group%20Badge/GBbadge2.jpghttp://i6.photobucket.com/albums/y211/razordws/GB%20Badges/WMIIIGBsmall.jpg

  • Member since
    July 2006
  • From: San Francisco Bay Area
Posted by bufflehead on Monday, November 19, 2012 12:45 AM

Oh my gosh Kugai!  Talk about finishing at the bell!!  I added the last part, the antenna, at 10:15 PM, exactly 48 hrs after starting!!  WHEW!! 

25 minutes to take photos (I took a lot, but only posted a few), cleaned my airbrush (can't have paint drying in it) and then uploaded to Photobucket....here you go!

Wow, is my workbench a total mess!!  Its a DISASTER!  Guess I know what I'll be doing tomorrow after work!!Whistling

Ernest

Last Armor Build - 1/35 Dragon M-26A1, 1/35 Emhar Mk.IV Female


Last Aircraft Builds - Hobby Boss 1/72 F4F Wildcat & FW-190A8


  • Member since
    July 2006
  • From: San Francisco Bay Area
Posted by bufflehead on Monday, November 19, 2012 12:53 AM

Kugai, looks like you posted just before me!  The last post I saw before I posted is you saying you had 40 minutes to go!.

Great work on the Tigershark!  I LUV the black paint job and the panel wash!  Sweet looking jet dude! YesYes

BTW, I didn't know the Tigershark was used by communist countires....Smile

Ernest

Last Armor Build - 1/35 Dragon M-26A1, 1/35 Emhar Mk.IV Female


Last Aircraft Builds - Hobby Boss 1/72 F4F Wildcat & FW-190A8


  • Member since
    July 2003
  • From: Huntington, WV
Posted by Kugai on Monday, November 19, 2012 1:16 AM

bufflehead

Great work on the Tigershark!  I LUV the black paint job and the panel wash!  Sweet looking jet dude! YesYes

BTW, I didn't know the Tigershark was used by communist countires....Smile

Bufflehead, And here I thought I was the only one!  I literally finished removing the mask from the canopy  , took the final pics, and walked over to the computer to see the clock at 11:59.  Adding yours to the "done" list.

Thanks for the compliments!  You may want to review the earlier posts to explain the odd results.  Long story short, I found out that the decals were too badly yellowed to get decent results, couldn't think of another paint scheme that could be planned out quickly that would be more "real" for an American plane, and with the leftover decals from a Foxbat that I never finished I decided to make a variation of the MiG-28 "Fantasy" aircraft ( yes, I know they were actually F-5s ) seen in Top Gun.

That's 3 years in a row that I've had things not work out as planned on this 48 hour thing, but I guess it's a good reminder of what one of the guys here used to have for his signature quote...

"Done is better than perfect."

http://i712.photobucket.com/albums/ww122/randysmodels/No%20After%20Market%20Build%20Group/Group%20Badge/GBbadge2.jpghttp://i6.photobucket.com/albums/y211/razordws/GB%20Badges/WMIIIGBsmall.jpg

  • Member since
    July 2006
  • From: San Francisco Bay Area
Posted by bufflehead on Monday, November 19, 2012 1:38 AM

DOH!  Yeah, I missed that post, sorry Kugai.  Now it makes sense, and its also a great save switching to the Top Gun antagonist!

Am I beat!  I knew I shouldn't have watched that Top Gear show this morning on Bond cars!  Otherwise I would have finished a couple of hours before the deadline!  Ah well, now for some well deserved shut-eye!

Thanks for hosting the GB Kugai!  I'm so glad we were able to get this going, I remembered my failure last year and wanted to have another crack at the 48 hr marathon!

Hmmm.....if this runs to the end of the year I wonder if I should try a second kit?

Ernest

Last Armor Build - 1/35 Dragon M-26A1, 1/35 Emhar Mk.IV Female


Last Aircraft Builds - Hobby Boss 1/72 F4F Wildcat & FW-190A8


  • Member since
    July 2003
  • From: Huntington, WV
Posted by Kugai on Monday, November 19, 2012 2:07 AM

bufflehead

Thanks for hosting the GB Kugai!  I'm so glad we were able to get this going, I remembered my failure last year and wanted to have another crack at the 48 hr marathon!

Hmmm.....if this runs to the end of the year I wonder if I should try a second kit?

Thanks for signing up!  If there is enough interest, I'm figuring on continuing these each year as long as I'm here or until razordws comes back to pick it back up.  I'll definitely get things started earlier so that we can start planning and coordinating earlier.

As far as the second kit, I'm planning on that myself.  I'm hoping that something could be coordinated with some of us that are participating next month so that we can maximize the "mutual support" element.

http://i712.photobucket.com/albums/ww122/randysmodels/No%20After%20Market%20Build%20Group/Group%20Badge/GBbadge2.jpghttp://i6.photobucket.com/albums/y211/razordws/GB%20Badges/WMIIIGBsmall.jpg

  • Member since
    August 2005
  • From: Los Angeles, CA
Posted by corvettemike on Monday, November 19, 2012 4:49 AM

bufflehead

That bottom set...I don't even....just wow

Rise my brothers we are blessed by steel in my sword I trust...

Arm yourselves the truth shall be revealed In my sword I trust...

Havoc Models

  • Member since
    April 2005
  • From: Australia
Posted by taxtp on Monday, November 19, 2012 7:21 AM

Ernest - that M5A1 is a credit to you. I can't believe that's a weekend job. I'd like to know more about how you weathered it, looks great.

Kugai - nice work on the Tigershark, does look very Top Gun ish, still a great movie.

Although I missed out this weekend, I think I'm inclined to have a 2nd go to redeem myself. Anyway, decals on, all glossy and toy like. Everything else is done and ready to go on.

It's past midnight, and I've got a busy one tomorrow. might be Wednesday here before I can apply the flat coat and finish it.

Cheers

Tony

I'm just taking it one GB at a time.

  • Member since
    July 2006
  • From: San Francisco Bay Area
Posted by bufflehead on Monday, November 19, 2012 10:20 PM

corvettemike


That bottom set...I don't even....just wow

LOL!!  corvettemike, that is SOO funny!  Big Smile

Tony, too bad you didn't finish the Shiden in time.  Still lets see it when its done!

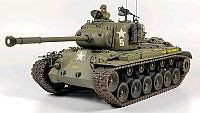
As for the weathering on the M5A1....maybe weathering isn't the proper word.  More like a "distressed" paint job!  Sorry, I forgot to take photos of the paint progression, but here's how I did it.  I'll use some photos of a previouis build to help describe it.

First, the paints I used:

Base coat of Tamiya Olive Drab.  Then I darkened all the panel lines, crevices, nooks and edges with MM Flat Black.  I had just mixed this with MM Schwarzgrau and used for the vinyl tracks so the paint was still in the AB cup, but any very dark color wouild work.  Then I switched to Lifecolour UA 223 Faded Olive Drab 1 to highlight all the upper panels, large raised areas (like the periscope covers) and then did a little color modulation to the tops of the verical sides.  I avoided the running gear and hedgerow cutter.  When done it looked pretty crazy...this BT-5 I completed a few months ago illustrates what it looks like at this point, although there was more contrast between the light and dark OD on the M5A1.

Finally I thinned Lifecolour UA 221Olilve Drab quite a bit and applied several light, mist coats over the model to blend it all together.  Another pic of the turret of the BT-5 depicts a before/after using this process.


The last step was a wash using Flory Models Black Weathering Wash, which is a process very similar to panel washes on aircraft models.  However I didn't bother with a gloss coat as I wanted a bit of staining to remain...to give it a grungy look.  Application was simple....shake bottle very well and use a large, soft brush to glop the wash all over the place!!  This product is simply water with a chalk based pigment that doesn't react with acrylic, enamel or lacquer paints.  I used a hair dryer on low to accelerate the drying time and in 30 minutes I started to remove the excess wash.   I used a damp paper towel to remove the wash from larger areas; I used a cotton swab to get to smaller areas and tight corners.  

I love this stuff for quick builds as its simple to use and achieves pretty darn good results.   I still use oil washes when I want more finesse or with a kit that has delicate PE parts, but this stuff rocks on simple, rugged builds like older Tamiya kits!

That's it.  Sorry for the long winded explanation! Zip it!

Ernest

Last Armor Build - 1/35 Dragon M-26A1, 1/35 Emhar Mk.IV Female
     

Last Aircraft Builds - Hobby Boss 1/72 F4F Wildcat & FW-190A8


  • Member since
    July 2007
Posted by scorpr2 on Monday, November 19, 2012 10:39 PM

WOW!!!  There are some great lookin' models in this GB!  That's some awesome work done in 48 hours!  Maybe I need to give it a go.

  • Member since
    July 2003
  • From: Huntington, WV
Posted by Kugai on Monday, November 19, 2012 11:16 PM

taxtp

Although I missed out this weekend, I think I'm inclined to have a 2nd go to redeem myself. Anyway, decals on, all glossy and toy like. Everything else is done and ready to go on.

Sorry that the George didn't get done in the 48, it looks great.

No problem if you want to try again.  I'm also thinking of trying again, maybe crossing over with the Saab GB to get that done by the deadline at the end of the year.

Scorpr2, feel free to join in!  Just state what you're doing and what weekends you'll have available, and I'll add you to the list.  I'm still hoping that we'll have enough of us with the same weekend to have another "main" round.

http://i712.photobucket.com/albums/ww122/randysmodels/No%20After%20Market%20Build%20Group/Group%20Badge/GBbadge2.jpghttp://i6.photobucket.com/albums/y211/razordws/GB%20Badges/WMIIIGBsmall.jpg

  • Member since
    April 2005
  • From: Australia
Posted by taxtp on Wednesday, November 21, 2012 4:26 AM

I usually do 1/48 for Australian subjects, and 1/72 for everything else, mainly due to cabinet space.

Here's the latest progress shots. It's had a wash, all the bits added except the undercarriage doors and prop, barrels drilled and some touch ups.

I'll get it as far as the flat coat tonight, then finish with the weathering tomorrow. I bit overdue, but still quick. Once you're back at work, it stretches out.

Cheers

Tony

I'm just taking it one GB at a time.

  • Member since
    May 2005
Posted by pyrman64 on Wednesday, November 21, 2012 7:24 AM

Tony: your George looks great Toast

Greg H

"There is many a boy here today who looks on war as all glory, but, boys, it is all hell." Gen. Wm T. Sherman (11 April 1880, Columbus, Ohio)

  • Member since
    July 2006
  • From: San Francisco Bay Area
Posted by bufflehead on Wednesday, November 21, 2012 9:16 PM

pyrman64

Tony: your George looks great Toast

Yes, looking very nice Tony!  Better late than never! Toast

Ernest

Last Armor Build - 1/35 Dragon M-26A1, 1/35 Emhar Mk.IV Female
     

Last Aircraft Builds - Hobby Boss 1/72 F4F Wildcat & FW-190A8
     

  • Member since
    July 2007
Posted by scorpr2 on Wednesday, November 21, 2012 10:56 PM

Kugai: I'm free every weekend, so just let me know when.  Not sure what it'll be yet.

That's a good lookin' george!

  • Member since
    April 2005
  • From: Australia
Posted by taxtp on Friday, November 23, 2012 7:40 AM

Here it is, the 1/72 Tamiya Kawanishi N1K1 'George'.I've tried to show it as the paint just begins to show wear and tear, rathr than the fully dilapidated state you sometimes see.

It eventually took me a full week. Although I missed the 48 hour target this time around, I feel like I've achieved something. Thanks for hosting it Kugai, I hope I can support you again.

I'm still thinking about round two. If I'm free on the next 'main' weekend then I'll find something else to miss the deadline with !

Cheers

Tony

I'm just taking it one GB at a time.

JOIN OUR COMMUNITY!

Our community is FREE to join. To participate you must either login or register for an account.

SEARCH FORUMS
FREE NEWSLETTER
By signing up you may also receive reader surveys and occasional special offers. We do not sell, rent or trade our email lists. View our Privacy Policy.