SEARCH FINESCALE.COM

Enter keywords or a search phrase below:

Imperial Japanese Group Build Part II

93233 views
746 replies
1 rating 2 rating 3 rating 4 rating 5 rating
  • Member since
    November 2009
  • From: SW Virginia
Posted by Gamera on Tuesday, June 4, 2013 12:40 PM

Ah hah, ok I see now, the 'doors' fold back over the aircraft to make the canopy. Sorry, I didn't look too close, neat design - I never noticed that it worked that way until your model!

"I dream in fire but work in clay." -Arthur Machen


  • Member since
    October 2008
  • From: italy
Posted by bsyamato on Tuesday, June 4, 2013 11:09 AM

mmh.. nope :) the opened canopy is the original canopy that i cut in the middle :)  hinge are at the side of windsreen .Here a real one

www.luftarchiv.de/.../bf108_2.jpg

The 108 is finished

  • Member since
    November 2009
  • From: SW Virginia
Posted by Gamera on Monday, June 3, 2013 8:02 PM

Ohhhhhhh, love those doors! Did she have an open top canopy or have you just not glued that on yet?

"I dream in fire but work in clay." -Arthur Machen


  • Member since
    October 2008
  • From: italy
Posted by bsyamato on Monday, June 3, 2013 4:54 PM

Thanx Cliff

yep!!!! 

then exhausts, propeller and cockpit door...

it's FINISHED!!!! ... after 8 months Tongue Tied

Tomorrow outdoor sun pictures :)  .. i hope so 

  • Member since
    November 2009
  • From: SW Virginia
Posted by Gamera on Monday, June 3, 2013 12:43 AM

Nice work! Love the tiny pitot tube and counterweights!

"I dream in fire but work in clay." -Arthur Machen


  • Member since
    October 2008
  • From: italy
Posted by bsyamato on Sunday, June 2, 2013 9:22 AM

near the end.. slowly:

On his legs

lefs exhausts here with copper tube (actually painting it )

Landing light modded. Pitot and ailerons counterweight scratched with heated sprue

At the next

  • Member since
    April 2005
  • From: Australia
Posted by taxtp on Tuesday, May 28, 2013 4:08 PM

Thanks BSY.

I'm just taking it one GB at a time.

  • Member since
    October 2008
  • From: italy
Posted by bsyamato on Tuesday, May 28, 2013 5:39 AM

Excellent Nanzan Tony Toast great mix of weathering 

  • Member since
    April 2005
  • From: Australia
Posted by taxtp on Sunday, May 26, 2013 12:11 AM

Thanks everyone.

I'm just taking it one GB at a time.

  • Member since
    November 2009
  • From: SW Virginia
Posted by Gamera on Saturday, May 25, 2013 9:33 PM

Tony: That is beautiful work my friend! Great job all around and wow the panel lines look sharp- I wish I could do 1/72nd so well but my eyes can't pull it off! Front page updated, and of course if you'd like a different photo please let me know.

Mark: Wow, she is a monster, I knew she was big but compared to the Sharpie - wow!!!

"I dream in fire but work in clay." -Arthur Machen


  • Member since
    November 2009
  • From: United Knigdom
Posted by Alex Shaw on Friday, May 24, 2013 7:45 PM

Fantastic work all!

  • Member since
    October 2008
  • From: Georgia
Posted by Rigidrider on Friday, May 24, 2013 7:42 PM

Tony, Very nice... I always marvel at what you guys who do the 72nds can do to them! Great Job!

Doug

When Life Hands You A Bucket Of Lemons...

Make Lemonade!

Then Sell It Back At $2 Bucks A Glass...

  • Member since
    March 2009
  • From: brisbane australia
Posted by surfsup on Friday, May 24, 2013 5:27 PM

You have done a beautiful job on her so congrats from me. Ok I am back into the Yamato. The Aft Deck Grates have been cut out and waiting for the P/E replacements. The Hull is now together along with the Degaussing Cable. More to come soon.....Cheers mark

If i was your wife, i'd poison your tea! If Iwas your husband, I would drink it! WINSTON CHURCHILL

  • Member since
    April 2005
  • From: Australia
Posted by taxtp on Friday, May 24, 2013 4:32 PM

Nice BSY, good fixing.

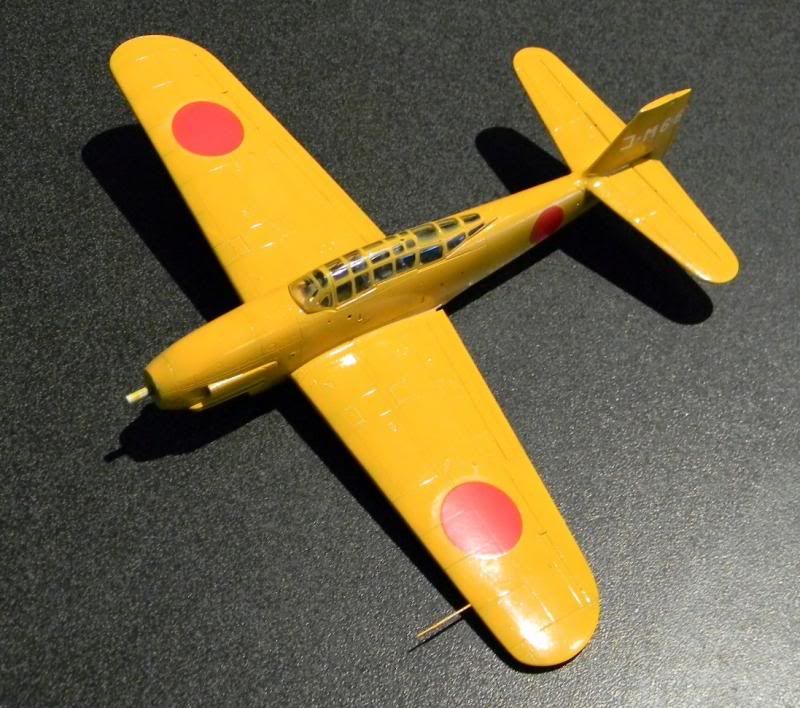
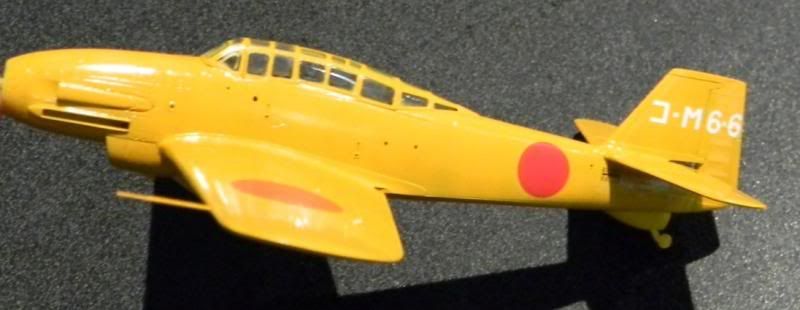
Well here it is, my take on Tamiya's 1/72 Aichi M6A1-K Nanzan. It's a really nice kit. The only non standard piece is the pitot, which I made myself.

Cheers

Tony

I'm just taking it one GB at a time.

  • Member since
    November 2009
  • From: SW Virginia
Posted by Gamera on Monday, May 20, 2013 6:55 PM

Ohhhhhhh nice Bsyamato- you're almost there!

Gosh I really need to get back to work!

"I dream in fire but work in clay." -Arthur Machen


  • Member since
    October 2008
  • From: italy
Posted by bsyamato on Monday, May 20, 2013 10:34 AM

Zvezda great work on cockpit i see :D don't see nothing wrong :)

I like the yellow Tony Yes

Instead here my work Alien ..just washed panel lines

Aaat the slowly next Embarrassed

  • Member since
    April 2005
  • From: Australia
Posted by taxtp on Monday, May 20, 2013 5:03 AM

Thanks Cliff. Next update is after the flat coat.

cheers

Tony

I'm just taking it one GB at a time.

  • Member since
    November 2009
  • From: SW Virginia
Posted by Gamera on Sunday, May 19, 2013 8:59 PM

Superb work there Tony! I find it so easy to overdo pre-shading on a light coloured plane like that but she looks really good!

"I dream in fire but work in clay." -Arthur Machen


  • Member since
    April 2005
  • From: Australia
Posted by taxtp on Saturday, May 18, 2013 8:06 PM

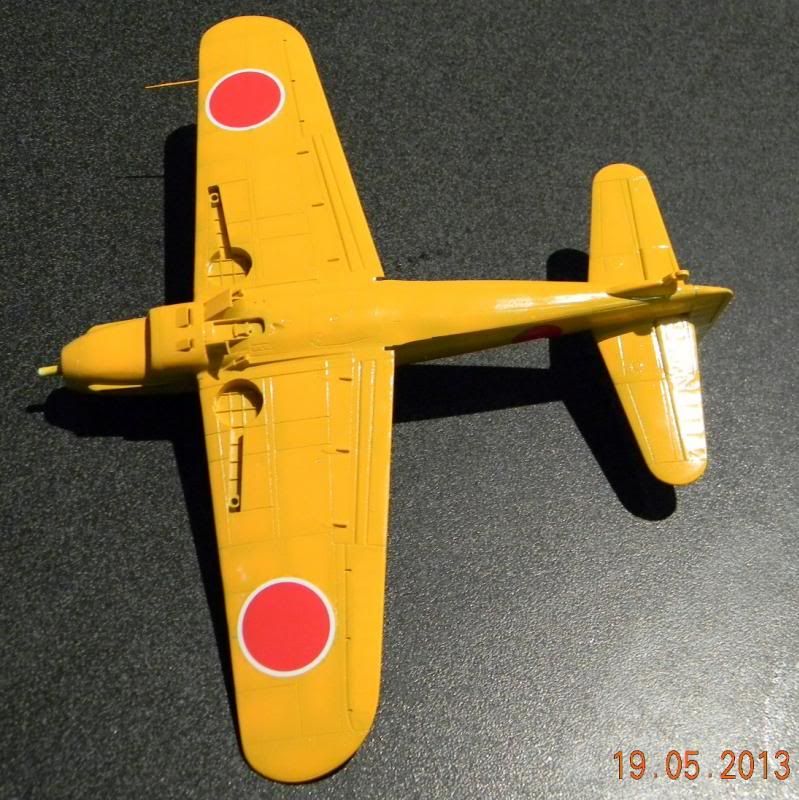
Hi Everyone,

Here's the latest. Hopefully it looks a bit more orange, and it's a nice, easy decal job on this one. You can still see that I haven't cleaned the muck from around the decals yet, and the canopy framing has soft overspray where the vinyl masks lifted. I'll push that off with a toothpick later. I've removed the canopy masking as I want to use Testors dullcote on it, and dont fancy trying to push that stuff off too. I'll mask the entire canopy when I apply that, then brush paint the flat coat on the framing.

There a couple of little things to fix up, and a bit more to do, but it's progressing well enough for me.

For some reason the under side photo shows the preshading better, but it's the same all over the model.

Cheers

Tony
I'm just taking it one GB at a time.

  • Member since
    November 2009
  • From: United Knigdom
Posted by Alex Shaw on Saturday, May 18, 2013 7:57 PM

Amazing results on that interior, very nice work indeed Yes

  • Member since
    November 2009
  • From: SW Virginia
Posted by Gamera on Saturday, May 18, 2013 7:49 PM

Tony: Nice job, does look a little yellow to me too. I can see the pre-shading- it's coming though great!

Zvezda: What are you unhappy about? If I did a cockpit that well I'm be thrilled! Really love the instrument panel. I wouldn't worry too much about those tiny control levers- I've had very little luck with those too. Even if I get them glued on somehow I bump it and they go flying.

"I dream in fire but work in clay." -Arthur Machen


  • Member since
    March 2010
  • From: MN
Posted by Nathan T on Saturday, May 18, 2013 6:22 PM

Nice detailing in the pit. PE takes some getting used too. Try using small resin bits plus a full pe detail set, like on my Tony. Now that can bring you too your knees! Good call on the pizza and beer too.


  • Member since
    January 2013
  • From: Athens, Greece
Posted by Zvezda1980 on Saturday, May 18, 2013 6:02 PM

Hello fellow imperial builders.

In this episode of the Ki-46 III Kai Otsu soap opera:

The assembly of the front and rear cockpit sections, wash, dry brushing and painting of various details is finished. The final 'Welding' of the cockpit sub-assemblies on the fuselage will be performed when the two fuselage halves are joined, in order to assure (hopefully) a decent alignment and fit and the 'Jazz Music' style cannon will be installed last, along with the control panel. 

The control panel  - even though prepainted - was painted thinly with the cockpit color, and a drop of gloss varnish took up the role of dials glass.

This is the first time that I deal with a cockpit further from simply adding a harness. At some moments, while working all those tiny PE stuff I was about to Bang Head, (I eventually lost some microscopic levers but I can live with it - since I'm not the pilot Big Smile) yet, overall I consider it was fun.

I am not entirely happy with the result and I will appreciate all your remarks, proposals and criticism.

First you may see some cockpit photos:

and a couple of control panel shots

Goodnight to all, I am off for some Beer and a Pizza to regain strength

  • Member since
    April 2005
  • From: Australia
Posted by taxtp on Saturday, May 18, 2013 2:40 AM

I decided that the orange was a little pale, so I've given it a light and thin coat of a brighter orange. It's blended in the preshading a little more, and looks a bette shade.

Cheers

Tony

I'm just taking it one GB at a time.

  • Member since
    April 2005
  • From: Australia
Posted by taxtp on Saturday, May 18, 2013 12:31 AM

Thanks Cliff and Doug. here's the next instalment. I've completed the prop and spinner too, but forgot to photograph it.

Cheers

Tony

I'm just taking it one GB at a time.

  • Member since
    October 2008
  • From: Georgia
Posted by Rigidrider on Friday, May 17, 2013 11:39 AM

Thats coming along great Tony! Looking forward to the paint and detail!

Doug (RR)

When Life Hands You A Bucket Of Lemons...

Make Lemonade!

Then Sell It Back At $2 Bucks A Glass...

  • Member since
    November 2009
  • From: SW Virginia
Posted by Gamera on Friday, May 17, 2013 10:45 AM

Lol, that's what I love about pre-shading- you don't have to stay inside the lines! I've tried it with a black Sharpie style felt-tip marker and it just looks too perfect- a little slop helps here.

Great job, the orange is going to look super cool.

"I dream in fire but work in clay." -Arthur Machen


  • Member since
    April 2005
  • From: Australia
Posted by taxtp on Thursday, May 16, 2013 4:24 PM

Here's the Nanzan with pre shading, or should that be pre blobbing ?

Anyway, I'll be a bit more careful as I apply the orange top coat. I used an Eduard set for masking the canopy. It's one of those old inflexible grey vinyl ones, and doesn't take to curves well. I'm sure I'll have some cleanup. The new er ones made from yellow masking tape material are infinitely superior.

Cheers

Tony

I'm just taking it one GB at a time.

  • Member since
    November 2009
  • From: SW Virginia
Posted by Gamera on Saturday, May 11, 2013 7:12 PM

Ouch!

Well, on the good side at least the decals are black, which makes it a lot easier to colour match with some black paint or cutting some up another black decal to cover the ripped areas.

"I dream in fire but work in clay." -Arthur Machen


  • Member since
    November 2009
  • From: United Knigdom
Posted by Alex Shaw on Saturday, May 11, 2013 3:19 PM

Damn, that's gotta be a pain in the ***. Good luck with trying to restore it, I'm sure you'll figure something out.

JOIN OUR COMMUNITY!

Our community is FREE to join. To participate you must either login or register for an account.

SEARCH FORUMS
FREE NEWSLETTER
By signing up you may also receive reader surveys and occasional special offers. We do not sell, rent or trade our email lists. View our Privacy Policy.