SEARCH FINESCALE.COM

Enter keywords or a search phrase below:

FineScale Modeler WWI Aeroplane Group Build 2013

139585 views
1262 replies
1 rating 2 rating 3 rating 4 rating 5 rating
Moderator
  • Member since
    September 2011
Posted by Tim Kidwell on Monday, April 1, 2013 7:06 PM

ruddratt

John, Tim, sasho, GM, Marc - you fellas are cranking out some seriously top notch stuff! Yes Keep it comin'!

Chuck - what a great site! I've got it bookmarked now - that Fe.2B detail set for the WnW kit looks way too good to pass up on.

Tim - loved the vlog!! Thanks for another good one!

Thanks, Ruddratt!

I wanted to give you guys a peek at where I'm at starting this week. I had a pretty bad cold last week that went super-colossal over the weekend, so not much accomplished--I blame Dark Power though he maintains it wasn't his fault.

Anyhow, I got the instrument panel in today:

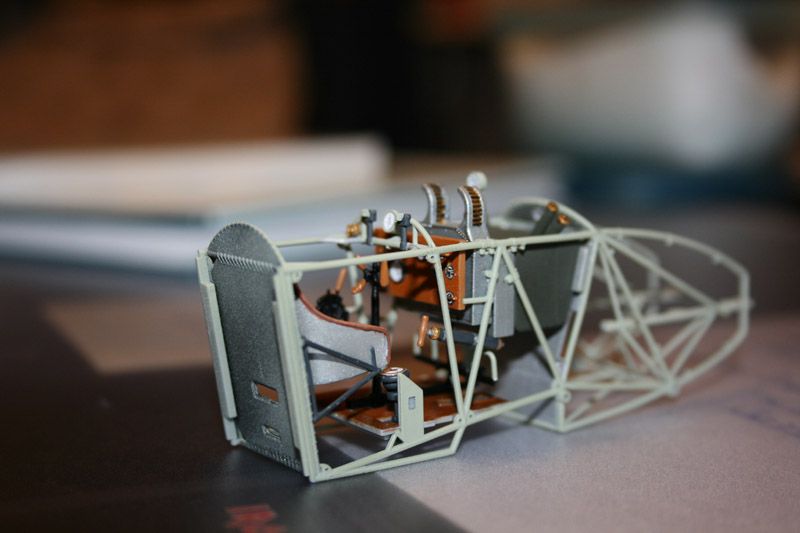
Yeah, not the best shot of it, but it's in there. Aaron talked me out of plumbing the instrument panel, and I'm glad he did. It would have destroyed me this time around. However, I have a Pfalz D.IIIa in the stash ... 

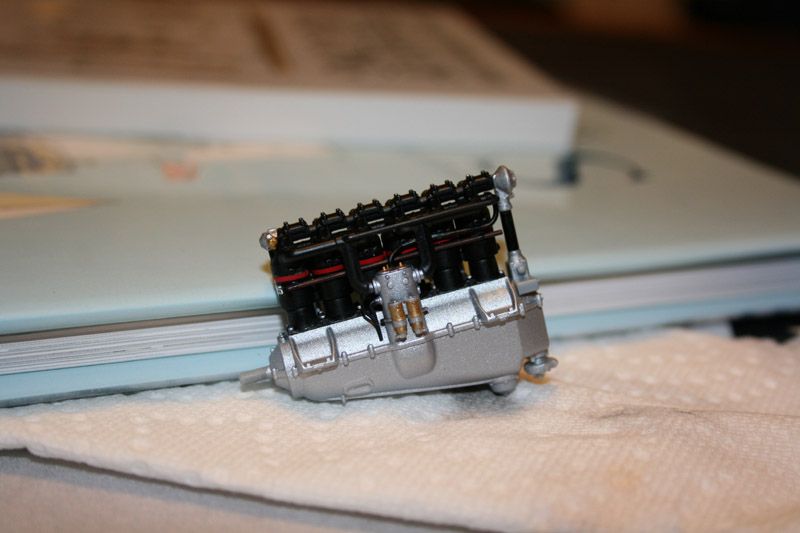
I'm proud of how the engine looks so far. Touch ups will come after it's complete:


And, a la Ruddratt, here's my attempt at wiring the first magneto: 

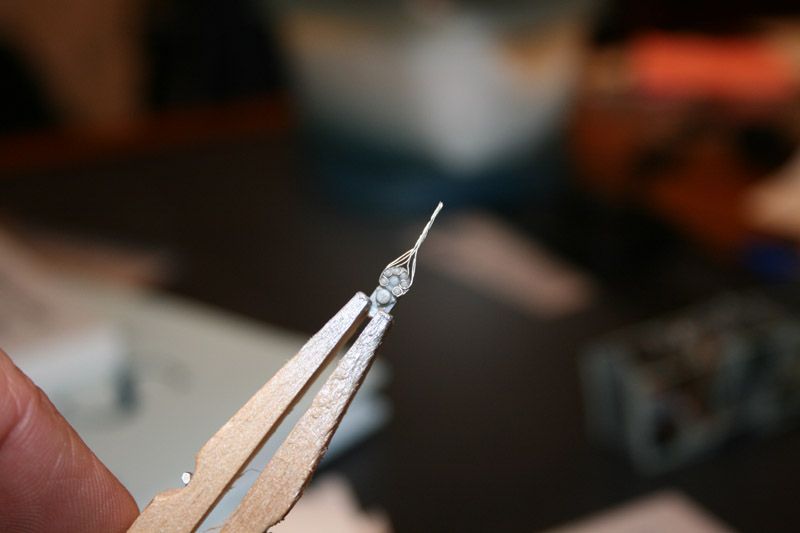
I didn't have wire as fine as his, though, and ended up unwinding some old antenna wire I had knocking around since 1999 (or something like that). Tomorrow, after some paint, this magneto goes on the engine along with the second one. 

Huh, as I type this, it occurs to me that I have a pair of earbuds that don't work anymore. I think I'll have a look at those wires for future possibilities. 

Chuck: Darn you! Now I'm looking at that PE set for the Pfalz!

Marc: Dude, no prop!? <runs off into the night, stricken with panic> Well, I guess simulated wood grain will have to do. It looks great.

Sasho: Thumbs up for your wood grain, too! We're all getting in the act.

GMorrison: Those wings look killer. Also, nice catch on the attachments and references.

That's all for now. Back to parenting.

[Note: Some additions and corrections were made after the initial post.]

--

Timothy Kidwell
Editor
Scale Model Brands
Kalmbach Media


  • Member since
    April 2005
  • From: Piscataway, NJ!
Posted by wing_nut on Tuesday, April 2, 2013 7:20 AM

I had a pretty bad cold last week that went super-colossal over the weekend,

A verbatim description of the last 7 days for me too.  It's been making the rounds out here and not fun.  Finally on the down wind leg and have taken the day off for a bit of R&R so should get some bench time today... if I don't sleep all dayWhistling

Tim, the wood prop has not been shelved, just put on the back burner  for the moment.  The next step is the make or break step but mostly  I just needed to get some plastic in my hands.  

What you've done there look real nice. What gauge wire did you use?  You can throw an answer to the one too Mike.

Marc  

  • Member since
    November 2009
  • From: SW Virginia
Posted by Gamera on Tuesday, April 2, 2013 7:26 AM

Sasho, Marc, Tim: Those are some beautiful cockpits guys! Kudos!

"I dream in fire but work in clay." -Arthur Machen


Moderator
  • Member since
    September 2011
Posted by Tim Kidwell on Tuesday, April 2, 2013 8:40 AM

wing_nut
What gauge wire did you use?

Hi Marc,

I just measured the wire with a micrometer: it comes up at approximately .1mm, so we're talking about 38 gauge. I showed my wife the magneto last night, and she said, "We've now come to a point where all I want to do is punch you." Me: <fist pump> "SUCCESS!"

--

Timothy Kidwell
Editor
Scale Model Brands
Kalmbach Media


  • Member since
    February 2006
  • From: Smithers, BC, Canada
Posted by ruddratt on Tuesday, April 2, 2013 9:24 AM

Marc, I couldn't tell ya what the wire gauge is that I used, only where it came from. It's a single strand of fine wire from an old computer ribbon cable. The stuff is hair thin or thinner.

.....and, hope your feeling better soon there. Lovin' how the Albatros is looking. Nice to see you haven't lost your touch in regards to the wingy thingies. Wink

Mike

 "We have our own ammunition. It's filled with paint. When we fire it, it makes pretty pictures....scares the hell outta people."


  • Member since
    December 2002
  • From: Bury St Edmunds, Suffolk, England
Posted by Bish on Tuesday, April 2, 2013 1:57 PM

There some stunning work going on in here. I need to do some catching up. Been trying to watch the vlogs but got a bit of slow connection at the minute.

I am a Norfolk man and i glory in being so


On the bench: Airfix 1/72nd Harrier GR.3/Fujimi 1/72nd Ju 87D-3

  • Member since
    April 2005
  • From: Piscataway, NJ!
Posted by wing_nut on Tuesday, April 2, 2013 6:09 PM

Thanks for the wire size info boys.  I have some that I harvest from old ear buds that's about 0.1 mm so I'm in like Flint.

BTW Tim, dunno when you started the cold and how you are felling... but my 1st day was Wednesday last week and I think I turned the corner today.  85% breathing through both nostrils and both ears have popped.  Gotta tell ya... those ears popping was nearly better than... well... a bunch of stuffWhistling

Didn't get as much done today as I had hoped.  Did get a fair amount of kip though.Sleep  I'll post a pic or 2 later.

Marc  

  • Member since
    February 2006
  • From: Smithers, BC, Canada
Posted by ruddratt on Tuesday, April 2, 2013 8:09 PM

Looking forward to the pics Marc! Yes

Had a nice little surprise waiting for me when I got home from work today. My Gaspatch Models 1/32 turnbuckles! Man, these things are sweet - can't wait to work with 'em!

Mike

 "We have our own ammunition. It's filled with paint. When we fire it, it makes pretty pictures....scares the hell outta people."


Moderator
  • Member since
    September 2011
Posted by Tim Kidwell on Wednesday, April 3, 2013 11:30 AM

wing_nut
BTW Tim, dunno when you started the cold and how you are felling... but my 1st day was Wednesday last week and I think I turned the corner today.  85% breathing through both nostrils and both ears have popped.  Gotta tell ya... those ears popping was nearly better than... well... a bunch of stuffWhistling

Mine started two Sundays ago. It felt like someone had filled my head with concrete. And while I had a cough, it wasn't terrible until Friday night. By Saturday morning, I couldn't talk and had an infernal time even sitting because of the continuous hacking. I still have a nagging cough and some sinus pressure, but it's coming to an end.

On the modeling front, I wired the other magneto this morning. I'll get into the paint booth sometime to day and then get the engine finished up. <crosses fingers>

--

Timothy Kidwell
Editor
Scale Model Brands
Kalmbach Media


  • Member since
    December 2002
  • From: Northern California
Posted by jeaton01 on Wednesday, April 3, 2013 10:57 PM

Between building my new shed to store my treasures and guarding the firing pins I have gotten some parts of my DH9a done enough to take pictures.  There are a lot of parts is this kit!  I am pretty much following the painting notes, and am sort of ok with the fuselage framing.  I over coated the light wood color with Tamiya Clear Yellow thinned a great deal to give it a varnished look.  I would like to give it some grain but my skills are not up to that, I fear, as I don't want to over do it, and the wood used for those areas is pretty tight grained.  There are a bunch of decals to put on the instrument panel and around the framing in various areas, that is next.  Nothing is glued in the last photo, it snaps together tightly, a thin coat of paint is enough to make things very tight indeed.

John

To see build logs for my models:  http://goldeneramodel.com/mymodels/mymodels.html


  • Member since
    February 2006
  • From: Smithers, BC, Canada
Posted by ruddratt on Thursday, April 4, 2013 12:40 AM

You're off to a great start John! Looks like that thing is just packed with detail!

I know what you mean about the tight tolerances between some parts. Found that out on the first WnW kit I built. Even the paint thickness can make for a tight fit. If you noticed on Marc's (wingnuts) Albatros, looks like he masked off the slots in the fuselage halves that house the bulkheads. I've done that as well and it makes a bigger difference than one might think.

Mike

 "We have our own ammunition. It's filled with paint. When we fire it, it makes pretty pictures....scares the hell outta people."


  • Member since
    April 2005
  • From: Piscataway, NJ!
Posted by wing_nut on Thursday, April 4, 2013 6:18 AM

John, very nice start there indeed.

Oh yes... the tolerancesIndifferent  I remembered from the 1st Albatros I built the fuselage halves needed a good squeeze to close up.  Not masked though Mike.  This time I scraped 'em out with a micro chisel.

Moving forward in the fuselage I got the next bulkhead  done with he fuel tank and magazines.  Are they called bulkheads or formers inside a fuselage?  Started in on the engine too.  hard to see in the pic but the valve rockers arm springs that are nothing more than tiny pegs on the cylinders where replaced with springs made from copper wire.  A little dry brush will make them visible down the road.

Before you all jump on me about the ejector pin marksWhistling i am adjusting my philosophy from, "I fix them because I know they are there." to, "If they won't be seen they won't be fixed."Stick out tongue

Marc  

Moderator
  • Member since
    September 2011
Posted by Tim Kidwell on Thursday, April 4, 2013 8:13 AM

wing_nut

Your fuel tank walked up and slapped me in the face. Wonderful weathering! Can you share colors and your process?
Great start on the engine, Marc, and as for the pin marks, I'm in your camp.
Bravo!

--

Timothy Kidwell
Editor
Scale Model Brands
Kalmbach Media


Moderator
  • Member since
    September 2011
Posted by Tim Kidwell on Thursday, April 4, 2013 8:22 AM

jeaton01

John, that is coming together nicely!

I've definitely learned my lesson with paint and fit on the WNW models. Something I've done when having a tough time joining some of the smaller attachments is to flow a little Tamiya extra thin cement into the area, give it a chance to soften the plastic, then push the parts together. Not helpful with the big stuff, but useful for the fiddly bits.


--

Timothy Kidwell
Editor
Scale Model Brands
Kalmbach Media


Moderator
  • Member since
    September 2011
Posted by Tim Kidwell on Thursday, April 4, 2013 8:34 AM

Just wanted to say that after the first month, by my count, we have 13 out of 18 models underway! Good show, gentlemen. It's really starting to get busy in here. To everyone, again, thanks for jumping in on this GB. I know for me, it has been great fun and educational (which is fun, too!).

--

Timothy Kidwell
Editor
Scale Model Brands
Kalmbach Media


Moderator
  • Member since
    April 2006
  • From: my keyboard dreaming of being at the workbench
Posted by Aaron Skinner on Thursday, April 4, 2013 10:00 AM

Popped my head out from under my workbench to see what's what and all I can say is, "Dang!" There's a lot of good-looking work here already. Outstanding gentlemen!

Wingnut: I second Tim's question about the distressing on the fuel tank. How'd you do it?

Jeaton: DH.9A is looking cherry.

GMorrison: Love the preshading and aileron detail work.

Sasho and Falconmod: Keep up the good work.

Aaron Skinner

Editor

FineScale Modeler

  • Member since
    September 2011
  • From: Milaca, Minnesota
Posted by falconmod on Thursday, April 4, 2013 10:00 AM

The new camera is in!!!  finally some decent shots.  Please excuse the darker green areas, it should all even out after I flat coat it.

But that ready mixed testors Aztec air brush gloss coat worked great, I have high hopes for the flat clear aswell.

John

On the Bench: 1/72 Ki-67, 1/48 T-38

1/144 AC-130, 1/72 AV-8A Harrier

  • Member since
    October 2011
  • From: Lake Villa, Illinois
Posted by Chuck Davis on Thursday, April 4, 2013 1:03 PM

So I’m sitting at my desk at lunch fighting a sinus headache (Tim/Marc – I blame you guys…), and I’m thinking I want to work on my F.1.  Sadly, I’ve forgotten the instructions at home.  Never fear…a few mouse clicks and I have a picture of a LeRhone 9J in front of me.  “Why look...” says my pained brain –“…there’s a hole in the thingie on top of the cylinder.”  Having a set of tools here I proceed to use my eyes with their now-growing sinus pain to drill out the thingies with a #79 drill.

 And I wonder why I don’t have much completed on this build yet…but hey!  It’s about having fun.  Other than my throbbing temples…it was fun.


 Falcon - Great progress!  Happy new camera

John - DH.9 is lookin' great...makes me want to start mine (must...finish...F.1 first...)

Marc - my man!  Let me echo the "how'd you do dat?"  Great weathering on the tank

Tim - excellent interior sir...and outstanding wiring for your first!

Chuck Davis

  • Member since
    April 2005
  • From: Piscataway, NJ!
Posted by wing_nut on Thursday, April 4, 2013 3:50 PM

Chuck, if someone ever figured out how to send THAT kind of virus through a computer... well we would be pretty much screwed.

Who'da thunk the tank would be such a hit.  I a bringing over the weathering techniques I've learned since putting tracks on my winged nut.  That was done with the hairspray technique. The tank was painted with brass metalizer then when dry a couple of good coats of hairspray.  This was the given a coat of  interior green, Tamiya XF-76 IJN Gray Green.  A stiff(ish) brush is dipped in water and start working over the paint lightly  the water gets under the paint  dissolved the hairspray and the paint "peels".  When that was all dry it was coated with raw umber oil paint... with a bit of japan Dryer to shorten the drying time... and most of that was wiped off with a soft cloth.  And Bob's your uncle... a beat up gas tank.Stick out tongue

Marc  

  • Member since
    December 2002
  • From: Northern California
Posted by jeaton01 on Thursday, April 4, 2013 3:55 PM

Thanks for the comments, it is more WNW Wings than me at this point!  I'm just the assembler!

Marc, I wish I could make woodwork look like you do.  I'll just keep practicing.  On a SMER kit!

On the bulkhead/former thing, a true bulkhead probably is a solid part or one that goes the full perimeter of the fuselage section, and a former is a part that is used to fill out a section on top, bottom, or side.  Both are used pretty loosely in my experience, and then there are the waterlines and bulkhead terms used in station diagrams which is a different thing altogether.

Doing itty bitty decals now.

John

To see build logs for my models:  http://goldeneramodel.com/mymodels/mymodels.html


  • Member since
    October 2011
  • From: Lake Villa, Illinois
Posted by Chuck Davis on Thursday, April 4, 2013 4:06 PM

Marc - Ahhh, yes.  The famous hairspray technique.  One I've tried to avoid.  You've convinced me I'll need to try this at some point.

Chuck Davis

  • Member since
    February 2006
  • From: Smithers, BC, Canada
Posted by ruddratt on Thursday, April 4, 2013 8:14 PM

Tim Kidwell

Just wanted to say that after the first month, by my count, we have 13 out of 18 models underway! Good show, gentlemen. It's really starting to get busy in here. To everyone, again, thanks for jumping in on this GB. I know for me, it has been great fun and educational (which is fun, too!).

I can honestly say that it's been our pleasure Tim, so thanks should also go out to you and Aaron for having us! Yes

John - the Albatros is looking real nice. Man, you're just cruising along on that thing! Great pics too! Yes

Marc - I've never tried that technique, but may have to now, especially after reading not only how to do it, but how it actually works. Thanks!

Regarding the E.III, I'm hoping to have the 'pit finished up tonight. It's looking pretty good so far. If that happens, I'll get some pics posted as well.

Mike

 "We have our own ammunition. It's filled with paint. When we fire it, it makes pretty pictures....scares the hell outta people."


  • Member since
    September 2011
  • From: Milaca, Minnesota
Posted by falconmod on Friday, April 5, 2013 7:17 AM

Chuck, if someone ever figured out how to send THAT kind of virus through a computer... well we would be pretty much screwed.

Who'da thunk the tank would be such a hit.  I a bringing over the weathering techniques I've learned since putting tracks on my winged nut.  That was done with the hairspray technique. The tank was painted with brass metalizer then when dry a couple of good coats of hairspray.  This was the given a coat of  interior green, Tamiya XF-76 IJN Gray Green.  A stiff(ish) brush is dipped in water and start working over the paint lightly  the water gets under the paint  dissolved the hairspray and the paint "peels".  When that was all dry it was coated with raw umber oil paint... with a bit of japan Dryer to shorten the drying time... and most of that was wiped off with a soft cloth.  And Bob's your uncle... a beat up gas tank.Stick out tongue

Marc,

 So what is japan dryer

John

On the Bench: 1/72 Ki-67, 1/48 T-38

1/144 AC-130, 1/72 AV-8A Harrier

Moderator
  • Member since
    September 2011
Posted by Tim Kidwell on Friday, April 5, 2013 8:34 AM

Marc - Of course! We get so used to seeing techniques used in one context, even we at the magazine forget you can use them to great results in others. Well done!

John - japan drier is an additive for oil paints that you can pick up at art supply stores. It lessens the drying time for oils.

--

Timothy Kidwell
Editor
Scale Model Brands
Kalmbach Media


  • Member since
    April 2005
  • From: Piscataway, NJ!
Posted by wing_nut on Friday, April 5, 2013 11:18 AM

Just notice my smile came out  as test... "Stick out tongue"  Well shut my mouth (no smile for that)Wink

Marc  

  • Member since
    November 2009
  • From: SW Virginia
Posted by Gamera on Friday, April 5, 2013 11:34 AM

John: Nice work, really sharp looking cockpit.

Chuck: Now that's a detailed engine!

"I dream in fire but work in clay." -Arthur Machen


Moderator
  • Member since
    September 2011
Posted by Tim Kidwell on Friday, April 5, 2013 4:13 PM

Hi guys!

I want to let you all know that we're postponing the next vlog until next Friday. I want to give Aaron a chance to clear some of the work off of his plate and catch up. Meanwhile, I'll post some pics over the weekend of my D.VII. The engine has been glued into its compartment, and a wash has dirtied it up a bit. There is also a little woe to go along with the weal.

Best,

Tim

--

Timothy Kidwell
Editor
Scale Model Brands
Kalmbach Media


  • Member since
    October 2011
  • From: Lake Villa, Illinois
Posted by Chuck Davis on Friday, April 5, 2013 4:23 PM

Awww....maaaaannn....I was lookin' forward to the Vlog, too.  Bummer.

Hey, Tim - did you make sure you had the lower cowl "hanging around" while you installed your engine?  The tips of the engine mounts are supposed to pop into the holes in the lower nose bowl...

Looking forward to seeing the pics!

Have a great weekend everyone...

Chuck Davis

  • Member since
    February 2006
  • From: Smithers, BC, Canada
Posted by ruddratt on Friday, April 5, 2013 7:19 PM

What!!?? No vlog!!?? Ah well, good things come to those who wait. Should be a good one! Can't wait to see the pics Tim! Yes

In the interim, work has been progressing well on the E.III. The 'pit is done and I'm happy with the way it turned out. It fits like a glove between the fuselage halves, and the best part is that the opening is big enough that most of it will still be seen once everything is buttoned up, which will be happening very soon. Things are gonna be moving along quickly from here on in and she's gonna look more like a warbird every day now that the 'pit is finished. Here's some pics.......

The next steps call for the fuselage halves to be joined, the cockpit combing, firewall,  and other body panels to be installed, and the main gear to be assembled and attached, so that's the plan. Stay tuned.

Mike

 "We have our own ammunition. It's filled with paint. When we fire it, it makes pretty pictures....scares the hell outta people."


Moderator
  • Member since
    September 2011
Posted by Tim Kidwell on Saturday, April 6, 2013 2:05 PM

Chuck Davis

Awww....maaaaannn....I was lookin' forward to the Vlog, too.  Bummer.

Hey, Tim - did you make sure you had the lower cowl "hanging around" while you installed your engine?  The tips of the engine mounts are supposed to pop into the holes in the lower nose bowl...

Looking forward to seeing the pics!

Think of it as a mid-season break, except it lasts only a week instead of six.

Many of you probably are already aware of this site, but here are some excellent photo references for a lot of the aeroplanes we're building.

So, I decided to rig the cockpit this morning. I sat down at the kitchen table this morning with a number of my tweezers and snips I use for rigging ships and rigged the pedals and stick, and enjoyed a mighty feeling of accomplishment. Then I saw Ruddratt's work, found a dark spot behind the sofa in our living room and wept softly for 45 minutes. 

I'm better now.

Yesterday, I put a Vallejo sepia wash on the engine before gluing it up front. 

After some test-fitting, I think I'll leave out the structural rigging on the cockpit sides. The tolerances are extremely tight and I have a small gap just behind the pilot seat between the fuselage halves. It's nothing I can't clean up, but it sounds a lot like problem that Chuck faced when he built his D.VII. I don't want to exacerbate the situation.

Gotta go drink some whisky and think on it.

Not sure how much more I'll get done this weekend. Dark Power's fifth birthday party is tomorrow, which essentially means opening the garage door and inviting Chaos to back his truck up to drop off a heaping pile of pandemonium. But I do love parties.

--

Timothy Kidwell
Editor
Scale Model Brands
Kalmbach Media


JOIN OUR COMMUNITY!

Our community is FREE to join. To participate you must either login or register for an account.

SEARCH FORUMS
FREE NEWSLETTER
By signing up you may also receive reader surveys and occasional special offers. We do not sell, rent or trade our email lists. View our Privacy Policy.