SEARCH FINESCALE.COM

Enter keywords or a search phrase below:

Reich Defenders IV Group Build: Strike From Above

54582 views
513 replies
1 rating 2 rating 3 rating 4 rating 5 rating
  • Member since
    December 2003
  • From: Charleston, SC
Posted by sanderson_91 on Monday, February 10, 2014 5:51 PM

Your 129 looks really good Tony!

Steve


  • Member since
    October 2008
  • From: Georgia
Posted by Rigidrider on Monday, February 10, 2014 6:13 PM

Wow... Clemens, Johnny, Tony... Man 3 good looking builds one after the other! All 3 looking great! I've never built a 129 (that I can remember, but then I'm told thats the first thing to go) I think its about time! Ands Clemens, I think I have your Jug in a book I have called "Flying Colors", Very nice theme!

Doug

When Life Hands You A Bucket Of Lemons...

Make Lemonade!

Then Sell It Back At $2 Bucks A Glass...

  • Member since
    November 2003
  • From: Naples, FL
Posted by tempestjohnny on Tuesday, February 11, 2014 5:50 AM

Well didn't get home from work last night til 9:15 so needless to say nothing got done


  • Member since
    April 2013
Posted by SchattenSpartan on Tuesday, February 11, 2014 3:50 PM

Not much progress on my side either. I got the fuselage codes and swastikas in place, but i still have to decal the lower wing surfaces. I just hope that area ends up looking good, there are some large raised details right where the decals are supposed to go...

Doug: The Germans had 2 captured Thunderbolts AFAIK and there's a sirprisingly big amount of decent pics of them. I just bought a Kagero book on the P-47 (P-47s with the USAAF - MTO, Asia and Pacific) and that one includes a few pictures of T9+LK (the one I'm not building) as well. I also found a photo that was new to me in a book about JG4 (they got one for practice dogfights as far as I can tell)

  • Member since
    April 2013
Posted by SchattenSpartan on Wednesday, February 12, 2014 4:30 PM

I managed to complete the decal work on one of the wings today.

Well, almost...

That decal "damage" you can see on the Balkenkreuz is there on purpose. It was impossible to get the decal on top of that large bump on the aileron, so I cut away part of the decal and I'm going to paint that area black after sealing the decals (to make them masking-proof)

My reference pictures of this particular bird actually saved my ass because those damn decal instructions tell you to place all the decals about 1cm further inwards. The only pictures of the lower wing surfaces show them where i put them. What would've been the problem you may wonder now? placing the decals according to the instructions would put the demarcation line between the white and black areas right on top of that bump which would make the touch-up work after cutting the decal a very tough job...

I still have to do some touch-up work on the 9. I accidentöy cut a slice of it off at the bottom end that needs reapinting. Most of it will be covered by the pylon anyway, so nothing to worry about here either.

I'll try to get all the decalling done tomorrow (only the other wing left) and spray the wings with some satin varnish. That allows me to touch-up all the decals and seal the whole model with a coat of Alclad's satin clear. Not much longer untill I can start the weathering and finish her off!

  • Member since
    December 2002
  • From: Bury St Edmunds, Suffolk, England
Posted by Bish on Wednesday, February 12, 2014 4:39 PM

I think that's a good move painting that in. I had to do the same on the chequered nose of my Fw 190 and it worked rather well, i was concerned it would not blend in.

I am a Norfolk man and i glory in being so


On the bench: Airfix 1/72nd Harrier GR.3/Fujimi 1/72nd Ju 87D-3

  • Member since
    April 2013
Posted by SchattenSpartan on Wednesday, February 12, 2014 4:49 PM

The decals are printed in pure, normal black, so I can use any black paint I have to repair them if some of the black gets scraped off (very easy to do) or if I have to cut the decal apart like i did with this one. I just hope a thin coat of Alclad clear is enough to stop the masking tape from ripping off the decals...

  • Member since
    April 2005
Posted by Thunderbolt379 on Wednesday, February 12, 2014 5:07 PM

SS -- that's a fiersome piece of work and you're handling it like a pro! I'd de-gum the masking tape to a very high degree, it just needs to hang on their long enough to work once! It'll be a tremendous model when finished! I just remembered, I have these markings in 1:72 somewhere in my stash, I could use them on an Academy razorback. If memory serves, they're an old sheet by Ventura of New Zealand, so I have no clue as to their quality. I have crosses and swastikas on AM sheets, all I really need are the serials... That might be a good project for the future, and I'll certainly use your approach to the paintwork as a steer!

Cheers, Mike/TB379

http://worldinminiature.blogspot.com/

  • Member since
    April 2013
Posted by SchattenSpartan on Thursday, February 13, 2014 3:11 AM

Thanks Mike!

I'm glad my pics of the painting progress are uf use!

  • Member since
    November 2003
  • From: Naples, FL
Posted by tempestjohnny on Friday, February 14, 2014 10:27 AM

Gloss coat on last night decals this weekend.


  • Member since
    April 2013
Posted by SchattenSpartan on Friday, February 14, 2014 2:55 PM

All decals are on and sealed now. I have to let the Alclad clear dry before I can touch up the wing crosses though. more pics tomorrow evening or on Sunday.

  • Member since
    December 2003
  • From: Charleston, SC
Posted by sanderson_91 on Friday, February 14, 2014 9:19 PM

Decals are looking really good Clemens!  

Hoping to finish up the 88 this weekend.


  • Member since
    November 2003
  • From: Naples, FL
Posted by tempestjohnny on Saturday, February 15, 2014 6:17 PM

Getting closer


  • Member since
    December 2003
  • From: Charleston, SC
Posted by sanderson_91 on Saturday, February 15, 2014 6:30 PM

Wow, that's looking sweet!


  • Member since
    April 2013
Posted by SchattenSpartan on Saturday, February 15, 2014 6:48 PM

Yeah, looking great John!

I finished painting the black areas of the crosses and I'll remove the masiking tape now. I just hope it doesn't pull any of the decals off. I'll post some pics tomorrow.

  • Member since
    April 2013
Posted by SchattenSpartan on Monday, February 17, 2014 4:37 PM

Hey guys!

I didn't forget about this GB, but I ran into a lot of trouble with those AM decals. I did mention how much I hate said decal set already, but my hatred reached new heigths today. I had to do some touch-up work on the left fuselage side, so I lightly placed a strip of de-tacked Tamiya tape to protect the decals. Well, guess what happened: The tape ripped one of the decals off. The K in the fuselage code came right off, so I had to make a new one. I simply took a black decal (an unused Balkenkreuz) and used it to cut 3 small strips. Then I placed them on the model one by one to create the new K. Whlie I was at it I decided to replace the K on the right fuse side as well (the printing quality on that one was really bad). I think they look quite good. Now I have to touch up some more OD (the Micro-sol ate through the fresh paint in a few spots). On my next German Jug (and there will be a next one - the sister of this beauty I'm building here) I'm going to use some masks instead. They are probably cheaper and definitely a whole lot easier to work with.

  • Member since
    April 2005
Posted by Thunderbolt379 on Monday, February 17, 2014 4:53 PM

Darn! Don't you hate it when you have to keep going back and fixing things? Fortunately I don't think I've had that happen, but I guess it's out there waiting for me! I keep knocking bits off, and managed to paint some separate flaps the wrong colors on each side... Hang in there, she'll be done soon!

M/TB379

http://worldinminiature.blogspot.com/

  • Member since
    April 2013
Posted by SchattenSpartan on Tuesday, February 18, 2014 8:45 AM

I'll spray another coat of Alclad clear on the whole model today. The huge amounts of Micro-sol I had to use on the AM decals damaged the clear coat, so I have to smooth things out again. I'll spray some Light Sheen instead of the pure Gloss because it dries way faster and the Flory wash will stick to it a bit better, resulting in a dirtier finish. I'll try to get the washing on tomorrow and the model should be finished this Weekend or next week (provided those decals don't come off again)

  • Member since
    April 2013
Posted by SchattenSpartan on Tuesday, February 18, 2014 3:06 PM

The Alclad Light Sheen has cured by now and I really like the way it sprayed. It produced a nice, almost-glossy finish, jsut the way I like it. There is one problem though:

I'm utterly impressed on how incredibly bad the LF-Model decals are. They are just absolutely, positively, without any doubt the biggest piece of Censored I've worked with untill now. Believe me, I tried to put it lightly, but it's not possible for me. Here's what I dislike about them:

  • they are badly printed in several areas (I managed to sort that out)
  • the paint goes off as soon as you look at them funny
  • you have to cut them out because the carrier film is not pre-cut (which is a major paint in the rear with the paint chipping issues)
  • The larger decals need at least 10 applications of Micro-sol to settle down properly which tends to damage uderlying paint
  • the more delicate decals desintegrate the second you remove them from the decal sheet

All those problems are really frustrating (especially if combined), but I was able to solve all of them one way or another.

Now there's a new problem that just popped up:

THE DAMN DECALS WRINKLE LIKE MAD AS SOON AS ANY CLEAR COAT EVEN COMES NEAR THEM!!!! Bang Head  Bang Head  Bang Head  Bang Head  Bang Head  Bang Head  

I just sprayed the model with the Alclad clear When I looked at it a few minutes later, I noticed that every single Balkenkreuz decal has wrinkled. All of them!!! I am absolutely sure it's not the Alclad clear itself that caused this. All the Tamiya decals are perfectly fine and show no damage or silvering at all. They look really good. The AM decals however look like crap now. I'll post a few pictures later tonight. Is there any possible way of saving this model? I hope the wrinkling disappears as soon as the Alclad clear coat is dry, but I don't think this is going to happen.

I'm just extremely frustrated right now, so any help is much appreciated. I jsut don't know what to do anymore as I'm running out of ideas to solve my decal problems. Crying

  • Member since
    April 2013
Posted by SchattenSpartan on Tuesday, February 18, 2014 3:16 PM

I just realized that I could've saved some money, my sanity and a lot of problems by simply not using any AM decals for this build at all.

Just a short list of the decals I didn't use:

  • Swastikas
  • one "F" and 2 "K"s on the fuselage

And a list of the decals I nearly destroyed that require lots of touch-up work:

  • the 2nd "F" on the fuselage
  • "9" on the lower wing area
  • "K" on the lower wing area
  • "T" on the lower wing area

A list of all the decals I had problems with:

  • "F" on the lower wing area (ripped into 3 pieces as soon as I slid it off the backing paper)
  • crosses on the lower wing surfaces
  • fuselage crosses

The only decals I had no problems of any kind with were:

  • upper wing crosses
  • tiny white "T" and "9" on the fuselage
  • "fuel-type-triangle-thingies" on the nose (indicating the fuel used)

Maksing all those things with generic Tamiya tape cut to shape and using some small number decals would've been a lot easier and cheaper.

I'll never even think of buying LF-Model Decals again and I can only advice you to do the same. Angry

Rant over...

Sorry guys, but I had to let off some steam. It's just way too frustrating ATM...

Cheers, Clemens

  • Member since
    April 2013
Posted by SchattenSpartan on Tuesday, February 18, 2014 3:26 PM

  • Member since
    April 2005
Posted by Thunderbolt379 on Tuesday, February 18, 2014 9:26 PM

GRRRRRRRRRRRR -- after all the hours of labour you've put into this, to have that happen at the last is frustrating beyond words. My advice, if they don't settle with drying (which I doubt too) is lift them off with tape, lightly sand the paint and repair the surface with a mist coat, then order up some crosses from TechMod or steal some from an AeroMaster or Microscale sheet. It would be very easy to be totally browned off with this and set the model aside, I know I would be!

M/TB379

http://worldinminiature.blogspot.com/

  • Member since
    December 2003
  • From: Charleston, SC
Posted by sanderson_91 on Tuesday, February 18, 2014 9:35 PM

Man, that really sucks!!!  I had the Alclad clear gloss come off using windex.  Maybe try a cotton bud dipped in windex and rub it over the decal?  Then try some Micro sol/set to get the wrinkles out?    

Steve


  • Member since
    April 2013
Posted by SchattenSpartan on Wednesday, February 19, 2014 11:22 AM

Mike, Steve: Thanks a lot for your suggestions. I'm afraid neither of them is going to work though.

I can't rip the decals off using Tape. I tried it several times but the Alclad clear seald them perfectly. (major kudos to Alclad at this point BTW, that stuff is really tough)

I can't use Windex either because of my painting process:

  • Mr.Surfacer
  • Gunze RLM66 and Black Gray for preshading
  • Gunze RLM04/Olive Drab
  • Alclad Clear Kote
  • Alclad Light sheen 

Every single one of the paint layers can be removed with the same solvent, so If I try to remove the final coat of Alclad clear, the solvent is going to eat through all the paint layers creating a horrible mess.

I think I found a solution though. My LHS had some Tamiya sandpaper in stock, so I grabbed the set with the finest grit they had (1200, 1500, 2000). I maksed the area around the cross that was damaged the most and started sanding the surface with the 1500 grit paper. I applied as little pressure as possible and after roughly 15 minutes I managed to even the surface out. then I smoothed it out a bit more with 2000 grit paper. It's looking good so far IMO.

Here's what the cross looks like:
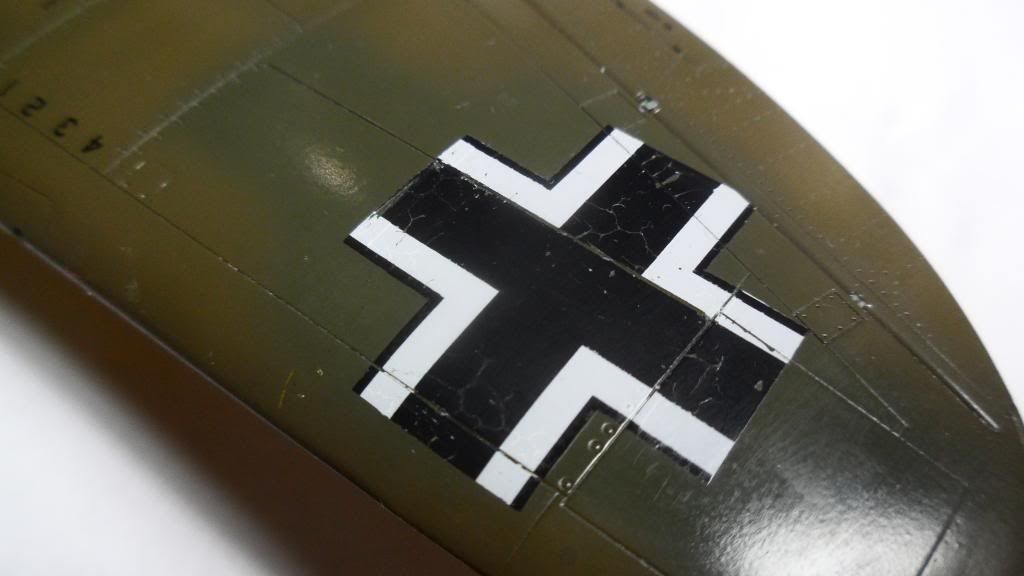
The ares where I sanded the wrinkles down need some touch-ups with black paint (those little "cracks" in the decals)

I originally planned on sealing the decals again with another coat of Alclad Clear after doing the touch-ups, but I'm afraid the same thing is going to happen, so I'll just polish the surface of the decal a bit before applying the Flory washing. I tested the spare decals (one of the partially destroyed swastikas) on a piece of plastic sheet and I noticed that Alclad's Maate Clear doesn't harm them as long as you only spray a misting layer, let it cure and then spray the next one, slowly building up the flat finish.

  • Member since
    April 2005
Posted by Thunderbolt379 on Wednesday, February 19, 2014 4:36 PM

It's an odyssey of experimental technique, Clemens, but you're weathering the storm, and I'm impressed by your dedication to finding a way to make the materials behave! I think you'll get there soon!

M/TB379

http://worldinminiature.blogspot.com/

  • Member since
    December 2003
  • From: Charleston, SC
Posted by sanderson_91 on Wednesday, February 19, 2014 7:55 PM

Clemens, that's a nice save on the decals!  

Applied a coat of Alclad Matte Kote to the 88 tonight.  Considering this one done!  All I need to add is the antenna wire, once my order of E-Z line comes in.  Once the clear coat is dry, I will take some final photos.

Steve


  • Member since
    November 2003
  • From: Naples, FL
Posted by tempestjohnny on Friday, February 21, 2014 5:53 AM

Update on the 129. Should have it wrapped up in the next couple of days. Got some silvering on some of the decals. Kit decals way to thick. Will post pics.  John


  • Member since
    April 2013
Posted by SchattenSpartan on Friday, February 21, 2014 4:37 PM

I sanded all the decals smooth today and I'll do the touch-up work tomorrow. Then I can (finally!) start the weathering. I'm thinking of ordering me some resin wheels, but the kit parts look quite nice actually and I don't think the replacements are going to arrive in time (I want to take her to a show in 2 weeks).

  • Member since
    November 2003
  • From: Naples, FL
Posted by tempestjohnny on Friday, February 21, 2014 5:38 PM

Have put 35 hours at work in the last 3 days.  Rough figures I have walked 50+ miles in the last 3 days. I'm exhausted and getting way to old for this.


  • Member since
    December 2003
  • From: Charleston, SC
Posted by sanderson_91 on Sunday, February 23, 2014 8:50 AM

Ok, so here are the photos of the finished model.  It just needs the antenna wire.  This was a fun build without any real issues, other than those of my own making. 

Steve


JOIN OUR COMMUNITY!

Our community is FREE to join. To participate you must either login or register for an account.

SEARCH FORUMS
FREE NEWSLETTER
By signing up you may also receive reader surveys and occasional special offers. We do not sell, rent or trade our email lists. View our Privacy Policy.