SEARCH FINESCALE.COM

Enter keywords or a search phrase below:

Longest Day GB

265292 views
2863 replies
1 rating 2 rating 3 rating 4 rating 5 rating
  • Member since
    September 2003
  • From: AandF in the Badger State
Posted by checkmateking02 on Sunday, July 20, 2014 5:51 PM

Thanks for the sympathy, stik.  Crying

I applied the decal potion a little thicker, and it seemed to hold things together better.  But--solve one problem and another crops up.  The stuff didn't level too well, and left a few bumps and ridges here and there.  Sad  I perceive this will take some finesse.

Still, it's working at least, and I got the stars and bars attached without losing any.

Time for a reward.  Beer


  • Member since
    July 2004
  • From: Sonora Desert
Posted by stikpusher on Sunday, July 20, 2014 6:28 PM

Lol! Good idea!


F is for FIRE, That burns down the whole town!

U is for URANIUM... BOMBS!

N is for NO SURVIVORS...

       - Plankton

LSM


GAF
  • Member since
    June 2012
  • From: Anniston, AL
Posted by GAF on Sunday, July 20, 2014 7:08 PM

Stik> That turned out great! Congratulations on the prize win.  Smile

CMK>  Decal problems?  I can sympathize!  They very nearly did me in.  Good luck on getting the rest done!

Gary

  • Member since
    November 2009
  • From: SW Virginia
Posted by Gamera on Monday, July 21, 2014 9:30 AM

CMK02: Decals- grumble... been there, done that, got the T-shirt...

"I dream in fire but work in clay." -Arthur Machen


  • Member since
    September 2003
  • From: AandF in the Badger State
Posted by checkmateking02 on Monday, July 21, 2014 9:12 PM

Here are the results of decaling the props.  Turned out OK, in spite of the "issues."  They didn't come with a T-shirt.  Devil


  • Member since
    September 2003
  • From: AandF in the Badger State
Posted by checkmateking02 on Monday, July 21, 2014 9:25 PM

I had a spare "Aries" decal sheet from a less-than-successful attempt at this aircraft more than ten years ago (this must be a jinx kit). 

I went through both sheets getting the squadron codes on.  Mostly, it was the edges of the image that continued to flake and shatter, in spite of MicroScale's decal potion.  Eventually, I cut around the image a little farther out, and that seemed to fix the problem.  Finally accomplished it, and will stop messing with it cuz it's as good as it's gonna get.


And since misery loves company, I'm glad I'm not the only one that has issues with decals.  Ick!


  • Member since
    November 2009
  • From: SW Virginia
Posted by Gamera on Tuesday, July 22, 2014 7:39 AM

CMK02: What you've got so far looks fine in the photos. I have an issue with getting all those prop decals lined up at the same place on the blade and then AFTER they're dried finding one has slid or maybe I measured wrong or something and some of them are off...

"I dream in fire but work in clay." -Arthur Machen


  • Member since
    September 2003
  • From: AandF in the Badger State
Posted by checkmateking02 on Tuesday, July 22, 2014 9:07 AM

Thanks, Gamera.  I know what you mean; and the tendency to either slide around or stick fast the minute you put them down seems to vary with the decal manufacturer.

One thing I've tried is to punch a hole in a piece of paper, insert the prop shaft so the prop lies flat, then make one measurement and mark it..  Then you can rotate each blade to that mark and apply the decal.

It has the advantage of getting the decal in the same location on each blade, or approximately so..

This time, I confess to using the eyeball method.  


  • Member since
    December 2002
  • From: Bury St Edmunds, Suffolk, England
Posted by Bish on Tuesday, July 22, 2014 9:19 AM

Looking really nice there Check. Add me to the list of people who have problems with prop decals.

I am a Norfolk man and i glory in being so


On the bench: Airfix 1/72nd Harrier GR.3/Fujimi 1/72nd Ju 87D-3

  • Member since
    September 2003
  • From: AandF in the Badger State
Posted by checkmateking02 on Tuesday, July 22, 2014 12:37 PM

Thanks, Bish.  It's always demoralizing to get to the decal stage, and then have them act up,  Good thing for after-market replacements.

Speaking of which, I bought the Kits-World sheet for "Aries," then noticed today that that aircraft number is different from the one included with Academy's kit--although the nose art is the same.  K-W is left; Academy is on the right.

So I did some research on the net and found that there were apparently two "Aries."

Here is noseart for 42-52765 which is the number included with the kit.  Using this number, the nose art would be wrong.  But the window doesn't look like this is a B-24H, and the window is covering up the "A."

Here is 42-52693 which carried the nose art included on both sheets.  The nose window is obviously different from 765.  Plus, the barely visible mission markings seem to indicate that this plane flew at least eight missions before this noseart was completely finished.

The information on the net is conflicting.  According to www.usaaf-noseart.co.uk 765 flew her first mission on 7 May, 1944 and her final combat mission on 17 July,1944.

According to www.extreme3d.wordpress. com, Sgt. Phil Brinkman painted the noseart for 693 in April, 1944.

None of the Zodiacs were lost on missions, so why there were two sets of noseart carried on two planes, both reportedly marked "2S-O?"

On top of that, the group letter for the 486th Bomb Group is an "O" on a white background.  Academy's sheet has the background as a white square; Kits-World has it has a white rectangle.

It's a little late now to do anything about it, but I'm wondering what "Aries" really looked like during the D-Day time-frame.


  • Member since
    December 2002
  • From: Bury St Edmunds, Suffolk, England
Posted by Bish on Tuesday, July 22, 2014 2:22 PM

O the joy of decals and companies getting them wrong. It sound as if Kits world has messed up in the shape of the background, it should defiantly be a square, there were no rectangles.

Did you check the 486th BG site. I had a look and they list the serials of their aircraft. There is no mention of 765, but there is a 693. Theres a pic of the aircraft in flight and one of a model.

693 is number 54 on this page. Go to page 2 and there is no 765.

http://www.486th.org/Photos/AC1/Aircraft.htm

And this is the model.

http://www.486th.org/Photos/AC6/Aries1.htm

There is several pages. And if anyone should know, I imagine it should be these guys.

I am a Norfolk man and i glory in being so


On the bench: Airfix 1/72nd Harrier GR.3/Fujimi 1/72nd Ju 87D-3

  • Member since
    December 2002
  • From: Bury St Edmunds, Suffolk, England
Posted by Bish on Tuesday, July 22, 2014 2:30 PM

And something else I found, the 486th only arrived in the UK in March 44, therr first mission was on 7th April In July they switched to B-17's, I thought it was odd to see a Suffolk based B-24. So I can't imagine the aircraft would have changed a great deal in 4 months.

I am a Norfolk man and i glory in being so


On the bench: Airfix 1/72nd Harrier GR.3/Fujimi 1/72nd Ju 87D-3

  • Member since
    September 2003
  • From: AandF in the Badger State
Posted by checkmateking02 on Tuesday, July 22, 2014 2:50 PM

I did check the 486th website, Bish.  It only mentioned 693, as you say.  I was also checking to see if I could find out how many missions "Aries" flew before 6 June.  Still looking.  The site seems to list missions by crew, rather than by aircraft.  Earl McCabe's crew flew "Aries" for six missions before D-Day, so I suppose she should at least carry six of the markers.

Still looking around the net, I found this on ebay:
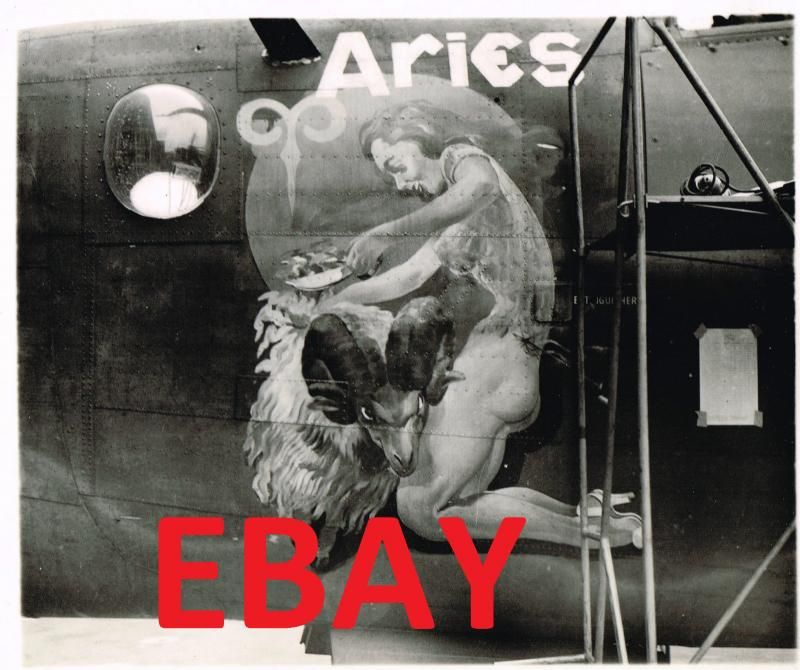
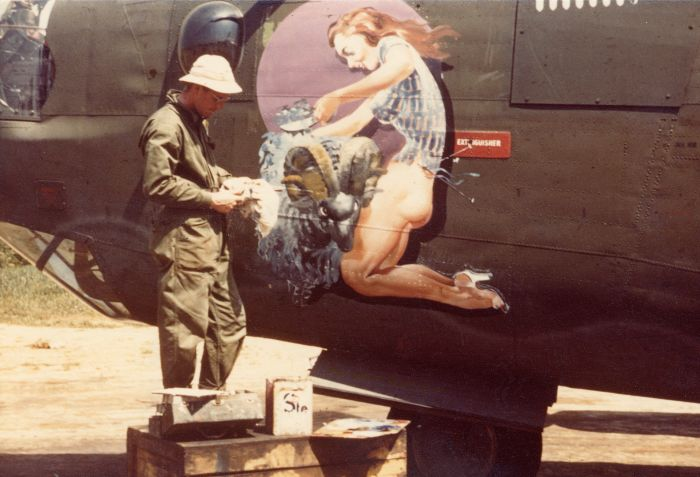
The nose art looks finished to me, but there are no mission bombs painted on the cockpit armor, visible at the upper right.

In contrast, again, is this photo showing Sgt. Brinkman at work--with the mission bombs clearly visible.
As far as the group "O" goes, I opted to go with the white square, since it obviously appears in photos.  Of course, that still means messing with MicroScale's decal potion.  So far, the wing insignia went on OK; that only leaves the two on the vertical stabilizers. 
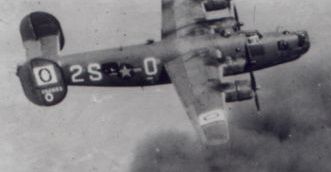
Interesting, too, in the above-photo are the long exhaust stains on the port wing, and the shorter ones evident on the starboard wing.  Apparently the rubber de-icer boots were left on the vertical stabilizers but removed on the wings and horizontal stabilizer. 

I applied the nose art decal today, and K-W's interpretation looks much superior to Academy's (done by Scale-Master, so the sheet says).

Making progress, anyway:  built the landing gear, painted the nose and tail turrets and the bomb bay doors, so if nothing goes wrong again I should finish up soon.


  • Member since
    December 2002
  • From: Bury St Edmunds, Suffolk, England
Posted by Bish on Tuesday, July 22, 2014 3:04 PM

I saw that last pic on the 486th site but had not noticed the staining, that is a bit odd.

Did crews tend to stick to the same aircraft, that was the impression I was under. I thought the aircraft would then go to a new crew when the previous one had completed their tour.

I have checked by B-24 books, but I have nothing on Aires. I think its going to be a case of making a best guess. I think 6 mission bombs would be about right.

I am a Norfolk man and i glory in being so


On the bench: Airfix 1/72nd Harrier GR.3/Fujimi 1/72nd Ju 87D-3

  • Member since
    September 2003
  • From: AandF in the Badger State
Posted by checkmateking02 on Tuesday, July 22, 2014 5:12 PM

I also thought the crews stuck to one assigned aircraft, but since reading your post I went back to looking through the crew missions.

"Aries" was flown by Lt.  van Camp's crew on 27 and 28 May, 1944, between missions flown by McCabe's crew (on 24 and 31 May).  Lt. Barker's crew flew her on 16 and 17 June; Lt. Hilfinger's crew flew her on 27 June, 1944--which are both out of the time frame, so that doesn't really matter.

So--if McCabe's crew flew six missions before D-Day, and van Camp's crew flew two, that should make eight mission markers before 6 June.

This is starting to hurt my head, so I think I'll go with eight mission markers, then leave it alone.  Kits-World conveniently included some decals for them.


  • Member since
    December 2002
  • From: Bury St Edmunds, Suffolk, England
Posted by Bish on Tuesday, July 22, 2014 5:38 PM

I guess its possible the other crews plane's were unserviceable, and for some reason McCabes were rested or something.

I don't think I would get to stressed over it. You can only go so far, and then just have to make a decision. I don't think you will be excluded from the GB if it is later shown your mission marks are not 100% correct.  

I am a Norfolk man and i glory in being so


On the bench: Airfix 1/72nd Harrier GR.3/Fujimi 1/72nd Ju 87D-3

  • Member since
    April 2006
  • From: ON, Canada
Posted by jgeratic on Tuesday, July 22, 2014 7:02 PM

Checkmate - I think whatever it is you chose decal wise, it will look great.  It is a bugger when the information is out there in bits and pieces.

It does seem there were two aircraft named Aries.  The one with the lone  ram artwork seems to have been renamed RAM IT DAMMIT at some point, according to this site;

http://www.b24bestweb.com/aries-v2-1.htm

regards,

Jack

  • Member since
    July 2004
  • From: Sonora Desert
Posted by stikpusher on Tuesday, July 22, 2014 7:08 PM

Yes crews usually, but not always flew the same aircraft. For example, Flak Bait's normal (and third) crew was bumped out of her so the Group commander could fly her for her milestone 200th mission. But usually the reasons are more mundane. The crew may be on leave or pass, or some reason of rank and mission number seniority. Another not so well known example of not using the crews assigned aircraft are both Enola Gay and Bock's Car. Both were flown on their Atomic Bomb missions by pilots who were not regularly assigned to them. The Enola Gay nose art was added just prior to that mission at the direction of Col. Tibbets, and really upset her normally assigned aircraft commander. That was "his ship" and not Col. Tibbets assigned mount.


F is for FIRE, That burns down the whole town!

U is for URANIUM... BOMBS!

N is for NO SURVIVORS...

       - Plankton

LSM


  • Member since
    September 2003
  • From: AandF in the Badger State
Posted by checkmateking02 on Wednesday, July 23, 2014 10:25 AM

It appears the Academy people didn't do their homework, either.  Thanks for the link Jack.  I see that the alternate "Aries" was assigned to the 44th BG.

Thanks also for the info, Bish and stik.  I'll proceed as planned, and will post some more progress photos later today.  Had a little trouble with the nose and tail turrets I need to see to.


  • Member since
    December 2002
  • From: Bury St Edmunds, Suffolk, England
Posted by Bish on Wednesday, July 23, 2014 10:33 AM

Clearly that did do their research. they must have seen the markings and thought Zodiac, it must belong to the 486th.

That other Aires, it joined the 44th, BG in Nov 44, several months before the 486th came over, so I am guessing this was the first one. then when the Zodiac Sq came over and had their Aires, they renamed the first one. That seems the most logical explanation to me.

I am a Norfolk man and i glory in being so


On the bench: Airfix 1/72nd Harrier GR.3/Fujimi 1/72nd Ju 87D-3

  • Member since
    September 2003
  • From: AandF in the Badger State
Posted by checkmateking02 on Wednesday, July 23, 2014 1:34 PM

Sounds plausible, Bish.  From what I've found, artist Sgt. Brinkman had some different designs.  There were apparently two for "Leo," and "Taurus" was never finished, so maybe the lone ram was his first concept.  Interesting historical digression, anyway.

Here's the Martin top turret.  There was originally a flange at the bottom of the solid piece, intended to sandwich the assembly between the fuselage and hold it in place.  I filed it off, and will just drop it in place.  It didn't fit well anyway. 

And the ball turret.  I'll have to glue this into the fuselage, since the bracket inside the fuselage broke once the fuselage was closed up.  It fell out, and defied my efforts to replace it. 

Looks like sanding dust got stuck inside.  I'll try blowing it out with my compressor--but then, maybe it's imperfections in the clear molding.  Didn't notice it until looking at the photo.

The main wheels.  I've already installed the nose wheel.

And the engine nacelles.

Currently working on the nose and tail turrets.  They'll be kind of unsightly, since they are each split in two pieces from side to side, right through the clear areas. 


  • Member since
    November 2009
  • From: SW Virginia
Posted by Gamera on Thursday, July 24, 2014 9:06 AM

CMK02: Again, very nice work there. I hate it when I cement something together and find sanding dust inside where I can't reach it so I hope it's not that.

Interesting facts about the two Aries, I had no idea. I think I'd mentioned building the same kit as Virgo for the pilot of that aircraft some years back. Sucks that he passed away a few weeks before I finished her. I found the photos the other night- will have to see about posting them over in the dio section.

"I dream in fire but work in clay." -Arthur Machen


  • Member since
    September 2003
  • From: AandF in the Badger State
Posted by checkmateking02 on Thursday, July 24, 2014 3:54 PM

Would that have been Lt. Charlie McGill?  The 486th BG website lists him as pilot of "Virgo." for 11 missions.  He must have had some stories to tell.

I for one would like to see the photos of your build.

Flat-coated the fuselage and wings today; applied some powdered pastel for engine exhaust staining; worked on the nose and tail turrets; painted de-icer boots on the rudders.

Not much substance there for photos, but the day is still young.


  • Member since
    December 2002
  • From: Bury St Edmunds, Suffolk, England
Posted by Bish on Thursday, July 24, 2014 4:02 PM

gamera, I hope you can find those pics. Do you still have the build.

I am a Norfolk man and i glory in being so


On the bench: Airfix 1/72nd Harrier GR.3/Fujimi 1/72nd Ju 87D-3

  • Member since
    September 2003
  • From: AandF in the Badger State
Posted by checkmateking02 on Thursday, July 24, 2014 7:32 PM

Some progress photos. 

I unmasked the windows, and managed to dislodge the astrodrome.  Also pulled up some paint on the cockpit canopy frame.  In the process of fixing both.  I could make progress if it weren't for all the repair work. Bang Head


  • Member since
    July 2004
  • From: Sonora Desert
Posted by stikpusher on Thursday, July 24, 2014 7:34 PM

Getting real close there now CMK


F is for FIRE, That burns down the whole town!

U is for URANIUM... BOMBS!

N is for NO SURVIVORS...

       - Plankton

LSM


  • Member since
    September 2003
  • From: AandF in the Badger State
Posted by checkmateking02 on Thursday, July 24, 2014 9:26 PM

Yeah, stik; I even got the wings attached after posting those photos.  


  • Member since
    November 2009
  • From: SW Virginia
Posted by Gamera on Thursday, July 24, 2014 10:37 PM

CMK02: I know what you mean about one step forward and one step back. Still the nose art and the clear parts look great!

Guys, yes Charlie McGill was the pilot, only met him once when I started work on the B-24, sadly he passed away before I finished it. I found the photos but they're a little blurry. I posted them over in the Diorama section.

Link

"I dream in fire but work in clay." -Arthur Machen


  • Member since
    February 2014
  • From: Michigan
Posted by silentbob33 on Friday, July 25, 2014 7:39 AM

Looking good CMK. I almost always get little "dings" here and there when I unmask.  And it seems like with every other  project I break something major off.  I think the decals look great despite the problems you've been having.

On my bench: Academy 1/35 UH-60L Black Hawk

  • Member since
    September 2003
  • From: AandF in the Badger State
Posted by checkmateking02 on Friday, July 25, 2014 9:31 AM

Thanks, guys.  I have hopes to finish things up this weekend.

Bob, I know how that goes.  One of the things to contemplate during building is what to add when--so I don't knock something off, especially when it's impossible to put it back on.

Gamera, the dio of Virgo looks great.  Just had a look at it.  Good motivation to get Aries finished.

Where did you get the figures from?  There never seems to be much available out there in 1/72.


JOIN OUR COMMUNITY!

Our community is FREE to join. To participate you must either login or register for an account.

SEARCH FORUMS
FREE NEWSLETTER
By signing up you may also receive reader surveys and occasional special offers. We do not sell, rent or trade our email lists. View our Privacy Policy.