SEARCH FINESCALE.COM

Enter keywords or a search phrase below:

Japanese Group Build Part III

90123 views
946 replies
1 rating 2 rating 3 rating 4 rating 5 rating
  • Member since
    January 2010
Posted by johnsan on Tuesday, March 25, 2014 9:25 AM

Sorry, Gamera. You shouldn't have to ask.

Platz & 72nd.

  • Member since
    October 2008
  • From: italy
Posted by bsyamato on Tuesday, March 25, 2014 10:46 AM

bsyamato

Jack i used a mix of 19 bright red with a micro add of yellow as i remember , unfortunalely i painted them after silver/mix coat.

Johnsan, not yet decided about the sonia scheme.. so many to choose :) from the decal sheet i think will use only the hiniomaru

.. forget the Brand, i used only humbrol enamels for the Claude Embarrassed

  • Member since
    November 2009
  • From: SW Virginia
Posted by Gamera on Tuesday, March 25, 2014 11:42 AM

Johnsan, sorry didn't mean to be picky- just like to have a list of scale and company at the beginning if anyone wants to buy the same kit you used.

Updating you now- I've heard a lot of good reviews of Platz kits, I'm looking forward to seeing her built up.

"I dream in fire but work in clay." -Arthur Machen


  • Member since
    January 2010
Posted by johnsan on Tuesday, March 25, 2014 5:51 PM

No need for apologies, Gamera. I should have noted the kit and scale. I hope I didn't appear touchy.

  • Member since
    November 2009
  • From: SW Virginia
Posted by Gamera on Tuesday, March 25, 2014 8:27 PM

johnsan

No need for apologies, Gamera. I should have noted the kit and scale. I hope I didn't appear touchy.

Oh no not at all, we're all friends here!

"I dream in fire but work in clay." -Arthur Machen


  • Member since
    January 2010
Posted by johnsan on Tuesday, March 25, 2014 9:45 PM

The Platz kit is very good; the best T-33 in any scale. It captures the shape well, again better than any other kit out there. Lockheed had a very distinctive rudder shape. Platz nailed this. Sword has a better detailed cockpit with their resin insert, but misses shape. Heller is chunky and misses shape. Hasegawa's ancient kit, one of their very first 72nd kits, is pretty good regarding shape. It is old, the molds are very tired, and it lacks detail. Still I rate it over both Heller and Sword.

I don't really follow 48th. I know only of the Academy/Hobbycraft kit. I hear it's shape is somewhat lacking.

In 32nd,  Squadron released one tooled by CMK. As CMK and Sword are from the same family, I suspect the errors with the 72nd are probably present with the 32nd. TBH, I haven't seen the CMK kit, so my comment is conjecture and I may be totally wrong on this. If so, I offer my apologies to Squadron and CMK.

All that said, Platz' kit is not without its problems. I rate them as minor. Others may disagree. First the panel lines are a bit soft. Fit is a bit iffy, but nothing that can't be improved with some minor shimming. Platz kit is the only T-33 kit that actually attempted to present the glove vanes at the leading edge of the wing next to the fuselage. All the other kits provide red decal to represent these. Unfortunately, Platz ends these at the wing when in actuality these continue on to the wing fuselage fairing. Just outboard of the vane, Platz placed a square shape. This should be sharp. So all easy fixes.

Positives for this kit include Cartograf decals, great shape, decent detail with the option of adding photo etch from both Platz and Eduard, and really good engineering. Platz especially did well with the intakes.

I started this kit when it was first released, but stopped soon with a medically forced hiatus from modeling. So I'm picking up where I left off: This is the last photo I took when I left off:

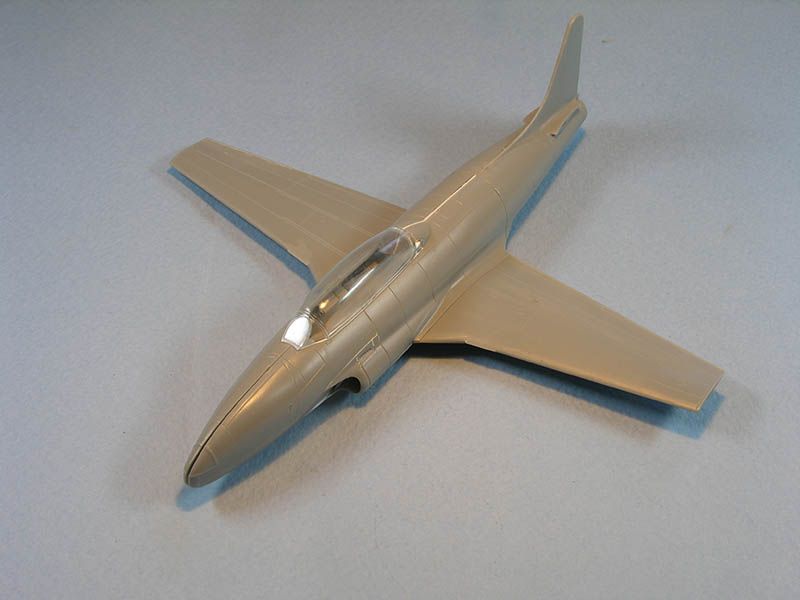
This just shows the parts pieced together to test fit after adding a shim aft of the cockpit topside. The wings are glued together. The aft fuselage is together. The cockpit has been started with some paint and some photo etch added. The forward fuselage is still in parts. Some of the molded on detail needs to be sanded back a bit. Construction is about a third done.

  • Member since
    November 2009
  • From: SW Virginia
Posted by Gamera on Wednesday, March 26, 2014 8:09 AM

Hey thanks for the run-down on the kits! The closest thing I have is Monogram's old P/F-80 in 1/48th. The Platz kit looks and sounds like a winner.

"I dream in fire but work in clay." -Arthur Machen


  • Member since
    April 2006
  • From: ON, Canada
Posted by jgeratic on Thursday, March 27, 2014 3:47 PM

Guys, thanks for the comments, and I've decided to take the advice and make my own masks for the hinomaru's.   So went ahead and ordered this gizmo;

The smallest circle it can cut is 10mm, but after measuring the kit decal roundels, those on the fuselage are about 9mm.  I'm thinking once I have this device in my possession, if I can shave about half a millimeter total off the arms, I should be able to squeeze them closer together to arrive at the proper size.

Now the only question remains is which red paint to choose.  There was an interesting discussion over at hyperscale, dated 2010 which is the most recent I could find.  So I put this chart together, alongside Italeri colours.  Insignia red seems to be popular, and will likely go with that.

Of course, trying to save on shipping costs, I could only find one site that had both paints and the circle cutter.  Hobbylinc though won't ship across border to Canada, even by ground, and  these are acrylic!!  Just as well, they wanted $10 per bottle.  So the tool is ordered from Amazon.ca, and the paints from Spruebrothers, along with Tamyia's A6M2 Zero in 1/72.  Sigh... the stash shows no sign of dwindling.

regards,

Jack

  • Member since
    January 2010
Posted by johnsan on Thursday, March 27, 2014 9:37 PM

Most true reds will work. Depending on what I'm doing, I'll either use Mr. Color or Tamiya acrylic red. Sometimes tinted with a touch of brown or yellow. Depends on what I'm going for. So long as the reds match on the model and are not too brown, pink, or orange, you'll be ok.

I have that circle cutter (it looks like the Olfa one) and used it for the hinomaru on one of my Fujimi Claudes. I didn't bother with trying to get the circle to 9mm, but closed it all the way. It looks close enough. These days I just draw a circle to the proper size and cut it with my silhouette stencil cutter. This can either cut decal paper, Tamiya masking tape, vinyl, or frisket. Very handy.

  • Member since
    December 2004
  • From: Houston, Texas
Posted by panzerpilot on Thursday, March 27, 2014 11:26 PM

Jgeratic. That's a pretty neat gizmo. What do you plan on using for the masks? Frisket film? The italeri guards red seems to be the color on hasegawa tony decals I am finishing up. I messed up the prep a bit for those, so I bought some lifelike decals. There are about the same color. I do like the insignia red though!

-Tom

  • Member since
    April 2006
  • From: ON, Canada
Posted by jgeratic on Friday, March 28, 2014 1:23 AM

Johnsan - never heard of a stencil cutter available to the general public.  After looking it up, wow! That has to be very handy to have around when opting to create a unique set of markings.  

Panzerpilot - I think Tamiya tape should work fine for the masks.  I have a wide roll of the stuff, but seems a lot more sticky.    I'll have to rub it down and lift it a couple times to decrease the tackiness - would hate to lift up paint at this stage.  

As for the reds, I've got all three on order.  Whatever I don't use, will be useful for some Napoleonic and medieval figures in my grey army.  

regards,

Jack

  • Member since
    November 2009
  • From: SW Virginia
Posted by Gamera on Friday, March 28, 2014 8:53 AM

Hey Jack and Johnsan thanks for the tips on the tools guys!

The two shades in the NE corner look more right to me - I don't think you can go wrong with the Insignia Red there.

I thought about masking and painting my hinomaru but I'm still undecided if I'll try it or not. I've got a couple of sheets of nothing but hinomaru decals I picked up a few years ago.

"I dream in fire but work in clay." -Arthur Machen


  • Member since
    December 2004
  • From: Houston, Texas
Posted by panzerpilot on Friday, March 28, 2014 10:31 AM

Gamera. Does that sheet include 1/32? I found one for 1/48, but not 1/32. Do you remember where you got it?

-Tom

  • Member since
    November 2009
  • From: SW Virginia
Posted by Gamera on Friday, March 28, 2014 10:42 AM

They're all different sizes, some of the smaller ones would probably work for 1/72nd and the bigger ones for 1/32nd but it was probably marked 1/48th. I honestly can't remember the brand now though. I'll check for you once I get home.

"I dream in fire but work in clay." -Arthur Machen


  • Member since
    December 2004
  • From: Houston, Texas
Posted by panzerpilot on Saturday, March 29, 2014 12:28 AM

I'm done! Ki-61 Tony. 1/32 Hasegawa. What a good feeling it is to be done! Thanks for taking a look!...

-Tom

  • Member since
    December 2002
  • From: NYC, USA
Posted by waikong on Saturday, March 29, 2014 10:19 AM

Excellent, the camo over NMF really came out looking nice!

My website: http://waihobbies.wkhc.net


  • Member since
    April 2006
  • From: ON, Canada
Posted by jgeratic on Saturday, March 29, 2014 3:42 PM

Panzerpilot - that is a sweet build you have arrived at. Yes

A really eclectic build, with both a natural metal and camou finish, and even some chipping - nicely done!

regards,

Jack

  • Member since
    November 2009
  • From: SW Virginia
Posted by Gamera on Saturday, March 29, 2014 7:26 PM

Hey Panzerpilot- she's just gorgeous! Fantastic job I love everything about her!

Going to update the front page now, and of course if you don't like the photo lemme know and I'll change it out.

"I dream in fire but work in clay." -Arthur Machen


  • Member since
    November 2009
  • From: SW Virginia
Posted by Gamera on Saturday, March 29, 2014 7:35 PM

Oh btw that sheet of hinomaru is form Tech Mod and it's listed as 1/48th.

I bought it from Flightdecs Canada a couple of years ago but they don't have it listed now.

"I dream in fire but work in clay." -Arthur Machen


  • Member since
    October 2008
  • From: Georgia
Posted by Rigidrider on Saturday, March 29, 2014 9:57 PM

PanzerPilot... Outstanding!  Beautiful job all around!

When Life Hands You A Bucket Of Lemons...

Make Lemonade!

Then Sell It Back At $2 Bucks A Glass...

  • Member since
    January 2010
Posted by johnsan on Sunday, March 30, 2014 9:30 AM

PanzerPilot, that is a thing of beauty. Very nice.

  • Member since
    November 2009
  • From: SW Virginia
Posted by Gamera on Sunday, March 30, 2014 10:10 PM

Weeeeeeeellllllllllllllllllll, here's my results. Not sure how much I like it. I think what I've done with the hairspray technique seemed to look better, to me at least.

"I dream in fire but work in clay." -Arthur Machen


  • Member since
    January 2010
Posted by johnsan on Monday, March 31, 2014 6:31 AM

I have to confess having never tried the salt technique. The results I've seen don't appear very realistic to me, but I understand that many guys do like the look it provides. The problem as I see it, and again I haven't used this technique, is the wear doesn't look very realistic to me.

A few years back I tried several techniques using dissimilar paint types. Of course I tried hairspray and generally like it. I use it for more than just chipping to show metal. For chipping to metal, I think I like the scalpel technique better. It's certainly more controlled. 

This is Hasegawa's 72nd Oscar. It was painted silver using Tamiya enamel aluminum, barrier coated with Future, and sprayed very randomly with a Mr Color green. While the green was fresh, like maybe 30 minutes after spraying, I chipped the green using a #15 scalpel blade and a light touch. Chips can be removed with the desired shape and at the desired position. The black was Tamiya's acrylic black and was too fragile for chipping this way. Touch ups are easy though and actually look better. Corrections add depth to the finish. I really liked the appearance of the finished model.

A modeling buddy likes to use the masking tape technique when he wants massive chipping. Again, dissimilar paints, a barrier coat, and a fragile final color coat. He then wads high tack masking tape in a ball and presses the tape in a random pattern. He then sharply pulls the tape away. This leaves a nicely chipped surface. This works really well for a highly chipped subject, but it's not as controllable as using a scalpel. It is much quicker, though.

These days, I generally use hairspray and chip with a dry toothpick or an abrasive erase. The final coat paint adheres to the hairspray. The hairspray doesn't really adhere to the paint layer below. That is at least not initially. 

I also like the sand stick method. Here the top layer is abraded using a fine sanding stick. This really is more a wear technique, but it can also chip paint. This works better with another chipping method. Again,  we're talking depth of finish here. 

There are other methods as well. We all have ways we like best. I won't tell someone not to use salt if that  look is what they like. It just seems to have be random to me. 

  • Member since
    November 2009
  • From: SW Virginia
Posted by Gamera on Monday, March 31, 2014 11:23 AM

Hey Johnsan that looks good! I've never tried the scalpel, tape rip, or sand stick methods. So far I've liked what I've gotten with hairspray, I like how when you rub the paint it comes off the highpoints and front edges which seems more realistic to me. Plus I can just tap the brush on the areas of the model I want to chip more.  

"I dream in fire but work in clay." -Arthur Machen


  • Member since
    April 2006
  • From: ON, Canada
Posted by jgeratic on Monday, March 31, 2014 4:26 PM

Gamara - I think you succeeded with the salt technique, in as far as that method gives those exact results.  If you can link or post a period photo of the effect you are trying to replicate, I might be better able to comment

Johnsan - I like the look of that Oscar.  I think this is the paint peeling effect look? - something I read about briefly somewhere.  Sorry, I forget the particulars about why this happened to the finishes of Japanese planes.

------------------------------------------------------

This past weekend, I almost pulled the trigger on the red paint.  The compass circle cutter arrived Friday, but it would be Sunday afternoon before I found bench time for the masking.  I had discovered an old MM acrylic Insignia red in my basement.  It had the consistency of rubber, but I seemed to have been able to rejuvenate it with automotive lacquer thinner.  24 hours later though, as I was about to pour some in my airbrush cup, it had returned back to it's worthless state.

So while waiting on the Italeri Reds, I worked on the cowl.  I did add some speaker wire to the engine, but they don't stand out as much after painting them black.

regards,

Jack

  • Member since
    December 2004
  • From: Houston, Texas
Posted by panzerpilot on Monday, March 31, 2014 4:36 PM

Thanks for the compliments on my "Tony", folks. I especially enjoyed working with mottling and am thinking of using that scheme again someday on another type.

Gamera. looks pretty good. Have you applied a clear coat? What did you use for the Green?

Jack. Those insignia will look nice with the Italeri's. What color will you use?

-Tom

  • Member since
    January 2010
Posted by johnsan on Monday, March 31, 2014 5:06 PM

Gamera - I was also curious about which paints you used.

Jack - Can you get Tamiya acrylics? Their red is a very good match for fresh hinomaru red and can be easily tinted for wear. About the peeling, this is more true for IJAAF than for IJNAF planes. It also depends on when. IJAAF planes were often delivered unpainted and field painting was on unprimed surfaces. Until fairly late in the ware, IJNAF planes were factory primed and painted. As to peeling effect, I guess. It's more a matter of degree. The scalpel can be used for just removing small chips as on the Oscar wings or mass amounts as seen on the Oscar fuselage.

Looking again at Gamera's George, it  looks like the salt technique would be very useful for replicating paint shifting color after prolonged sun exposure like on wrecks, stored, or derelict aircraft.

  • Member since
    April 2006
  • From: ON, Canada
Posted by jgeratic on Monday, March 31, 2014 6:44 PM

Panzerpilot and Jonhsan, for the red I was planning on Insignia Red  FS 31136.

You know, I do have some Tamiya XF-7 flat red, but never considered it an option, at least not straight from the bottle, as I just don't want to make a mix that will end up sitting around for years on end.    Looking back a few pages, you have (as repeated here), advised on adding a bit of tint to it.  

I think I will try it, but I'm thinking will need to add some gloss as well, so the current surface will accept it.  I'm afraid it might crack since it is a flat base going over a shiny coat.   Trying to pinpoint an FS number for this Tamiya red, I couldn't find one.  Going to http://scalemodeldb.com/paint , I've found XF-7 and Insignia Red.  This will give me a better starting point of where I need to go with the Tamiya shade.

In comparison, the above colour site's rendition of 1136 has more green(43) and blue(37) than the Federal Standard's version, which has no blue at all, and green being only (23).  The values in brackets are those representing the RGB system.

I know, I know, just paint the damn thing - lol.    Alrighty, off to the paint booth.....

regards,

Jack

  • Member since
    January 2010
Posted by johnsan on Monday, March 31, 2014 9:16 PM

If you mix the Tamiya acrylic with lacquer and a bit of retarder and apply in very thin coats, you won't get cracking. Add a little brown to the mix. It doesn't need much.

Adding gloss isn't a bad idea. It will act as a retarder and will blend the paint better to the finish you have already. It'll also make it easy to add the numeral decals to the tail.

I'd be surprised if you found an FS match. Tamiya's red is matched to JPMA standard, like many of their other paints.

  • Member since
    November 2009
  • From: SW Virginia
Posted by Gamera on Tuesday, April 1, 2014 7:37 AM

Hey Jack that's one heck of a job masking. And I'd love to see more close-ups of the engine you wired there, I can see them a little bit there.

Guys, I used Tamiya XF-70 for the green, looks reasonably close to Kawanishi green to me. I was trying to replicate some of the beat-up Shidens in 'Genda's Blade' but mostly as a test subject for the salt masking technique. I pulled a little Alclad off the bottom of one of the stabs which I'm repainting now, after that I'll decide what I'm going to do.

"I dream in fire but work in clay." -Arthur Machen


JOIN OUR COMMUNITY!

Our community is FREE to join. To participate you must either login or register for an account.

SEARCH FORUMS
FREE NEWSLETTER
By signing up you may also receive reader surveys and occasional special offers. We do not sell, rent or trade our email lists. View our Privacy Policy.