SEARCH FINESCALE.COM

Enter keywords or a search phrase below:

Japanese Group Build Part III

90141 views
946 replies
1 rating 2 rating 3 rating 4 rating 5 rating
  • Member since
    April 2006
  • From: ON, Canada
Posted by jgeratic on Sunday, April 13, 2014 8:14 PM

A5M4 Claude is now done.

Wish there was better natural lighting to be had here in the great white north, but it continues to be cloudy day after day - at least it's not snowing.  I had to lighten up the pictures a tad in photoshop to make up for the overcast, but the final results are fairly close to what is seen with the natural eye.

regards,

Jack

  • Member since
    November 2009
  • From: SW Virginia
Posted by Gamera on Sunday, April 13, 2014 9:16 PM

Bsyamato: Just posted you to the front page!

Bob: Went ahead and put down your Zero while updating the front page. Take your time, no rush.

Jack: Wow, she's just gorgeous! Love how she turned out! Went ahead and posted you to the front page too, if you don't like the photo I used lemme know and I'll swap it out.

"I dream in fire but work in clay." -Arthur Machen


  • Member since
    October 2008
  • From: italy
Posted by bsyamato on Monday, April 14, 2014 4:00 AM

Thanx for comments guys :)

Top work Claude Jack Toast realistic look 

  • Member since
    October 2008
  • From: italy
Posted by bsyamato on Monday, April 14, 2014 10:08 AM

Just the Sprues of the sonia for now, alreday done some improvement work

As someone knows , this kit was original mould from mania, as you see the arrangment of details are different from usual hasegawa style. In these days Mania probably was a better brand than hasegawa (looking to the kate too that have in the stash)

no box for now, this kit was a part of a combo kit sent from a my friend, soon will send other decals for the version i wish to do... with some other kit Propeller

  • Member since
    April 2006
  • From: ON, Canada
Posted by jgeratic on Monday, April 14, 2014 4:39 PM

Gamera and Bsyamato, thanks!

Spoke too soon and had a dumping of snow today.  There was a moment of bright conditions, so took a few more shots and added/changed some to my gallery.

regards,

Jack

  • Member since
    January 2010
Posted by johnsan on Monday, April 14, 2014 6:17 PM

Jack - Nice!

Bsyamato - You're correct. When Mania released their kits (early 70's) they were the best kits around in any scale. The kits they released for the most part haven't been surpassed. (I'm excepting the 72nd Nate) and most haven't been done by anyone else since. It's apparent that they were influential with Hasegawa as it wasn't long after release of these kits that Hasegawa kits improved greatly. Mania's Sonia is still one of my very favorite kits and I've got several in the stash waiting their turn at the bench.

  • Member since
    December 2004
  • From: Houston, Texas
Posted by panzerpilot on Monday, April 14, 2014 7:45 PM

Bsyamato and Jgeratic...

Good work guys! Congrats!

-Tom

  • Member since
    October 2008
  • From: italy
Posted by bsyamato on Tuesday, April 15, 2014 4:07 AM

Thanx Panzerpilot :)

Well done the new pictures Jack, i really like the cowling looking. Wishing to get another one or two fujimi Claude :)

Johnson, never see the hasegawa/mania ki-27 but suspect that the Icm nate really rocks :) i build one for the first japanese GB

The works done on the Sonia

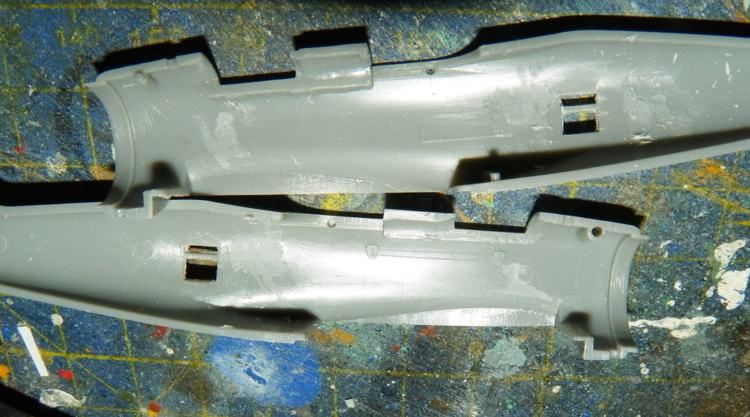
Before to get better referencies i cut too may flaps parts Pirate after glued the two unused flaps and keep the correct central flap

the fuselage details before the sanding work, will make new structures and instruments on the walls

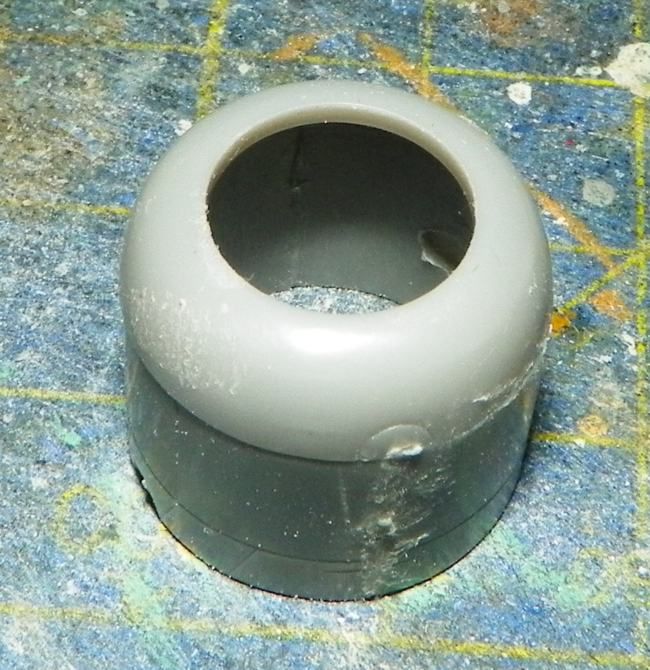
glued the 3 parts cowling

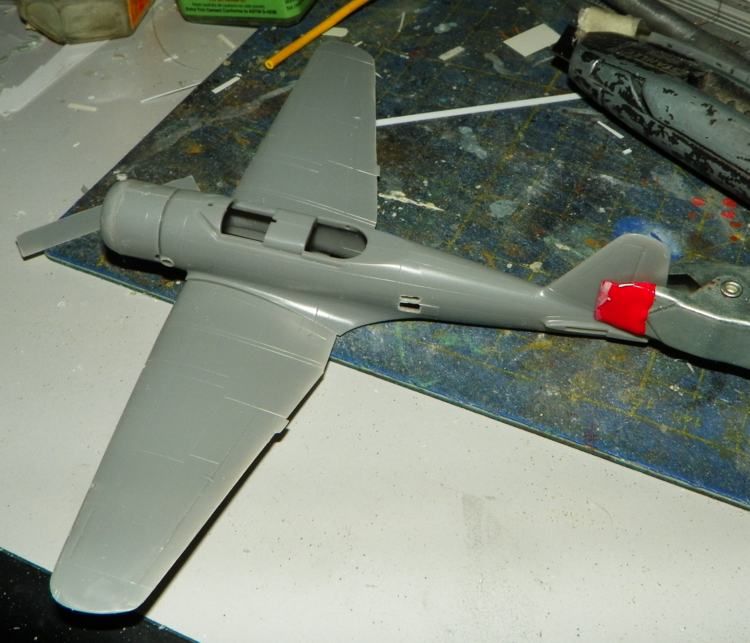
a test fitting that shows the good quality of this kit

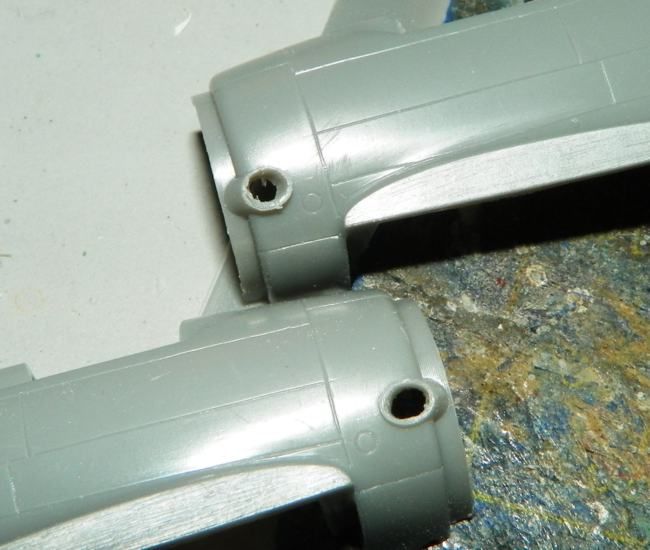
drilled holes in the exhausts 

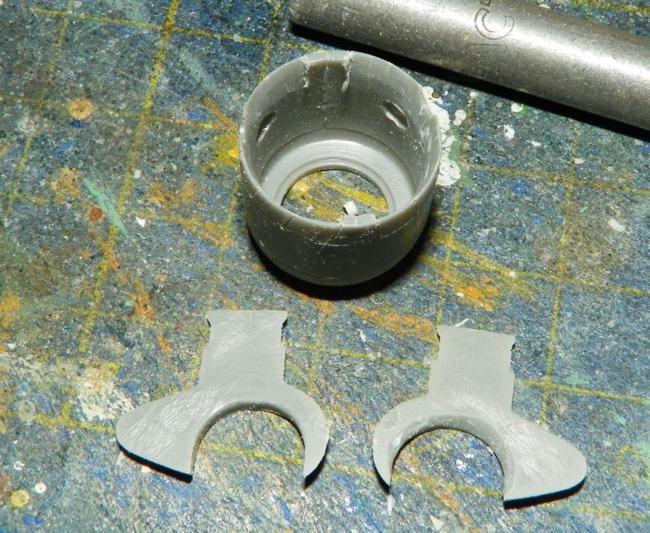
thinned the cowling on the back, just left two surfaces for the gluing, also started to improve the look of wheels , moulded on a side of gears, will try to give them a better sense of dept

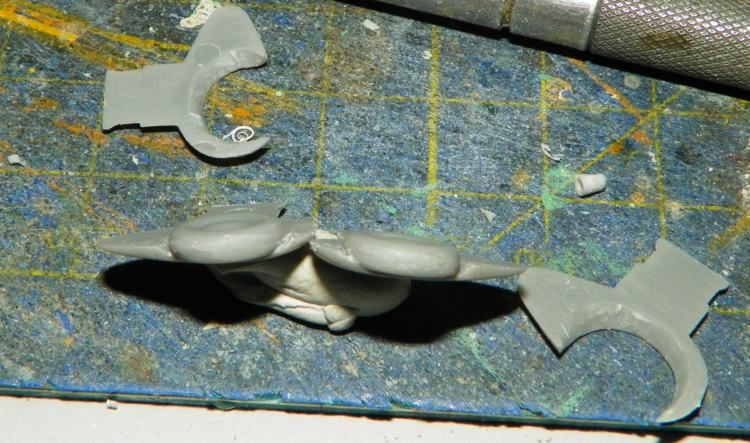
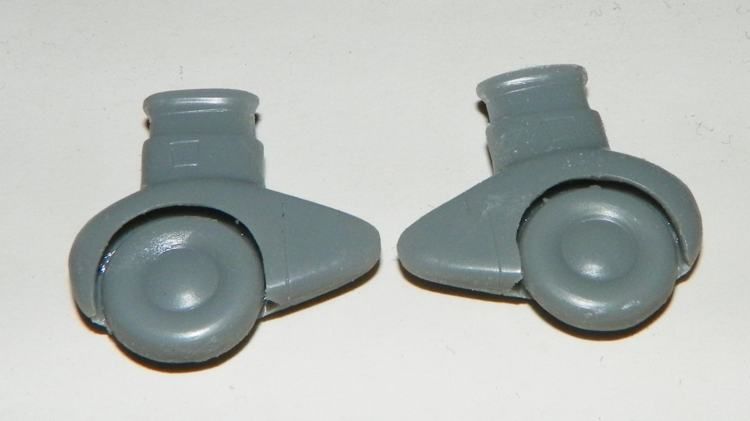
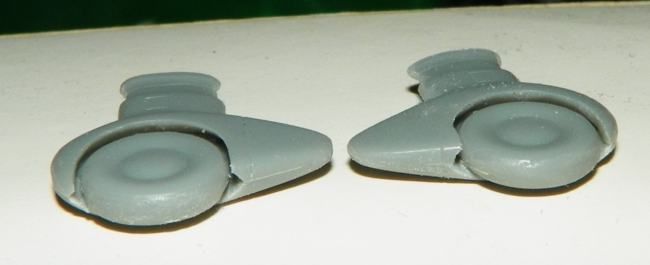
then glued , some other retouches but almost done

That's all for now, next step structures on the fuselage i think :)

  • Member since
    October 2008
  • From: Georgia
Posted by Rigidrider on Tuesday, April 15, 2014 10:58 AM

BSY... AsAlways... looking good!  You get so much out of and put so much into your 72nds... too small for me any more! LOL

Doug

When Life Hands You A Bucket Of Lemons...

Make Lemonade!

Then Sell It Back At $2 Bucks A Glass...

  • Member since
    April 2006
  • From: ON, Canada
Posted by jgeratic on Tuesday, April 15, 2014 12:59 PM

Johnsan and Panzerpilot - thanks guys!

Oh by the way, the tail wheel on the Claude remained intact for the duration of the build.  The antenna mast was another story.  It snapped  off three times before deciding to leave it off until the very end.

regards,

Jack

  • Member since
    November 2009
  • From: SW Virginia
Posted by Gamera on Tuesday, April 15, 2014 2:15 PM

Bsyamato: Looks like a great kit there but I love seeing all the extra touches you add!

Jack: Love the last photo (the sunset close-up)  there- you sure you don't want me to swap out your photo on the front page for it?

"I dream in fire but work in clay." -Arthur Machen


  • Member since
    January 2010
Posted by johnsan on Tuesday, April 15, 2014 5:33 PM

Jack - I always expect aerials and pitots to break off, so I replace them with brass. Makes for much stronger and generally better looking parts. I've never been so lucky with a Fujimi Claude tailwheel. You must be doing something right!

  • Member since
    October 2008
  • From: italy
Posted by bsyamato on Tuesday, April 15, 2014 6:57 PM

Thanx Doug Toast

Cliff the Sonia will be a speed build (..Alien..) .. maybe

LOL the curse of fujimi's Claude tail wheel Whistling then was not me only ..

Two rod pieces and aluminium stripe on my claud :D Lost during the second paint session

More works i did on the sonia today but no pictures yet .. asap i'll post

  • Member since
    April 2006
  • From: ON, Canada
Posted by jgeratic on Wednesday, April 16, 2014 12:55 AM

Gamera - thanks, but yea your call about switching out the front page photo - I'm easy on that regards.

Johnsan - agreed about the protruding bits.

Bsyamato - thanks for the laughs, and look forward to your next creation.

regards,

Jack

  • Member since
    September 2011
  • From: Milaca, Minnesota
Posted by falconmod on Monday, April 21, 2014 7:30 AM

Well I got something done this weekend,  finished filling and sanding ridges and stuff and got my base coat of silver on.  Now I can think about doing the salt method for the green top color.Bang Head

Sorry it's a little out of focus,  that's what happens when I take pictures after midnight!

John

On the Bench: 1/72 Ki-67, 1/48 T-38

1/144 AC-130, 1/72 AV-8A Harrier

  • Member since
    November 2009
  • From: SW Virginia
Posted by Gamera on Monday, April 21, 2014 12:23 PM

John: Yeah it's a little blurry but looks like a nice clean blemish free paint job to me. A real good start there!  

"I dream in fire but work in clay." -Arthur Machen


  • Member since
    April 2006
  • From: ON, Canada
Posted by jgeratic on Monday, April 21, 2014 6:20 PM

John, looking forward to the salt technique results.

-----------------------------------------------------------------

I've begun another Japanese aircraft slated for the Trainer GB, but would like to share it here since it also fits the theme.  It's a resin kit in 1/72 of the Tachikawa ki-9.

Lower wings were pinned with brass rods for added strength, and I've got some initial putty and sanding done on the fuselage seams.

Now I've a question, anybody read Japanese, or familiar with stencils on this bird?  Kit instructions do not show where to place them.

regards,

Jack

  • Member since
    November 2009
  • From: SW Virginia
Posted by Gamera on Tuesday, April 22, 2014 7:25 AM

Jack: Looks like a pretty cool kit there, I'll get you down. Only question is I can't make out the brand there- Choroszy Modelbud!?! Big Smile Wish I could read Czech!!! 

I found a few photos of the Ki-9 but none showed the stenciling. I've got the 1/48th kit by I think Otaki in my stash, if I can remember I'll try to hunt it up and see what decals it included and where it says to position them. 

"I dream in fire but work in clay." -Arthur Machen


  • Member since
    April 2006
  • From: ON, Canada
Posted by jgeratic on Wednesday, April 23, 2014 1:16 AM

Gamera, thanks, and yes you got the manufacturer's name right.

Well I went back to google image, looking closer at other 1/48 builds and both artwork and period photos - of course now I see the stenciling.  Looks like they are all vertically placed on the aft end of the fuselage, with the rearmost stencil having the arrow pointing down:

... and b/w for confirmation:

--------------------------------------

In my searches, found this site by chance, with cockpit panels  from a whole slew of a variety of Japanese planes - please excuse if this has been linked before:

http://gunsight.jp/c/english/cockpit-e-3D.htm

regards,

Jack

  • Member since
    November 2009
  • From: SW Virginia
Posted by Gamera on Wednesday, April 23, 2014 7:33 AM

Jack: Glad you found the photos since I was going to look for the Otaki kit and it completely slipped my mind! Guess I should have written myself a note- sigh.

Great site- not sure if you've linked it or not but it bears repeating- thanks!

"I dream in fire but work in clay." -Arthur Machen


  • Member since
    October 2008
  • From: italy
Posted by bsyamato on Wednesday, April 23, 2014 11:04 AM

Intresting subject JackI did some new work on the Sonia but my photobucket account is actually down. Will try with flickr soon

  • Member since
    April 2006
  • From: ON, Canada
Posted by jgeratic on Wednesday, April 23, 2014 12:29 PM

Thanks guys!

Gamera, you actually can still check something for me.  In the lone photo of my in progress build, I have an arrow pointing to a kit piece I could not find where it would go.  It could be either a fire extinguisher or compressed air tank?

regards,

Jack

  • Member since
    November 2009
  • From: SW Virginia
Posted by Gamera on Wednesday, April 23, 2014 1:51 PM

Sure, you mentioned it before but I assumed you'd figured it out. Will see what I can find.

"I dream in fire but work in clay." -Arthur Machen


  • Member since
    August 2009
  • From: Netherlands
Posted by duiker2106 on Thursday, April 24, 2014 9:09 AM

Hi guys,

I have a sad announcement to make. Due to the accident I had last year /i'm not able to do the fine things like model building for now. So with pain in my hart I have to quit the group build(s)

So to Gamera, you can take my thinga of the list...

I'll keep an eye on you all and I enjoy the wondefull things you guys make.

Cheers,

Paul Andriessen, Beverwijk, the Netherlands

On the bench: 1:350 Yamato + I-400, 1:48 F15 strike eagle...

  • Member since
    April 2006
  • From: Denver, Colorado
Posted by waynec on Thursday, April 24, 2014 9:03 PM

sorry to hear that. i pray the "for now" offers hope you will be able to build in the future.

Никто не Забыт    (No one is Forgotten)
Ничто не Забыто  (Nothing is Forgotten)


  • Member since
    November 2009
  • From: SW Virginia
Posted by Gamera on Thursday, April 24, 2014 9:48 PM

Paul I really hate to hear that. I haven't been in a mood to get much stuff done recently but I'm sure that if I couldn't model for some medical condition I'd go crazy with desire to build something!

I hope things get better for you and please feel free to drop by and say hello anytime!

"I dream in fire but work in clay." -Arthur Machen


  • Member since
    January 2010
Posted by johnsan on Sunday, April 27, 2014 7:44 PM

Working on the aft fuselage. Correcting fin profile to a more airfoil shape.

The kit has the leading edge as a 6 scale inch blunt edge. Filing and sanding this removed some panel lines. I took this as an opportunity to be better fair the fuselage pieces together. Rescribing was easy using a template.

Another weak point with this kit is the shape and lack of detail of the ejection seats. I added sides to the seat back and redid the ejection seat armrests. The seats still need belts, straps, and stirrups.

  • Member since
    November 2009
  • From: SW Virginia
Posted by Gamera on Monday, April 28, 2014 11:09 AM

Hey Johnsan, looks good! I love seeing you and Bsyamato modifying stuff like that since I can barely keep a kit built right out of the box.

Jack: I looked for the Otaki Ki-9 over the weekend but couldn't find it. And I swear I have a reference book somewhere with some photos of trainers but I can't find it either. Sorry I haven't been more helpful- not my memory this time but my horrible organization skills...  

"I dream in fire but work in clay." -Arthur Machen


  • Member since
    January 2010
Posted by johnsan on Tuesday, April 29, 2014 12:41 AM

Jack - if you are looking for a good, inexpensive  resource for the Ki-9 you should check out the FAOW #73 Army Type 95 Trainer.  It's available from HLJ for 829yen. 

I suspect the part you point to is an O2 canister mounted horizontally behind the seats. The FAOW has a couple of cutaway drawings showing cockpit detail. 

Gamera - adding or correcting detail isn't that difficult. The problem is that it does lead to AMS. 

  • Member since
    April 2006
  • From: ON, Canada
Posted by jgeratic on Tuesday, April 29, 2014 3:02 AM

Johnsan - nice job with the corrections, particularly on the tail -  scribing looks in tune with the original detail.

----------------------------------------------

Guys, thanks for the tip about that mystery piece and the Type  95 Trainer book.  If it was a /148 build, I'd pull the trigger on that publication.  Since it is so small, I'm not going to worry about it anymore.

I've been scratch building some hand holds/foot holds to the fuselage, plus some other details.  Just have one more brace and tail wheel to add, then the main fuselage will be ready for primer and a final once over.   Will post a pic soon.

regards,

Jack

JOIN OUR COMMUNITY!

Our community is FREE to join. To participate you must either login or register for an account.

SEARCH FORUMS
FREE NEWSLETTER
By signing up you may also receive reader surveys and occasional special offers. We do not sell, rent or trade our email lists. View our Privacy Policy.