SEARCH FINESCALE.COM

Enter keywords or a search phrase below:

1944 Group Build

132355 views
1959 replies
1 rating 2 rating 3 rating 4 rating 5 rating
  • Member since
    January 2013
Posted by jibber on Wednesday, February 26, 2014 5:57 PM

Blue, that paint job is awesome, love the pre shading and tones. Very nice sir.

  • Member since
    October 2008
  • From: Georgia
Posted by Rigidrider on Thursday, February 27, 2014 4:39 AM

Thanks guys...

Yes, the silver will serve as an aluminum base to be able to scratch and ding up' I dont always use silver base coats, but the PTO played hell on paint with the sand and salt, and much paint wore thin, more then chipped although both occured.

The way I've thought to do my finish, there will be much wear on the finish with thinning and fadeing.

Clemens the silver is just a rattle can od "Rustoleum" silver from the local Home Depot. I will be using acrulic top coats sop shouldnt have to worry about wrinkling like what befell Jor R one time.

Doug

When Life Hands You A Bucket Of Lemons...

Make Lemonade!

Then Sell It Back At $2 Bucks A Glass...

  • Member since
    August 2009
  • From: MOAB, UTAH
Posted by JOE RIX on Thursday, February 27, 2014 8:06 AM

Doug, Things are looking good for you so far. Very cool to see you taking on the silver undercote weathering technique. I have yet to try it but I always recall a weathering article FSM ran a few years ago where the gentleman weathered an SB2C Helldiver by applying the aluminum/silver undercote. He then sprayed on  a glosscote. After painting the base colors/camo he very lightly sanded areas to expose the silver undercote to simulate wear and chipping. It was quite impressive.

I should note that the top cote I used when the wrinkling occured was an acrylic top cote but was a cheap brand purchased at the local hardware store. I learned the valuable lesson that trying to save a few bucks by buying some offbrand is not wise. I will now stick to proven model specific top cotes.

"Not only do I not know what's going on, I wouldn't know what to do about it if I did". George Carlin

  • Member since
    October 2008
  • From: Georgia
Posted by Rigidrider on Thursday, February 27, 2014 11:29 AM

Yeah Joe I know it gave you a hell of a mess, but you still persevered an pulled it out. You still have my respect and hold me in awe at the way you turned it around and brought it to an amazing conclusion....

Me... I'd of had to seen how far it could fly! Ha...

I use the silver base coat at times, but prefer to dry brush. You got it though, with a silver undercoat, I can "fade" and wear the paint more evenly. I generally dont gloss coat on this type finish, but begin chipping and scratching soon as I can handle safely. Much easier th remove when freshly painted. Also I use scotch brite pads to thin and remove paint, it doesn't leave scratches as bad as sandpaper. Any way, I will have more by this weekend I hope.

Take care...

Doug

When Life Hands You A Bucket Of Lemons...

Make Lemonade!

Then Sell It Back At $2 Bucks A Glass...

  • Member since
    August 2009
  • From: MOAB, UTAH
Posted by JOE RIX on Thursday, February 27, 2014 2:50 PM

I'm certainly excited to see the results of your technique Doug. I know it's going to be good.

"Not only do I not know what's going on, I wouldn't know what to do about it if I did". George Carlin

  • Member since
    January 2013
Posted by jibber on Thursday, February 27, 2014 4:13 PM

I'll see if I can get a few close up shots of UHU and add them later. 

  • Member since
    December 2002
  • From: Bury St Edmunds, Suffolk, England
Posted by Bish on Thursday, February 27, 2014 4:26 PM

O, wow, this came out of no where. Great looking build jibber, nice work. Glad to have this one on board.

I am a Norfolk man and i glory in being so


On the bench: Airfix 1/72nd Harrier GR.3/Fujimi 1/72nd Ju 87D-3

  • Member since
    August 2009
  • From: MOAB, UTAH
Posted by JOE RIX on Thursday, February 27, 2014 6:54 PM

Oh Man jibber, That is great looking. You have done an excellent job. Your camo is really well done as well as the weathering. Thank you for sharing your unique Uhu with us.

"Not only do I not know what's going on, I wouldn't know what to do about it if I did". George Carlin

  • Member since
    October 2008
  • From: Georgia
Posted by Rigidrider on Thursday, February 27, 2014 7:45 PM

That is just too cool!... Excellent build!

Doug

When Life Hands You A Bucket Of Lemons...

Make Lemonade!

Then Sell It Back At $2 Bucks A Glass...

  • Member since
    January 2013
Posted by jibber on Thursday, February 27, 2014 10:48 PM

Thank you all, this was a lot of fun. Love the 251's.

  • Member since
    October 2013
Posted by Big Blue on Thursday, February 27, 2014 11:47 PM

Wow, nice job Jibber!

I've made some progress: 2 coats of Aqua Gloss, and the non-stencil decals are on.  The Barracuda decals went on beautifully, with minimal fuss.  Here are a few quick pics:
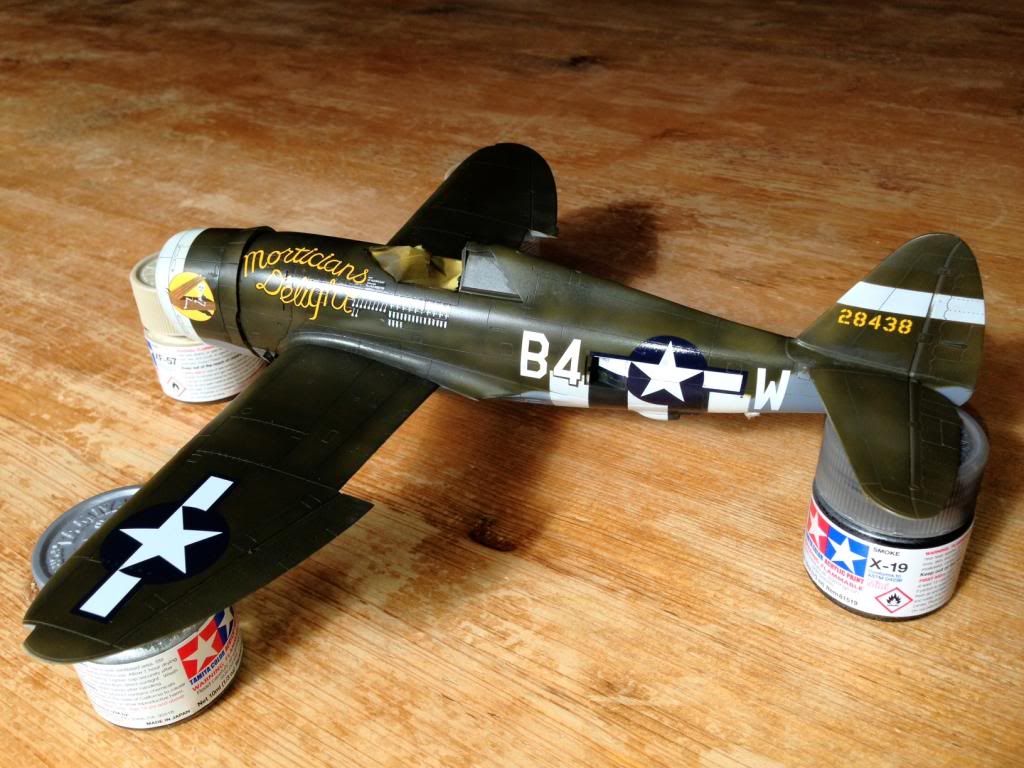
The olive drab looks darker, greener and more contrasty in these pictures than it does in person, and the glossy finish isn't helping.  The cowl and flaps are dry fit for the pictures.

I need to wash everything down a bit to clean it up, and give it another gloss coat or two to help blend the carrier film in a bit.  That will have to wait until I get the stencils laid down.

One slightly odd thing about the nose art is that the "Mortician's Delight" script is large enough that it just fits on the aircraft's nose, and in fact, the leading edge of the "M" is actually under the open cowl flaps.  Odd as this looks, it matches the artwork in Barracuda's marking guide.  Unfortunately, my only reference photo has that section blocked, but the placement of the scorecard and name plates seem to be correct.  If anyone has a decent shot that contradicts this, please let me know... although I'm not sure what I'd do about it now anyway.  Heck any reference photo is always welcome.

As you may be able to tell from the shot of the cowling, I have also tested out a couple of Flory washes for the panel lines.  Neither of my two usual washes, black and dark dirt, shows up particularly well against the green, but perhaps this will change with a matte clear coat.  

This picture also shows that I should have masked out a white circle to go under the nose art as the contrast between the olive drab & white stripe shows through.  I was smart enough to think about the issue and mask for the stars & bars on the fuselage, but didn't even think about the nose art.  One more lesson learned.

One last thing you can see in the photo of the underside is that I made the bold call of painting the metal arms that extend the lowered flaps a brass color.  I have no idea if this is accurate for wartime Thunderbolts, but I have a color reference photo showing this to be the case (page 25 of Walk-Around; I apologize for not scanning it.)

Thanks again to all of those who have contributed suggestions as well as those who have taken the time to share the positive comments.  Both are much appreciated.

  • Member since
    January 2013
Posted by jibber on Friday, February 28, 2014 6:59 AM

Blue thanks, I have to say again that the tones you employ are awesome. You see a lot here and I don't build many aircraft, but the green shade and the underbelly blue is right out of WWII. You do a great job. Love the decal work too.

  • Member since
    August 2009
  • From: MOAB, UTAH
Posted by JOE RIX on Friday, February 28, 2014 7:44 AM

Big Blue, Boy, your talents are turning out one amazing "Jug". Nice. Really really nice. I have to say that your panel wash on the cowling is among some of the sharpest and crisp I've seen. Is that done with the Flory washes? As far as a wash on the darker OD, you may want to try a a medium to light gray. The decaling looks real sharp also.

"Not only do I not know what's going on, I wouldn't know what to do about it if I did". George Carlin

  • Member since
    December 2002
  • From: Bury St Edmunds, Suffolk, England
Posted by Bish on Friday, February 28, 2014 9:45 AM

jibber

Thank you all, this was a lot of fun. Love the 251's.

Well, there's plenty more versions to choose from. That's a great job, thanks for those close up's. I do like the result you have got on the light.

I am a Norfolk man and i glory in being so


On the bench: Airfix 1/72nd Harrier GR.3/Fujimi 1/72nd Ju 87D-3

  • Member since
    December 2002
  • From: Bury St Edmunds, Suffolk, England
Posted by Bish on Friday, February 28, 2014 9:47 AM

Blue, wow, that's is looking awesome. Can't wait to see this finished.

I am a Norfolk man and i glory in being so


On the bench: Airfix 1/72nd Harrier GR.3/Fujimi 1/72nd Ju 87D-3

  • Member since
    December 2013
Posted by schmidty on Friday, February 28, 2014 10:42 AM

Wow Big Blue, that is amazing!  Great work!

--Mike

On the Bench: 1:72 Academy P-51B

On Deck: 1:72 Hobby Craft DHC-3 (U-1A) & 1:72 Academy Ju 87G-1

  • Member since
    October 2013
Posted by Big Blue on Friday, February 28, 2014 4:37 PM

Thanks again for the supportive comments.

Joe, that is the Dark Dirt Flory wash, and yes, it does show up very nicely against that white paint!  I hadn't thought about a lighter wash on the drab; I am waiting to see how everything looks under a matte coat before reacting.

Blue

  • Member since
    April 2013
Posted by SchattenSpartan on Friday, February 28, 2014 5:09 PM

Amazing work, Blue! I didn't get to applying a wash yet (still fighting those damn AM decals), but I'll start messing around with it tomorrow. I still have to think of a way to add some streaking to my bird that doesn't rely on my beloved oil paints. I can't use oils because they'd jsut eat right through the alclad gloss...

  • Member since
    October 2013
Posted by Big Blue on Friday, February 28, 2014 7:56 PM

Thanks Clemens.

Are you using the regular Alclad gloss?  If you are really stuck, you could always try using the Aqua Gloss... no issues with oils or associated thinners.

  • Member since
    April 2013
Posted by SchattenSpartan on Saturday, March 1, 2014 4:11 AM

Yeah, normal gloss it is. It's too late to spray some aqua gloss on top without softening all the surface details though, so I'm really stuck with what I got right now.

  • Member since
    December 2013
Posted by schmidty on Sunday, March 2, 2014 5:21 PM

Funny story: After much-too-much stressing over using accurate paint colors, I finally told myself to stop it.  I'd get as close as I could and just get a @$&* model built.  So after many weeks of stressing about it, I see in my pictures that my camera (well...me) is unable to accurately reproduce the colors I used anyway!

So, anyway here's my cockpit pics.  The green is quite a few shades darker than it appears.  There seems to be a ton of discussion on what color green to paint the Mustang interior.  So, I took the advice of one guy (can't remember who or even which site) and mixed 10 parts Model Master Green Zinc Chromate with 1 part Testors Flat Black.

And I took my first stab at weathering.  I painted the floor Testors Gloss Wood and then went sloppily over the top with Flat Black.  I then carefully scrapped away a little more right where the pilots feet would be.  I think it turned out OK.  Something I'll have to work on.

The office:

Fuselage halve assembled:

--Mike

On the Bench: 1:72 Academy P-51B

On Deck: 1:72 Hobby Craft DHC-3 (U-1A) & 1:72 Academy Ju 87G-1

  • Member since
    October 2008
  • From: Georgia
Posted by Rigidrider on Sunday, March 2, 2014 5:55 PM

Hey mike... Looking good! Yeah I know what you mean, I'll go over colors, choose, use, then see something that contridicts or makes me doubt my choice. Its looking right to me brother!

Doug

When Life Hands You A Bucket Of Lemons...

Make Lemonade!

Then Sell It Back At $2 Bucks A Glass...

  • Member since
    October 2008
  • From: Georgia
Posted by Rigidrider on Sunday, March 2, 2014 6:14 PM

OK guys... some more progress...

Guys Im sorry, but I got so wrapped up in the paint that I forgot to take step by step pictures... Before I knew it I had the paint on and was weathering. Any way, After the silver base coat , I sprayed an extra thin coat of MM Dark sea blue. Then I took the left over mix and put several drops of Tamiya Sky grey and some MM flat finish , mixed well and applied another light coat to the previous blue.

As soon as I could safely handle (approx 30 min) I began scratching and scuffing, then lightly buffing the paint away with a light scotch brite cloth, in the usual wear areas until the silver underneath began to show through. I had read that the paint on these craft was fairly rugged and resisted chipping, (although it did chip) but the salt, sand and ground up coral and pumice of the Pacific islands played hell on the finishes.I have it glossed now, and will start applying decals next. Thanks...

Doug

When Life Hands You A Bucket Of Lemons...

Make Lemonade!

Then Sell It Back At $2 Bucks A Glass...

  • Member since
    December 2013
Posted by schmidty on Sunday, March 2, 2014 6:36 PM

Doug,

Thanks for the encouragement.  The biggest thing holding me back was all the discussions between the excellent builders on here regarding the exactly correct shade for various builds. I finally realized they all have much more experience (and I assume a much larger collection of paints) and I needed to let go and JUST DO IT.  (Hopefully any other newbies with the same problem do the same)

Great job on your paint/weathering.  It looks like that bird has seen quite a bit of action!

--Mike

On the Bench: 1:72 Academy P-51B

On Deck: 1:72 Hobby Craft DHC-3 (U-1A) & 1:72 Academy Ju 87G-1

  • Member since
    October 2008
  • From: Georgia
Posted by Rigidrider on Monday, March 3, 2014 4:58 AM

You know... just about every time I dfecide on a color, I find out I,ve either made the wrong choice or another example will turn up. Yes I do try to be as acurate as I can, but there comes a time when you just have to choose and build. I just research and build best as I am able. Your start is looking fine.

Yeah these birdies were often left in theater when the units shifted and were maintained and flown by several different squadrons. They rarely left an area unless withdrawn completely. They did not live an easy life.

Doug

When Life Hands You A Bucket Of Lemons...

Make Lemonade!

Then Sell It Back At $2 Bucks A Glass...

  • Member since
    October 2013
Posted by Big Blue on Monday, March 3, 2014 8:12 AM

Mike: nice start on that cockpit.  Looks like Mustang green to me.

Rider: now THAT is a war plane that's seen some service!  Looking forward to more updates.

  • Member since
    August 2009
  • From: MOAB, UTAH
Posted by JOE RIX on Monday, March 3, 2014 12:36 PM

Mike: I think your cockpit looks really good. The color is fine. I, like others, like to get as close as I can to any given color. But. I just don't get myself to wadded up about it as I have to remember that I am modeling for myself. Take the cockpit green for instance. Color could vary between the factories in which it was assembled.So, if I have some thing that is remotely close I'll run with it. Keep it coming you're doing great.

Doug: You indeed have yourself one hammered Bentwing there. It appears that your technique worked out quite well. Thanks for sharing that.

"Not only do I not know what's going on, I wouldn't know what to do about it if I did". George Carlin

  • Member since
    October 2008
  • From: Georgia
Posted by Rigidrider on Monday, March 3, 2014 5:18 PM

More later... Thanks!

DougJust a little more for the moment. Started to put decals on... They too will have to be aged and weathered...

When Life Hands You A Bucket Of Lemons...

Make Lemonade!

Then Sell It Back At $2 Bucks A Glass...

JOIN OUR COMMUNITY!

Our community is FREE to join. To participate you must either login or register for an account.

SEARCH FORUMS
FREE NEWSLETTER
By signing up you may also receive reader surveys and occasional special offers. We do not sell, rent or trade our email lists. View our Privacy Policy.