SEARCH FINESCALE.COM

Enter keywords or a search phrase below:

PACIFIC CARRIER AVIATION GROUP BUILD

90834 views
1294 replies
1 rating 2 rating 3 rating 4 rating 5 rating
  • Member since
    July 2014
  • From: Franklin Wi
Posted by Bakster on Saturday, December 20, 2014 7:18 PM

Joe... I agree.  Too much time and expense to throw in the towel. Keep at it.  That is a total bummer that happened but we are pulling for you. Hang in there friend.

  • Member since
    April 2013
Posted by SchattenSpartan on Saturday, December 20, 2014 11:11 AM

That orange peel looks really dreadful. Hang in there, buddy! With your skills and patience things can only look great once you're done!

Regarding that P-47 of yours (Eight Nifties if I remember correctly?), I'm toying with the idea of running a Republic Aviation GB in 2016. Would be great to have you aboard in case you wanna give that repair job a shot?

  • Member since
    September 2003
  • From: AandF in the Badger State
Posted by checkmateking02 on Saturday, December 20, 2014 11:01 AM

Good going, Joe!  It looks like you'll get the problem conquered.

I'd never heard about the product you're using, so that's also a good tip to store away.


  • Member since
    August 2009
  • From: MOAB, UTAH
Posted by JOE RIX on Saturday, December 20, 2014 8:49 AM

Gentlemen, I Thank you for your kind words and encouragement. Yeah, I dunno if it's patience or stubbornness. Bit of a gray area there. Unfortunately, I am becoming too well versed in this procedure. I have a 1/48 Tamiya P-47 that had an issue with NMF Alclad over the entire fuselage that I will eventually get back to and strip down. For me, It's that I have invested too much time and money on a project to simply give up. Especially when there is a solution. Yes, it is frustrating but the fact remains that I have the tools to repair it and, thus, I will not just give up.

"Not only do I not know what's going on, I wouldn't know what to do about it if I did". George Carlin

  • Member since
    May 2013
  • From: From the Mit, but live in Mason, O high ho
Posted by hogfanfs on Saturday, December 20, 2014 7:29 AM

Joe, you are a better man than me! I would have tossed it in the trash and started over. You have the patience of a saint! Realy looking forward to seeing this plane finished!

 Bruce


 On the bench:  1/48 Eduard MiG-21MF

                        1/35 Takom Merkava Mk.I


  • Member since
    December 2012
Posted by flyerduke on Saturday, December 20, 2014 6:32 AM

Joe, you are a far better modeler than I.  I would have boxed it up and put it away.  Probably never touched again.  Looking forward to seeing how it turns out.

  • Member since
    March 2012
  • From: Corpus Christi, Tx
Posted by mustang1989 on Saturday, December 20, 2014 3:15 AM

  !! We're all cheerin' for you Joe! 


 Forum | Modelers Social Club Forum (proboards.com) 

  • Member since
    August 2009
  • From: MOAB, UTAH
Posted by JOE RIX on Friday, December 19, 2014 11:48 PM

Well, I'm slowly making some progress on fixing the gloss coat mishap. Figured I share exactly how I am going about this.

Here is a not so good pic of the orange peel effect that occurred on the wing:

In order to strip off the paint I use this miraculous stuff. Works like a charm and does not affect the plastic or glue. I highly recommend this stuff for your bench just i case you meet with any similar events.

II do start by sanding off as much of the gloss coat and paint layer as I can. Then I just simply brush on some ELO to the area I want strip, let sit for a few minutes and then wipe off with a cloth or scrub with an old toothbrush. It takes a couple of applications to remove the gloss coat, paint and primer. I started on the tail planes:

And currently I've pretty much cleaned off the tail:

The wings themselves are going to take a while to get fully stripped but, I'll get it.

"Not only do I not know what's going on, I wouldn't know what to do about it if I did". George Carlin

  • Member since
    January 2011
  • From: Commonwealth of Virginia
Posted by Tal Afar Dave on Wednesday, December 17, 2014 10:59 AM

Beautiful rendition of the Hellcat in the GB badge squadron colors!!  Looks awesome, love that fierce Hellcat mouth!!

TAD

2022 New Year's Resolution:  Enter 1 group build and COMPLETE a build this year!!  Why Photobucket did you rob me of my one Group Build Badge???  Must be part of the strong anti-Monogram cartel!!!

 ]

  • Member since
    April 2013
Posted by SchattenSpartan on Tuesday, December 16, 2014 2:23 PM

Craig: Now that Hellcat is a beauty! Great work all around! I'll add her to the front page right away.

Bruce: Nice looking powerplant! It should turn out really nice with some paint on there!

  • Member since
    December 2012
Posted by flyerduke on Monday, December 15, 2014 7:51 PM

Thanks.  I appreciate it.

Craig

silentbob33

Looks great Craig!

  • Member since
    December 2012
Posted by flyerduke on Monday, December 15, 2014 7:49 PM

Thanks Joe.  I t took a couple tries, but I got it.  My first badge!  Yeah

mustang1989

You should be able to go to community settings and paste your first GB badge into there like we do pics  here. Adding badges gets a little bit more in depth but not much.

  • Member since
    February 2014
  • From: Michigan
Posted by silentbob33 on Monday, December 15, 2014 8:50 AM

Looks great Craig!

On my bench: Academy 1/35 UH-60L Black Hawk

  • Member since
    March 2012
  • From: Corpus Christi, Tx
Posted by mustang1989 on Monday, December 15, 2014 8:18 AM

You should be able to go to community settings and paste your first GB badge into there like we do pics  here. Adding badges gets a little bit more in depth but not much.


 Forum | Modelers Social Club Forum (proboards.com) 

  • Member since
    December 2012
Posted by flyerduke on Monday, December 15, 2014 7:01 AM

By the way, how do I attach the badge to my posts?

  • Member since
    December 2012
Posted by flyerduke on Monday, December 15, 2014 6:59 AM

Thanks everyone!  It feels good to have a completed build under my belt.  I learned a lot during this build and it was do to the input from all of you.  I look forward to participating in future GB's.  Thanks again.

Craig

  • Member since
    March 2012
  • From: Corpus Christi, Tx
Posted by mustang1989 on Monday, December 15, 2014 3:54 AM

flyerduke

OK.  I think I'm done!  Or at least I'm calling this thing finished.  Overall, I'm happy with the way this plane turned out.  Will it win any modeling competitions, no.  However, this is the first model I've actually completed in the last 20 years.  I've started several over the last couple years, but haven't finished a single model.  So I'm somewhat proud of myself.

I really need to thank everyone for their words of encouragement and advice.  I truly believe I would have shelved this thing at some point during the build if I hadn't joined this GB.  So thank you all. 

Also, I have to praise the kit (Eduard 1/48 F6F-3 ProfiPack) I built.  The instructions were super easy to read and follow.  Lots of super nice detail and excellent fitting parts.  Well done Eduard!  I hope someone starts a Bf-110 GB over the summer so I can build the Eduard 1/48 Bf-110D ProfiPACK kit I picked up over this past summer.  Anyways...  It's time to get going on the F-107 so I can join in on the Bf-109 GB within the next couple months.

Clemens, I'd like to use the first (top) photo for the completed build section.  Thanks.

THANKS AGAIN!  I had a lot fun.

Craig
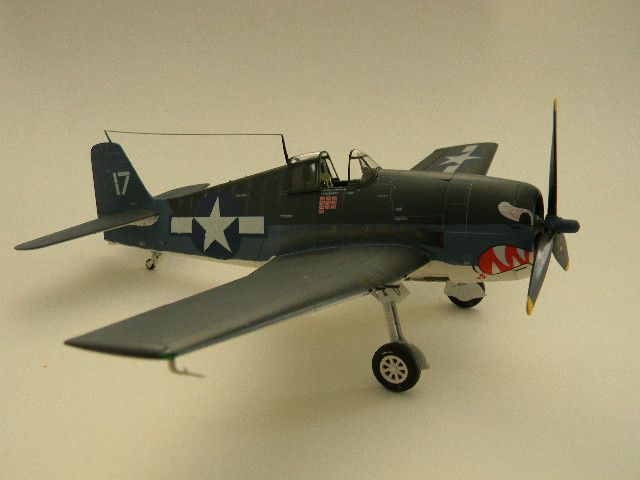
Dang Craig! What a job on this beauty. I was truly a blast  to watch you build this man.Yes


 Forum | Modelers Social Club Forum (proboards.com) 

  • Member since
    August 2009
  • From: MOAB, UTAH
Posted by JOE RIX on Sunday, December 14, 2014 9:42 PM

Bravo Craig! Bravo! You did one outstanding job on your Hellcat. It really does look excellent. Congratulations on finally completing a model after a prolonged absence. A vast majority of us have traveled the same path and it is indeed a wonderful feeling to get the first completion under your belt. It has been a real pleasure to have you share your efforts with us. I hope to see you in another GB.

Bruce, Your certainly off to a nice start on the R2600. Sweet work.

After a taking a short break and getting my attitude in the right place, I started the slow process of stripping the paint on the afflicted area of my Hellcat today. I'm using Polly S ELO, Easy Lift Off, paint and decal remover. Really awesome stuff for the purpose. I'll get some pics for you all so that you can see my progress.

"Not only do I not know what's going on, I wouldn't know what to do about it if I did". George Carlin

  • Member since
    September 2003
  • From: AandF in the Badger State
Posted by checkmateking02 on Sunday, December 14, 2014 9:13 PM

Sharp looking engine, Bruce.  Nice detail work!


  • Member since
    May 2013
  • From: From the Mit, but live in Mason, O high ho
Posted by hogfanfs on Sunday, December 14, 2014 8:03 PM

Gentleman,

I made a little more progress on the SB2U. Finally had some time to wash the front and rear cockpit. Now I'm waiting for them to dry, then will spray with some flat. Once complete I'll post picks.

In the mean time I started to work on the R2600. 

I trimmed the "Medusa snake heads" from the hub:

Then cut and .010 styrene rod for new push rods:

I have a little clean up on the rim of the hub (looks like teeth), then will look to get it painted, and install the brass plug wires. 

Thanks for looking, comments and critiques are welcome!

 Bruce


 On the bench:  1/48 Eduard MiG-21MF

                        1/35 Takom Merkava Mk.I


  • Member since
    May 2013
  • From: From the Mit, but live in Mason, O high ho
Posted by hogfanfs on Sunday, December 14, 2014 6:00 PM

Craig,

The Hellcat looks fantastic! Great job, you should be proud!

Kind of funny that it looks like three of us in this GB have had extensive layoffs from modeling. I'm in the same boat as you, I have several started kits, but have not finished one in 20+ years. I'll keep my fingers crossed that my SB2U looks half as good as your Hellcat!

 Bruce


 On the bench:  1/48 Eduard MiG-21MF

                        1/35 Takom Merkava Mk.I


  • Member since
    July 2014
  • From: Franklin Wi
Posted by Bakster on Sunday, December 14, 2014 4:45 PM

Hey Craig... I want add my voice to this and say you did an awesome job.  It really looks great!  Congrats on this. I am glad you finished it and didn't shelve it.  Like you I am back after a 20 year hiatus. I hope I can get through my first build as well.  Seeing that you did encourages me too.  Way to go man! Now you can sit back and reflect on the journey.

Steve

  • Member since
    May 2013
  • From: Indiana, USA
Posted by Greg on Sunday, December 14, 2014 3:21 PM

Hey Craig, the first finished model after a long hiatus IS a big deal. It feels good, doesn't it?

Your Hellcat looks great, good job!

  • Member since
    September 2013
Posted by Raven728 on Sunday, December 14, 2014 3:11 PM

Very nicely done, Craig, congratulations! That's the great thing about GBs: the community support. I've been eying those Eduard Bf110 kits myself, but with all the builds I have planned for next year, I'm hoping against a GB. Wink

- Steve

  • Member since
    September 2003
  • From: AandF in the Badger State
Posted by checkmateking02 on Sunday, December 14, 2014 2:14 PM

Great looking Hellcat.  I like the way the panel lines turned out.  A fierce looking bird!


  • Member since
    December 2012
Posted by flyerduke on Sunday, December 14, 2014 1:33 PM

OK.  I think I'm done!  Or at least I'm calling this thing finished.  Overall, I'm happy with the way this plane turned out.  Will it win any modeling competitions, no.  However, this is the first model I've actually completed in the last 20 years.  I've started several over the last couple years, but haven't finished a single model.  So I'm somewhat proud of myself.

I really need to thank everyone for their words of encouragement and advice.  I truly believe I would have shelved this thing at some point during the build if I hadn't joined this GB.  So thank you all. 

Also, I have to praise the kit (Eduard 1/48 F6F-3 ProfiPack) I built.  The instructions were super easy to read and follow.  Lots of super nice detail and excellent fitting parts.  Well done Eduard!  I hope someone starts a Bf-110 GB over the summer so I can build the Eduard 1/48 Bf-110D ProfiPACK kit I picked up over this past summer.  Anyways...  It's time to get going on the F-107 so I can join in on the Bf-109 GB within the next couple months.

Clemens, I'd like to use the first (top) photo for the completed build section.  Thanks.

THANKS AGAIN!  I had a lot fun.

Craig

  • Member since
    December 2012
Posted by flyerduke on Friday, December 12, 2014 6:58 PM

Clemens, I think we were thinking along the same line.  I added some dark gray paint to the exhaust port areas.  Not real sure about it.  Any suggestions.

Craig

  • Member since
    April 2013
Posted by SchattenSpartan on Friday, December 12, 2014 6:16 PM

Craig, she looks truly amazing. I think the wash turned out just right! I also like the exhaust stains.

There's one little thing I'd like to suggest though: The stains don't really start at the exhausts, but rather a wee bit after them. Maybe you could try to add a bit more soot closer to the exhausts?

  • Member since
    September 2003
  • From: AandF in the Badger State
Posted by checkmateking02 on Friday, December 12, 2014 3:04 PM

It's a great looking Hellcat!  Very nice work.


  • Member since
    December 2012
Posted by flyerduke on Friday, December 12, 2014 1:41 PM

No worries my friend.  I only have about an hour of total work left.  I guess I should quit screwing around on the computer and finish the model.  I actually have the next few days off.  I should be able to finish by Sunday evening.  Maybe. 

Craig

JOE RIX

Hey Craig, I'm really sorry about jumping the gun with my exhaust staining suggestion. My fault for assuming that you were going to call it done after you felt that your wash didn't work out. My bad. I'm a big fan of the Tamiya weathering sets. In fact, I have done all of my exhaust staining with them up til now. And you have done a real nice job with them on your Hellcat. Yet, this time I just may step out of my comfort zone and attempt my first exhaust effect with my airbrush.

JOIN OUR COMMUNITY!

Our community is FREE to join. To participate you must either login or register for an account.

SEARCH FORUMS
FREE NEWSLETTER
By signing up you may also receive reader surveys and occasional special offers. We do not sell, rent or trade our email lists. View our Privacy Policy.