SEARCH FINESCALE.COM

Enter keywords or a search phrase below:

PACIFIC CARRIER AVIATION GROUP BUILD

90833 views
1294 replies
1 rating 2 rating 3 rating 4 rating 5 rating
  • Member since
    March 2012
  • From: Corpus Christi, Tx
Posted by mustang1989 on Thursday, May 21, 2015 7:08 PM

Hey Joe! I thought we were gonna get some pictures today.................Confused


 Forum | Modelers Social Club Forum (proboards.com) 

  • Member since
    September 2003
  • From: AandF in the Badger State
Posted by checkmateking02 on Thursday, May 21, 2015 7:05 PM

You can do it, Joe!  You've triumphed over worse!  Yes


  • Member since
    August 2009
  • From: MOAB, UTAH
Posted by JOE RIX on Wednesday, May 20, 2015 7:48 AM

Easy there my eager little friends. I am currently putting on the finishing touch ups here and there. I then only need to glue on the sliding canopy and prop. The antenna wire has given me some hassles, but I've got it on. It is actually unsatisfactory, but at this point it will have to do because I'm about ready to move on. I will in the near future redo it. I have simply spent far too much time on this little Hellcat. I hope to finish up today and get pics to you all very soon. Thanks for the kindly push though.

"Not only do I not know what's going on, I wouldn't know what to do about it if I did". George Carlin

  • Member since
    July 2014
  • From: Franklin Wi
Posted by Bakster on Wednesday, May 20, 2015 7:21 AM

I totally agree with Mustang.   Let's see the purdy blue planes.....

  • Member since
    March 2012
  • From: Corpus Christi, Tx
Posted by mustang1989 on Wednesday, May 20, 2015 5:05 AM

Where's the progress in here..................? I was sure a lookin' forward to some purdy blue planes that were being worked on.Stick out tongue


 Forum | Modelers Social Club Forum (proboards.com) 

  • Member since
    August 2009
  • From: MOAB, UTAH
Posted by JOE RIX on Tuesday, April 28, 2015 8:15 PM

Great to see some pics lewbud. You've done a terrific job on it so far. I would hope that you would still build it as VF-51 if that is what you really wanted to do. Please do not let the fact that we are using the same decal sheet deter you from building what you honestly want to. It's your build, build it as you want to. I certainly do not have any single issue with that.

"Not only do I not know what's going on, I wouldn't know what to do about it if I did". George Carlin

  • Member since
    July 2014
  • From: Franklin Wi
Posted by Bakster on Tuesday, April 28, 2015 6:33 PM

Lewbud, thanks for posting the pictures.  We finally get to see it.  It is looking good!  I look forward to seeing more progress...

  • Member since
    June 2008
Posted by lewbud on Tuesday, April 28, 2015 5:00 PM

I finally got to the local library to post some pics.  I originally planned to have this be my last build for last year's Weekend GB (this year's episode will be coming to a computer near you this fall!).  However, life got in the way and she languished like this until a couple of weeks ago.

She now looks like this.

Tonight, the cowling, wheels, tank, and landing gear will be painted.  It's supposed to be warmer and drier tomorrow, so hopefully I'll get some gloss on her tomorrow.  Joe, it looks like we're using the same decal sheet.  To avoid duplication, I'll change mine to a bird from VF-1 off USS Yorktown.

Buddy- Those who say there are no stupid questions have never worked in customer service.

  • Member since
    December 2012
Posted by flyerduke on Monday, April 27, 2015 10:24 PM

Glad to hear you guys are almost there.  Lookin' forward to the finished photos.

Craig

  • Member since
    August 2009
  • From: MOAB, UTAH
Posted by JOE RIX on Monday, April 27, 2015 9:26 PM

Glad to hear your still at it lewbud. Sounds like some good progress is being made. Good on you for being able to fix the gloss issue. Definitely looking forward to some pics. Funny, my "Little Joe" is also from VF-51 San Jacinto. My finger is healing up and I'm able to handle the fiddly bits a good bit now. I've got the landing gear on and I'm just now fitting the pitot tube and then the antenna. I'm close. Very close.

"Not only do I not know what's going on, I wouldn't know what to do about it if I did". George Carlin

  • Member since
    June 2008
Posted by lewbud on Sunday, April 26, 2015 9:15 PM

Still plugging away on my Hellcat.  She is now in an appropriate three tone scheme.  Had a lot of schmutz on the wings after applying the gloss sea blue.  I thought, hey no problem, I'll buff that out and be ready fordecals.  Turns out Model Master's military colors don't buff out (plus I burned through the paint near the leading edge).  Shot some flat sea blue over the wings and fuselage and everything was fine.  Now I'm waiting for the humidity to get below 50% so I can shoot some gloss.  Assembled the engine today.  It's a radial, but it never rolled off the P&W line.  Markings will be a F6F-3 from VF-51 off the USS San Jacinto.

Buddy- Those who say there are no stupid questions have never worked in customer service.

  • Member since
    March 2012
  • From: Corpus Christi, Tx
Posted by mustang1989 on Friday, April 17, 2015 7:53 PM

Gotcha covered Joe. And good news on that finger dude!


 Forum | Modelers Social Club Forum (proboards.com) 

  • Member since
    August 2009
  • From: MOAB, UTAH
Posted by JOE RIX on Friday, April 17, 2015 7:49 PM

Thank You very much flyer, Steve and Joe.

Thanks for asking Joe. I got good news actually. I do not have a ruptured tendon. Thus no surgery. It is a torn lateral muscle and will heal over time. WHEW! Unfortunately, I will have to wear the splint for another week or two. Hey, If it means I will heal, then I'm on it.

On a another note, the WestFest Model show that I attend regularly has been postponed due to the sudden death of one of the Grand Junction IPMS members. I had got to know Jim Hockett at the contests and had the opportunity to judge with him. It is a very sad loss to our modeling community. May you send prayers to his family.

"Not only do I not know what's going on, I wouldn't know what to do about it if I did". George Carlin

  • Member since
    March 2012
  • From: Corpus Christi, Tx
Posted by mustang1989 on Friday, April 17, 2015 10:58 AM

Doing good there Joe!! How did the splint doctor visit go? Hopefully good?????!!


 Forum | Modelers Social Club Forum (proboards.com) 

  • Member since
    July 2014
  • From: Franklin Wi
Posted by Bakster on Friday, April 17, 2015 8:37 AM

Hey Joe--I think those pigments and pastels worked well!  It looks really good man. Keep at Joe. 


Lewbud--thanks man.  Yes--post some pics.  I want to see what you have going on.

  • Member since
    December 2012
Posted by flyerduke on Thursday, April 16, 2015 10:07 PM

Joe, your plane looks great.

  • Member since
    June 2008
Posted by lewbud on Wednesday, April 15, 2015 11:21 PM

Steve,  great job on the Avenger!  I know car guys that can't shoot that glossy a paint job.  Very nice work.

Joe, your Hellkitty is looking great.

Tonight I forced myself to clean my work table, as well as my airbrush.  It's the first time I've worked on a model since the beginning of the year.  My Hellcat now has two colors on it, and hopefully tomorrow it will have three.  Nothing really picture worthy yet.  Will try to have some pics up by Friday.

Buddy- Those who say there are no stupid questions have never worked in customer service.

  • Member since
    August 2009
  • From: MOAB, UTAH
Posted by JOE RIX on Wednesday, April 15, 2015 10:49 PM

Hi There Guys. I figured I'd continue to post on here until either I'm done or until Clemens threatens to take my birthday away for deadline violation.Lol. I've managed some progress despite the big finger splint. Created exhaust stains using pastels and Mig pigments, painted the ID lights MM chrome and then painted over with Tamiya clear colors and then a misting Tamiya light gray heavily thinned with iso alcohol. That's pretty much all I can do until I get the splint off. I visit the physical therapist tomorrow and find out more about my future. Until then,  pics, pics, pics:

The exhaust stains really didn't show up to well in the pics. Still some more work to do but, I'm getting there. Thanks for hanging in there with me.

"Not only do I not know what's going on, I wouldn't know what to do about it if I did". George Carlin

  • Member since
    March 2012
  • From: Corpus Christi, Tx
Posted by mustang1989 on Friday, April 3, 2015 8:12 AM

No problem lil buddy!


 Forum | Modelers Social Club Forum (proboards.com) 

  • Member since
    August 2009
  • From: MOAB, UTAH
Posted by JOE RIX on Friday, April 3, 2015 6:32 AM

Thank You very much Joe. That is very helpful indeed. Yeah, it will have to be done in pastels as handling the model and the airbrush at the same time is not really an option at this time.

"Not only do I not know what's going on, I wouldn't know what to do about it if I did". George Carlin

  • Member since
    March 2012
  • From: Corpus Christi, Tx
Posted by mustang1989 on Friday, April 3, 2015 4:31 AM

This one's for the Reverend Joe as promised. Here's that article I was talking about referring to exhaust stains. This guy uses paint but in your case , and with your luck, I would use pastels like I did as they are a lot more forgiving.

The article:

His results using paint:


My results using pastels: (same result and a lot less hassle!)


 Forum | Modelers Social Club Forum (proboards.com) 

  • Member since
    July 2014
  • From: Franklin Wi
Posted by Bakster on Tuesday, March 31, 2015 7:57 PM

Hey guys---I am humbled by all of your comments. I don't even know what to say other than to thank you so much for your positive feedback!  I mean that, thank you!  All of you are awesome.

A couple of you hit on some thoughts that are really interesting, and I just want to take a moment to comment.  

Checkmateking02:  You mentioned this being a terrific tribute to Flight 19.  That is insightful and an honor.  A big part of why I chose this subject was so that in my own way, I could honor those that paid the ultimate price in that incident.  Not that building this model would really mean anything, but that maybe bringing their story to the forefront again might help us reflect on that. More so really, that I reflect on it.  It is just a reminder to me of the huge sacrifices people paid in that war, and in all wars. 

Greg:  You mentioned the plane having a showroom finish with slight weathering. As odd as this may sound, that is precisely what I was shooting for.  The whole event of Flight 19 has so many oddities that in my mind, it is an enigma. It is hard to explain some of the things that took place.  With that said, I wanted to bring that to life in my build.  The enigma being this...  It would have a shiny new feel, yet at the same time, give it an appearance of being older than it really looks. Like, well, this is odd...  How can this be?  Smile

Deep thoughts, I know.

Lastly, few days ago Lewbud mentioned that he should be able to finish his Hellcat in time. Buddy! Bring that bird in!  The Carrier is waiting for you.  The lights are on and the crew is waiting. Land that sucker.  

Thanks again guys!

Steve

  • Member since
    May 2013
  • From: From the Mit, but live in Mason, O high ho
Posted by hogfanfs on Tuesday, March 31, 2015 5:33 PM

Steve, the Avenger turned out fantastic! You did a great job on your first born! Congrats on making to the finish line!

 Bruce


 On the bench:  1/48 Eduard MiG-21MF

                        1/35 Takom Merkava Mk.I


  • Member since
    February 2014
  • From: Michigan
Posted by silentbob33 on Tuesday, March 31, 2015 4:41 PM

Your Avenger Is gorgeous Steve! It's been a pleasure watching it come together

On my bench: Academy 1/35 UH-60L Black Hawk

  • Member since
    May 2013
  • From: Indiana, USA
Posted by Greg on Tuesday, March 31, 2015 10:15 AM

Holy cow, Steve.

I hadn't realised this scheme was the flight leader of flight 19. That is very cool.

The showroom new (except for your slight weathering) finish really makes your TBM pop. All those beautiful AM/Academy panel lines and rivets and what-not really pop.

The position lights are gorgeous, and thanks for sharing your tip. That I gotta try.

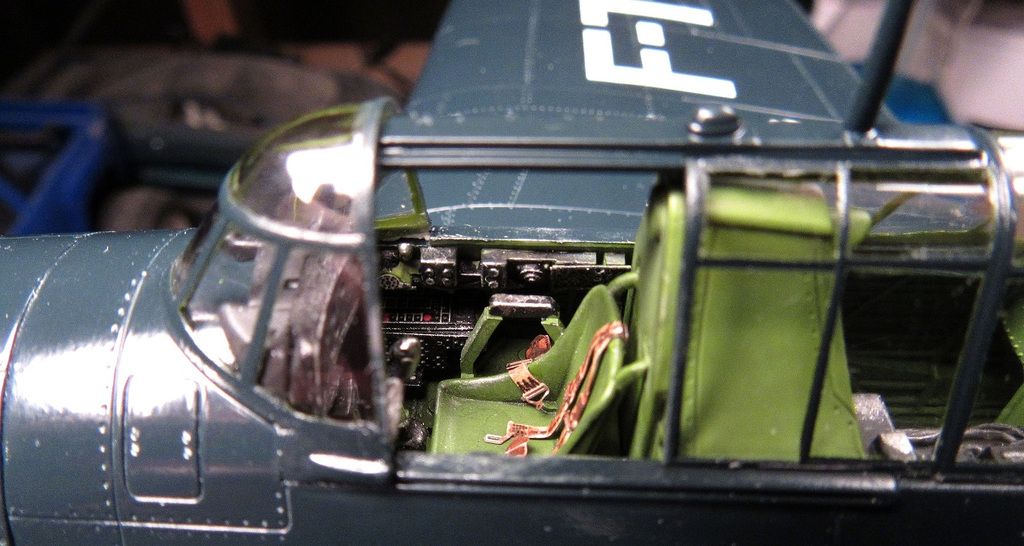
Really like the way the interior green contrasts against the otherwise dark airframe. What is that, Midnight Blue or something close?

You should be very proud of your first build back after your hiatus.  Toast Yes Yes 

  • Member since
    March 2012
  • From: Corpus Christi, Tx
Posted by mustang1989 on Tuesday, March 31, 2015 8:24 AM

I know this Joe busted the popcorn out!! Good Grief!!!! This sir is an outstanding masterpiece of an Avenger! The finish...flawless....the appearance...breathtaking!!! You should be proud to put this thing not only in your display case but also in a show. Great job Steve!Yes


 Forum | Modelers Social Club Forum (proboards.com) 

  • Member since
    August 2009
  • From: MOAB, UTAH
Posted by JOE RIX on Tuesday, March 31, 2015 7:02 AM

Bravo! BRA-VO!!! That is absolutely awesome Steve. Man, you should immensely proud of that overall effort. One thing in particular that I am impressed with is the work you did to portray it with the gear up. Really nice work there. Congratulations on your completion and finishing the GB. It has been an absolute pleasure to watch your skills at work.  

"Not only do I not know what's going on, I wouldn't know what to do about it if I did". George Carlin

  • Member since
    December 2012
Posted by flyerduke on Monday, March 30, 2015 11:38 PM

Beautiful!  You really did a great job Steve.  Well done.

  • Member since
    September 2003
  • From: AandF in the Badger State
Posted by checkmateking02 on Monday, March 30, 2015 10:35 PM

Great presentation and an outstanding Avenger.  A terrific tribute to Flight 19.  It's a fascinating story.


  • Member since
    July 2014
  • From: Franklin Wi
Posted by Bakster on Monday, March 30, 2015 9:37 PM
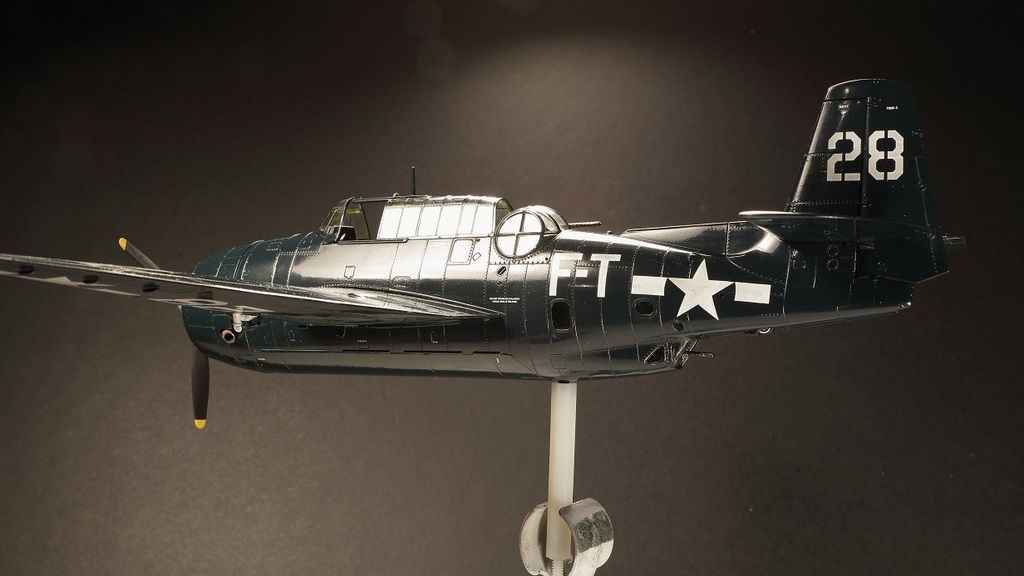
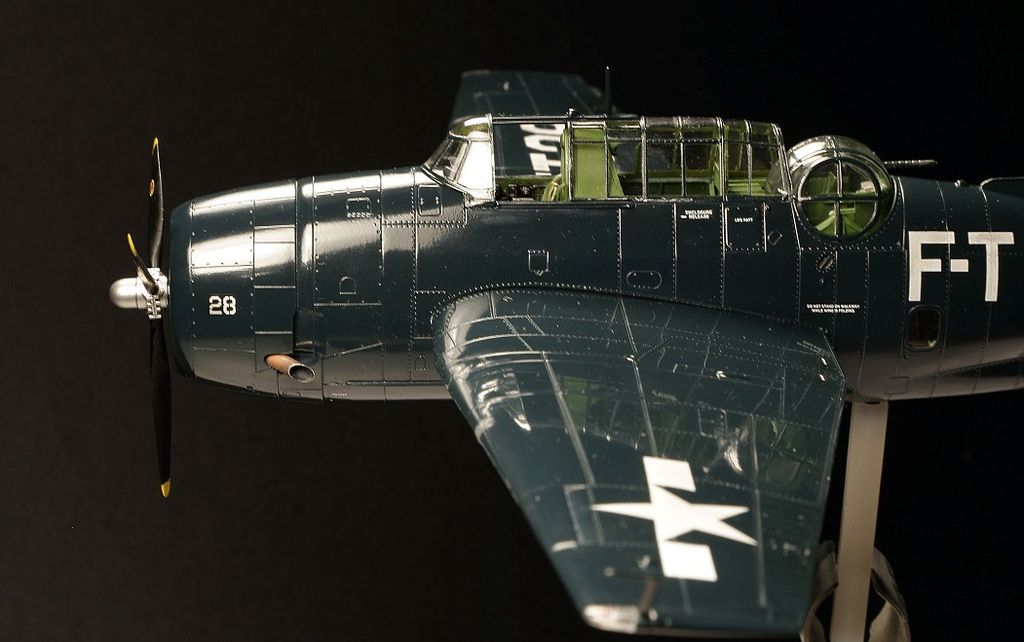
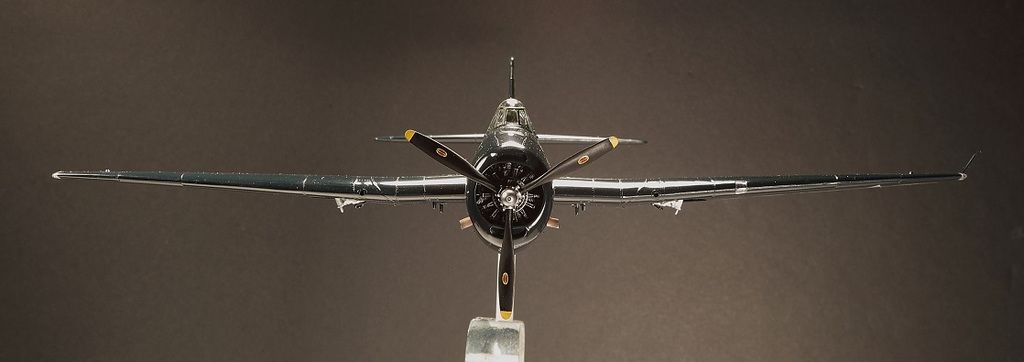
Hello everyone.  Well, I have been working on this build for 9 months and she is finally done percolating. Like after given birth, a big sigh of relief.
Joe and Greg want to break out some Popcorn for this reveal, so I promised to provide an extended version.  Heck.  This is my first born, so the first is always the one you don’t forget.  So like a proud papa, I want to break out the cigars. I hope you can put up with me on this.
Many of you are probably familiar with the case of Flight 19.  If not, type that into Google and you will easily see the odd events that surrounded that squadrons disappearance. Not only that squadron, but with rescue missions that followed.  That case always fascinated me.  I thought it would be cool to build the squadron leaders plane, and so that is what I set out to do. 


Prior to this build if you would have talked to me about a TBM-3 Avenger I would have said, huh?  I did my research as best as my limited knowledge afforded me, and I decided on the Academy Models version of that plane.  In retrospect, I probably should have searched out an in-flight kit since that was what I was looking to build.  I didn't though, and so it was a bit more difficult of a build for me.
In general, the kit offers a lot of nice detail.  You may remember my earlier ramblings about fit issues, sink marks, and poor instructions.  Those were all true, but to a skilled modeler (not me), the kit would be a cakewalk. None the less, this kit forced me to get my skills moving in the right direction. Thus, I have no regrets.
Before we get into the slideshow, I should mention that I did not install the antenna wire.  I have plans to, but I am holding off until I decide about adding a pilot to the build at some future date.  I need to keep the main canopy section unattached if I am going to do that, and I can’t add an antenna wire until I attach the canopy.  Also, you won’t see the front side windows in any of the images and for the same reason.  I tried resting them in place but without tacking them in somehow, they would just fall out.  So for the purposes of this GB, this kit is complete.
I should also mention that I did some weathering in the last few weeks that I didn't cover on the GB. Sadly, those effects are lost with the limitations of my photos.  I added some paint chipping to the canopies, guns, and I added some washes to the prop, the office, and I even toned down the decals with a misting of very thinned down black paint.  Anyway--I did try to weather some.


Well Greg and Joe, do you have your popcorn?


Below:  With this image, I just want to make a few comments.

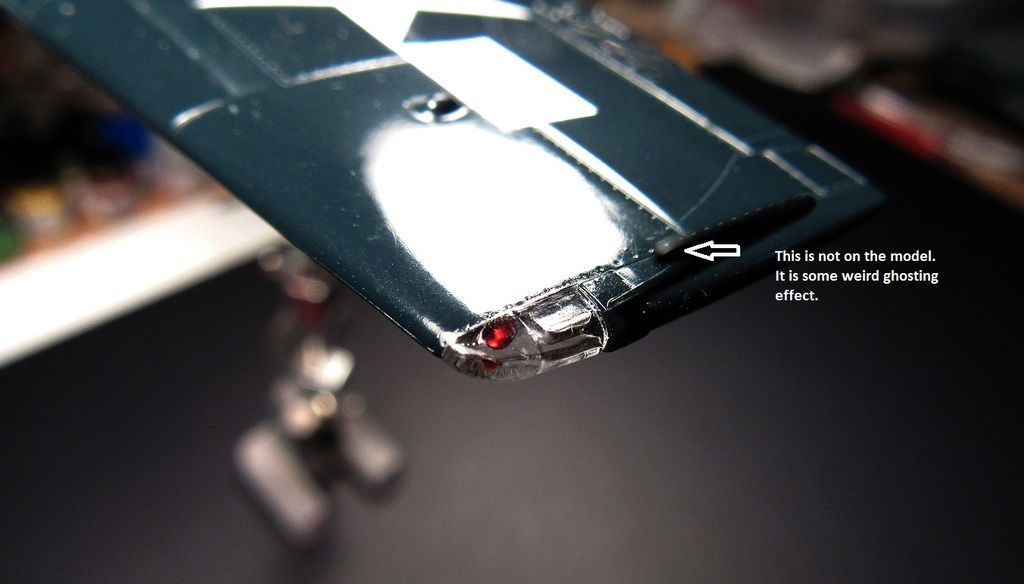
1.        Many of you may already be doing this, but it was my first attempt. Rather than using a canopy or white glue, I opted to try using Future to tack pieces like this in place.  It worked absolutely terrific. There were no worries of gloppy messes and the end result is a very clean install.  It has decent strength to it and even better, it was so dang easy.  I laid the piece in position,dipped my #0 brush into Future, dabbed off the excess, then pulled the brush along the joins.  Capillary action drew the Future into the join and you are done. Let it set, and forget it.  Sounds like an infomercial doesn't?  

2.        I used Tamiya clear to paint the bulbs and for the base color I used Alclad aluminum.  When ambient light hits the bulb just right, it looks absolutely gorgeous.  It almost sparkles at you, like a gem. The painted bulb gives the look of translucence, as bulbs are.  I just thought I would share that.

3.       In my research about these position lights I had read one thread where it was said that on some planes, the lens covers were colored.  Reading this sent me off on a tangent to find out more.  The thought of colored covers sounded kind of cool to me.  I searched and searched, but I was not able to confirm this.  Then one day, I went to a local HS to pick up some paint.  In the store was a customer I had talked with before, and the guy claimed to have worked on refurbishing Avengers.  That is a long story in itself but if true, what are the odds I would meet someone that has firsthand knowledge about this plane.  Greg, you know this story.  This was a second meeting with him, and not the first I told you about.  I thought, great!  I’ll see what he has to say.  To my surprise, he confirmed that both had been used.  He explained that if the mechanic was out of stock on colored bulbs, he would install the colored covers and use clear bulbs. He said they would use whatever they had in stock at the time.  Everything the guy said made sense, and he even told me stories about how they converted some Avengers to be more of a transport plane.  They pulled out a bunch of stuff from the cockpit and fitted in more seats.  He went on to say that the Avengers flew like a dream.  BTW—the guy firmly believes the military knows exactly where the lost squadron went down. He said the military gets weird when the bodies are still in the planes, hence the secrecy. I can’t speak to that but I thought it interesting.  At the end of the day, I opted to use colored bulbs.  I felt that odds are Avengers came off the line with colored bulbs and clear covers.


Before I close this out.  I want to thank everyone for their patience with me, and for all the help and comradery.  It was fun, and a great learning experience.  Also--a special thanks to Clemence for running the GB.  I especially thank you for extending the time frame.  When you first floated the idea of an extension you mentioned something like 3/1.  Today, I am really glad you decided 3/31.  I needed every day of it to finish this.


JOIN OUR COMMUNITY!

Our community is FREE to join. To participate you must either login or register for an account.

SEARCH FORUMS
FREE NEWSLETTER
By signing up you may also receive reader surveys and occasional special offers. We do not sell, rent or trade our email lists. View our Privacy Policy.