SEARCH FINESCALE.COM

Enter keywords or a search phrase below:

PACIFIC CARRIER AVIATION GROUP BUILD

90867 views
1294 replies
1 rating 2 rating 3 rating 4 rating 5 rating
  • Member since
    April 2013
Posted by SchattenSpartan on Monday, November 17, 2014 3:05 PM

So tell me, Joe, when exactly did you change that Monogram kit for one of the Tamiya Corsairs? And don't lie to me!

All kidding aside, that's a truly amazing Corsair you got there! I would've never guessed that it started out as an ill-fitting, crude looking monogram relic. I'm sure your buddy is going to love it!

Is there any particular photo you want me to put on the front page?

  • Member since
    March 2012
  • From: Corpus Christi, Tx
Posted by mustang1989 on Monday, November 17, 2014 9:03 PM

The first pic would be great Clemens. Thanks for letting me on board!


 Forum | Modelers Social Club Forum (proboards.com) 

  • Member since
    July 2014
  • From: Franklin Wi
Posted by Bakster on Wednesday, November 19, 2014 10:49 PM

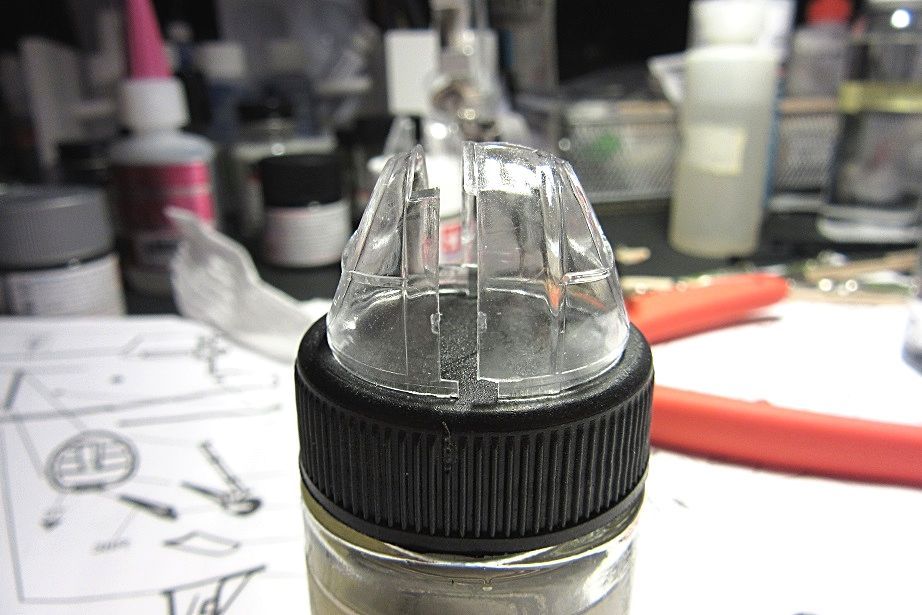
Greetings guys.  A little quiet on here, so I'll chime in.  So last Sunday I had a dilemma on how to glue my turret canopy.  I tried Micro Kristal Klear and I found that the bond strength was extremely weak.  The two halves separated with minimal pressure.  Joe thought I might try Testers Clear Cement.  So I went out and bought some and I tried it.  It definitely had a stronger hold because I carefully tested it.. (Thanks Joe).  Things went well until I did some light polishing and when snap! The bond failed. Darn it.  

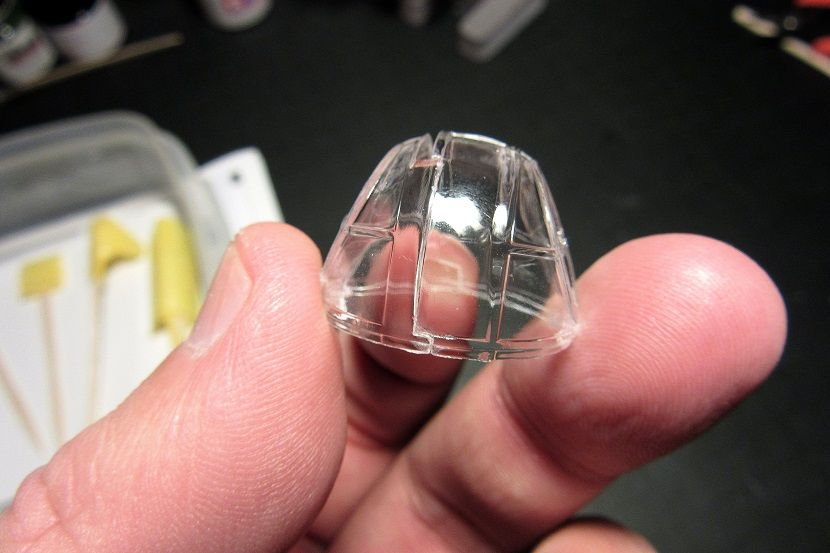
I thought about it a long time and I decided to go for broke.  I cleaned up the joins, taped the two halves into position, and pulled out the Tamiya Extra Thin Cement.  Oh yes folks...the big gun.  I took a deep breath, said a prayer, and flipped the turret over bottom side up.  I dabbed the join end with cement and let gravity and capillary action do the rest.  Well what do you know. The glue was for the most part staying within the join.  Once I was sure the glue set enough, I flipped the canopy over and did the other end.  This process was repeated on the other side.  I did it.  The canopy has pretty clean joins and a really nice bond.   The next day I gave it the Future treatment.  What a difference that makes too.

BTW Joe.  You were right about the sprue marks too.  I was able to sand and polish those out fairly easily.  I did do one additional step though and that was to give it  a final once over with plastic polish.  In the end, I am really happy how this turned out.  The next step is to mask it.   

Once I get this turret canopy painted, I can glue the whole assembly into the fuselage. Then finally, I can move towards joining the fuselage halves.

Before image below:
After image below:
  • Member since
    March 2012
  • From: Corpus Christi, Tx
Posted by mustang1989 on Thursday, November 20, 2014 12:10 AM

Looks like you pulled it off Bakster! Not bad, not bad at all. Yes


 Forum | Modelers Social Club Forum (proboards.com) 

  • Member since
    August 2009
  • From: MOAB, UTAH
Posted by JOE RIX on Thursday, November 20, 2014 7:46 AM

Outstanding Steve! I was not completely sure if the Testor's would provide a strong enough bond. Sounds as though it would be fine as long as no stress is put on it. I am definitely relieved to hear that the liquid cement worked without damaging the the clear part. Thank you for taking that bold step and for putting a bend in my learning curve.

Good on ya for progressing to the plastic polish. That certainly works very well for putting the finishing touches on any clear plastic. By the way, what plastic polish did you use?

It is great to hear from you and see some quality progress from your neck of the bench.

"Not only do I not know what's going on, I wouldn't know what to do about it if I did". George Carlin

  • Member since
    March 2012
  • From: Corpus Christi, Tx
Posted by mustang1989 on Thursday, November 20, 2014 9:41 AM

Well whaddya know. It's good ol Reverend Joe! Good to see you.


 Forum | Modelers Social Club Forum (proboards.com) 

  • Member since
    January 2011
  • From: Commonwealth of Virginia
Posted by Tal Afar Dave on Thursday, November 20, 2014 10:37 AM

Mustang- great job on the Corsair!!  With the pinkish backgrounds you could say that you're just doing your best to raise awareness for *** cancer, like the guys in the NFL do!!!  Seriously though, looks really good!

TAD

2022 New Year's Resolution:  Enter 1 group build and COMPLETE a build this year!!  Why Photobucket did you rob me of my one Group Build Badge???  Must be part of the strong anti-Monogram cartel!!!

 ]

  • Member since
    March 2012
  • From: Corpus Christi, Tx
Posted by mustang1989 on Thursday, November 20, 2014 10:54 AM

Thanks Dave!!! The pinkish backgrounds....lol .. Man I'm still learning that camera. Bakster has given me a little insight on that to help out so hopefully it doesn't happen again.


 Forum | Modelers Social Club Forum (proboards.com) 

  • Member since
    January 2011
  • From: Commonwealth of Virginia
Posted by Tal Afar Dave on Thursday, November 20, 2014 1:05 PM

It's all good!!!  I'm at a loss for anything camera related; good to know that other folks know what they are doing to help each other out!!

TAD

2022 New Year's Resolution:  Enter 1 group build and COMPLETE a build this year!!  Why Photobucket did you rob me of my one Group Build Badge???  Must be part of the strong anti-Monogram cartel!!!

 ]

  • Member since
    July 2014
  • From: Franklin Wi
Posted by Bakster on Thursday, November 20, 2014 7:51 PM

Thanks Mustang and Joe.

Joe you are correct.  The Testers is a decent bond if you don't put too much stress on it.  So for standard canopy use, I think it is a pretty good option. You called that from the beginning.  You stated as much that it won't have a real strong bond but it should be better than what I was using. I think you nailed that. One other nice thing about the Testers glue was that it was easy to remove from the canopy.  It was like rubber, and you could roll it right off.  It did not affect the plastic in the least.

Yes I decided to use plastic polish because the canopy still had a fog to it after polishing with the stick.  For grins, I brushed on some Future to see if that would remove it.  It helped it, but it was not as clear as it was before. So then I progressed to the polish.  The polish removed that remaining fog. 

As to what kind of polish I used, my options were limited with the lateness of the hour and on an Sunday. I did not have any at home, so I went to a hardware store. I found something called Flitz Polish.  There are probably better options out there but it is all that they had.  It served its purpose and did the job.

Well.. I have some nice time off coming next week.  I hope to really dig in and make some progress.

Steve

  • Member since
    September 2003
  • From: AandF in the Badger State
Posted by checkmateking02 on Thursday, November 20, 2014 8:46 PM

Nice work with the canopy, Steve.

And if you really get hard pressed, when the hardware store is closed, toothpaste can polish clear plastic pretty well, too.  But it has to be the paste type, not the gel.  Then, finishing up by rubbing with t-shirt material will often give a nice shine.


  • Member since
    December 2012
Posted by flyerduke on Thursday, November 20, 2014 8:47 PM

Steve-The canopy looks real nice.  I'll have to remember this page if I ever run into canopy problems.

Well, I eliminated one of my excuses for not working on my plane.  My spray booth arrived today.  Nothing fancy, but it will do for what I need.

Unfortunately, work is starting to pick up.  I may be using it as an excuse more than I like.  The good news is that I'm off all next week.  So things should start rolling along.

Craig

  • Member since
    March 2012
  • From: Corpus Christi, Tx
Posted by mustang1989 on Thursday, November 20, 2014 9:13 PM

Looking forward to your progress Craig. Off all week.......................hmmm...........................the modeling one could get done.  


 Forum | Modelers Social Club Forum (proboards.com) 

  • Member since
    December 2012
Posted by flyerduke on Thursday, November 20, 2014 9:19 PM

Big SmileBig Smile Lets hope the weather is nasty next week.  That way I'll have to stay inside. Wink

  • Member since
    March 2012
  • From: Corpus Christi, Tx
Posted by mustang1989 on Friday, November 21, 2014 7:06 AM

Ha ha ha ha! Woooo hooo! I know that feeling!! No yard work to do.............................but you didn't hear that from me...Zip it!


 Forum | Modelers Social Club Forum (proboards.com) 

  • Member since
    July 2014
  • From: Franklin Wi
Posted by Bakster on Friday, November 21, 2014 5:27 PM

Hey Craig

Thanks. BTW.. Nice looking spray booth you have there.  I made one from scratch many years ago and it may need revamping or replacing..  It worked well for model cars but space is kind of tight for an airplane.  Seeing yours has me thinking.  Have fun with it man!

Steve

  • Member since
    March 2012
  • From: Corpus Christi, Tx
Posted by mustang1989 on Friday, November 21, 2014 9:47 PM

Hey Steve. I finally found that dam incandescent setting on my camera. Fixed it and it works like a charm now!!  Thanks a mil.


 Forum | Modelers Social Club Forum (proboards.com) 

  • Member since
    July 2014
  • From: Franklin Wi
Posted by Bakster on Saturday, November 22, 2014 12:34 AM

Hey Mustang...way to go buddy!  That is awesome to hear...  Ok.  So now that you know that...another lesson for you.  Just in case you ever change your lighting source..keep in mind that the different technologies of bulbs operate at different spectrums of light.  All these new fangled light bulbs can really play havoc with image color.  Or like with my workbench as an example. The bench light has fluorescent, and my magnifier light is incandescent. If I have both lights on at the same time, I get a mixture of light.  If I take the image during the day, then I have sunlight coming in adding yet another spectrum of light. If I took a picture using all those light sources, I would have a mess. The point is this.  If you really want to get an more accurate color rendition, try to control your light sources.  Stick to one spectrum of light and set the camera accordingly.  BTW...cameras are designed to try and identify color temperature while in the automatic mode.  The problem is...most cameras do a poor job at.  That is the very reason you had to set it manually to make it look right. Cameras get especially confused if there is more than one spectrum of light going on in the room.  

Probably more information than you needed.  

Way to go buddy!!!

Steve

  • Member since
    July 2014
  • From: Franklin Wi
Posted by Bakster on Saturday, November 22, 2014 12:50 AM

Thanks Checkmate..  Too bad I didn't know that about the toothpaste.  It would have saved me a trip to the store!  I will make a note of this.

Thanks again...

Steve

  • Member since
    August 2009
  • From: MOAB, UTAH
Posted by JOE RIX on Saturday, November 22, 2014 7:45 AM

Craig: Nice spray booth you got yourself. That will definitely put you in business. I know that I would be severely handicapped in my building if I didn't have a spray booth at my disposal.

Steve: Thank you for the photo lighting tips. Very informative indeed. I'm assuming that if you throw a flash into the mix it will explode your camera.Big Smile

Joe: So, let's see some updated pics, post tutorial. Very curious to see how they look using a more proper setting.

I've finally got my Hellcat masked up for the intermediate blue application. Will shoot that tonight or tomorrow. I'm also looking forward to some extended time off from work over the holidays. Should be able to make some hay with the available free time.

"Not only do I not know what's going on, I wouldn't know what to do about it if I did". George Carlin

  • Member since
    December 2012
Posted by flyerduke on Saturday, November 22, 2014 9:45 PM

Question- What's the best way to remove acrylic paint from parts?  I shot some of the landing gear and doors with Vallejo model air white a couple weeks ago.  I took a closer look at it this evening and it looks like crap.  Thick in spots and thin in others.  One of these days I'm going to figure out the airbrush of mine.  Anyways...I want to strip off the Vallejo and use Mr. color this time around when I shoot the underside of the Hellcat.  Thanks.

Craig

  • Member since
    August 2009
  • From: MOAB, UTAH
Posted by JOE RIX on Saturday, November 22, 2014 11:13 PM

Craig, Try Windex first. That may be enough to do the trick. Another option is Polly S Easy Lift Off paint and decal remover. I've used this stuff a number of times and it works like a charm. Here is a link to some on Amazon.

www.amazon.com/.../B000BQSKQE

"Not only do I not know what's going on, I wouldn't know what to do about it if I did". George Carlin

  • Member since
    March 2012
  • From: Corpus Christi, Tx
Posted by mustang1989 on Sunday, November 23, 2014 4:28 AM

............................and if that don't get it , try some 70% Isopropyl alchohol. That'll get anything off and it costs slightly  over $1. I use alcohol pads and they work great.


 Forum | Modelers Social Club Forum (proboards.com) 

  • Member since
    December 2012
Posted by flyerduke on Sunday, November 23, 2014 7:49 AM

Thanks.  I'll try the glass cleaner first then alcohol since I have both on hand.

  • Member since
    April 2013
Posted by SchattenSpartan on Sunday, November 23, 2014 11:00 AM

That turret looks perfect, Steve!

I normally use Revell's Aqua Color Clean for both cleaning my airbrush and removing paint from models. I find it to be a wee bit stronger than normal alcohol.

  • Member since
    July 2014
  • From: Franklin Wi
Posted by Bakster on Sunday, November 23, 2014 4:52 PM

Thanks Clemens.  It's good it worked out that way or I might have been grounded for the rest of this mission Smile

Say Joe--That is funny about the Flash.  

Well, we are fast approaching Thanksgiving. For those of us in the States that celebrate it....I want to wish you all a fantastic holiday. Enjoy it!  

Steve

Below: A special message to Reverend Joe.

  • Member since
    August 2009
  • From: MOAB, UTAH
Posted by JOE RIX on Sunday, November 23, 2014 5:46 PM

LOL LOL LOL!!!! You are indeed a righteous member of the flock Brother Bakster. He Who Knows only Styrene will be anointing you greatly for your faith.

                                 Rev. Joe

"Not only do I not know what's going on, I wouldn't know what to do about it if I did". George Carlin

  • Member since
    July 2014
  • From: Franklin Wi
Posted by Bakster on Sunday, November 23, 2014 6:40 PM

Oh how great this day is!  I have been imbued in your light of styrene.  I am awash in it. What a mess it is.  Toast

  • Member since
    May 2013
  • From: Indiana, USA
Posted by Greg on Sunday, November 23, 2014 7:41 PM

Hey Steve, what a novel idea using Tamiya thin to join those turret canopy halves. I will keep that in mind in the future. Surely looks good.

  • Member since
    July 2014
  • From: Franklin Wi
Posted by Bakster on Sunday, November 23, 2014 11:37 PM

Hey Greg... thanks!  My next problem to deal with is the color coat.  I have the canopy pieces all masked and ready for color...but I need to nail down the paint process.  I am trying to use Acryl Deep Sea Blue for this build and I believe this paint is supposed to be a gloss. At least that is what I read.  I have been experimenting with the paint by first spraying some plastic spoons.  The best I have been able to get out of it is a satin, or semi-gloss.  Today, I tried adding some Acryl Clear Gloss in hopes that will help.  It did, but it is not where I want to be yet.  I am beginning to think that the paint is drying too fast.  It's not going on wet enough to allow itself to level and gloss out.  I guess I will try adding a leveler.  I also bought the same color in enamel.  I will see how the enamel works for me too.  Sigh...

JOIN OUR COMMUNITY!

Our community is FREE to join. To participate you must either login or register for an account.

SEARCH FORUMS
FREE NEWSLETTER
By signing up you may also receive reader surveys and occasional special offers. We do not sell, rent or trade our email lists. View our Privacy Policy.