SEARCH FINESCALE.COM

Enter keywords or a search phrase below:

PACIFIC CARRIER AVIATION GROUP BUILD

90834 views
1294 replies
1 rating 2 rating 3 rating 4 rating 5 rating
  • Member since
    April 2013
Posted by SchattenSpartan on Saturday, January 10, 2015 5:45 PM

Rob: Sorry for the long delay. I've been having issues with my router again the last couple of days. Finally decided to replace the damn thing. and now everything works fine again. That Devastator of yours looks really good. I'll get her added to the front page ASAP.

Joe: Holy damn, just when you think you got it all behind you, things go south again... I do know you'll get her looking as if nothing ever happened though!

Freddie: Those Hellcats look really nice! The weathering on the horizontal surfaces in particular turned out great! Nice start on the Corsair as well!

  • Member since
    August 2005
  • From: Long Island, New York, USA
Posted by fjs3 on Saturday, January 10, 2015 11:26 AM

Using black as a base , I have found gives the color some depth.  I don't put on the black heavy either, just for effect.  Even when applying the base color, I don't go heavy with the way I streak the paint across the model's surface, allowing the black to bleed through.  With each layer of paint, I lighten the shade of the base color, and apply it in the same fashion, only using a wider separation between the band's of paint.  With each application, I lighten the color further, separating the band's still more.  I'm sure you get the idea, LOL!!

"I'm gonna build all these models one kit at a time!

  • Member since
    August 2009
  • From: MOAB, UTAH
Posted by JOE RIX on Saturday, January 10, 2015 8:35 AM

Very impressive and gorgeous Hellcats Freddie. I love 'em. Your use of black primer definitely produces an excellent effect. Although I do the same thing but, with white or gray primers, I'm going to keep that idea in mind on future builds. Thanks for sharing you builds and your process. Also, your start on the Corsair office is looking mighty fine.

"Not only do I not know what's going on, I wouldn't know what to do about it if I did". George Carlin

  • Member since
    January 2008
  • From: Limoges
Posted by Rob.H on Saturday, January 10, 2015 8:17 AM

Thanks for the tips Freddie.  I never would have thought to put a black coat under the base colour and "weather" the base coat by spraying it overtop like that.

on the bench: Moebius Battlestar Galactica, Tamiya 1/35 M13/40

 photo PacificCarrierBuild2014small_zps595053a9.jpg

  • Member since
    December 2012
Posted by flyerduke on Saturday, January 10, 2015 8:07 AM

fsj3- Wow!  Those are very impressive airplanes.  You got that weathering down.

  • Member since
    August 2005
  • From: Long Island, New York, USA
Posted by fjs3 on Saturday, January 10, 2015 12:21 AM

Sure thing Rob

Weathering was done using a series of steps, involving painting the model.  Then it was done with thinned oils and chalk pastels.  

There are a lot of steps to the painting, but I'll try to sum it up in a nutshell.   I used Testors Model Master enamels.  

First coat was Camo Gray for the undersides.  I used this color instead of Insignia White, because the aircraft were dirty, and Camo Gray, looks the part of dirty white.  then I masked off the lower surfaces.

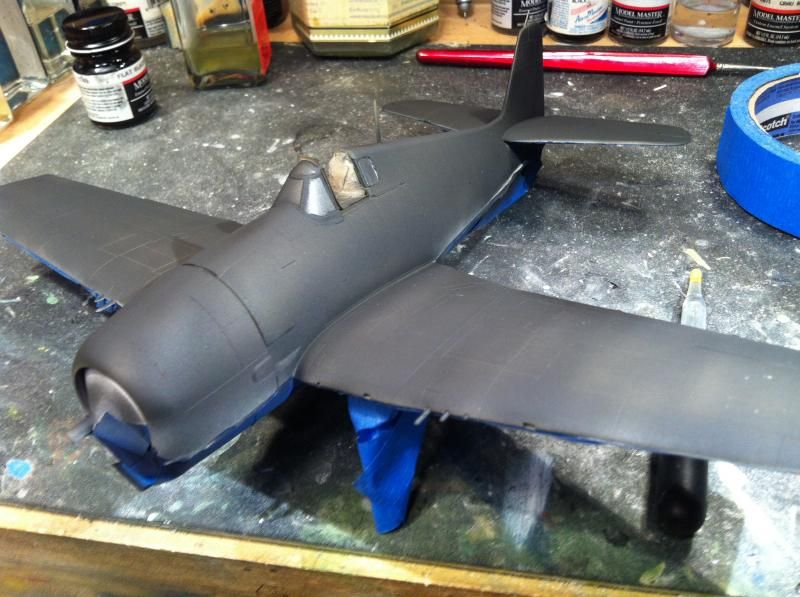
Uppers were painted flat black first.  Then the Intermediate Blue, applied in a streaking fashion to give the illusion of Intermediate blue, but covering, AND letting the black bleed through a little.  Then masked this loosely, because I wanted the demarcation line between all colors to be soft

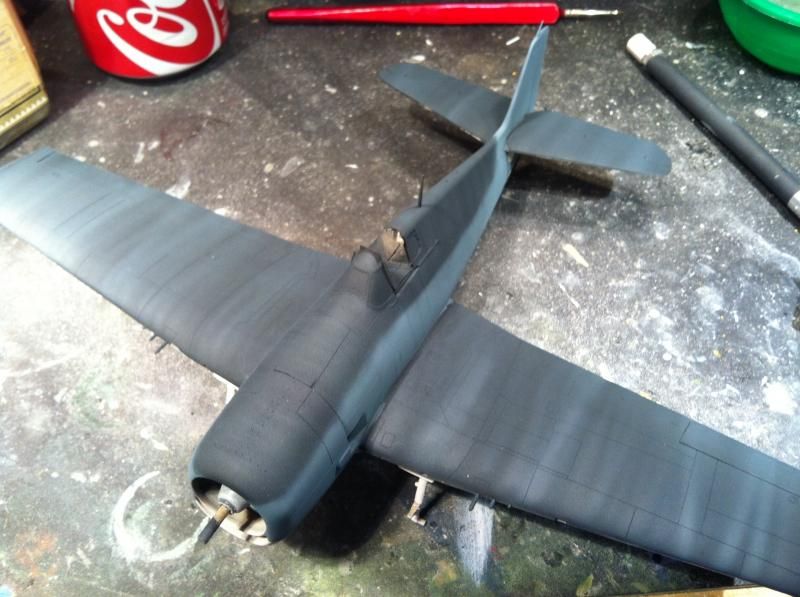
Upper surfaces were painted the exact same way.  Color was applied over the flat black in a streaky manner to give the illusion of Dark Sea Blue,and letting the black bleed through.  Streaks were done in the direction of the airflow on both the wings, AND the tail planes.  On the fuselage however, the streaks are done cross ways, to simulate drying stains and oxidation from rain and sea water.

But your not done yet.  when putting on the first coat of Dark Sea Blue, the passes you make make to be quick and relatively close together.  This goes for both the wings, tail and fuselage.  

Next, lighten the base coat a little, with some light gray.  Just a bit.  repeat the passes, but widen the gaps between passes.  Repeat again with a still lightened version of the base coat, widening the passes further still.  You can do these steps as much as you feel you need too, to get the desired effect.  

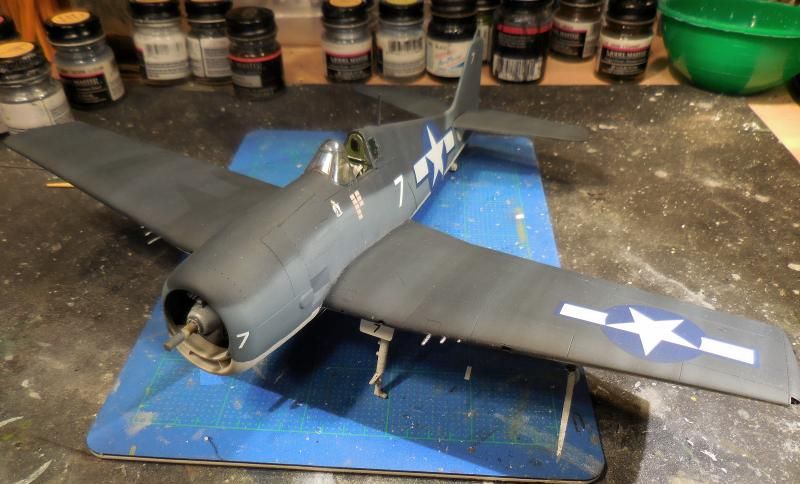
It may look drastic at first, but, when

you beginning applying your clear gloss and flat coats, it WILL tone it down a bit...

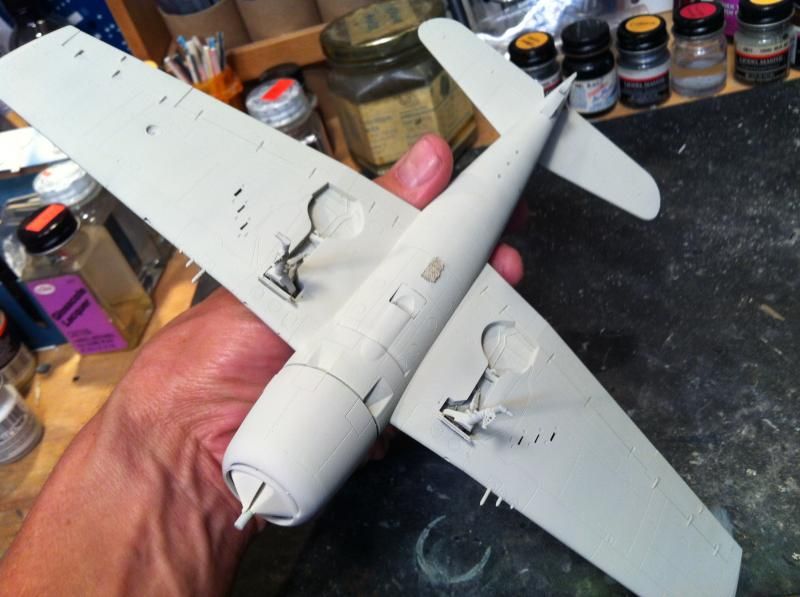
First pic is camo grey...
Now the black on the upper surfaces, before any other colors are applied...
Now the paint is on, and the streaks are VERY obvious.....right now at least Lastly, with the clear coats and decals applied, you can see how all the streaks have been toned down a bit
Add a little thinned oils.. I used a thinned neutral Gray for the upper surfaces, and a grimey brown/black for the lowers. 

I hope all that helps someone out.  It's a lot of steps, but in he end, it looks prety good on a model, especially if you are looking to make her LOOK like a combat aircraft

"I'm gonna build all these models one kit at a time!

  • Member since
    August 2005
  • From: Long Island, New York, USA
Posted by fjs3 on Friday, January 9, 2015 10:23 PM

I enjoyed building Eduard's '-3', "Hellcat" so much, that I started building a '-5' before I finished the first one.  I have a couple pictures, from the cockpit on out.  The seat belts are made from bits of paper, cut from the kit's instruction sheet.   

Here are a couple of the kit after painting...

And here are a few, with the decals in place, and after the flat coat has been applied...and there's NO SILVERING!!!  YAY!!

And there she is.  "White 99", an F6F-5, "Hellcat" flown by the CAG of Air Group Ninteen, Cdr. Hugh T. Winters, USS Lexington, (CV-16).  The aircraft is nicknamed, "Hanger Lilly"


"I'm gonna build all these models one kit at a time!

  • Member since
    August 2005
  • From: Long Island, New York, USA
Posted by fjs3 on Friday, January 9, 2015 8:23 PM

Okay, I think one will fit the criteria for this group build.  It's a Tamiya F4U-1, "Corsair" and as you can see, just the cockpit has the base color applied and the acrylic wash I made to darken the shadows.  Next up will be highlighting the base color by dry brushing all these parts with, first the base color, and then successively lighter shades of the base color.

"I'm gonna build all these models one kit at a time!

  • Member since
    January 2008
  • From: Limoges
Posted by Rob.H on Friday, January 9, 2015 8:15 PM

That's a sharp looking Hellcat Freddie.  

Could you provide me with an explanation of how you created the weathering on the wings and the engine exhaust on the fuselage?

Thanks,

Rob

on the bench: Moebius Battlestar Galactica, Tamiya 1/35 M13/40

 photo PacificCarrierBuild2014small_zps595053a9.jpg

  • Member since
    August 2005
  • From: Long Island, New York, USA
Posted by fjs3 on Friday, January 9, 2015 7:53 PM

This is my Eduard, 1:48 scale F6F-3 "Hellcat".  I had built this one over the last few months, before I had any idea this group build was even here.  I had been off the website for awhile and I just popped on one day, after I had literally finished putting the antenna wire on, and found you folks!

Anyway, here she is, "White 7" ,  an F6F-3, from Fighting Sixteen, (VF-16) and flown from the deck of USS Lexington, (CV-16) by Cdr. Paul D. Buie.

"I'm gonna build all these models one kit at a time!

  • Member since
    August 2005
  • From: Long Island, New York, USA
Posted by fjs3 on Friday, January 9, 2015 7:39 PM

Thanks for the approval!  I will post pics of both Hellcats, and the F4U, which is just started...

"I'm gonna build all these models one kit at a time!

  • Member since
    August 2005
  • From: Long Island, New York, USA
Posted by fjs3 on Friday, January 9, 2015 7:26 PM

Will do Sir.  Pictures are on the way!  and thank you for the go ahead.  I'll post the -3 first as she's the one that has been finished  The -5 and the corsair will be along shortly.  Thanks again!

"I'm gonna build all these models one kit at a time!

  • Member since
    August 2009
  • From: MOAB, UTAH
Posted by JOE RIX on Wednesday, January 7, 2015 8:51 AM

Thank you for sharing that info Joe. Definitely food for thought. What I find interesting about this article is that he is referring to using Tamiya Lacquer paints. My knowledge and experience with anything lacquer based is that they are fast drying and curing. i.e. Alclad and Tamiya, Testor's and Mr. Super Clear clear coats. I have never heard of having to allow anything lacquer based a month to fully cure. Interesting. This includes all the lacquer based products I work with and sell at my Ace Hardware Store.

"Not only do I not know what's going on, I wouldn't know what to do about it if I did". George Carlin

  • Member since
    December 2012
Posted by flyerduke on Wednesday, January 7, 2015 8:29 AM

Joe - Good read.  That's some good to know information.

JR- Keep on truckin'.

  • Member since
    July 2014
  • From: Franklin Wi
Posted by Bakster on Wednesday, January 7, 2015 7:31 AM

Hey Mustang...that might be the smoking gun on Tamiya clear.  

Joe...glad to hear you are able to recover the job without stripping it all.  That is good news.

  • Member since
    March 2012
  • From: Corpus Christi, Tx
Posted by mustang1989 on Wednesday, January 7, 2015 4:18 AM

Heya Joe. The following excerpt from Scale Car Magazine deals with Tamiya clear out of the can but it's the only thing I can think of that's causing your paint issue in the fact that you have a curing rate problem or a chemical compatibility issue with them. Anyhow see if you can use this info pal.

Quote from Scale Car Magazine:

Careful with that clear
I'll finish up this installment with one important note about Tamiya's lacquer paint. If you choose to apply Tamiya's clear gloss (no. TS-13) over a Tamiya color finish, you'll need to be careful when you apply it. You have two choices: you can add the clear coat immediately after applying the last wet color coat, or you can apply the clear coat after the color coat has cured and gassed out for at least a month. Tamiya's clear gloss paint cures at a different rate than the color paints in the line. If you wait even a day to apply the clear gloss, the different curing rates will cause the clear finish to crack. 


 Forum | Modelers Social Club Forum (proboards.com) 

  • Member since
    August 2009
  • From: MOAB, UTAH
Posted by JOE RIX on Tuesday, January 6, 2015 10:51 PM

You know Craig, I haven't. Best I've got is merely speculation. So, rather than racking me wee brain I'm simply moving forward.

"Not only do I not know what's going on, I wouldn't know what to do about it if I did". George Carlin

  • Member since
    December 2012
Posted by flyerduke on Tuesday, January 6, 2015 7:49 PM

Good to hear Joe.  Have you figured out the cause of your issues?

  • Member since
    August 2009
  • From: MOAB, UTAH
Posted by JOE RIX on Tuesday, January 6, 2015 7:34 PM

Hi There Craig! I'm actually making some fair progress on my second round of gloss coat repair. I've managed to sand out the wrinkles and now I'm masking in order to respray some white. I'll then flatten the glossy paint prior to reapplying the gloss coat. I'm feeling encouraged.

"Not only do I not know what's going on, I wouldn't know what to do about it if I did". George Carlin

  • Member since
    December 2012
Posted by flyerduke on Tuesday, January 6, 2015 6:23 PM

How's things comin' along guys.  I believe there are four of you still actively building planes.

  • Member since
    July 2014
  • From: Franklin Wi
Posted by Bakster on Sunday, January 4, 2015 12:30 AM

Thanks everyone for the encouragement!  I do appreciate it.

Wow Joe...not again.  Argh.  Your thinking about the gloss paint seems logical.  Man that is frustrating.  I hope you will be able to just sand that out.  

  • Member since
    January 2008
  • From: Limoges
Posted by Rob.H on Saturday, January 3, 2015 8:24 PM

Well Joe I was almost ready to congratulate you on beating the orange peel, and then I read the second half of your post.  Quel dommage!  I hope that sanding fixes the issue.  You may be right about it being the gloss paints though.  I wonder if they are causing the gloss coat to bead up?  I'd be curious to know if hitting the gloss with Dullcote and then the gloss coat would solve that problem?  Perhaps a test run on a piece of scrap before putting the plane back under?

on the bench: Moebius Battlestar Galactica, Tamiya 1/35 M13/40

 photo PacificCarrierBuild2014small_zps595053a9.jpg

  • Member since
    May 2013
  • From: From the Mit, but live in Mason, O high ho
Posted by hogfanfs on Saturday, January 3, 2015 7:54 PM

@Bakster, the Avenger is moving along nicely. Looks like it will be a chore to get those bomb bay doors closed. But, I know you will make it look exceptional.

@Joe Rix, sorry to hear the orange peel paint happened again. Really hoping you can get this figured out. 

@Freddie, looking forward to seeing pics of your Hellcat.

 Bruce


 On the bench:  1/48 Eduard MiG-21MF

                        1/35 Takom Merkava Mk.I


  • Member since
    December 2012
Posted by flyerduke on Saturday, January 3, 2015 7:28 PM

Rob - That's one sharp looking airplane.  Well done!

Joe and Steve - Nice forward progress.  You really have some nice clean lines Steve.

  • Member since
    August 2009
  • From: MOAB, UTAH
Posted by JOE RIX on Saturday, January 3, 2015 7:04 PM

Well, I have met with success! To a degree that is. I took a different approach to the fading this time around in that this time I used Tamiya medium blue thinned with iso alcohol. It seems to have worked well. I then gloss coated with Mr. Super Clear. It came out wonderfully:

After that had dried I then moved on to gloss coat the underside as I had not got that far when the first coat went south on me. I sprayed it on and as it dried BAM!

Yup, another issue with the orange peeling. Unbelievable!!!!!! So, the best I can figure is that both the Tamiya and Mr. Super Clear gloss coats do not react well over a glossy paint. I draw this conclusion only in that when I applied the Tamiya thinned blue it flattened the sheen on the upper wing. Purely conjecture on my part. Well, this time, considering the damage is not as extensive, I will attempt to sand it smooth and then repaint the white. Oh, and by the way, AAAAAAHHHHHH !!#$%&*!!!!!!!!!. I'm feeling much better now.

"Not only do I not know what's going on, I wouldn't know what to do about it if I did". George Carlin

  • Member since
    August 2009
  • From: MOAB, UTAH
Posted by JOE RIX on Saturday, January 3, 2015 6:44 PM

Rob: Absolutely stunning job on your Devastator. That is some really great work. There is no way that I can tell that this only your second model. Looks like it was done by a seasoned veteran to me. Congratulations on finishing it for the GB. It's been a real pleasure to share a GB with you.

Steve: Excellent progress my friend. I'm quite sure that you be successful in whooping those bomb bay doors into shape. I also use EZ Line and it is indeed wonderful to use for aerials. This is good for me as I am a complete dork when it comes to stretching sprue.

I have a little experience with VF canopies myself. I will break down and use them only if the kit canopy is unacceptable or if the kit canopy does not offer an open option.With that said, like Rob, my issue is with cutting them out. It's difficult to cut them out perfectly so that they will fit on the first try. The other issue I have is that the material used to make is an absolute bugger to sand. It is some really tough stuff so it takes some hard core sanding to get it down to a good fit on the aircraft. But, I do like the fact they give you the option of a potentially better canopy.

"Not only do I not know what's going on, I wouldn't know what to do about it if I did". George Carlin

  • Member since
    July 2014
  • From: Franklin Wi
Posted by Bakster on Saturday, January 3, 2015 6:19 PM

Hey Freddie...welcome to the GB.  I am looking forward to seeing your progress.

Steve

  • Member since
    July 2014
  • From: Franklin Wi
Posted by Bakster on Saturday, January 3, 2015 6:17 PM

Rob.... Holy Cow. As I read through your experience I was thinking yep, that makes total sense!    Now I know what I would be in for if I go that route. I think that most every issue you mentioned is an inherent problem with vacuum forms.  Just my opinion.  It just occurred to me that I once worked on a blasawood plane and it had a VF canopy.  I had an aweful time cutting it and in fact it looked terrible.  I suppose as a person gets adept at working with it, it might get easier. The one deal breaker for me though might be that the detail is soft.  I can see that being a byproduct of the vacuum form process. I guess that is a pros and cons thing.

Thanks a million for sharing your experiences on this build.  Hopefully others can weigh in on the vacuum forms.

  • Member since
    January 2008
  • From: Limoges
Posted by Rob.H on Saturday, January 3, 2015 5:30 PM
Bakster

I can imagine though that VF offers its own problems.  If you don't mind me asking.  What issues did you see with vacuum form?

I had three problems with the vacuum canopies Steve. The first was cutting them out. That was a real hairy experience since one mistake can destroy the canopy. I didn't do as good job of getting nice clean cuts as I would have liked. Most likely that is an experience issue. But as a result of the cuts I made, the canopies didn't give a really snug fit to the airframe.

The second issue arose when I was masking the canopy frame. I found some of the details for the frame a bit "soft" and so it made it a little more difficult to mask them off. When I first tried to use Tamiya tape I couldn't really decide where I should cut the tape to make the masks. Fortunately the bare metal foil I switched to was so thin I could easily see where to scribe the masks (the BMF had another set of issues with the adhesive... sigh). The soft details could be a specific issue with this particular canopy, or it may be a general problem with vac formed canopies. I don't have enough experience with them to know.

Issue number three is that the plastic used in not as rigid as styrene, and this led to some "fit" issues when I was trying to attach the canopies. After separating the three sections for the rear of the canopy the different pieces did not retain their proper widths. The main canopy section pulled in too narrow and the last section of canopy splayed a bit too much out. Because of this, and the slow curing time of the clear parts cement it was very difficult to get the parts to conform to the width of the airframe while the glue was setting. In the end I switched to CA and tacked down the main canopy section with the two smaller pieces simply tucked inside. Again, it could just be a specific problem with this particular canopy since I had to section the single piece molded part into five separate pieces to create an open canopy.

One final comment on the vac formed canopy that I didn't really think about until the end was that I had to drill holes in the windshield to fit the torpedo sight on. That was another really hairy moment as I had visions of a slip of the drill or files scratching the canopy just at the end of the project!

By the way, if anyone has gotten to the end of this diatribe and has any solutions to my issues, I'd be happy to hear them.

on the bench: Moebius Battlestar Galactica, Tamiya 1/35 M13/40

 photo PacificCarrierBuild2014small_zps595053a9.jpg

  • Member since
    January 2008
  • From: Limoges
Posted by Rob.H on Saturday, January 3, 2015 5:04 PM
Hi Freddie, Clemens did give you a go ahead on the unfinished Hellcat in this earlier post which you must have missed.
SchattenSpartan

Freddie: Please do post some pictures of your Hellcats! I can't include the finished one on the front page because you built it outside this GB, but the unfinished one is a go!

on the bench: Moebius Battlestar Galactica, Tamiya 1/35 M13/40

 photo PacificCarrierBuild2014small_zps595053a9.jpg

JOIN OUR COMMUNITY!

Our community is FREE to join. To participate you must either login or register for an account.

SEARCH FORUMS
FREE NEWSLETTER
By signing up you may also receive reader surveys and occasional special offers. We do not sell, rent or trade our email lists. View our Privacy Policy.