SEARCH FINESCALE.COM

Enter keywords or a search phrase below:

100th Anniversary of WWI GB

75869 views
879 replies
1 rating 2 rating 3 rating 4 rating 5 rating
  • Member since
    October 2013
Posted by Big Blue on Tuesday, July 29, 2014 10:46 AM

Bish,

If I'm not mistaken, I have seen pictures of Mike's Eindecker from the GB, and it is not only this kit, but the same markings I am planning!

That aside, take the Wingnut plunge.. you will not regret it.

  • Member since
    December 2002
  • From: Bury St Edmunds, Suffolk, England
Posted by Bish on Tuesday, July 29, 2014 11:35 AM

O I will do, I was thinking that if this GB carries on for each year of the war, I might do one of these and possibly one of the new tank kits coming out.

I am rather drawn to Udet's aircraft as well

I am a Norfolk man and i glory in being so


On the bench: Airfix 1/72nd Harrier GR.3/Fujimi 1/72nd Ju 87D-3

  • Member since
    June 2013
Posted by bvallot on Tuesday, July 29, 2014 12:41 PM

I can't believe this thing is just kicking off and we're already on page 23 of this GB!!  Good Lord!! =D

On the bench:  

Tamiya F4U-1  Kenneth Walsh


  • Member since
    November 2008
  • From: Central Florida
Posted by plasticjunkie on Tuesday, July 29, 2014 4:44 PM

BB

Doing the wood grain is really easy and not a big deal. Here is a TUT: http://www.clubhyper.com/reference/woodgrainel_1.htm

and one for the prop:

http://www.aeroscale.co.uk/modules.php?op=modload&name=SquawkBox&file=index&req=viewtopic&topic_id=107041&page=1


I built this 1/28 Fokker Dr.1 a while back and doing the prop lamination was very easy. I sprayed the prop Acryl wood color, then used craft acrylic burnt umber for the darker lamination. I let it dry for a couple of ours and then applied multiple washes of artist oils in different brown shades till I got the desired filter. A couple of days later I brushed some Future for the gloss finish.

Close up of the prop grain effect


 GIFMaker.org_jy_Ayj_O


Too many models to build, not enough time in a lifetime!!

  • Member since
    April 2006
  • From: Denver, Colorado
Posted by waynec on Tuesday, July 29, 2014 4:46 PM

Bish

O, now that sneaked up out of no where. I won't be starting mine for a while, but I will defiantly be watching.

me too. i am so far behind and overcommitted though fortunately i am coming off a 3 week post regionals building slump just in time. i have a started KONIG i may do for this or a 1/700 DERFLINGER. have all the KONIGs and a DREADNOUGHT. plus a bunch of airplanes and a tank. so i haven't decided yet but i should do a boat.

Никто не Забыт    (No one is Forgotten)
Ничто не Забыто  (Nothing is Forgotten)


  • Member since
    October 2013
Posted by Big Blue on Tuesday, July 29, 2014 7:13 PM

Thanks for the links & info, PJ.

I have done wood graining before, so am not worried there... you are right, easy to do once you've tried it.  My concern is with the laminations, as I don't trust myself to be able to keep six to eight layers parallel to each other over those compound curves.  Your prop looks great, and I'd be happy to achieve a that result.

  • Member since
    February 2006
  • From: Smithers, BC, Canada
Posted by ruddratt on Tuesday, July 29, 2014 8:53 PM

Big Blue

Bish,

If I'm not mistaken, I have seen pictures of Mike's Eindecker from the GB, and it is not only this kit, but the same markings I am planning!


Exactamundo guys.  That's the very one and I enjoyed every minute of it. Yes

Blue, this is a pricey little tool,  but it may be what you're looking for as a possible solution to painting your prop....

http://www.ultracast.ca/products/RB_Productions/Tools_Scratch-Building/RB-T036/default.htm


.....and as for entries,  here's the WnW kit I'm building,  pretty much OOB.  Haven't chosen a scheme yet,  but I'm leaning towards option B ( same as the box top ),  which is one of the more rare 2-gun machines.....

It's great to see so much enthusiasm about this GB,  and how much progress has already been made.  Let's keep it going fellas!


Mike

 "We have our own ammunition. It's filled with paint. When we fire it, it makes pretty pictures....scares the hell outta people."


  • Member since
    October 2013
Posted by Big Blue on Tuesday, July 29, 2014 9:09 PM

ruddratt

Blue, this is a pricey little tool,  but it may be what you're looking for as a possible solution to painting your prop....

http://www.ultracast.ca/products/RB_Productions/Tools_Scratch-Building/RB-T036/default.htm

Mike, thanks.  I had forgotten that I had seen that before.  Not sure I'm ready to give up on a home-brewed solution just yet, but good to keep that in mind!  

Looking forward to your Triplane.  That is an attractive scheme.

  • Member since
    April 2006
  • From: ON, Canada
Posted by jgeratic on Wednesday, July 30, 2014 11:18 AM

Big Blue, how about a home brewed solution based on the product Mike had linked?

Made mine out of sheet styrene for a 1/48 Albatros.  You should be able to add another sheet or two to increase the look of laminated layers.  I would increase the number of shims between the plastic sheets to at least five (I used only three and found it a bit flimsy).    Just keep them narrow, and don't worry  that they will block the paint spray - I found moving the airbrush back and forth along the length of the slot openings gives full coverage behind the shims.

regards,

Jack

  • Member since
    June 2013
Posted by bvallot on Wednesday, July 30, 2014 11:52 AM

Hot Damn!  That is a handy little trick.  That's why I love this forum.  =]  I'm not even going to bother explaining how I had originally planned to mask my prop for a wooden paint scheme. =P

Thanks again!!

On the bench:  

Tamiya F4U-1  Kenneth Walsh


  • Member since
    October 2013
Posted by Big Blue on Wednesday, July 30, 2014 7:07 PM

Oh I like that, Jack!  Very nice!

I think I have worked out a scheme involving masking with thin strips of Tamiya tape, but I may steal from you if my plan fails; many thanks!

In related news, I got my oil work (mostly) done last night, but was it was late, so I didn't have time to post pics.  I still need to do the propeller, obviously, but am on hold due to the aforementioned sink marks.  My filling skills came up short on round one, so I wasn't able to try out my lamination plan.

Here's the woodwork so far:

The oil is still drying, but once it does, I will give them a coat of clear yellow/orange to give them a varnished look and tie the grain together.

I hope to get some more interior work done this evening.

Blue

Edit:  In case its not clear, the parts without oil are not supposed to be wood, and will eventually be painted some other color (leather, aluminum, etc.)

  • Member since
    June 2013
Posted by bvallot on Wednesday, July 30, 2014 8:03 PM

Blue, this looks great.  This is pretty much what I have things planned to look like.  This will be my first biplane so everything will be done towards expectations and not from experience.  =[

But this is very encouraging!!! =D

On the bench:  

Tamiya F4U-1  Kenneth Walsh


  • Member since
    October 2013
Posted by Big Blue on Wednesday, July 30, 2014 8:16 PM

I am looking forward to seeing your build, BV; you're going to love it.

  • Member since
    July 2010
  • From: Tempe AZ
Posted by docidle on Thursday, July 31, 2014 2:57 PM

Thanks for all the input gentlemen and hopefully I can pull this build off.  I finally finished all the filling and sanding on the hull.  Even though Trumpeter used bulkhead stiffeners in the hull, there was still a fit issue.  Here are a couple of photos showing one of the last sandings and the hull primed, bilge keels added and mounting holes drilled.

Steve


  • Member since
    September 2013
  • From: San Antonio, Texas
Posted by Marcus McBean on Thursday, July 31, 2014 4:06 PM

Looks great.  The bilge keels are sitting nicely.  

I see you purchased the props for the Zevada kit.  I couldn't make them work without a whole lot of effort so I used the props from the kit, but I did install bass rods for prop shafts painted them steel.

  • Member since
    July 2010
  • From: Tempe AZ
Posted by docidle on Thursday, July 31, 2014 6:28 PM

Thanks for the help on the keels Marcus, it is most appreciated.  What size metal rod did you use for the prop shafts?  I am trying to decide on the best way to remove the props from the tree at the moment.  


  • Member since
    September 2013
  • From: San Antonio, Texas
Posted by Marcus McBean on Thursday, July 31, 2014 8:19 PM

I used 1mm bass rod.

  • Member since
    October 2013
Posted by Big Blue on Sunday, August 3, 2014 12:06 AM

Update:

Thanks to my using a little Japan Drier in my paint, the oil "grain" in my woodwork dried and I was able to get some work done on the cockpit.  Not done with it yet, but progress.
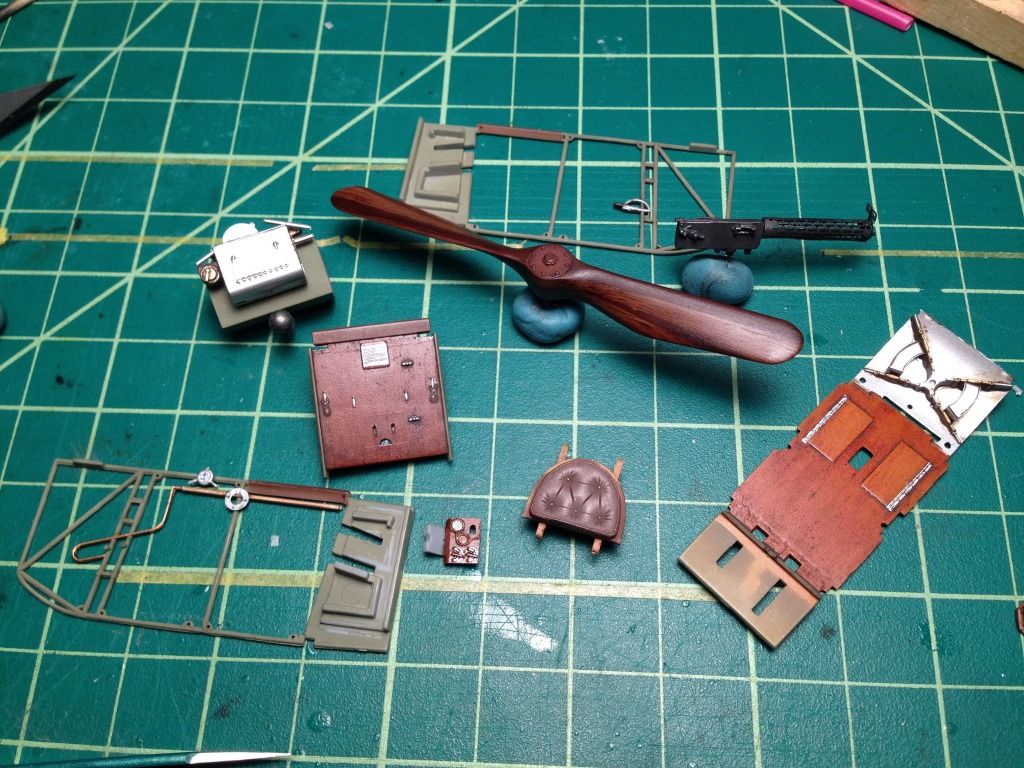
Once the oils had dried, I gave the woodwork a light coat of "varnish" made from a mix of Tamiya Clear Yellow & Red (3:1).  Both the floor and the rear wall then got a wash using Flory Dark Dirt.

The metalwork is a 2:3 mix of Tamiya XF-49 (Khaki) & XF-22 (RLM Gray), with a little XF-2 (Flat White) to lighten it up.

The Spandau machine gun is the kit plastic and photo etch combo. After priming it, I painted it flat black (XF-1) and then buffed it with AK Pigments Dark Steel which has the nice effect of giving it an overall steel / gun metal look, and highlighting the details (you can see it more clearly in the close up picture below.

As you can also see in this picture, I made my attempt(s) at the laminated prop.  Having figured out that I wasn't going to get the results I wanted by freehand, I devised a jig out of Legos, a machine screw and a few nuts (which is pretty much what my wife thinks I am after seeing this thing!):

The idea is as follows: the prop sits on the thin green piece (actually the blue tape on the green piece) and is held in place with a small clamp.  I hold the pencil flat on the smooth yellow pieces, and slide it from side to side to mark the prop.  By changing the green shelf's height, parallel lines can be drawn to represent the edges of the laminations.

My first attempt used brown colored pencils over a Desert Yellow (XF-59) base, but I wasn't happy with the unevenness of the pencil's coverage.  After looking at reference shots of Udet's aircraft, I also decided that I wanted a darker propeller, with less contrast between the laminations.  Something more like this (actual) Garuda prop:

So on my second attempt, I gave the propeller a base coat of Flat Earth (XF-52), marked it using the jig, and then masked the lines with thin tape:
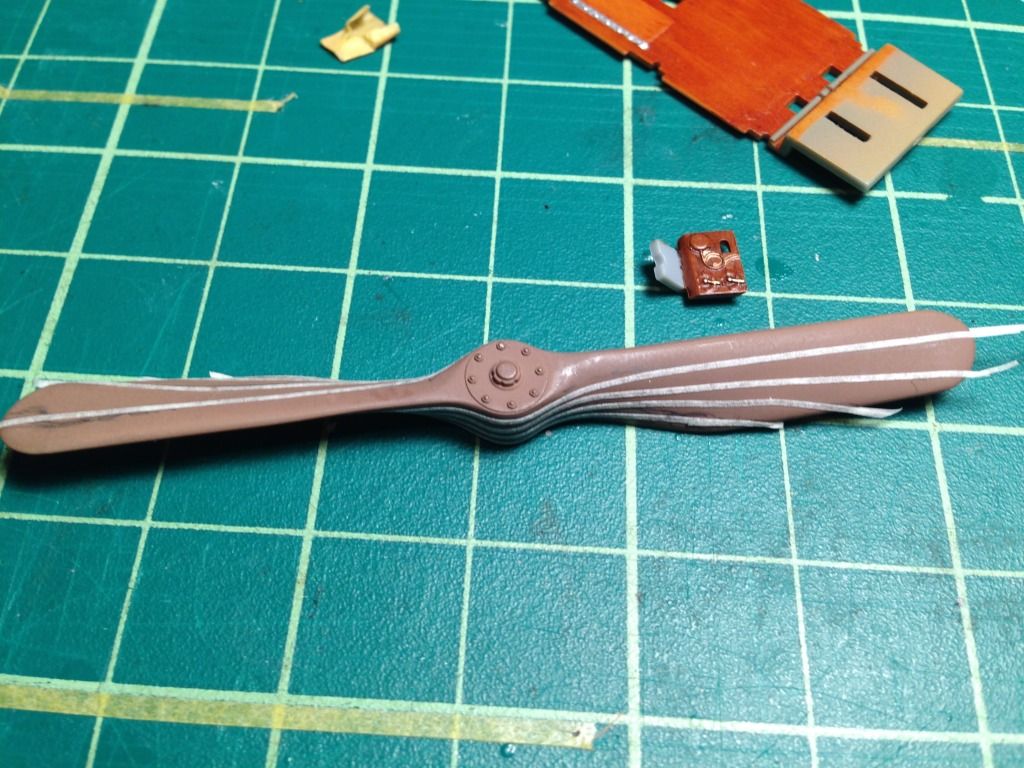
As you can see in the picture, my jig doesn't exactly give razor precise results (there's a bit of play in the structure), and the negatively sloped blade (left side in the picture) made tracking the pencil a challenge.  I wound up getting the best results I could on the right hand blade, and then using the lines to match up on the back side. 

Anyway, I filled in the laminations I wanted to mask with liquid mask, and sprayed XF-4 Flat Brown for the darker layers.  Once done, I dragged oils (Burnt and Raw Umber) and got these results:
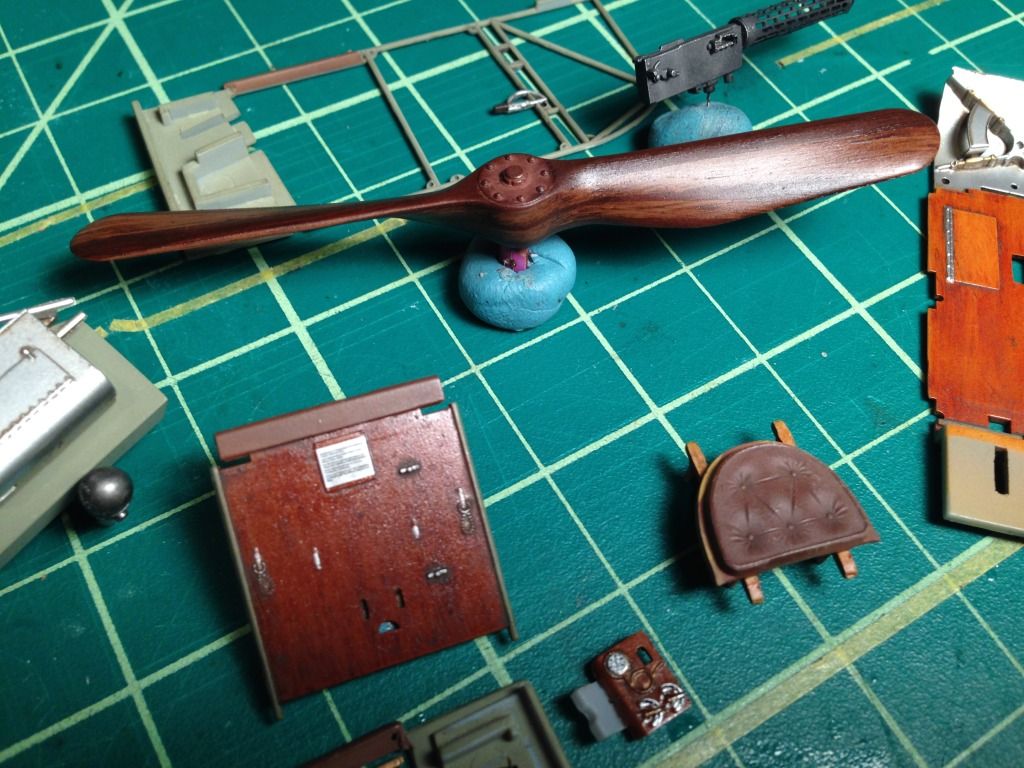
Sorry for the glare.  Its far from perfect: my layers are not even, my lines aren't particularly symmetric, its still more contrasty than I wanted, and I only have 5 laminations (I believe the 1:1 scale versions are generally 6-8 layers), but the overall effect is what I was going for.  I'll let it dry, "varnish" it, paint the boss, then apply decals and weather it a bit.

That's it for now,

Blue

  • Member since
    July 2010
  • From: Tempe AZ
Posted by docidle on Sunday, August 3, 2014 1:12 AM

Marcus, thanks for the metal rod size, I am heading to my LHS tomorrow to pick some up so that I can start the painting of the hull.

Blue,

Your build is looking really nice, thanks for posting the updates.  And by the way, my wife thinks I am completely mad but there you have it.

Steve


  • Member since
    December 2002
  • From: Bury St Edmunds, Suffolk, England
Posted by Bish on Sunday, August 3, 2014 4:20 AM

Blue, that is some sweet work on the wood. I love how the propeller looks.

I am a Norfolk man and i glory in being so


On the bench: Airfix 1/72nd Harrier GR.3/Fujimi 1/72nd Ju 87D-3

  • Member since
    February 2005
  • From: Proctor. MN
Posted by 65ss on Sunday, August 3, 2014 12:21 PM

Blue, the wood work looks good!

Dale

  • Member since
    February 2006
  • From: Smithers, BC, Canada
Posted by ruddratt on Sunday, August 3, 2014 3:32 PM

Steve, Blue -  you fellas are off to a great start!  I've never really followed a ship build, so this is gonna be really cool to watch!  Blue, that Eindecker is bringing back a lot of good memories - keep up the excellent work guys!

Work has commenced on the Tripe, mostly in the cockpit prepping for all the rigging in there.  Planning well ahead really helps make the rigging work go smoothly.  I'll be adding primer soon and base coats for the wood grain, CDL,  and NMF in there - should have some pics up soon.

Mike

 "We have our own ammunition. It's filled with paint. When we fire it, it makes pretty pictures....scares the hell outta people."


  • Member since
    February 2007
  • From: Bronze Squadron - Battlestar Cerberus
Posted by Lodni Kranazon on Monday, August 4, 2014 12:22 AM

Wow guys! Great work and thanks a bunch for the links! Here is a couple of pics of my SPAD wing getting rubber banded in anticipation of a dunk in hot water to get rid of the warp and (at one end) kink. Never done it before on this big (and thick) of a wing. I've already squared off the tips, being that the Polish aircraft were later-built Bleriot manufactured aircraft.

I have some Tom's Modelworks PE for French Aircraft and the Vickers guns so between that and some tips and techniques I have been able to glean off the Web this should turn out pretty good! Stick out tongue

Update: While it did not come out perfect, it did get enough of the warp and kink out to where I can at least WORK with it. I'm just glad the fuselage sections were not the same way!  Yes

[Admiring Starbuck's space fighter] Cassiopeia: It's a perfect machine! Born to dance amongst the stars! Starbuck: Yeah, it's bumping into them that has me worried.

  • Member since
    October 2008
  • From: Georgia
Posted by Rigidrider on Monday, August 4, 2014 10:35 AM

My 28th scale RMX wing is also warped, I tried clamping down both wing tips with a thicker washer under the centerpoint of the wing and gradually heating with a heat gun, it got some of the warp out. I like the method your using better, good luck and hope it works. How hot is the water to be? If its been mentioned, sorry, Im at work trying to scan forums while eating lunch.

Thanks

Doug

When Life Hands You A Bucket Of Lemons...

Make Lemonade!

Then Sell It Back At $2 Bucks A Glass...

  • Member since
    February 2007
  • From: Bronze Squadron - Battlestar Cerberus
Posted by Lodni Kranazon on Monday, August 4, 2014 6:47 PM

Doug, I used boiling water and left the wings in the water for a good 20 minutes. I did clamp the ends & the center. Like I said, it didn't come out perfect, but it did get it to were I felt I could work with it.

BTW, with everyone being so generous sharing links I thought I would share this one (I've got many and will post those up later). Shows a SPAD XIII being restored. Some excellent reference photos!!

memorial.flight.free.fr/SpadXIIIuk.html

Cool

[Admiring Starbuck's space fighter] Cassiopeia: It's a perfect machine! Born to dance amongst the stars! Starbuck: Yeah, it's bumping into them that has me worried.

  • Member since
    February 2011
Posted by GreySnake on Monday, August 4, 2014 7:38 PM

Hello guys,

Its been forever since I've logged onto the forum. The past few months I went through some financial trouble and other stuff that I won't get into do. I'll just say that I had to sell most of my stash and start from scratch again. But I've finally pretty much gotten everything back on track and under control. Anyway I'm terribly sorry for my long absence and hope you guys won't mind me coming back. 

Regards David

  • Member since
    February 2006
  • From: Smithers, BC, Canada
Posted by ruddratt on Monday, August 4, 2014 8:12 PM

No worries at all Dave,  just really glad to have you back.  We kept the lights burning for ya and have gotten off to a pretty good start.  On page one,  you'll find a current roster I've been keeping.  All you need to do is copy and paste it. 

Mike

 "We have our own ammunition. It's filled with paint. When we fire it, it makes pretty pictures....scares the hell outta people."


  • Member since
    August 2007
  • From: back country of SO-CAL, at the birth place of Naval Aviation
Posted by DUSTER on Monday, August 4, 2014 11:19 PM

      Dave!

Its not been easy  for me to watch all the action knowing you were MIA.

  But  I knew you would be back . Yep I keep saying, " He's never   uh, I mean, IS coming back .You can take my word for it" ---uhuh, yeah, that's what I said,   yep , I said it right out loud, yes siree, I knew you'd be back,


SERIOUSLY Good to see you back 

Steve

Building the perfect model---just not quite yet  Confused

  • Member since
    April 2013
Posted by SchattenSpartan on Tuesday, August 5, 2014 5:41 AM

That's some damn amazing wood effect you got going there, Blue!

It's really nice to have you back, Dave!

  • Member since
    April 2013
Posted by SchattenSpartan on Tuesday, August 5, 2014 5:41 AM

That's some damn amazing wood effect you got going there, Blue!

It's really nice to have you back, Dave!

JOIN OUR COMMUNITY!

Our community is FREE to join. To participate you must either login or register for an account.

SEARCH FORUMS
FREE NEWSLETTER
By signing up you may also receive reader surveys and occasional special offers. We do not sell, rent or trade our email lists. View our Privacy Policy.