SEARCH FINESCALE.COM

Enter keywords or a search phrase below:

P-40 GB 2014

55640 views
508 replies
1 rating 2 rating 3 rating 4 rating 5 rating
  • Member since
    October 2008
  • From: Georgia
Posted by Rigidrider on Friday, April 4, 2014 1:43 PM

Black dog... I hear ya... looks mean as hell just sitting on the tarmac.

Theuns... Thanks, I will

When Life Hands You A Bucket Of Lemons...

Make Lemonade!

Then Sell It Back At $2 Bucks A Glass...

  • Member since
    October 2008
  • From: Georgia
Posted by Rigidrider on Saturday, April 5, 2014 12:51 PM

OK Theuns... I have uncovered a nice one I forgot I even had in stash, Its the 1/32 Revelle Smithsonian P40-E, I had bought several years ago. There are two I'm considerind at the time and even though it wasnt an "E" I think I want to try to do the mount of Lt Taylor from the Pearl Harbor attack. I have a book coming and it might Change my mind being Lt Taylor's P40 was a "B". But the kit will be the same. The other is of a captured "Tomahawk" in Japanese markings. Thanks again for doing this GB and the tribute to this beautiful old bird!

Doug

When Life Hands You A Bucket Of Lemons...

Make Lemonade!

Then Sell It Back At $2 Bucks A Glass...

  • Member since
    September 2011
Posted by fightnjoe on Sunday, April 6, 2014 10:37 PM

well tis another brief update.

first the big oops that happened. all the way through i had measured, dry fit, measured, dry fit, etc. you get the picture. well when i went to do a final run through with pit and engine together i found to my horror i was about a half inch too long. after much cursing and a strong urge to make the current work a powder with blunt object i made several mistakes. first i cut the motor mounts at the firewall. big mistake and even bigger no no. messed up the firewall and broke off a couple pieces. next big mistake, try to force it. another huge no no. again with the broken pieces. next up was to try to fix my mess up with the cuts. made it worse for the firewall. so after much back tracking and fixing the royal mess i made of what i had done i finally got the broken pieces back in place and tried to mend the firewall a bit. well after all of that i come to tonight. some pictures of the engine in place on the pit and within the fuse. i believe it will fit in the fuse now but still not entirely sure of it. 

so here it is.


after taking the pics i decided the best way to tackle this paint job is to paint around the cuts prior to closing the fuse. this way i can not worry about overspray on the interior pieces. using acrylics, life color. had to remix it a couple of times before i got a decent spray through the brush. then found another major issue. seems somewhere along the way i had glued a small piece of sheet styrene to the side of the fuse and completely missed it. going to have to sand the area and respray yet again. 

what a messed up week.

all in all it shouldnt be bad but i am disappointed in that i had to do surgery on it and then in doing that i messed up a couple of parts. 


lets see what i can mess up next shall we.


all comments, critiques, and criticism are encouraged.


joe

Veterans,

Thank You For Your Sacrifices,

Never To Be Forgotten

Where you can find me:

Workbench on FaceBook  Google Plus  YouTube

  • Member since
    September 2013
Posted by blackdog62 on Sunday, April 6, 2014 11:49 PM

Your build is amazing. For me it's the exost pipes man those things just pop can you give the secret up. LOL amazing

  • Member since
    September 2011
Posted by fightnjoe on Monday, April 7, 2014 7:48 AM

thanks blackdog, no secret at all for the exhausts.  the exhausts are just alclad alum with a misting of model master burnt exhaust.  nothing special at all to them.

joe

Veterans,

Thank You For Your Sacrifices,

Never To Be Forgotten

Where you can find me:

Workbench on FaceBook  Google Plus  YouTube

  • Member since
    June 2013
Posted by bvallot on Monday, April 7, 2014 4:35 PM

Joe, that sounds awful! I've been there before.  Measure twice and cut once and somehow after all the math...something goes terribly wrong... =[

I can't imagine how that would happen to you with mostly kits parts in that area.  Only thing I can think is that the firewall being misaligned throws everything else off...

For me...I haven't accomplished too much more just yet.  I was putting off posting any of this just yet until I had something more worthwhile to share, but after a conversation with Ray concerning the True Details cockpit fitting properly...I decided I'd just post a couple of things to show how that's coming along.  So here goes:

Starting with what was removed.  I've sanded down everything that was molded on the sides of the fuselage.  I took a rotary tool and made quick work of it.  Sanding stick finished it off.  That cleans it up for the TD cockpit upgrade.  The floor of the cockpit on the kit parts has a couple of pins that fit together into the fuselage...took those off so that the new floor can fit more snugly up against the cockpit side-panels.  The remains of the holes are just barely visible.

Cockpit floor dry fit.

Here's a top view showing the left panel in place and the floor lined up appropriately.

It's important to file down those female ends to allow the TD floor to fit higher up or the gap between the panel and floor will be a bit too far.  It will cause a bigger shadow than it should.  So sand those nubs down and it'll fit.  =]

While I'm doing this, I'll just piggyback on what's happening in front of all this.  Just like Joe had an issue pop up with length...I've been careful to cut out these motor mounts to the appropriate length so that the engine sits right for the exhausts to fit through the opening for them in the cowl.  I'm taking more of an engineering approach of what's practical. The propeller reduction box fits onto a plate that marries to the propeller.  I've cut/filed this down to the right length so that the prop reduction box fits snugly to it and creates that right space for all the extra fittings and tubes that wrap around and into the engine.  This way the engine will be glued to the "plate" piece of the kit and centered.  The rest of the engine parts and mounts will match up accordingly and I shouldn't have anything get too long or too short on me.  I will have to build up a shim for the exhausts in order for them to hang out the cowl correctly.  The Ultracast exhaust parts were originally meant to snap right in there from just inside the cowl.  It'll just take a little scratching to get 'em to work.  =]

Hopefully, I get the ball moving on this now that I've got things sorted and figure out! =]

On the bench:  

Tamiya F4U-1  Kenneth Walsh


  • Member since
    December 2013
  • From: Greenville, TX.
Posted by Raymond G on Monday, April 7, 2014 6:12 PM

Doesn't look to bad, Britt.  How's the fit on the back plate?  Looking good!!!  

Joe, if it helps, I tattooed myself this morning working on the cockpit.  My air brush was acting up and I'd taken the atomizer off to clean it.  While doing so, the air brush slipped out of the holder (luckily not much paint in it) and I caught it... needle end down.  You probably heard the yell ;-)  

On the Bench:

U.S.S. Arizona (Revell)

P-51D Tribute (Revell)

57 Chevy Bel Air


  • Member since
    June 2013
Posted by bvallot on Monday, April 7, 2014 7:15 PM

The backplate is fine.  No issues with it.  However, I did have to scratch a piece behind the head rest.  You can see it on the 4th picture showing the cockpit. It's still white, but it's there.  I got a little carried away sanding the kit part off...sooo. =[  I would recommend test fitting the backplate first and then lining up your side panels.  That will keep everything in it's place.  =]

On the bench:  

Tamiya F4U-1  Kenneth Walsh


  • Member since
    November 2003
  • From: State of Mississippi. State motto: Virtute et armis (By valor and arms)
Posted by mississippivol on Monday, April 7, 2014 8:45 PM

Nice work, y'all!

  • Member since
    September 2011
Posted by fightnjoe on Monday, April 7, 2014 9:04 PM

thanks for the support all.  

actually thinking about it and looking at the way it sits, it may have been bulkhead 5 that caused the issue.  it may have the angle wrong.  just dont know how i could have missed such a large error.

joe

Veterans,

Thank You For Your Sacrifices,

Never To Be Forgotten

Where you can find me:

Workbench on FaceBook  Google Plus  YouTube

  • Member since
    December 2003
  • From: Charleston, SC
Posted by sanderson_91 on Tuesday, April 8, 2014 7:20 PM

Joe - nice save on your firewall and mounts.  Can't even tell you had any issues with them.

BV - looking good as well.

I'm making some progress on my P-40.  I just about have the resin cockpit installed.  I had some fit issues that required some careful sanding, but it's just about done. I will take some photos and post later.

Steve


  • Member since
    September 2011
Posted by fightnjoe on Sunday, April 13, 2014 9:57 PM
small but rather significant.


the fuse sides are now joined, seams sanded, flat black sprayed, and then a first. using life color acrylics. god they are tempermental. holy crap. had to repaint dang near the entire fuse again after i made the mistake of handling it after a couple of days.

here is where i sit right now. 

Image
Image

and something different. and truly not sure where i am going with this. the tail radio connection. 

Image


not sure where i am going with that as i am not sure if i am going with one of the wires to the wing or both wires. not sure of that as i havent sorted out the wings yet. not sure what i am doing with them. full wing or one as just the framing. still thinking about this.


so for now that is all. 


all comments, critiques, and criticism are encouraged.


joe

Veterans,

Thank You For Your Sacrifices,

Never To Be Forgotten

Where you can find me:

Workbench on FaceBook  Google Plus  YouTube

  • Member since
    December 2013
  • From: Greenville, TX.
Posted by Raymond G on Monday, April 14, 2014 12:37 AM

I was able to get most of the cockpit going this week.  I ran into a little problem with the nozzle on my airbrush, but I think I've got that taken care of.  I lack placing the instruments in the I.P., and while I've got the chair done I'm thinking about using the OOB seat and adding lap belts in lieu of what I've got.  Apparently, the early P-40s only had lap belts and not full harnesses.  Sense I'm doing Boyington's #21 while he was in the AVG I may go that route.  Thoughts?  I did run across one site where the contributor was a little taken aback by a picture that did show shoulder harnesses on one of the AVG birds.  May be no way to know for sure, but I do vaguely remember him saying something about getting ready for take off in his book.  I can't remember just how detailed he got, but I'll take a quick gander to see if he mentions anything about that.  

I'll try and get some pics up later this week.  Shoulder surgery in the morning, so it may be a few weeks though.  I'll miss watching you guys until then.  Talk to you soon, Raymond  

On the Bench:

U.S.S. Arizona (Revell)

P-51D Tribute (Revell)

57 Chevy Bel Air


  • Member since
    June 2013
Posted by bvallot on Monday, April 14, 2014 7:02 AM

Joe, that's coming along.  Looks like you got everything to fit pretty well.  =]

And you say lap belt only huh Raymond...?  Crap!  I'll look into that as well.  Rest up. and good luck.

On the bench:  

Tamiya F4U-1  Kenneth Walsh


  • Member since
    October 2008
  • From: Georgia
Posted by Rigidrider on Monday, April 14, 2014 11:34 AM

Good luck Raymond. Take your time and get better..

Doug

When Life Hands You A Bucket Of Lemons...

Make Lemonade!

Then Sell It Back At $2 Bucks A Glass...

  • Member since
    April 2010
Posted by Theuns on Tuesday, April 15, 2014 10:21 AM

Good work all round guys, keep the pix coming :-)

Theuns

  • Member since
    October 2008
  • From: Georgia
Posted by Rigidrider on Tuesday, April 15, 2014 10:54 AM

Joe, BV... great work guys! Outstanding!!!

When Life Hands You A Bucket Of Lemons...

Make Lemonade!

Then Sell It Back At $2 Bucks A Glass...

  • Member since
    June 2013
Posted by bvallot on Friday, April 18, 2014 5:20 PM

Thanks everyone.  Okay this will be one of my lasts updates for a while it seems.  I've got to pack all this up and move. =/  Oh boy.

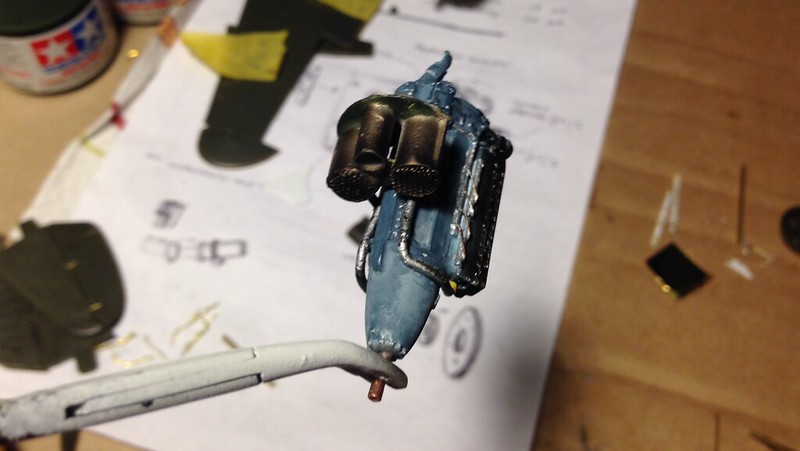
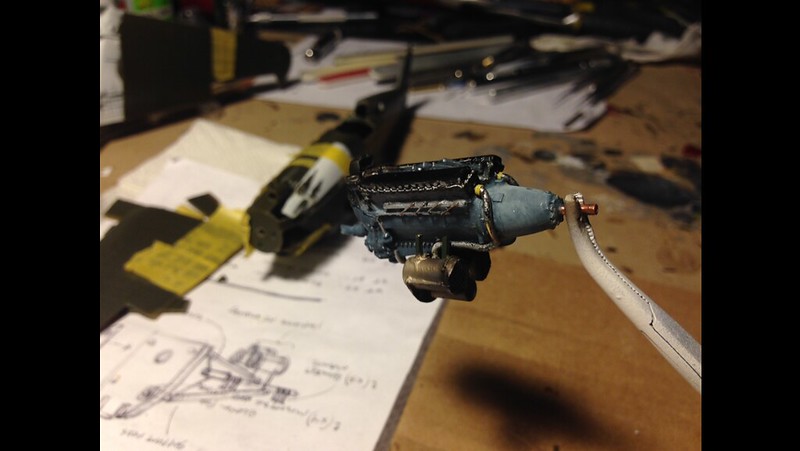
Just made some major progress on this V-1710-33 Allison.  It hasn't received a clear or flat coat yet.  I've got a few more things to add still before I can finish weathering everything here.  One thing I had to settle on was attaching the rod for the motor mount onto the engine first.  It was just too touchy trying to match it to the engine while a part of the rest of the mounting support arms.  There's also some touch up painting to do still, but I really needed to get to this part so that I could move on with it.
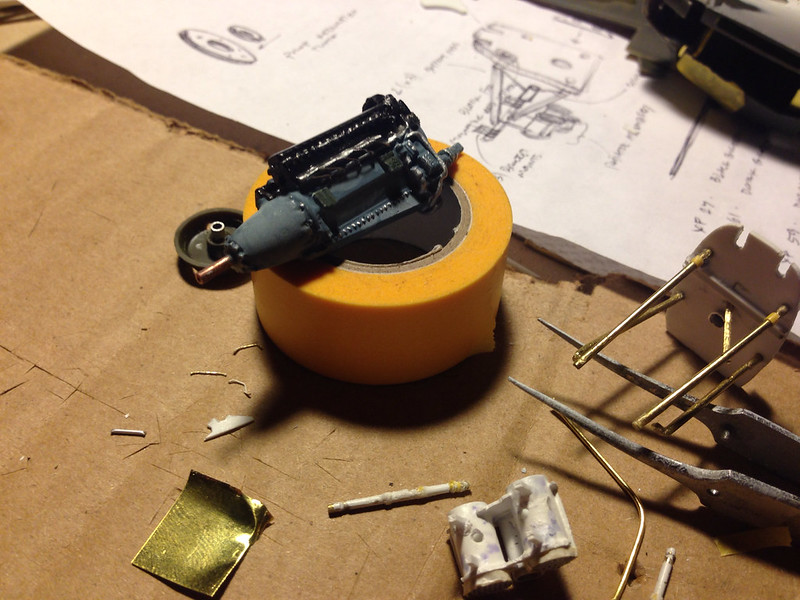
 image by brittvallot, on Flickr

 image by brittvallot, on Flickr
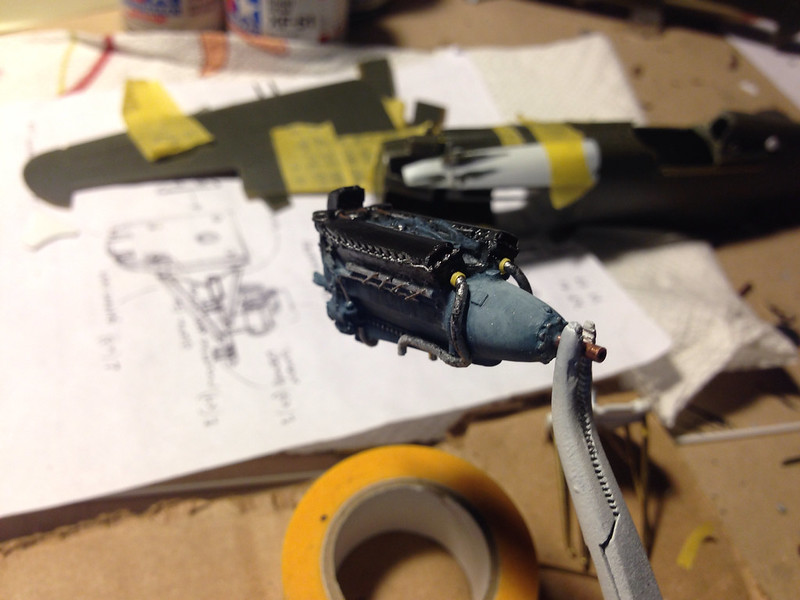
You can see here where a few of the ignition cables have fallen off while handling.  They'll get put back on later.
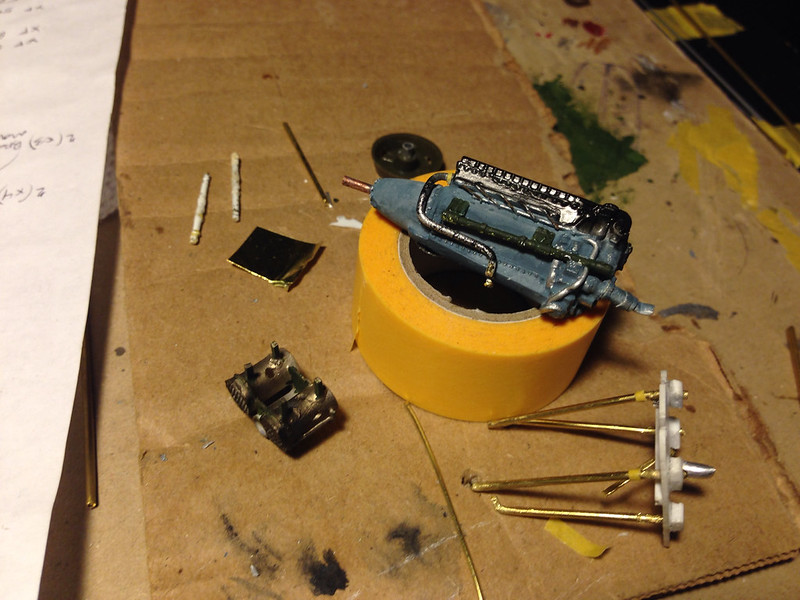
 image by brittvallot, on Flickr

 image by brittvallot, on Flickr
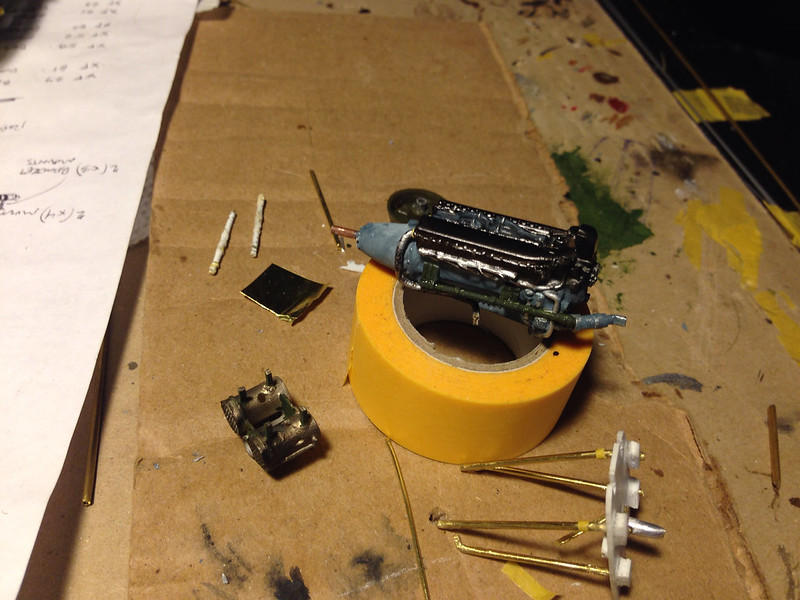
 image by brittvallot, on Flickr

 image by brittvallot, on Flickr
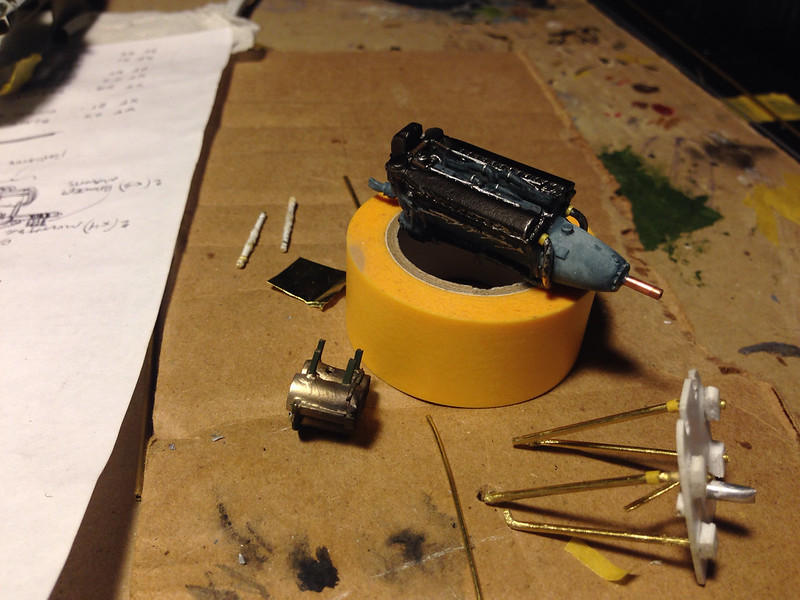
Here the radiator is loosely attached to test fit.  Quite pleased with it so far. =]

 image by brittvallot, on Flickr

 image by brittvallot, on Flickr
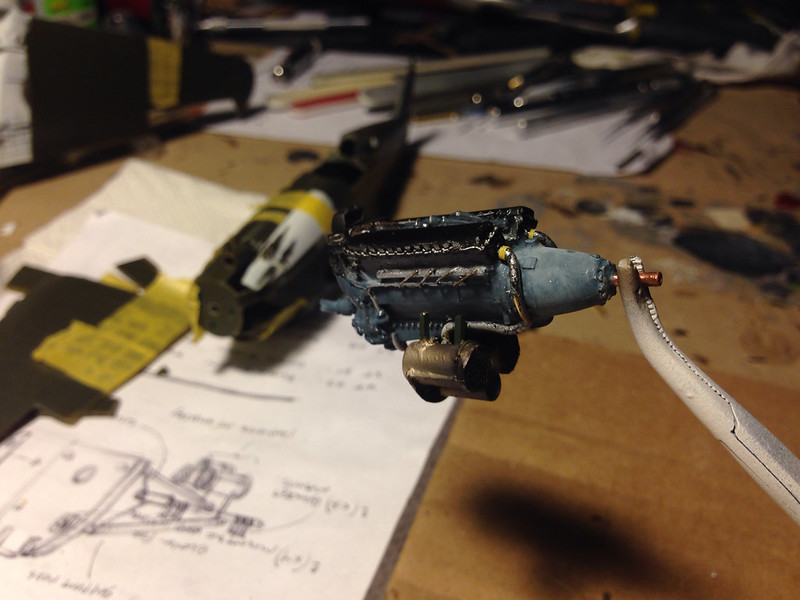
 image by brittvallot, on Flickr
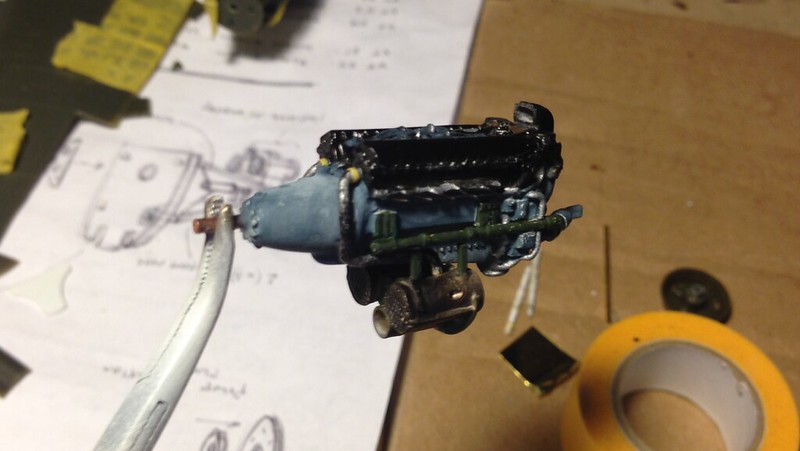
The blue is a Tamiya's Medium Blue.  I made a quick coat with the AB and followed up with some Med Blue lightened up with Flat White with a fine brush to fix up weathering the paint in places.  I mixed and thinned the color to lay down somewhat what randomly.

The top over the crankcase is painted in Alclad's Jet Exhaust.  It puts down a nice dark color that isn't quite black but has enough character to look to reflect some of what is going on with the rest of the engine being hot.  The oil and coolant piping is made of brass rod and primed and painted in Tamiya's Flat Black and then Flat Aluminum.  The radiator is painted in Alclad's Pale Burnt Metal first and then touched up with Exhaust Manifold.  All of the green parts are just painted in Tamiya's Olive Green for now so that I have something up there.  I will later paint these with a color that will go down on the rest of the cowl parts of the engine area.

This is a really fantastic resin engine from Engine & Things and with just a little bit of love and some scratchbuilding, you can make something quite special to add some life to your build. =]  I'm glad I got one!

Tags: P-40 GB 2014

On the bench:  

Tamiya F4U-1  Kenneth Walsh


  • Member since
    November 2003
  • From: State of Mississippi. State motto: Virtute et armis (By valor and arms)
Posted by mississippivol on Friday, April 18, 2014 9:47 PM

Lookin' great, BV! Good luck w/the move

  • Member since
    October 2008
  • From: Georgia
Posted by Rigidrider on Saturday, April 19, 2014 7:47 AM

Beautiful work BV! And yes... Good luck w/move.

When Life Hands You A Bucket Of Lemons...

Make Lemonade!

Then Sell It Back At $2 Bucks A Glass...

  • Member since
    September 2011
Posted by fightnjoe on Tuesday, April 22, 2014 9:06 PM

well here i am again with a small update. 


after two weeks of work ended in frustration i went to work again and came up with the skeleton for the starboard wing. i started with a cheat of sorts. i have built this kit before and in the box of builds that didnt make the moves i found the lower wing as well as the upper wings. i reglued them and then sliced them to get a profile for the spars. i then traced them out, gut them out, glued them to the cut wing parts with white glue, sanded them to the appropriate shape, and then assembled them with the wingtip to fuse spars. mind you these are in no way, shape, or form perfect. i am sure they are not 100% accurate but close enough for me. they are not square either. this is something that i can, to be honest, live with. 

so the starboard wing skeleton.

Image
Image
Image

used the kit wingtop to try to get the overall shape correct. 


next up is to try to fashion the wing mounted gun assembly, the cable and pulley system for the flaps, the wingtip lights, and the fuel tank. thinking the upper wing will be cut on frame inward of the skeleton and the lower one frame outward of the wheel well. 


what do you think of this. if it dont work i will be using the full wing and go that route.

all comments, critiques, and criticism are encouraged.


joe

Veterans,

Thank You For Your Sacrifices,

Never To Be Forgotten

Where you can find me:

Workbench on FaceBook  Google Plus  YouTube

  • Member since
    November 2003
  • From: State of Mississippi. State motto: Virtute et armis (By valor and arms)
Posted by mississippivol on Tuesday, April 22, 2014 9:28 PM

Looks fine so far, Joe. Will you be putting the gun bays in, too?

  • Member since
    September 2011
Posted by fightnjoe on Wednesday, April 23, 2014 9:16 PM

mississippivol i will.  trying to find a decent pic or drawing that show the detail around the gun mounts.  

joe

Veterans,

Thank You For Your Sacrifices,

Never To Be Forgotten

Where you can find me:

Workbench on FaceBook  Google Plus  YouTube

  • Member since
    November 2003
  • From: State of Mississippi. State motto: Virtute et armis (By valor and arms)
Posted by mississippivol on Wednesday, April 23, 2014 9:25 PM

Well, howdy, here's an update. I can't believe I've been working on this off and on since January. I'm not pleased with my scribing efforts, and now to cut some corners to hurry it up some, I decided to glue the flaps in place instead of detailing and dropping them. There were some pretty severe gaps that I used some plastic to shim, and now I'm going to have to shim the starboard side of the fuselage to close the gap between the flap and the fuselage:

I am going to box in the wheel wells and detail them some; I should've punched the lightening holes before gluing the walls on, and they're probably too shallow, but it's better than before:

Here's how she looks thus far:

  • Member since
    June 2013
Posted by bvallot on Thursday, April 24, 2014 1:25 AM

Joe, that doesn't look bad at all.  You're certainly going the extra mile on this P-40.  When the whole thing is done...it won't really be just one thing or another that stands out...everything will come together and be seen as a whole.  Whatever little thing you might be on the fence about will bother you much less when she's finished.  =]

Mississippivol, I know just what you mean.  This has been one of the longest and most dragged out builds I've ever set out on.  I don't even have my fuselage halves closed up yet. =P Are you going to set the canopy in place to stay open?

On the bench:  

Tamiya F4U-1  Kenneth Walsh


  • Member since
    November 2003
  • From: State of Mississippi. State motto: Virtute et armis (By valor and arms)
Posted by mississippivol on Thursday, April 24, 2014 5:08 PM

Hey, BV, I'm going to open the canopy (did too much work on the 'pit).

  • Member since
    June 2013
Posted by bvallot on Friday, April 25, 2014 11:40 PM

Okay guys. I think I'm finally getting somewhere. =]  Glenn I'm just about caught up to you! =P

Finally decided to install the cockpit. Here it is now.

I had to fix up the bulk head here to make the TD cockpit fit:

 image by brittvallot, on Flickr

IP installed:

 image by brittvallot, on Flickr

 image by brittvallot, on Flickr
Bulkhead behind the seat:

 image by brittvallot, on Flickr

 image by brittvallot, on Flickr

Everything in place:

 image by brittvallot, on Flickr

 image by brittvallot, on Flickr

 image by brittvallot, on Flickr

I did have to mess with the fit a bit more.  Usually the case when you actually go to put it in.  So, keep your eyes open Ray.  The floor needed a bit of narrowing to get it to seat better.  Nothing a sanding tool can't take care of...And you might want to consider doing something similar behind the seat as well.  Just double check your fit before you glue anything in.

Does anybody have any suggestions on wiring the IP?  How much of this is actually visual from outside the cockpit?

FINALLY! ugh.  When does thing end again? lol Time *ticking clock...

On the bench:  

Tamiya F4U-1  Kenneth Walsh


  • Member since
    January 2011
  • From: Commonwealth of Virginia
Posted by Tal Afar Dave on Saturday, April 26, 2014 8:01 AM

Hey Joe,

That's crazy!  What a great way to figure out the wing skeleton dimensions by chopping up an old wing to get the look right!  Will definitely be following your build with great interest....I've always thought that the cutaway models were really cool.....Thanks for sharing!

Dave

2022 New Year's Resolution:  Enter 1 group build and COMPLETE a build this year!!  Why Photobucket did you rob me of my one Group Build Badge???  Must be part of the strong anti-Monogram cartel!!!

 ]

  • Member since
    November 2003
  • From: State of Mississippi. State motto: Virtute et armis (By valor and arms)
Posted by mississippivol on Saturday, April 26, 2014 7:06 PM

Bv, are you adding the machine guns in the cockpit as well? I didn't see them sticking out by the instrument panel.

  • Member since
    September 2011
Posted by fightnjoe on Saturday, April 26, 2014 7:23 PM

many thanks.  crazy is a pretty good way to describe what i am doing.

now for the news.

this has taken a bit of a change. there will be no skeleton wing for this bird. as much as i wanted it, my skill set at this time wont allow it. so on to plan b. 

this morning i began by trying to get the skeleton wing to work. try as i may all i ended up with was frustration. after a couple of hours of cussing and such i went with the suggestion of cutting the wing without redoing the entire wing. so out came the blades, the dremel, and the sandpaper. the cut was made, sorry no pic of just the cut. then out came the files and the sandpaper and i went about trying to clean up the mess. i then started with boxing out the ammo bin. now mind you this is, i am more than sure, not accurate. i am however moving forward with it. i then began to try to fashion some ammo crates, again these are not accurate, i am more than positive i just couldnt get the right shape for the pic i have nor the room that would allow the belts to feed the guns. i then moved onto the set of .303's in the wing. now these although not perfect are a large step up from the kit parts.

all told was a pretty long day in the bunker with really not much to show for it.

first up the .303's. 

Image
Image
Image
Image

now for the overall. this is why i am actually pretty happy to move forward.

Image
Image


now unless the mood strikes me to redo the ammo boxes i plan to get some color on this and then move on to the next step.


all comments, critiques, and criticism are encouraged.


joe

Veterans,

Thank You For Your Sacrifices,

Never To Be Forgotten

Where you can find me:

Workbench on FaceBook  Google Plus  YouTube

JOIN OUR COMMUNITY!

Our community is FREE to join. To participate you must either login or register for an account.

SEARCH FORUMS
FREE NEWSLETTER
By signing up you may also receive reader surveys and occasional special offers. We do not sell, rent or trade our email lists. View our Privacy Policy.