SEARCH FINESCALE.COM

Enter keywords or a search phrase below:

Aces Group Build

28235 views
266 replies
1 rating 2 rating 3 rating 4 rating 5 rating
  • Member since
    September 2007
  • From: Finland funland
Posted by Trabi on Friday, March 13, 2015 5:18 PM

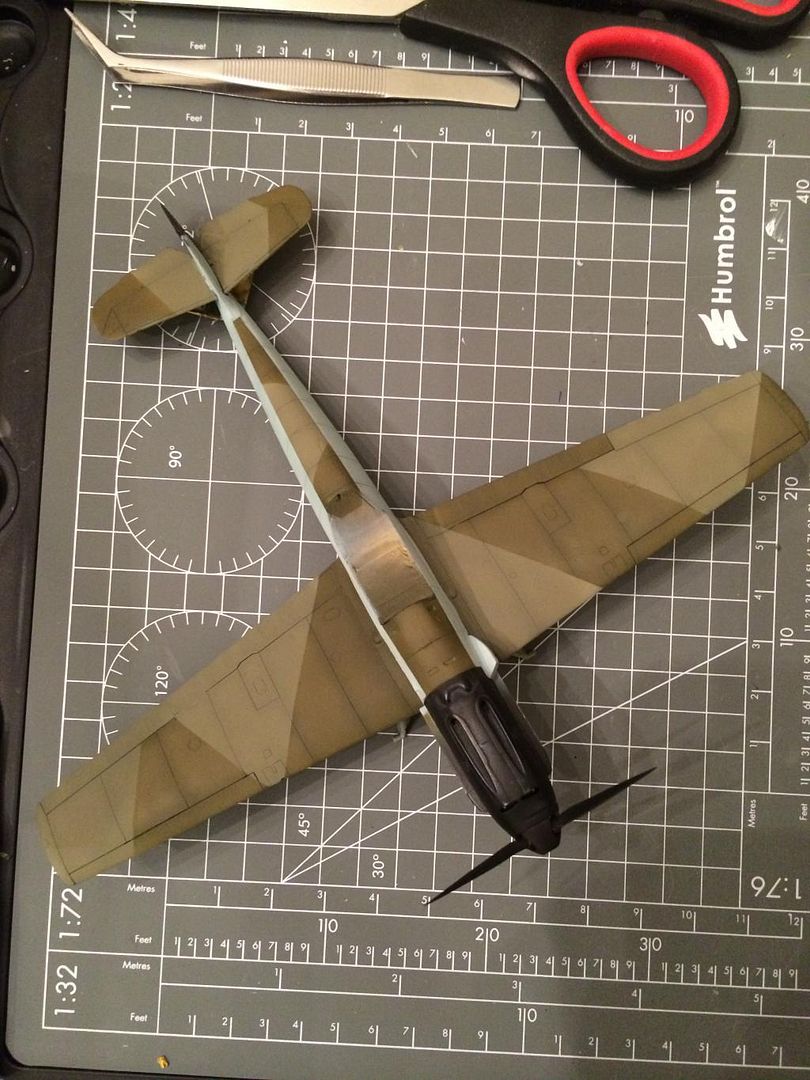
Slow progress with Fokker. Fuselage and wings glued:


Cockpit painted:


"Space may be the final frontier, but it´s made in Hollywood basement." RHCP, Californication

  • Member since
    October 2009
  • From: Oil City, PA
Posted by greentracker98 on Monday, March 9, 2015 7:08 PM

My latest Purchase Lydia

 I just ordered her Here's the web site If anyone wants something from them. They're in England

http://www.modeldesignconstruction.co.uk/mall/productpage.cfm/ModelDesignConstruction/_VVS01a/427842/WINGS%20%20%20VVS%20Women%20Pilot%20Standing%20on%20Wing

A.K.A. Ken                Making Modeling Great Again

  • Member since
    October 2009
  • From: Oil City, PA
Posted by greentracker98 on Monday, March 9, 2015 2:03 AM

Nice work Nomad, Can't wait to see it finished

A.K.A. Ken                Making Modeling Great Again

  • Member since
    May 2014
Posted by Nomad53 on Thursday, March 5, 2015 12:13 PM

modelcrazy

The first camo job you airbrushed you say? Nice job Brandon! Great mottling.

I agree Brandon. Great job.

Okay all here are some update photos. The decals are Zot's. They are for a different P-47 but I did the best I could on getting them to fit. I had some tear on e so I used decals from other kits that I had in my stash. Hope you all like it so far.

Doug

Nomad53


  • Member since
    July 2014
Posted by modelcrazy on Thursday, March 5, 2015 8:06 AM

The first camo job you airbrushed you say? Nice job Brandon! Great mottling.

Steve

Building a kit from your stash is like cutting a head off a Hydra, two more take it's place.


http://www.spamodeler.com/forum/

  • Member since
    January 2015
Posted by BrandonD on Thursday, March 5, 2015 12:48 AM

...aaaaand Galland's Bf-109 is complete!

The kit is the 1:48 Tamiya, and I used Techmod decals for the markings. Bf-109 nuts will notice three inaccuracies that I'm aware of, but I really enjoyed this kit, and it's the first camouflage scheme I've airbrushed. Can't wait to do more!

This is a JG-26 aircraft, and I wanted to build it after reading the book :JG26: Top Guns of the Luftwaffe," which was very well-researched, and Galland wrote the intro. Hence his plane.

Now to paint the Galland figure. I have a generic pilot, but I am hoping to find a good price on the Verlinden figure that actually is Galland. Stay tuned.

-BD-

  • Member since
    October 2009
  • From: Oil City, PA
Posted by greentracker98 on Wednesday, March 4, 2015 6:10 PM

Great work everyone. I feel like I'm getting way behind LOL I don't have the P 47 or the 190, Oh well. We still have lots of time

A.K.A. Ken                Making Modeling Great Again

  • Member since
    May 2014
Posted by Nomad53 on Wednesday, March 4, 2015 11:30 AM

BrandonD

Nice work on that Otaki Spitfire, ajd!

I love the P-47, too, Nomad53. Great job with the Alclad!

-BD-

Thanks Brandon. Love the decal job you did. Everything looks painted on.

adj that Spitfire looks good.

Here are a couple of update photos of the OD green, red and white painted on. I am going to make this plane look like it is flying because the wheel wells are not open. Plus I lost one of the landing gear.

Doug

Nomad53


  • Member since
    January 2015
Posted by BrandonD on Wednesday, March 4, 2015 1:27 AM

I got the decals on with only a few slip-ups. I found the Techmod sheet to be a bit finicky, and I tore the first cross I put on, but fortunately had a spare that matched (from another Techmod sheet).

Here it is with a little while left to go yet:

I need to touch up around the canopy (photo directly above) and then paint the canopy rails themselves with the dark green, then do the undercarriage and wheels. Machine guns are on, and the wing ones still need a drybrushing, but it's coming together.

I tried to work a bit with the Flory wash, but it didn't come off the flat clear coat as much as I wanted, and so after doing the underside and nose, I just flowed it directly into the panel lines up top to keep the effect muted. Next time I'll gloss it first, then use the wash, then flat coat it. I put some exhaust staining on with pastel powder and Tamiya weathering... whatever you call the stuff that looks like makeup.

So far I'm liking the way this is going, and I imagine I'll finish it in the next week or so.

-BD-

  • Member since
    January 2015
Posted by BrandonD on Wednesday, March 4, 2015 1:27 AM

Nice work on that Otaki Spitfire, ajd!

I love the P-47, too, Nomad53. Great job with the Alclad!

-BD-

  • Member since
    May 2014
Posted by Nomad53 on Tuesday, March 3, 2015 7:54 AM

greentracker98

Looks good AJ, I have yet to try a weekend madness. It seems to take me forever to do a kit.

Hey all,

Sorry that I have not been on lately but things are busy here with a two year old and a one hear old in the house. Here are some update photos on the P-47 Miss Fire. all taped up and ready for the OD Green and then on to paint the smaller parts.

Hope to have more progress this week.

Doug

Nomad53


  • Member since
    October 2009
  • From: Oil City, PA
Posted by greentracker98 on Saturday, February 28, 2015 8:18 PM

Looks good AJ, I have yet to try a weekend madness. It seems to take me forever to do a kit.

A.K.A. Ken                Making Modeling Great Again

  • Member since
    October 2013
Posted by ajd3530 on Thursday, February 26, 2015 8:04 PM
Alright, I'm going to assume this is the thread where we post WIP. So this Otaki Spitfire is one of those kits that is incredibly simple, yet still is very nice. The cockpit is pretty basic, but good enough for a closed cockpit.


Since I am building it closed up, so didnt really do anything to the inside except give it a treatment of pastel powders


Its going together extremely quick, this kit might be a very good canidate for the next instalment of Weekend Madness.
  • Member since
    May 2014
Posted by Nomad53 on Thursday, February 26, 2015 6:21 AM

Hey all,

Looking good Brandon. I like your paint job. It is awesome.

Okay all here are a couple of update photos of the P-47 Bubbletop. I got my spray booth ion and the Alclad paint so I got the plane painted for the most p[art. I still have some smaller parts to get done and then on to the decals.

That may be a chore because I might have to do some cutting on them to make them fit.

Doug

Nomad53


  • Member since
    October 2009
  • From: Oil City, PA
Posted by greentracker98 on Wednesday, February 25, 2015 8:37 PM

Absolutely smashing mate lol

A.K.A. Ken                Making Modeling Great Again

  • Member since
    October 2013
Posted by ajd3530 on Wednesday, February 25, 2015 8:33 PM
I'm going to do Clive "Killer" Cadwell's RAAF Spitfire Mk. VIII from 1945 with Arii's (Otaki) 1/48 Spit. I believe the Tamiya Spit Vb trop I have has an English pilot figure in Tropical attire, so I'll use that.
  • Member since
    October 2009
  • From: Oil City, PA
Posted by greentracker98 on Wednesday, February 25, 2015 12:46 PM

Looking good Brandon. A lot to do yet, but you'll get it, I'm sure

Ken

A.K.A. Ken                Making Modeling Great Again

  • Member since
    January 2015
Posted by BrandonD on Wednesday, February 25, 2015 1:17 AM

Ok, quick update on the Bf-109 E4 tonight.

I got the mottling done, and that alone was worth buying the 0.2mm airbrush setup. I'd still like to get better at it and figure out a way to shade it. I'm not confident enough to post-shade it with smoke or anything, and that wouldn't probably be that noticeable once the decals are on anyway.

I noticed the splinter pattern on the fuselage is a bit high for an E4, but I did find some photos of Galland sitting in one where the splinter pattern is where mine is, so I didn't go all OCD and repaint that part.

I also painted the yellow bits, and it really is darker/deeper in person than in these photos. And no, the cowl isn't glued down yet. I need to re-black the engine, drill the barrels of the cowl machine guns, paint them and install them before that happens. I also need to touch up the prop blades where I scratched one to the bare plastic. Then the spinner hub can be glued on.

It's really falling together at this point. I just need to paint the landing gear doors, wheels and legs themselves, add the tail wheel, paint the canopy rails and wait for my decals to arrive.

-BD-

  • Member since
    January 2015
Posted by BrandonD on Tuesday, February 24, 2015 11:58 PM

Thanks! I've got the Tamiya 1:48 P-51D I will be using to build Petie 2nd.

-BD-

  • Member since
    October 2009
  • From: Oil City, PA
Posted by greentracker98 on Tuesday, February 24, 2015 10:35 AM

Please everyone, If I'm missing something or if I'm wrong about something. Please send me a private message or at least mention it here.

I'm only human, you won't hurt my feelings

I don't expect you to go on with out getting it right

BD - The ME 109 is looking good, nice work

I tried to do something different on my Luftwaffe Ace figure. I painted it with Rustolium black to get the shading, but now you cant see the light blue Tamiya calls for on the outside. So, now I'm at a stand still.

Will  95% rubbing alcohol  take off the black paint?

A.K.A. Ken                Making Modeling Great Again

  • Member since
    October 2009
  • From: Oil City, PA
Posted by greentracker98 on Tuesday, February 24, 2015 4:52 AM

BD - What scale is Meyers Petie 2nd? I'll g4et Petie 2nd entered later  today

Also there isn't any limit on the time period for entering an ace build.

A.K.A. Ken                Making Modeling Great Again

  • Member since
    January 2015
Posted by BrandonD on Tuesday, February 24, 2015 1:41 AM

Well, I got my paint today and mixed up the dark green. Now the splinter pattern is done, and I just have the mottling on the sides of the tail and fuselage for the camo. Just... Then the yellow on the nose and rudder.

This is the first time I've done a camouflage scheme with the airbrush, and I have a few small parts at the wing roots to touch up where it's a little too sharp on the curve where it meets the RLM 65. I'll probably brush that to just round it out and maybe spray mottling nearby so the tonal crush hides any imperfections on the coverup.

Anyway, she's looking like a 109 now, and I just need to get my Galland figure started so she can go places.

(Note that this is the Tamiya E3 kit, and I am going to paint it in the scheme of Galland's E4 because, to me, a JG-26 109 needs a yellow nose, and I think the mottling will be an interesting challenge. I have an E4 canopy from the Eduard Bf-109 E7 I picked up today (oops, another 109...).
So how am I doing? I was worried the RLM 02 was a little too green, but next to the dark green, I think it looks like it should.

Greentracker - While I am building plenty of aces' planes, I haven't committed to others on here. However, I am building Petie 2nd right now (the Tamiya P-51) for the Mustang group build, so if it's not too late, you can add him on there and I will find and post the ace info for that one. I have a figure somewhere that will work for him.

-BD-

  • Member since
    October 2009
  • From: Oil City, PA
Posted by greentracker98 on Monday, February 23, 2015 5:34 PM

Ooops. I didn't realize there are 2 Brandon's here

Brandon D -  Are you doing anything else besides Adolf Galland?

A.K.A. Ken                Making Modeling Great Again

  • Member since
    January 2015
Posted by BrandonD on Sunday, February 22, 2015 8:34 PM

OK, so I got started on Galland's Bf-109E this week. I took pictures as I went. I am not too thrilled with the cockpit, but I built it straight out of the box (this is the Tamiya kit). This was my first time using an instrument panel decal, and I think I learned some things I'll change next time.

Anyway, once the cockpit was done, I put the plane together, and it was a really quick build. After that, I sprayed the whole thing Tamiya flat black. The two separate nose pieces are not yet glued on, as they will be yellow and easier to paint if I leave them off for now.

I started with the light blue underside/side color, sprayed the base coat, then the white shading coat and then the blend coat. After that, I masked it and then shot the RLM02 on the wings and top of the fuselage following the same three-layer color process. I made the RLM02 per Tamiya's instructions of a 1:1 mix of RLM gray and khaki.

Once I get out and get some olive drab at the shop this week, I'll paint the RLM71. Tamiya calls for it to be mixed 1:1 olive drab and khaki.

BrandonK - please don't let Neville shoot this one down before I finish, ok? I considered waiting a while before posting so it wouldn't come right after a Spitfire :)

Side note - I don't think I'm listed on the roster, but maybe I missed it.

-BD-

  • Member since
    June 2014
Posted by BrandonK on Sunday, February 22, 2015 4:29 PM

Here you go.

On the bench:

A lot !! And I mean A LOT!!

2024 Kits on deck / in process / completed   

                         14 / 5 / 2  

                              Tongue Tied

  • Member since
    October 2009
  • From: Oil City, PA
Posted by greentracker98 on Sunday, February 22, 2015 3:02 PM

Question Would everyone prefer to have the medals separate from the badge, or on it?

A.K.A. Ken                Making Modeling Great Again

  • Member since
    October 2009
  • From: Oil City, PA
Posted by greentracker98 on Sunday, February 22, 2015 2:46 PM

Brandon take a photo of Neville with his plane, Okay?

I will private message The new badge with the Distinguished Flying Cross  to you

Sorry, King George VI  is unable to attend the award ceremony to present to you  the DFC

A.K.A. Ken                Making Modeling Great Again

  • Member since
    June 2014
Posted by BrandonK on Sunday, February 22, 2015 2:16 PM

Sorry for the delay gentlemen, I've had a hard time painting this little guy and getting to where I like it. I am not too good at little faces, but I can't waste anymore time on him, it'll have to do. 

Meet Neville Duke, RAF ace pilot. 

Now I am officially done with plane #1 the Spitfire of Neville Duke, Northern Italy. I have some others I will get on for this build, but I need to knock out 3 more GB's first, then I'll get back on this one. 

On the bench:

A lot !! And I mean A LOT!!

2024 Kits on deck / in process / completed   

                         14 / 5 / 2  

                              Tongue Tied

  • Member since
    October 2009
  • From: Oil City, PA
Posted by greentracker98 on Saturday, February 21, 2015 8:46 PM

I just did the compatibility view for Windows 8.1. The instructions are pretty straight forward and its working like I want.

And I have  the tool bar here as well

A.K.A. Ken                Making Modeling Great Again

  • Member since
    October 2009
  • From: Oil City, PA
Posted by greentracker98 on Saturday, February 21, 2015 8:27 PM

Everything looks great guys.

I've done some small scratch building, But things like that scare me, so I tend to not do them

Ken

A.K.A. Ken                Making Modeling Great Again

JOIN OUR COMMUNITY!

Our community is FREE to join. To participate you must either login or register for an account.

SEARCH FORUMS
FREE NEWSLETTER
By signing up you may also receive reader surveys and occasional special offers. We do not sell, rent or trade our email lists. View our Privacy Policy.