SEARCH FINESCALE.COM

Enter keywords or a search phrase below:

"Out of your comfort zone" GB '17

9696 views
145 replies
1 rating 2 rating 3 rating 4 rating 5 rating
  • Member since
    April 2010
Posted by Theuns on Wednesday, December 21, 2016 12:56 AM

Roster and pix page

Theuns - Tamiya 1/35 Flakvierling 38  (completed page 3)

Eagle90 -  Revell/Monogram U.S.S. Lionfish (completed page 4)

lewbud -  contest Hasegawa 1/72 F/A 18E (with lots of extras)

Daniel Ficke -  Revell 1/35 T34/76

Greg H -  Tamiya "Pibber" (converted to a police patrol boat!

Seabe - M1A2 Abrahams (completed page 5)

modelcrazy -  Dragon 1/9 Iron Man III Igor armor  (completed page 4)

BrandonD -  Meng's 1/35 Renault FT-17. (completed page 4)

taxtp -  a vignette, with a couple of figures

castlenuovo - TBA

Rigidrider -  Tamiya 1/35 scale Panzer (IV) 

PANZERJAGER - Blohm und Voss Bv 40 Armored Glider Fighter 1/48(completed page 5)


Theuns

  • Member since
    January 2014
Posted by Seabe on Wednesday, December 21, 2016 10:11 AM

Daaarn, this sounds interesting! You expert will giggle at my attempts - but I may leave the auto's and try my hand at the one tank in my pile - or one of the planes... Heaven forbid, I will most likely be crucified along the way! Count me in - I will hopefully be done by end Jan with one of my current WIP's... 

Lewbud, really looking forward to seeing that Tyrrell! Is it the WCT version? I bought that a couple of years ago - and trust me, it looks WAY simpler than some of the other super-detailed Tameo kits. There's another version (at least one) of Tameo's 006's, I think it's the Monaco GP version. But it will be good to see one being built! Personally... I think the 20th kit manufacturers (esp the multi-media ones) can learn a LOT from the 43rd guys - think there's even more detail in these than a lot of the 20th kits. Good luck! 

  • Member since
    April 2010
Posted by Theuns on Wednesday, December 21, 2016 10:28 AM

"You expert will giggle at my attempts - "

That is the thing, non of us will be experts as we all will be trying something new, that is where the fun comes in :-)


Theuns

  • Member since
    May 2005
Posted by pyrman64 on Wednesday, December 21, 2016 11:38 AM

Well, since I'm not a ship guy, I'm in with a Tamiya "Pibber" (converted to a police patrol boat!Surprise) I've had it in the stash for a few years.

Greg H

"There is many a boy here today who looks on war as all glory, but, boys, it is all hell." Gen. Wm T. Sherman (11 April 1880, Columbus, Ohio)

  • Member since
    April 2010
Posted by Theuns on Wednesday, December 21, 2016 10:16 PM

Great, 5 builders willing to try something new....we'r cooking with gas now!

Theuns

  • Member since
    January 2014
Posted by Seabe on Thursday, December 22, 2016 9:23 AM
I'm in - so 6... just now sure what I'll go for yet.

  • Member since
    April 2010
Posted by Theuns on Thursday, December 22, 2016 10:56 AM

Cool Seabe I will add you to the roster


Theuns

  • Member since
    April 2005
  • From: Australia
Posted by taxtp on Tuesday, December 27, 2016 1:43 PM

Hi Theuns,

I've ben racking my brains for this one, a I build almost everything. I am wondering if a vignette, with a couple of figures, would be OK ? I've only ever done single figures with a bit of simple groundwork.

I'll wait for your decision before choosing something.

Cheers

Tony

I'm just taking it one GB at a time.

  • Member since
    July 2014
Posted by modelcrazy on Tuesday, December 27, 2016 4:46 PM

Hey buddy, I'd like to join up with the Dragon 1/9 Iron Man III Igor armor but may not get to it before April. 

I'll see what I can do but don't hold me to it.

Steve

Building a kit from your stash is like cutting a head off a Hydra, two more take it's place.


http://www.spamodeler.com/forum/

  • Member since
    April 2010
Posted by Theuns on Tuesday, December 27, 2016 10:06 PM

cool, I will add you to the roster.


Theuns

  • Member since
    October 2016
  • From: Lincoln, NE
Posted by Daniel Ficke on Wednesday, December 28, 2016 4:56 PM

I just got the Revell 1/35 T34/76.

Daniel J. Ficke

  • Member since
    January 2015
Posted by BrandonD on Wednesday, December 28, 2016 5:49 PM

Hah, I just decided to build an AFV after a 20-plus-year absence and started Takom's Skoda PA-II Turtle. But seeingas how it's almost all assembled, that won't work for this one, so I will go with Meng's 1/35 Renault FT-17.

Let's hope I can pull itoff in the timeframe!

Great idea for a GB!

-BD-

  • Member since
    April 2010
Posted by Theuns on Wednesday, December 28, 2016 10:39 PM

Daniel, I updated the model you'll do.

Brandon, welcome mate 


Theuns

  • Member since
    April 2005
  • From: Australia
Posted by taxtp on Thursday, December 29, 2016 3:12 PM

taxtp

Hi Theuns,

I've ben racking my brains for this one, a I build almost everything. I am wondering if a vignette, with a couple of figures, would be OK ? I've only ever done single figures with a bit of simple groundwork.

I'll wait for your decision before choosing something.

Cheers

Tony


Hey Theuns,

What did you think about my vignette idea ?

Cheers

Tony

I'm just taking it one GB at a time.

  • Member since
    October 2016
  • From: Lincoln, NE
Posted by Daniel Ficke on Thursday, December 29, 2016 7:53 PM

tankUpdate on my Revell 1/35 T34/76:Built and ready to paint


Daniel J. Ficke

  • Member since
    April 2010
Posted by Theuns on Thursday, December 29, 2016 10:55 PM

Tony my humble apologies mate! I totally missed your post....must have my peepers checked.

I think if it is some form of modling you dont really do and would want to use it to try something different to what your usual style is  then yes it would fit right in.

I will add you to the roster.


Daniel, the link gives me an error code :-(    The tank I got you up for on the roster, is it a new build or the one that is now ready for painting?


Theuns

  • Member since
    April 2005
  • From: Australia
Posted by taxtp on Saturday, December 31, 2016 6:44 PM

Hi Theuns,

I would like to try and base my vignette on this artwork, which shows 60th and 95th Riflemen circa 1815 by C. Hamilton Smith. I'll use two Airfix 54mm 95th Riflemen to do it.

The poses may be slightly different, but it will be loosely based on it. It's an idea I got from the old Airfix magazine guide, which I inconveniently can't find this morning.

Cheers

Tony


I'm just taking it one GB at a time.

  • Member since
    April 2010
Posted by Theuns on Saturday, December 31, 2016 10:23 PM

Cool one Tony, looking forward to it.

Here is a pic of the one I will attempt to do.

Theuns

  • Member since
    October 2016
  • From: Lincoln, NE
Posted by Daniel Ficke on Sunday, January 1, 2017 7:16 PM

Its a new  one built in two days and now ready for paint but I can't figure out how to pit images on a post.

Theuns

Tony my humble apologies mate! I totally missed your post....must have my peepers checked.

I think if it is some form of modling you dont really do and would want to use it to try something different to what your usual style is  then yes it would fit right in.

I will add you to the roster.


Daniel, the link gives me an error code :-(    The tank I got you up for on the roster, is it a new build or the one that is now ready for painting?


Theuns


Daniel J. Ficke

  • Member since
    July 2008
  • From: Vancouver, the "wet coast"
Posted by castelnuovo on Sunday, January 1, 2017 11:53 PM

I'll join with some kind of an airplane. I build few dozen of them...some 35 yrs ago Smile. In the last 5 yrs or so, I have built only 3.

  • Member since
    April 2010
Posted by Theuns on Monday, January 2, 2017 12:45 AM

"I'll join with some kind of an airplane. I build few dozen of them...some 35 yrs ago Smile. In the last 5 yrs or so, I have built only 3."

Great , got you up the roster page.

Daniel, are you going to build another model for the GB?


Theuns

  • Member since
    October 2016
  • From: Lincoln, NE
Posted by Daniel Ficke on Monday, January 9, 2017 8:22 AM

Theuns

"I'll join with some kind of an airplane. I build few dozen of them...some 35 yrs ago Smile. In the last 5 yrs or so, I have built only 3."

Great , got you up the roster page.

Daniel, are you going to build another model for the GB?


Theuns


Maybe, the camouflage on the tank will take a while and I want to scratch build extras too. And I could use some help uploading photos.

Daniel J. Ficke

  • Member since
    April 2010
Posted by Theuns on Monday, January 9, 2017 9:48 AM

Daniel, would you say that the tank you want to enter is 25% built or less?

Otherwize if it is way more complete I would sugest maybe another kit?


Regards


Theuns

  • Member since
    October 2016
  • From: Lincoln, NE
Posted by Daniel Ficke on Monday, January 9, 2017 10:01 AM

It's about 25% done.

Daniel J. Ficke

  • Member since
    April 2010
Posted by Theuns on Monday, January 9, 2017 10:37 AM

Ok that is cool, I thought from your posts it was close to being done ;-)

Theuns

  • Member since
    October 2008
  • From: Georgia
Posted by Rigidrider on Wednesday, January 11, 2017 12:18 PM

Afternoon... Well, I received a Tamiya 1/35 scale Panzer (IV) I believe for Christmas last year and was wondering what to do with it since I could probably count the armor I've done on one hand and still have fingers left over. If you armor pros promise not to laugh too hard I'll chip in. Lolol... Thanks , Doug


When Life Hands You A Bucket Of Lemons...

Make Lemonade!

Then Sell It Back At $2 Bucks A Glass...

  • Member since
    January 2014
Posted by Seabe on Wednesday, January 11, 2017 9:30 PM

Doug, I can count the amount of armour I've done on one hand and still have 5 fingers left! You're in bad company... And lo and behold, that is one of my considerations for this build!

  • Member since
    April 2010
Posted by Theuns on Wednesday, January 11, 2017 10:14 PM

Doug, got you up :-)


Theuns

  • Member since
    October 2008
  • From: Georgia
Posted by Rigidrider on Friday, January 13, 2017 12:52 PM

Theuns... Thank you...Seabe, lol... well then, lets get busy!lol


When Life Hands You A Bucket Of Lemons...

Make Lemonade!

Then Sell It Back At $2 Bucks A Glass...

  • Member since
    April 2010
Posted by Theuns on Friday, January 13, 2017 11:01 PM

Just dont get "too busy" that you go past 25% completed before 1 Feb ;-)


Theuns

  • Member since
    October 2016
  • From: Lincoln, NE
Posted by Daniel Ficke on Saturday, January 14, 2017 8:17 PM

Tank

Here is an update on what I have so far.

Daniel J. Ficke

  • Member since
    November 2010
  • From: Florida-West Central
Posted by Eagle90 on Saturday, January 21, 2017 11:54 AM

Hey everyone.  With Feb 1 fast approaching, I thought I'd go through the stash and figure out what I'm going to build.  As most know, I mostly build aircraft and have jumped into armor big time.  I also do Sci-Fi and real space subjects.  So I thought for this GB I'd do a ship.  I looked through the stash and found this baby.  The guns and exterior stuff look pretty small, but hey, that's the theme of the GB right?  Out of your Comfort Zone.  So I will be doing the Revell/Monogram U.S.S. Lionfish!  So I hope you ship builders are ready because I'm sure I'll have some questions!  Embarrassed  Off to do some submarine research before 1 Feb. 

Bobby

P.S. if anyone has built this kit before and has any advice...let me know.  Wink


  • Member since
    April 2010
Posted by Theuns on Saturday, January 21, 2017 12:50 PM

Nice, that looks like an interesting boat :-)

I am in the very final stage fo my 1/32 Spitfirem Mk8 build for our MOY next weekend and am actually looking forward to building the AA gun in this GB.

Theuns

  • Member since
    November 2010
  • From: Florida-West Central
Posted by Eagle90 on Saturday, January 21, 2017 1:32 PM

Theuns

Nice, that looks like an interesting boat :-)

I am in the very final stage fo my 1/32 Spitfirem Mk8 build for our MOY next weekend and am actually looking forward to building the AA gun in this GB.

Theuns


Thanks.  I'm pretty excited about doing it.  Just hope I do it justice.  LOL.

I'll be watching your Flak build.  I have the Trumpeter kit of that.  Looks like a cool subject to build!


  • Member since
    April 2010
Posted by Theuns on Saturday, January 28, 2017 11:27 AM

At the IPMS meeting today I got an old 1/35 Tamiya M4A3E3 Sherman kit for a very cheap price. This will also be the perfect kit to "cut my teeth on" for this GB, I can try out all the weathering tecniques I still need to learn on armour.


Theuns

  • Member since
    January 2014
Posted by Seabe on Monday, January 30, 2017 11:06 AM

Oh bugger, this is getting close and I'm still knee... no, make that neck-deep in two auto builds. Both with hick-ups. (Maybe a sign I should try something different!)

Theuns, I will most likely be doing a (don't laugh!) M1A2 Abrahams. As for out of my comfort zone... I have NEVER built any armour before! Small chance of a plane overtaking this, having last built one... about 20-odd years ago. But put me down for the M1A2.

  • Member since
    April 2010
Posted by Theuns on Monday, January 30, 2017 11:33 AM

Will do.

We can learn to build armour together ;-)


Theuns

  • Member since
    January 2015
Posted by BrandonD on Monday, January 30, 2017 11:46 AM

I'll be right there with you two on the armor front. I think my last armor kit was when I was in high school, and I'm not entirely sure when the last one I completed was done. I want to say I was probably 16 or 17, which makes it about 16 or 17 years ago.

-BD-

  • Member since
    April 2010
Posted by Theuns on Wednesday, February 1, 2017 6:08 AM

Well, it is officialy 01 feb so you have 3 months guys :-)

Theuns

  • Member since
    October 2008
  • From: Georgia
Posted by Rigidrider on Wednesday, February 1, 2017 11:31 AM

Hey Bobby (Eagle 90) there is a Submarine warfare GB going on now, and there is some amazing work going on there if you snoop around there a bit. I did one for it and felt like an amature compared to some of the builds(lol). I learned alot for maybe a future build.Take care..

Doug


When Life Hands You A Bucket Of Lemons...

Make Lemonade!

Then Sell It Back At $2 Bucks A Glass...

  • Member since
    July 2014
Posted by modelcrazy on Wednesday, February 1, 2017 6:10 PM
Don’t fool yourself Doug you did a great job on your sub.
 
I guess I’ll start things off here with the beginnings of the Igor armor. The kit is quite large and goes together well. It’s almost a snap kit and the plastic is somewhat brittle. It doesn’t like CA glue very much.
Here is the beginning of the torso. I’m planning on installing an LED for the arc reactor and eyes. We’ll see how that goes.

Steve

Building a kit from your stash is like cutting a head off a Hydra, two more take it's place.


http://www.spamodeler.com/forum/

  • Member since
    April 2010
Posted by Theuns on Wednesday, February 1, 2017 10:09 PM

Nice start :-)


I am busy with a quick build of a 1/72 Italeri Bell 47 for a friend and should be done by the weekend. Then I will start on my 2 builds of the ancient Tamiya Sherman and the newer Tamiya Flak vierling.


Theuns

  • Member since
    December 2007
  • From: Eagle River, WI
Posted by PANZERJAGER on Thursday, February 2, 2017 11:09 AM

Theuns,

I was wondering, if I could cross post, as this GB also fits with my next project I am going to build in the Who Needs Engines Glider GB?

If so, here is my submission;

A Blohm und Voss Bv 40 Armored Glider Fighter 1/48 scale from Czech Model that I inherited a while back.

I have never built a glider before...

PANZERJAGER

 PANZERJAGER


  • Member since
    April 2010
Posted by Theuns on Thursday, February 2, 2017 10:34 PM

Hi, if this glider is not your "usual" style of model building then yes you are most welcome to join in.

Theuns

  • Member since
    December 2007
  • From: Eagle River, WI
Posted by PANZERJAGER on Friday, February 3, 2017 10:06 AM

 PANZERJAGER


  • Member since
    January 2015
Posted by BrandonD on Friday, February 3, 2017 3:44 PM

Hey all,

I typically build planes these days, but about 20 years ago was really into armor. Last year, on a lark, I bought the Meng FT-17 with riveted turret because who can resist it?

So this is definitely out of my comfort zone, haha.

This kit doesn't have a full interior, and I planned to build it closed up, but I wanted to play with some weathering techniques, so I went ahead and painting the innards. Here is where they are when I was mostly finished with them.

That was where I got to early last night, and then I went about assembling the tank. It seems to have a much higher parts count than the old Tamiya kits I was building in the '90s, but it went together pretty quickly and, wonder of wonders (for an aircraft guy) there was no seamwork to deal with.

I closed up the fighting compartment last night, and wenthome for lunch today to throw primer on it.

This is where I am now. I've taken it as far as I want to before painting, with the exception of the upper suspension arms, which I will glue in at the main point, but leave unattached at the forward eng so I can rotate them out of the way for paint. This is just sitting together - turret and all of the suspension will be coming off for paint, as it looks in the photo above.

Thanks for looking! This is really fun...

-BD-


  • Member since
    November 2010
  • From: Florida-West Central
Posted by Eagle90 on Saturday, February 4, 2017 5:38 PM

Rigidrider

Hey Bobby (Eagle 90) there is a Submarine warfare GB going on now, and there is some amazing work going on there if you snoop around there a bit. I did one for it and felt like an amature compared to some of the builds(lol). I learned alot for maybe a future build.Take care..

Doug


Hey Doug,

Sorry for the delay (I was doing a small vacation with the kids in Orlando...yeah, House of Mouse and Universal!).

That is a great idea and I will for sure do that.  I plan on jumping back into building tomorrow (been resting from a week in Orlando!).  Building and Superbowl...should be a great Sunday!

Bobby


  • Member since
    July 2014
Posted by modelcrazy on Saturday, February 4, 2017 11:11 PM

Igor is turning out to be big, the arms are poseable do to a gear mechanism which is cool. I used some plastic cut from a milk carton to act like a diffuser for the LED I'm going to install for the arc reactor. Originally it was clear. The white areas in the reactor are white glue which is still drying.

This is where I’m at for the moment.

Steve

Building a kit from your stash is like cutting a head off a Hydra, two more take it's place.


http://www.spamodeler.com/forum/

  • Member since
    November 2010
  • From: Florida-West Central
Posted by Eagle90 on Sunday, February 5, 2017 10:29 AM

Hey everyone.  Just got back from a week long vacation with the kids at the House of Mouse and Universal.  Had a blast with the kids!  Now I'm ready to jump into building again.  I've done 4 builds already this year!  Going to see if I can put a dent into the 425+ stash this year!

So here I go with the USS Lionfish!  Started taking parts off the sprues and cleaning them up.  Initial fits are......o.k., but I can see a bit of filling and sanding work in my future.  LOL!

Enjoy!

Bobby


  • Member since
    April 2010
Posted by Theuns on Sunday, February 5, 2017 10:15 PM

That boat lends itself well to do some weathering on it :-)

Image

Theuns

  • Member since
    July 2014
Posted by modelcrazy on Sunday, February 5, 2017 11:39 PM
I have some filling and then onto painting. Man this thing is big!

Steve

Building a kit from your stash is like cutting a head off a Hydra, two more take it's place.


http://www.spamodeler.com/forum/

  • Member since
    November 2010
  • From: Florida-West Central
Posted by Eagle90 on Monday, February 6, 2017 7:25 AM

Theuns

That boat lends itself well to do some weathering on it :-)

Image

Theuns


Hey Theuns.  Any advice on weathering a sub?  I'm guessing some rust or something on the exterior?  Remember...Out of Your Comfort Zone...never done a sub before.  LOL!

Bobby

P.S.  Just clicked on to your image.  It didn't pop up right away.  Sorry.  Yeah, I guess a little rust is in order.  LOL!  Salt water did a number on subs huh?  Also, what is that pink stuff?  Primer?


  • Member since
    July 2014
Posted by modelcrazy on Monday, February 6, 2017 8:18 AM

Bobby, 

Take a look at the Submarine Warfare GB, we have a lot of sub weathering discussions over there.

I could tell you but then I'd have to kill you Wink

Steve

Building a kit from your stash is like cutting a head off a Hydra, two more take it's place.


http://www.spamodeler.com/forum/

  • Member since
    January 2014
Posted by Seabe on Monday, February 6, 2017 11:44 AM

Hmmm... I may have to start getting going on this one. So, without further messing about, out with the box! Quite a hefty one relative to what I'm used to! But at least this means I'll page through the building plans tonight.

So here it is - the obligatory box opening shot! (Sure as heck can't be that one bit od PE that's that heavy!)

  • Member since
    January 2015
Posted by BrandonD on Monday, February 6, 2017 12:06 PM

Eagle - that sub looks cool. Seems like it would be a really fun weathering project, and like you I don't know where I would start. I'd probably head for oils, but I'll be interested in seeing what people say and how you proceed.

Seabe - that looks like a nice kit. I wonder if it's based on their older M1 boxing? I built one asa kit and remember loving it.

-BD-

  • Member since
    January 2015
Posted by BrandonD on Monday, February 6, 2017 12:06 PM

I thought I'd have to wait till tonight for paint, but I managed to spray the brown and green on Friday night, and I spent most of late Saturday night masking it.

I used Tamiya Tape for Curves on this, and I wouldn't again. I have used it on aircraft and been happy, but I think the more irregular surface of armor needs something that has a little more bite to it. The vinyl tape kept moving around.

Thin strips (like 0.5mm) of standard Tamiya Kabuki tape were much more useful.

Sunday morning, I sprayed the tan color and pulled up the masks. Lots of work to do still, and some touching up is in order, but overall I'm happy with it.

For colors, I used Tamiya paints: RAF Dark Green, Flat Brown and a 1:1 mix of Buff and Desert Yellow.

Hopefully I'll gewt some time tonight to touch up the areas where themasks lifted, and I'm hoping I can do that with a brush.

Weathering will probably mostly be done with oils, though I may toss a Flory Dark Dirt wash in some of the panel lines.

-BD-

  • Member since
    January 2014
Posted by Seabe on Monday, February 6, 2017 9:16 PM

Brandon, if you can teel me what the term "older M1 boxing" means, I'll have a look.

So I came to the options on the kit and ended up trawling the interwebs for two hours to try and decide which unit markings to use - they use different options at places and some are M1A1HA's. That happens when you haven't got a clue what you're doing! 

  • Member since
    November 2010
  • From: Florida-West Central
Posted by Eagle90 on Monday, February 6, 2017 9:48 PM

modelcrazy

Bobby, 

Take a look at the Submarine Warfare GB, we have a lot of sub weathering discussions over there.

I could tell you but then I'd have to kill you Wink


I'll for sure be popping in to check it out.  I see there are 2 Lionfish kits going on.  I'll be checking those out for some advice!  Wink

LOL!  That never gets old.  Smile

Bobby


  • Member since
    November 2010
  • From: Florida-West Central
Posted by Eagle90 on Monday, February 6, 2017 9:52 PM

BrandonD

Eagle - that sub looks cool. Seems like it would be a really fun weathering project, and like you I don't know where I would start. I'd probably head for oils, but I'll be interested in seeing what people say and how you proceed.

Seabe - that looks like a nice kit. I wonder if it's based on their older M1 boxing? I built one asa kit and remember loving it.

-BD-


Hey BD, she is a pretty cool kit.  Lots of seam work and a bit of filling, but nothing I can't handle.  I found some Tamiya "Hull Red" in my paint stash!  Finally get to use it!  LOL!  Weathering will be the stretching for me.  Not too long ago I was starting in armor...now boats!  What next?!  Whistling

Bobby


  • Member since
    April 2010
Posted by Theuns on Monday, February 6, 2017 10:23 PM

I am on step 1 of my Tamiya Flak 20mm and I am already confused!!

The instructions are contradicting and the one part does not fit no matter how I try. Being a Tamiya I though it to be a  shake and bake easy kit.


I am out of my depth here and it will take some thinking to get it right....not knowing anything about the full size also does not help.


Theuns

  • Member since
    October 2016
  • From: Lincoln, NE
Posted by Daniel Ficke on Tuesday, February 7, 2017 2:47 PM

I carefully pried apart the top and bottom halves of my tank after removing the turret. I am planning to create an interior. No photos at this time.

Daniel J. Ficke

  • Member since
    November 2010
  • From: Florida-West Central
Posted by Eagle90 on Tuesday, February 7, 2017 8:51 PM

Great work going here! 

Here's a few update pics.  Lots of filling and sanding right now.  Sure thought a streamlined shape like a sub would be fast, but the body needed some filling and the "tower"? is turning out to be the real pain with filling and sanding.  We will get there thou.  Super Angry  Charge!

Enjoy.

Bobby


  • Member since
    January 2014
Posted by Seabe on Tuesday, February 7, 2017 9:25 PM

To the more experienced armour guys - any tips on the tracks? I've read up a bit and it seems a drop of CA and/or some staples are the way to go... but any input will be valued.

  • Member since
    January 2015
Posted by BrandonD on Friday, February 10, 2017 3:13 PM

Seabe

Brandon, if you can teel me what the term "older M1 boxing" means, I'll have a look.

So I came to the options on the kit and ended up trawling the interwebs for two hours to try and decide which unit markings to use - they use different options at places and some are M1A1HA's. That happens when you haven't got a clue what you're doing! 


Seabe - I meant is it the moldings from their kit that was available in the '90s or early 2000s. I am just curious if it's an upgrade with new features or an entirely new tool. Either way, should be a blast to build.

-BD-

  • Member since
    April 2010
Posted by Theuns on Sunday, February 12, 2017 10:34 PM
  • Member since
    June 2008
Posted by lewbud on Sunday, February 12, 2017 11:28 PM

MC, looking forward to seeing paint on Igor.

Brandon, the FT-17 is looking good.

Eagle, the sub is looking good as well.  Don't recall any subs with hull red, usually they were gray and black.  

Theuns, that kit has been around forever, before Tamiya became known as a shake and bake.


Buddy- Those who say there are no stupid questions have never worked in customer service.

  • Member since
    July 2014
Posted by modelcrazy on Monday, February 13, 2017 12:26 PM
Thanks Lebud,
I painted Igor all silver and will go over that with a blue metallic in areas. I am having quite a time with the hands. They are rubber and I can’t get enamel or lacquer to stick to it. They seem to dry then the next day the paint is sticky. I’m trying to prime with acrylic but don’t hold out much hope.
If the acrylic doesn’t work I’ll try some Krylon made for plastic and rubber to use as a primer.


Any ideas?

Steve

Building a kit from your stash is like cutting a head off a Hydra, two more take it's place.


http://www.spamodeler.com/forum/

  • Member since
    July 2014
Posted by modelcrazy on Thursday, February 16, 2017 11:17 AM
Did some more work to Igor last night. Painted the blue and will mask that and paint the black/silver areas. I had a boo boo though, while I was spraying the blue on an arm, it fell onto the carpet. I had to strip one area to remove carpet fibers…blaa. Oh well, I need to wet sand it and repaint some areas again anyway. Almost there though, a little repaint, masking and silver and white stripes on the forearms and legs, decals, just a tad of weathering (some chipping and darkening around the joints), mount it to the base, connect the battery and switch, add some debris to the base and I’m done….maybe I’m not as close as I thought.

Steve

Building a kit from your stash is like cutting a head off a Hydra, two more take it's place.


http://www.spamodeler.com/forum/

  • Member since
    January 2014
Posted by Seabe on Thursday, February 16, 2017 9:29 PM

Modelcrazy, I really like what you're doing there! 

For a guy used to mostly 4 or two wheels, this is a looot of wheels...

  • Member since
    April 2010
Posted by Theuns on Thursday, February 16, 2017 10:36 PM

I must say I like the blue on the Igor :-)

Wheels are one of my most dreaded things to paint, that is why I like Helos with skids LOL

My Flak 20mm is almost done....I beat it into submition!

Now I just need to figure out how to do a whitewash on the armour plating.


Theuns

  • Member since
    July 2014
Posted by modelcrazy on Sunday, February 19, 2017 1:34 AM
Thanks Theuns.
I am masking Igor and this is taking some time but the results look good. I still have the left leg and both arms to do. I’m glad I primed with silver because some of the blue is chipping off and it’s really adding to the overall effect.

Steve

Building a kit from your stash is like cutting a head off a Hydra, two more take it's place.


http://www.spamodeler.com/forum/

  • Member since
    July 2014
Posted by modelcrazy on Tuesday, February 21, 2017 7:26 AM

Spent a lot of hours masking but I'm done. Now I need to touch up here and there and add just a little weathering.

Steve

Building a kit from your stash is like cutting a head off a Hydra, two more take it's place.


http://www.spamodeler.com/forum/

  • Member since
    April 2010
Posted by Theuns on Tuesday, February 21, 2017 9:09 AM

That Igor is looking really nice.

I completed my Flak 20mm but cant out on the final clearcoat with all the rain we we are having.


Theuns

  • Member since
    January 2014
Posted by Seabe on Tuesday, February 21, 2017 10:58 AM

Send some of that rain down to us in the Western Cape... 

  • Member since
    January 2015
Posted by BrandonD on Tuesday, February 21, 2017 9:31 PM

Nice work, modelcrazy. That striping looks absolutely perfect.

-BD-

  • Member since
    January 2015
Posted by BrandonD on Tuesday, February 21, 2017 9:35 PM

Very small update on the Meng FT-17. I got the decals (all six of them) on. After building a Mirage last year that felt like it had 70 or 80 decals/stencils, this is a nice change of pace, especially when looking at a Phantom that has 100+.

I've since touched up paint on the uppermost part of the suspension so it matches the camouflage pattern on the body. I also got some more parts glued together, but this is still largely press-fit subassemblies.

As of now, it all has a gloss clear on it, and I can start on the weathering. I still need to paint the tools, wooden box on the side and exhaust pipe. But it feels like a tank now.

-BD-

  • Member since
    July 2014
Posted by modelcrazy on Wednesday, February 22, 2017 10:36 PM

Thanks Theuns and BD,

I’m almost done with Igor. The first picture is with some chipping and the second has an oil wash added. I need to work on the base and add the batteries for the lights.


Steve

Building a kit from your stash is like cutting a head off a Hydra, two more take it's place.


http://www.spamodeler.com/forum/

  • Member since
    April 2010
Posted by Theuns on Saturday, February 25, 2017 11:58 PM

I am calling my Flak 20mm Vierling done....

I did not go mad with the weathering, just enough not to look factory fresh.


Theuns

  • Member since
    July 2014
Posted by modelcrazy on Sunday, February 26, 2017 1:22 AM

That is really cool Theuns Yes Something to shoot at you Mustang.

What scale is that again?

Steve

Building a kit from your stash is like cutting a head off a Hydra, two more take it's place.


http://www.spamodeler.com/forum/

  • Member since
    April 2010
Posted by Theuns on Sunday, February 26, 2017 4:21 AM

LOL, it is 1/35


Theuns

  • Member since
    January 2015
Posted by BrandonD on Tuesday, February 28, 2017 11:33 AM

Ok, so...what now, armor experts?

I think I'm at a snag. I keep staring at it and wondering which way to go next. Most of this is still just press-fit in subassemblies, and the tracks are removable at this point. I painted them Mr. Paint Steel, then dropped some Flory Dark Dirt panel line wash on them, using a brush to rough it up and remove most of it. But they're still clean, and while pigments sound fun, I don't know if that's going to be enough. But judging by this pic of the same tank I am building, maybe it is?

There appears to be some mud on the big suspension bars, but the rest appears rather clean. Maybe some mud in the forward part of the track cleats.
This thing served in Verdun, according to Meng, and having visited Verdun, that's one of the things that drew me to this scheme. I remember Verdun being muddy, even in 2008 when the grass and trees had grown back.

So I guess what I'm asking is this: What's the best way to replicate some stuck-on mud in the tracks as shown in the pic? I have some of the Vallejo Mud product, but have yet to use it, or even open it. I have considered mixing paint with Tamiya putty and stippling it in, and even just dropping pigments onto a wet surface and building them up, but I don't know if that would work.

As for the rest of the vehicle, I still need to add a metal screen on top (one of the PE parts), finish the exhaust and finish painting the wooden storage box and tools, then cement them on.

I also feel like there should be more tonal variation in the paint, and I might hit it with another round of oil filters now that it has a mostly flat coat on it. I oil dot filtered it when it was glossy, and I liked the effect, but it's a bit muted now.

Thanks in advance for any input and advice. This has been a lot of fun, and I will definintely be looking forward to the Mk.V I have in the stash.

-BD-

  • Member since
    April 2010
Posted by Theuns on Tuesday, February 28, 2017 11:43 AM

I am by no means an armour guy but for mud I have in the past used chalk pastel powder miged with pva glue to form a paste, it works well enough for me and if you want a wet look to the "mud" you can put some clear acrylic over it.


Theuns

  • Member since
    January 2014
Posted by Seabe on Tuesday, February 28, 2017 12:03 PM

Wow... both Theuns and Brandon - great work! 

Theuns, how cast in concrete is this end date? I may be in trouble. Haven't been able to do much on any of my three builds (two for the "Red hot and Rollin" GB as well) the last couple of weeks - with a weekend of craziness with my wife working as well.

Then next weekend is Argus... and way too soon after that, Oceans. As fellow Saffa, you may know what I'm talking about... training like crazy in all weird hours of the day the rest of the world would like to call "free time".

  • Member since
    July 2014
Posted by modelcrazy on Tuesday, February 28, 2017 12:06 PM

I'm not a huge armor guy either although do dabble with them on occasion. 

I do what Theuns does with pastels except I found water will make the pastels adhere rather nicely and you can build it up. The glue idea would work even better I should think.

Oddly enough for mud...I use actual dirt I shift through a screen and apply with acrylic varnish or PVA glue. It will create a mud color and. 

My Sherman

Steve

Building a kit from your stash is like cutting a head off a Hydra, two more take it's place.


http://www.spamodeler.com/forum/

  • Member since
    December 2002
  • From: Fort Knox
Posted by Rob Gronovius on Tuesday, February 28, 2017 12:43 PM

Seabe

Modelcrazy, I really like what you're doing there! 

For a guy used to mostly 4 or two wheels, this is a looot of wheels...


Those center hubs on the wheels are made of clear plastic so the crew can check the oil level in the hub. Looks like a clear bottle of Coke when sitting on its side.

  • Member since
    December 2002
  • From: Fort Knox
Posted by Rob Gronovius on Tuesday, February 28, 2017 1:06 PM

BrandonD

Eagle - that sub looks cool. Seems like it would be a really fun weathering project, and like you I don't know where I would start. I'd probably head for oils, but I'll be interested in seeing what people say and how you proceed.

Seabe - that looks like a nice kit. I wonder if it's based on their older M1 boxing? I built one asa kit and remember loving it.

-BD-


Brandon, that Tamiya M1 lower hull and suspension is the exact same parts as their 1980s plain M1 kit. It still has the motorization holes for the motor gearbox. They did add two later style sprockets to the kit. The upper hull is the same as earlier M1A1 kits. Because of this, the version of the M1A2 the kit builds into is an uncommon "straight" M1A2 used by just a few divisions (by only a few tank battalions within those divisions). First Cavalry Division and 4th Infantry Division at Fort Hood were the units fielding them. They were eventually replaced by and in turn were rebuilt as M1A2SEP tanks.

Seabe:  This is actually a 3 in 1 kit where it will build into a US Army M1A2, US Army M1A1 heavy or USMC M1A1 heavy. Make sure you know which optional parts go with which version. The M1A2 has a different cupola and the Marines use a different type of smoke grenade lauchers. The Marines also have an anti-missile device that is mounted where the M1A2 has the commander's viewer. Bottom line, some options will never be seen with other options.

The tracks are better than earlier versions. A staple used to secure them will be unseen under the side skirts if placed somewhere along the top run of the tracks.

  • Member since
    January 2014
Posted by Seabe on Tuesday, February 28, 2017 9:37 PM

Thanks Rob - appreciate the heads-up on the wheels! (Shows I am not an armour boffin!) Yes, did see the different options and realised I have to make a call early - I went for the M1A2 version.

Please shout if you see me stuffin up on options and/or assist with pics such as now - I really appreciate it!

  • Member since
    April 2010
Posted by Theuns on Tuesday, February 28, 2017 10:10 PM

just complete the model, the end date is not so important, we must have fun here ;-)


Theuns

  • Member since
    December 2002
  • From: Fort Knox
Posted by Rob Gronovius on Wednesday, March 1, 2017 12:41 AM

Seabe

Thanks Rob - appreciate the heads-up on the wheels! (Shows I am not an armour boffin!) Yes, did see the different options and realised I have to make a call early - I went for the M1A2 version.

Please shout if you see me stuffin up on options and/or assist with pics such as now - I really appreciate it!


I'm not trying to take the fun out of building your kit as someone implied. Just trying to steer you in the right direction and add some useful tips that you may or may not need. I know I have built jets and stuck various underwing stores on them because they look cool, not knowing that those combinations never happened or with that load the aircraft could never get off the ground with all that stuff.

Even armor modelers miss the clear hubs. It is a unique trait to the Abrams series. Only three of the most recent manufacturers have included a clear part for the hub. Depicting it is just a painting issue trying to replicate clear glass with paint.

Some modelers strive for accuracy. To them, replicating every excruciating detail is fun. Others like to build straight out of the box and that's fun too. I'm probably somewhere in between depending on subject. I like to super detail subjects I "care" about, but will crank out a kit in a weekend that just caught my eye without regards to accuracy or corrections. That's why the title "out of your comfort zone" caught my eye. I like to build models, but I am mainly an armor and sci-fi modeler. And I like to build just about any subject that catches my eye.

Bottom line, neither type of modeler is wrong, just enjoying the hobby differently. Implying that someone who strives for accuracy is not having as much fun as an out of box builder is the same as implying that someone who builds car models is not having as much fun as someone who builds airplanes.

I'm sorry to have crashed your group build. The title got my attention and then the Seabe's Abrams photos caught my eye. I saw some questions asked that I could answer and tried to give some pointers. My mistake, I'll leave now.

  • Member since
    April 2010
Posted by Theuns on Wednesday, March 1, 2017 9:08 AM

It seems we have a miss comunication here ;-)

My reply to have fun was aimed at the poster asking if the end date was set, I was trying to tell him not to worry about it to much and just have fun with the GB.

I think your input about the wheels and clearbits is of value to us all , as we all are specifically not clued up on the subject matter we are building for this GB.

If we all share what we know I recon we all become better modlers, weather we build really great models or just for fun, it doesnt matter.

It would be a shame if you left this GB with a feeling of un hapyness, stay and educate us of things we might not know much about :-)


Theuns

  • Member since
    January 2014
Posted by Seabe on Wednesday, March 1, 2017 10:24 AM

Rob Gronovius
I'm sorry to have crashed your group build. The title got my attention and then the Seabe's Abrams photos caught my eye. I saw some questions asked that I could answer and tried to give some pointers. My mistake, I'll leave now.

Hey Rob, I really appreciated your feedback and will alter my wheels with what means I have available. Clear is not on for me, but I'll try to do some replication - even if just SGB - which is the way I'm leaning. Yes, not 100% accurate, but being cast solid does make it hard to replicate!

As Theuns has said, he aimed his reply at my question regarding the end date, implying I should not worry about the dealine, have fun and rather finish the kit than think the dealine has passed and maybe have it stagnate. It was a written-word being interpreted other than intended thing. Complete misunderstanding, like he confirmed as well.

By all means, your comments are more than welcome! Like I said, I really appreciated it. It will help me to build something closer to what it should be.

  • Member since
    July 2014
Posted by modelcrazy on Thursday, March 2, 2017 8:54 PM
I’m done with Igor. He was a fun build and went together well. I tried all different paints and couldn’t get the hands to be non-tacky. I ended up painting them with a base of acrylic but after a few days with enamel over the top of the acrylic, they were tacky again. I don’t get it. Oh well. Our local Hobby Town wants to display him in their case, but not after I take him to the IPMS meeting this month. The theme is Sci-Fi.


The light for the arc reactor and eyes are made with LED’s and the concrete pieces are Styrofoam. I’m not very good at  non water bases but I needed something of interest.


Steve

Building a kit from your stash is like cutting a head off a Hydra, two more take it's place.


http://www.spamodeler.com/forum/

  • Member since
    April 2010
Posted by Theuns on Friday, March 3, 2017 8:14 AM

Now that IS cool, I posted a pic on the front page.

Please educate me a bit about the "Igor III" , I am not farmiliar with that iron man .

It just occured to me we have no badge for this G B....any one have any ideas for one?


Theuns

  • Member since
    July 2014
Posted by modelcrazy on Friday, March 3, 2017 8:20 AM
Sorry Iron Man 3 and that's the Mark 38 Igor armor. If you watch Iron Man 3 you can catch a glimpse of it for about 2 seconds during the last battle

Steve

Building a kit from your stash is like cutting a head off a Hydra, two more take it's place.


http://www.spamodeler.com/forum/

  • Member since
    April 2010
Posted by Theuns on Friday, March 3, 2017 10:02 AM

Aha, is it is Tony Stark's new armour then?


Theuns

  • Member since
    July 2014
Posted by modelcrazy on Friday, March 3, 2017 10:07 AM

No it's his heavy lift armor.  He has more advanced models like the Mark 39 and on. That's about all I know about Iron Man and that was from the research into the Mark 38.

Steve

Building a kit from your stash is like cutting a head off a Hydra, two more take it's place.


http://www.spamodeler.com/forum/

  • Member since
    November 2010
  • From: Florida-West Central
Posted by Eagle90 on Friday, March 3, 2017 4:59 PM

lewbud

MC, looking forward to seeing paint on Igor.

Brandon, the FT-17 is looking good.

Eagle, the sub is looking good as well.  Don't recall any subs with hull red, usually they were gray and black.  

Theuns, that kit has been around forever, before Tamiya became known as a shake and bake.


Hey lewbud...sure wish I had seen your reply before shooting the Hull Red on there.  Embarrassed  I'm sure I will let down a lot of Navy folks here, but this an Out of Your Comfort Zone GB.  LOL!  And I am abviously out of mine.  Huh?  Thanks for the good advice thou.  I'll pay more attention next time.  Sorry.

Eagle90


  • Member since
    November 2010
  • From: Florida-West Central
Posted by Eagle90 on Friday, March 3, 2017 5:16 PM

Man, it looks like the only one out of their comfort zone is me!  Great work everyone!

Sorry for the delays.  Been crazy busy at work and have been laid up sick past couple of days.  I want to post the pic of what I've gotten done so far.  Not too far from being finished!  Wink  Lewbud corrected me on the hull color, but I didn't see his reply in time.  Don't want to retape everything, so might just let it slide this time.  That being said, I'd like to say I sure hope non of my brothers and sisters in arms from the Navy branch take offense to my novice sub building.  Embarrassed  I know I'm not doing the sub people any justice, but I mean no disrepect.  Yes.

So here is what I have so far.  Lots of seam work and with it being a sub...I'm not familiar with where there are and are not seams.  LOL!  Using the box art for a lot of my queries...I know, not a good idea.  Sorry.

I'm working on the finishing touches and then going to give it some weathering...again, hope I get close.  Thanks for looking.

Eagle90

P.S.  How in the heck did they keep the deck guns working?!  It is a sub!  I would think the sea water would just eat the weapons alive.  Huh?


  • Member since
    July 2014
Posted by modelcrazy on Friday, March 3, 2017 6:54 PM

Eagle, I wouldn't worry too much about the color. I found pastels do a good job with sub weathering. 

For the guns, they put a plug in the end of the barrel Wink. Actually I thought about the same thing and I have no idea.

Steve

Building a kit from your stash is like cutting a head off a Hydra, two more take it's place.


http://www.spamodeler.com/forum/

  • Member since
    November 2010
  • From: Florida-West Central
Posted by Eagle90 on Friday, March 3, 2017 7:26 PM

modelcrazy

Eagle, I wouldn't worry too much about the color. I found pastels do a good job with sub weathering. 

For the guns, they put a plug in the end of the barrel Wink. Actually I thought about the same thing and I have no idea.


Thanks for the tip!  Gonna pull them out and give them a try on her.

O.K., I can see that for the muzzle, but what abou tthe breach?  Did they make them water tight or does it make a difference if the insides are wet?  LOL!  Obviously I don't know much about heavy weapons either.  Embarrassed


  • Member since
    April 2010
Posted by Theuns on Friday, March 3, 2017 10:54 PM

I like the Sub, I will be interested to see the weathering, I have to do a sub myselff oneday...


Theuns

  • Member since
    November 2010
  • From: Florida-West Central
Posted by Eagle90 on Saturday, March 4, 2017 9:36 AM

Theuns

I like the Sub, I will be interested to see the weathering, I have to do a sub myselff oneday...


Theuns


Thank you!  I have to be honest...when I picked this kit, I thought...hey this doesn't look to bad, pretty easy actually.  Yeah right.  I'm finding ships to be a challenge...and I'm loving it!  I actually have a couple of more subs in the stash and a hand full of regular ships..to include a Pirate ship!  Embarrassed.  I'm really looking forward to them now!

So here is what I did last night.  I'm speculating that the weathering on a sub would have been somewhat "minimal"?  After all, it's under water most of the time..right? So here is what I've got.

And yes....the second picture....(as soon as all the good ship builders stop laughing), I put the anchor in the wrong place.  Whistling.  And trust me, I'm laughing along with you all.  Stick out tongueFunny thing is, I kept looking at it as I was doing some weathering and putting the decals on and kept saying something didn't look right.....DUUUHHH!  O.K., commence the barrage of Air Force boy doing a ship jokes!  I actually want to hear them.  LOL!  So, I learned a long time ago, admit your mistakes, learn from them, and press on.  LOL!  It is pretty funny!  So I'm putting multiple coats of Micro Sol on the decals.  I'm seeing the original decals (from 1998) are pretty shiny!  Hopfully a coat of Testors dullcoat will help when all is said and done.  Huh?  Also going to add some Florys wash to bring out the deck a bit more and all the detail on the sub itself.  Maybe a light dry brushing with some Nato Black to help the detail pop out.

Thanks for checking it out...and having a good laugh with me.

Eagle90


  • Member since
    July 2014
Posted by modelcrazy on Saturday, March 4, 2017 10:25 AM

Eagle,

Subs will have more weathering than you might think even though they are always taking a bath.

Saltwater, sun, waves are all very corrosive. Boats and ships would return with their hulls chipped dented and rusted and the deck paint would be worn down to the wood.

I think you did a great job, especially on such an old kit. I would love to see you build some of your other ship kits. Ships are difficult and time consuming but oh so worth it once they are done.

By the way, I didn’t even notice the anchor was in the wrong place until you said something.

Steve

Building a kit from your stash is like cutting a head off a Hydra, two more take it's place.


http://www.spamodeler.com/forum/

  • Member since
    June 2008
Posted by lewbud on Saturday, March 4, 2017 3:53 PM

Eagle, 

You have to remember, these boats spent way more time on the surface than they did submerged.  Top speed surfaced was 20 knots, submerged 8-9 knots.  As to the hull red, just say that's how it came out of the graving dock, and hasn't been completely painted yet.  You did a great job sir. I like the weathering you've done so far.

Theuns,

I'm going to change my build as I don't have access to the part of my stash that has the Tyrrell.  I've never built an all out contest model, so I'd like to try that instead.  I've got a 1/72 Hasegawa F/A-18E that will be my attempt.  In addition to the Wolfpack Designs Wing Fold and Dropped Flaps kit, I have an Aires resin cockpit on the way.  I've never used resin on an aircraft before, nor have I done any sort of weathering as I usually build box stock and factory fresh.  Hoping to find some resin exhausts for cheaper than what's on evilbay right now.  So this will be my first time using pastels, washes, etc.

Buddy- Those who say there are no stupid questions have never worked in customer service.

  • Member since
    November 2010
  • From: Florida-West Central
Posted by Eagle90 on Saturday, March 4, 2017 4:13 PM

[quote user="lewbud"]

Eagle, 

You have to remember, these boats spent way more time on the surface than they did submerged.  Top speed surfaced was 20 knots, submerged 8-9 knots.  As to the hull red, just say that's how it came out of the graving dock, and hasn't been completely painted yet.  You did a great job sir. I like the weathering you've done so far.


Thank you sir!  So they would have used the deck guns as much as the torpedoes?  Wow, these guys just keep getting more and more heroic. 

LOL!  Yeah, we'll say that for the Hull Red this time.  I'll do better next time.  Embarrassed

Well, took everyone's advice on the weathering and hope this looks good.  I think it came out pretty good.  I'm sure there are some inaccuracies, but I did have fun doing this.  I have a German WWII sub in the stash, but I'm thinking there will be another US WWII one in my future...I have about 4 model shows I'm planning on going to this year.  Whistling

So her she is!  I think I'm finished.  I did more weathering attempting to make it look like the wear and tear on the paint starting to show through to the wood on the deck, some rust..everywhere, some nicks, dents, and bumps, and I wasn't sure about the "antenna", but I put a little black on it to show up better.  Hope you all enjoy it.  I had a blast doing it! 

Thanks Theuns for hosting a great GB!  Out of Your Comfort Zone...Brilliant!

Bobby


  • Member since
    November 2010
  • From: Florida-West Central
Posted by Eagle90 on Saturday, March 4, 2017 4:16 PM

modelcrazy

Eagle,

Subs will have more weathering than you might think even though they are always taking a bath.

Saltwater, sun, waves are all very corrosive. Boats and ships would return with their hulls chipped dented and rusted and the deck paint would be worn down to the wood.

I think you did a great job, especially on such an old kit. I would love to see you build some of your other ship kits. Ships are difficult and time consuming but oh so worth it once they are done.

By the way, I didn’t even notice the anchor was in the wrong place until you said something.


Thank you sir!

LOL!  I made where I had the anchor a "scratch and dent" area.  I took your advice and tried to simulate the wood coming through a bit on the deck.  Added a bit more "rust" around her too.  This was a really fun build!  Thanks for the advice!  Much appreciated.

Bobby


  • Member since
    July 2014
Posted by modelcrazy on Saturday, March 4, 2017 4:20 PM
Oh yeah, that looks much better Yes. Great job.
On your next sub build you can try to drill out the limber holes if you’re feeling adventurous.

Steve

Building a kit from your stash is like cutting a head off a Hydra, two more take it's place.


http://www.spamodeler.com/forum/

  • Member since
    November 2010
  • From: Florida-West Central
Posted by Eagle90 on Saturday, March 4, 2017 4:30 PM

modelcrazy
Oh yeah, that looks much better Yes. Great job.
On your next sub build you can try to drill out the limber holes if you’re feeling adventurous.
 

Thank you sir!  Means a lot.

Timber holes?  I'm always up for adventurous....but...uh....what are Timber holes?  Embarrassed


  • Member since
    July 2014
Posted by modelcrazy on Saturday, March 4, 2017 4:37 PM

Limber holes. They are the holes that allow the water to enter and escape the outter hull. You can see the outline of them on the sides under the deckon your build.

Here is an example on a my 1/72 type IX U-boat

Steve

Building a kit from your stash is like cutting a head off a Hydra, two more take it's place.


http://www.spamodeler.com/forum/

  • Member since
    November 2010
  • From: Florida-West Central
Posted by Eagle90 on Saturday, March 4, 2017 4:59 PM

modelcrazy

Limber holes. They are the holes that allow the water to enter and escape the outter hull. You can see the outline of them on the sides under the deckon your build.

Here is an example on a my 1/72 type IX U-boat


Oh yeah!  That would add some serious detail!  You know I'll do that.  Thanks so much!

Bobby


  • Member since
    April 2010
Posted by Theuns on Saturday, March 4, 2017 10:48 PM

Now that is one cool looking boat you built there, and like you said it's your first so it turned out very well indeed :-)

The thing I find so memecing about subs are that they can kill you and you didnt even knoe they were there! Just like here in Africa, we have many snakes and other creatures that can do the same, you have to be either crazy or tough to live here...havnt figured out wich of the two I am yet LOL


I will put you on the pix page, than for taking part :-)


Lewbud I will change your entry no worries


Theuns

  • Member since
    November 2010
  • From: Florida-West Central
Posted by Eagle90 on Sunday, March 5, 2017 8:52 AM

Theuns

Now that is one cool looking boat you built there, and like you said it's your first so it turned out very well indeed :-)

The thing I find so memecing about subs are that they can kill you and you didnt even knoe they were there! Just like here in Africa, we have many snakes and other creatures that can do the same, you have to be either crazy or tough to live here...havnt figured out wich of the two I am yet LOL


I will put you on the pix page, than for taking part :-)


Lewbud I will change your entry no worries


Theuns


Thank you sir! 

I'd say your tough!  LOL!  The only time I stepped foot in Africa was on a stop over to Saudi, when we stopped in Egypt.  Cairo airport looked rough enough!  LOL!

Thanks for hosting a great GB!  Got me wanting to do more ships, and I learned a lot along the way!

Bobby


  • Member since
    April 2010
Posted by Theuns on Sunday, March 5, 2017 10:15 AM

" Got me wanting to do more ships, and I learned a lot along the way!"


I would call this GB a success in that regard the :-)


Theuns

  • Member since
    November 2010
  • From: Florida-West Central
Posted by Eagle90 on Sunday, March 5, 2017 8:49 PM

Theuns

" Got me wanting to do more ships, and I learned a lot along the way!"


I would call this GB a success in that regard the :-)


Theuns


Absolutely.  A smashing success I'd say!  Thank you!

Bobby


  • Member since
    July 2014
Posted by modelcrazy on Sunday, March 5, 2017 9:35 PM

Eagle90


Theuns

" Got me wanting to do more ships, and I learned a lot along the way!"


I would call this GB a success in that regard the :-)


Theuns


Absolutely.  A smashing success I'd say!  Thank you!

Bobby


Steve

Building a kit from your stash is like cutting a head off a Hydra, two more take it's place.


http://www.spamodeler.com/forum/

  • Member since
    November 2010
  • From: Florida-West Central
Posted by Eagle90 on Monday, March 6, 2017 8:06 AM

modelcrazy


Eagle90


Theuns

" Got me wanting to do more ships, and I learned a lot along the way!"


I would call this GB a success in that regard the :-)


Theuns


Absolutely.  A smashing success I'd say!  Thank you!

Bobby


Ohhhhh....cookies!


  • Member since
    July 2014
Posted by modelcrazy on Monday, March 6, 2017 9:31 AM

Steve

Building a kit from your stash is like cutting a head off a Hydra, two more take it's place.


http://www.spamodeler.com/forum/

  • Member since
    November 2010
  • From: Florida-West Central
Posted by Eagle90 on Monday, March 6, 2017 7:09 PM

modelcrazy


Whaaaa?!?!?!?!  No cookies?  Crying


  • Member since
    January 2015
Posted by BrandonD on Wednesday, March 15, 2017 3:26 PM

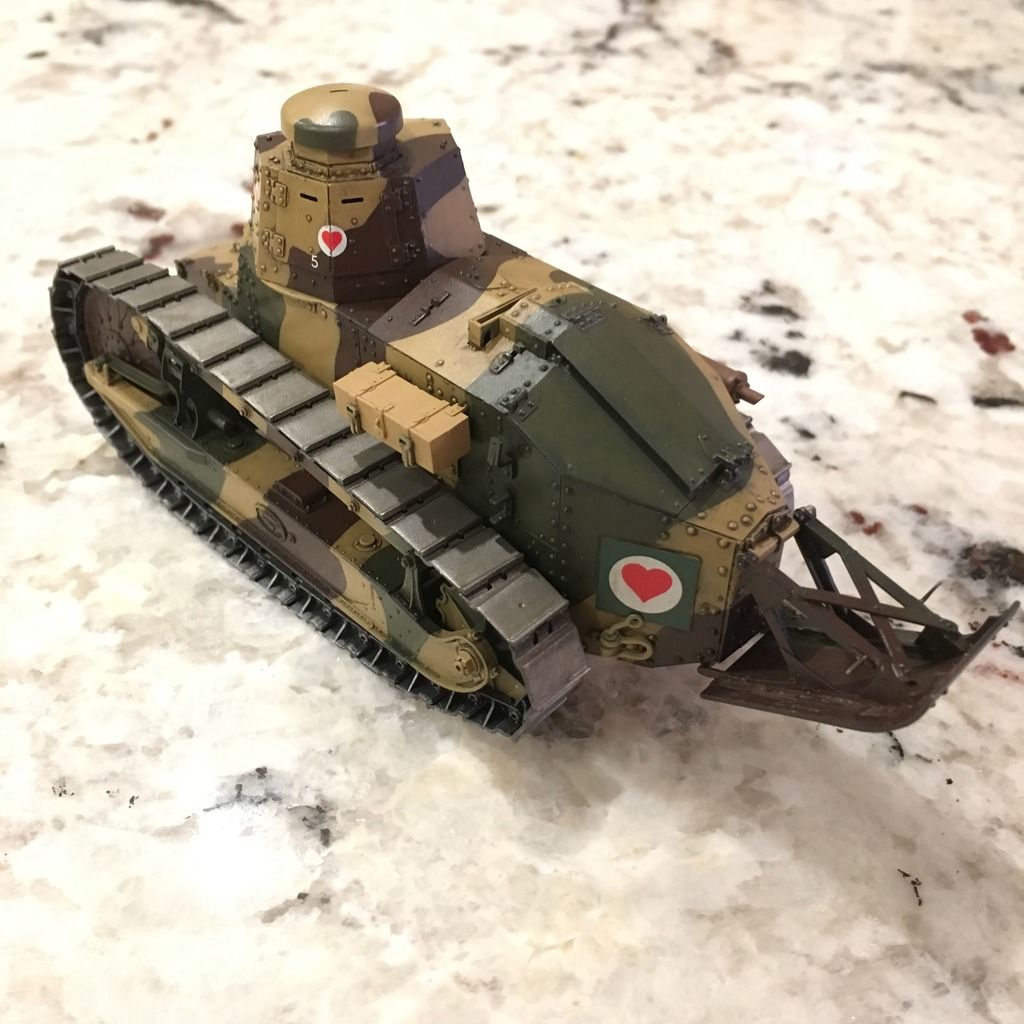
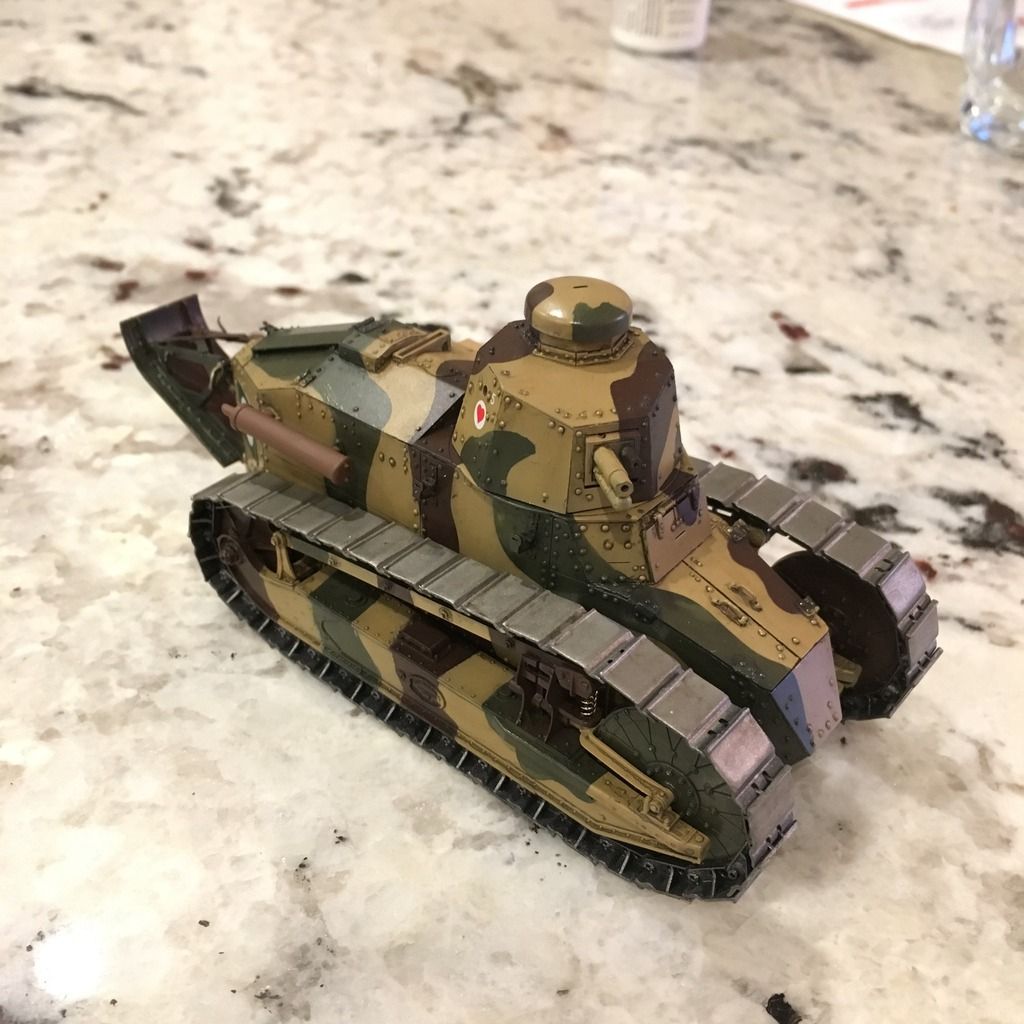
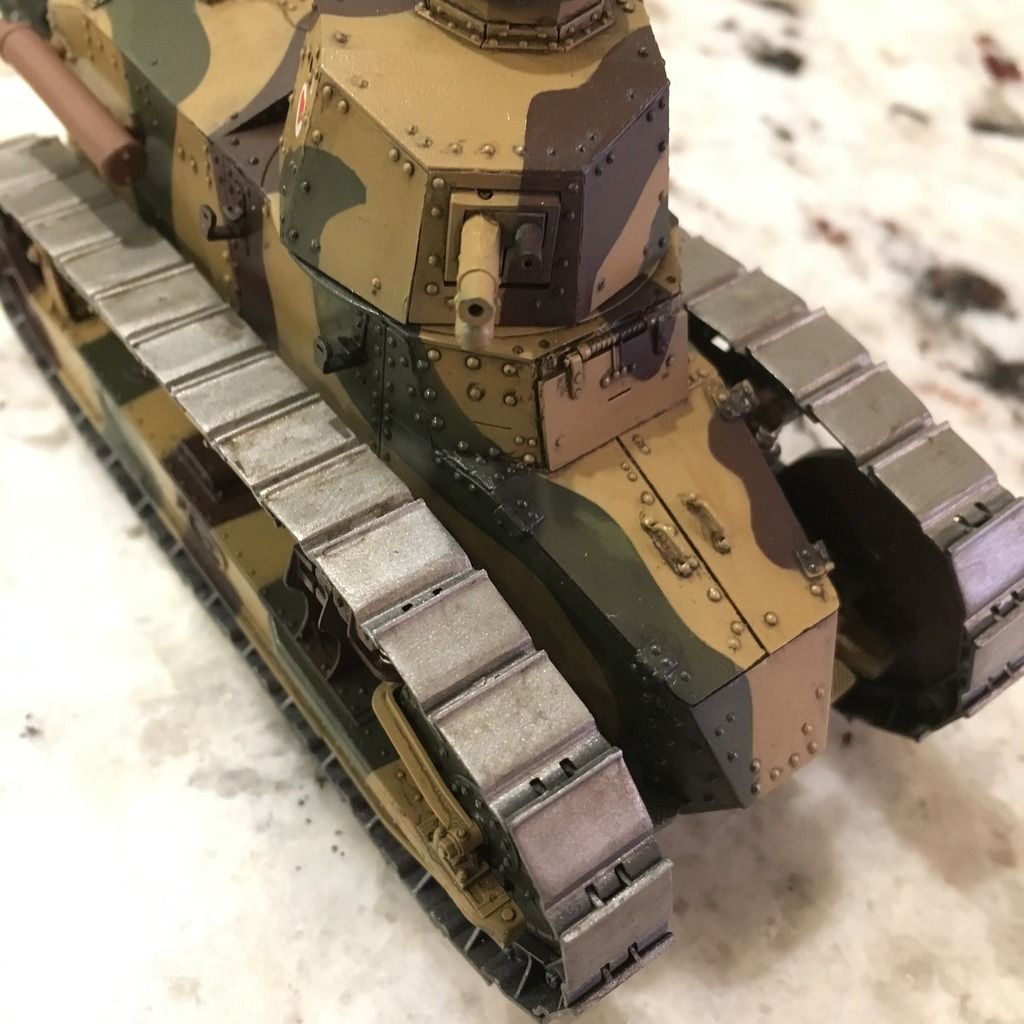
Ok, it's finished, and it's definitely out of my comfort zone. Once again, this is the 1/35 Meng Renault FT-17 with riveted turret. My first armor model in about 17 years.

Hope you all like it. It's been a fun diversion from wingy things.

I guess the second pic for the front works for me.

-BD-

  • Member since
    July 2014
Posted by modelcrazy on Wednesday, March 15, 2017 3:31 PM

Looks great BD, it dosn't look like you lost your touch with armor.

Steve

Building a kit from your stash is like cutting a head off a Hydra, two more take it's place.


http://www.spamodeler.com/forum/

  • Member since
    April 2010
Posted by Theuns on Wednesday, March 15, 2017 11:34 PM

Very coolk build Brandon, I like what you did with the tracs and the tools on the side is a nice toutch.Thanx for taking part.


It makes me think of the British TV series "Alo Alo" with Lt Gruber and his little tank LOL


Theuns

  • Member since
    January 2014
Posted by Seabe on Friday, March 17, 2017 10:58 AM

Okay, so all the wheels and tracks are installed. I see on the pic that I missed some of the lower outside edges when going over the tracks - and really not too worries about the top side, since that will be covered. While doing the edges, I may dirty up the upper/inside of the track on the bottom side a bit as well.

Yes... I know the brown is not a 100% desert shade. But really, an auto guy that has ANY shade of brown is surprising... close enough for me!

  • Member since
    January 2015
Posted by BrandonD on Friday, March 17, 2017 5:16 PM

Thanks, guys! It was a lot of fun.

-BD-

  • Member since
    January 2014
Posted by Seabe on Monday, March 20, 2017 9:52 AM

Some more progress. With these sections (esp the turret section I have now started) I am finding just how little I know about these types of builds. My usual painting techniques does not quite match some of the patterns these are supposed to be built in - but it's still fun and I learn a lot! And that's what this is supposed to be about.

Anyhow, current state - wheels have company.

  • Member since
    July 2014
Posted by modelcrazy on Monday, March 20, 2017 10:07 AM

Yeah, armor is a whole other beast than airplanes or ships. I'm not so good on them either.

Steve

Building a kit from your stash is like cutting a head off a Hydra, two more take it's place.


http://www.spamodeler.com/forum/

  • Member since
    December 2007
  • From: Eagle River, WI
Posted by PANZERJAGER on Tuesday, March 21, 2017 9:58 AM

sorry for being absent for bit, I had to get some other projects out of the way first.

This kit is rather poor, I am having to rescribe all of the pannel lines because they are almost non existant. I did the fus. now I'll have to do the wing too.

speaking of the wing, the fit to the fus. was pretty bad, and I had to shim it with some Evergreen strip.

Also the resin gun pods don't fit well either. you will see in the pics that I am going to have to putty of Mr Surfacer the joints to make them look better.

But here are a few pics for now...

 PANZERJAGER


  • Member since
    December 2007
  • From: Eagle River, WI
Posted by PANZERJAGER on Wednesday, March 22, 2017 9:37 AM

Here are some more pics.

I want to fair in the pods then scribe a seperation line around them once the putty dries tonight.

 PANZERJAGER


  • Member since
    January 2014
Posted by Seabe on Monday, March 27, 2017 10:23 PM

Slow progress is better than nothing at all! Turret is starting to take shape.

  • Member since
    April 2010
Posted by Theuns on Monday, March 27, 2017 11:33 PM

Nice work on the turret :-)


As for the filling of seams like on the glider, this was one of my pet hates as one usually sands away some surface detail to smooth the putty.

I use to mask the area, apply the tamiya putty and fare it smooth with an earbut dipped in a solvent like thinners, this hepled lesten the sanding.

Since I descovered perfect plastic putty I am a believer! When cured it simply wipes off with a wet ear bud and no sanding needed :-)


Theuns

  • Member since
    January 2014
Posted by Seabe on Saturday, April 8, 2017 8:41 AM

Some more progress on the turret. Slowly getting to the stage where I must join it to the chassis and then for all the figures and the "luggage and spare wheels"... Now if building armour was out of my comfort zone, this is really going to take me to a different time zone. I have done nothing of this kind before, so no laughing at my attempts to make it look "realistic".

Anyways, here's the turret in current state. Oh, the light MG's a bit on the short side - it snapped when I clipped it from the sprue. The mat monster is still holding the barrel hostage. Negotiations have not even started. 


  • Member since
    April 2010
Posted by Theuns on Saturday, April 8, 2017 10:41 AM

Nice work on the turret :-)


Theuns

  • Member since
    January 2014
Posted by Seabe on Monday, April 17, 2017 12:57 PM

Say, do you armour guys glue all these extras in place or just park them there loosely?

I have been way out of my comfort zone on this. And learnt a bucket load... I do not do figures and in the world of gloss auto's, there is very little need for dry brushing and shading. Just doing the extras was an eye-opener. And I set out the figures for very last. But busy with them now... 

The M1A2 itself is done, but for one set of decals. As is most of the extras. Just want to add some wear to some of the metallic sections. And then just to finish off the figures... They will surely shoot me somewhere for what I did to these poor figures, but trust me this is not is NOT my first love! Even on race cars I tend to pose a helmet only...

  • Member since
    July 2008
  • From: Vancouver, the "wet coast"
Posted by castelnuovo on Tuesday, April 18, 2017 9:38 PM

Well, I'll be totaly late for this one and not a chance to finish on time. But...finaly I got my s... Embarrassedtogether (hey life gets in the way Smile), and will build Italeri's Harvard Mk. IIa in 1:48...as soon as it arrives

  • Member since
    April 2005
  • From: Australia
Posted by taxtp on Thursday, April 20, 2017 1:35 AM

Theuns - I can't get the Figure Vinette done as  I thought. The conversion of one of the figures involves some parts from so old kits that I haven't got in the stash, so I'll flick the switch and make a change.

I've been asked to build a 1/72 Airfix Spitfire Mk 1 in a non military, non commercial, fictitious, made up, imaginative scheme for a club display. It's not something I'd ever dream of doing really, and I  plan to leave it at the display :)

I'm thinking that maybe it could be a Batplane...

Theuns - feel free to sack me if this doesn't qualify.  I won't be offended.

Anyway, here's the beginnings of it.

Cheers

Tony


I'm just taking it one GB at a time.

  • Member since
    April 2010
Posted by Theuns on Thursday, April 20, 2017 1:53 AM

Go for it Tony.


I understand about modling having to take a backseat sometimes , no worries atall, enjoy the Harvard :-)


Theuns

  • Member since
    December 2007
  • From: Eagle River, WI
Posted by PANZERJAGER on Thursday, April 20, 2017 8:24 PM

Well, after scribing in all the almost non-existant panel lines, furring in all the resin blobs that didn't fit and countless hours of body and fender work.

Here it is..... DONE!

I am never building another Czeck Model kit again.

Enjoy!

 PANZERJAGER


  • Member since
    April 2010
Posted by Theuns on Thursday, April 20, 2017 11:25 PM

Looking at the result you got there one would not say you had any issiues with that kit, it looks really good well done.

I like the paintwork on it.

Thanx for taking part.


Theuns

  • Member since
    December 2007
  • From: Eagle River, WI
Posted by PANZERJAGER on Friday, April 21, 2017 12:01 PM

Theuns

Looking at the result you got there one would not say you had any issiues with that kit, it looks really good well done.

I like the paintwork on it.

Thanx for taking part.


Theuns


Thanks Theuns,

 You have no idea how crappy this kit was.

The pannel detail was so faint you could hardly see where to scribe them in.

I am also not super experianced wit scribing pannel lines anyway, I've probbably done 5-6 kits where I had to scribe pannel lines.

Also this is the 1st. time with a vacu-formed canopy, that was a trip too. Pretty flimsy.

I'll stick with my Tamiya and Hasegawa aircraft kits for now.

Besides I mostly build armod and sometimes a hot rod or two.

Hey, we don't have a badge for this GB yet, do we???

 PANZERJAGER


  • Member since
    April 2010
Posted by Theuns on Friday, April 21, 2017 11:35 PM

Nobody has sugested a badge yet, do you have ab idea for one?


Theuns

  • Member since
    January 2014
Posted by Seabe on Saturday, April 22, 2017 4:25 AM

Okay, so the armour itself is done. GB was definitely a success from my perspective. It got me to build a kit I don't think I'd ever have the drive to pull out, I learnt a lot, incl. some new techniques and subject, plus I had fun! 

Most of the peripherals have also been completed, just finishing up on the figures.

So some whots of the M1A2 as it currently stand - empty.


One place where some decalling skills helped, the multiple segments on the rear CIP to create the F2... 

And some of the peripherals...


  • Member since
    April 2010
Posted by Theuns on Monday, May 1, 2017 10:40 AM

Is there anyone who needs another week or so to complete a model for this GB or can I call it a day?

Theuns

  • Member since
    January 2014
Posted by Seabe on Monday, May 1, 2017 10:09 PM
Theuns, I've completed the model before the long weekend. Just did not have a chance to take a pic of the end product. Will do so soon.

  • Member since
    April 2010
Posted by Theuns on Monday, May 1, 2017 11:33 PM

cool I will replace pic when you send me a new one.


Theuns

  • Member since
    January 2014
Posted by Seabe on Thursday, May 4, 2017 10:40 AM

Hey Theuns, at last got around to taking some pics! Nothing studio quality, but at least it's something.

Again, thanks for this GB - think it was a great idea! I really learnt lot, most of which was with techniques I don't usually used and got to try out. Also, the concept of figure building and all the peripherals (bags, tents, etc.) was foreign to me - and very good fun!

Anyhow - here's the end product, some more detailed shots below...

Right rear corner


Figures

Left-side 

  • Member since
    April 2010
Posted by Theuns on Thursday, May 4, 2017 10:48 AM

Very cool, I like the waterbottle :-)


Pic updated.


Since no one asked for an extention I will say this GB is now closed, thanx to all who took part.


Theuns

JOIN OUR COMMUNITY!

Our community is FREE to join. To participate you must either login or register for an account.

SEARCH FORUMS
FREE NEWSLETTER
By signing up you may also receive reader surveys and occasional special offers. We do not sell, rent or trade our email lists. View our Privacy Policy.