SEARCH FINESCALE.COM

Enter keywords or a search phrase below:

"Out of your comfort zone" GB '17

9477 views
145 replies
1 rating 2 rating 3 rating 4 rating 5 rating
  • Member since
    April 2010
Posted by Theuns on Monday, February 6, 2017 10:23 PM

I am on step 1 of my Tamiya Flak 20mm and I am already confused!!

The instructions are contradicting and the one part does not fit no matter how I try. Being a Tamiya I though it to be a  shake and bake easy kit.


I am out of my depth here and it will take some thinking to get it right....not knowing anything about the full size also does not help.


Theuns

  • Member since
    October 2016
  • From: Lincoln, NE
Posted by Daniel Ficke on Tuesday, February 7, 2017 2:47 PM

I carefully pried apart the top and bottom halves of my tank after removing the turret. I am planning to create an interior. No photos at this time.

Daniel J. Ficke

  • Member since
    November 2010
  • From: Florida-West Central
Posted by Eagle90 on Tuesday, February 7, 2017 8:51 PM

Great work going here! 

Here's a few update pics.  Lots of filling and sanding right now.  Sure thought a streamlined shape like a sub would be fast, but the body needed some filling and the "tower"? is turning out to be the real pain with filling and sanding.  We will get there thou.  Super Angry  Charge!

Enjoy.

Bobby


  • Member since
    January 2014
Posted by Seabe on Tuesday, February 7, 2017 9:25 PM

To the more experienced armour guys - any tips on the tracks? I've read up a bit and it seems a drop of CA and/or some staples are the way to go... but any input will be valued.

  • Member since
    January 2015
Posted by BrandonD on Friday, February 10, 2017 3:13 PM

Seabe

Brandon, if you can teel me what the term "older M1 boxing" means, I'll have a look.

So I came to the options on the kit and ended up trawling the interwebs for two hours to try and decide which unit markings to use - they use different options at places and some are M1A1HA's. That happens when you haven't got a clue what you're doing! 


Seabe - I meant is it the moldings from their kit that was available in the '90s or early 2000s. I am just curious if it's an upgrade with new features or an entirely new tool. Either way, should be a blast to build.

-BD-

  • Member since
    April 2010
Posted by Theuns on Sunday, February 12, 2017 10:34 PM
  • Member since
    June 2008
Posted by lewbud on Sunday, February 12, 2017 11:28 PM

MC, looking forward to seeing paint on Igor.

Brandon, the FT-17 is looking good.

Eagle, the sub is looking good as well.  Don't recall any subs with hull red, usually they were gray and black.  

Theuns, that kit has been around forever, before Tamiya became known as a shake and bake.


Buddy- Those who say there are no stupid questions have never worked in customer service.

  • Member since
    July 2014
Posted by modelcrazy on Monday, February 13, 2017 12:26 PM
Thanks Lebud,
I painted Igor all silver and will go over that with a blue metallic in areas. I am having quite a time with the hands. They are rubber and I can’t get enamel or lacquer to stick to it. They seem to dry then the next day the paint is sticky. I’m trying to prime with acrylic but don’t hold out much hope.
If the acrylic doesn’t work I’ll try some Krylon made for plastic and rubber to use as a primer.


Any ideas?

Steve

Building a kit from your stash is like cutting a head off a Hydra, two more take it's place.


http://www.spamodeler.com/forum/

  • Member since
    July 2014
Posted by modelcrazy on Thursday, February 16, 2017 11:17 AM
Did some more work to Igor last night. Painted the blue and will mask that and paint the black/silver areas. I had a boo boo though, while I was spraying the blue on an arm, it fell onto the carpet. I had to strip one area to remove carpet fibers…blaa. Oh well, I need to wet sand it and repaint some areas again anyway. Almost there though, a little repaint, masking and silver and white stripes on the forearms and legs, decals, just a tad of weathering (some chipping and darkening around the joints), mount it to the base, connect the battery and switch, add some debris to the base and I’m done….maybe I’m not as close as I thought.

Steve

Building a kit from your stash is like cutting a head off a Hydra, two more take it's place.


http://www.spamodeler.com/forum/

  • Member since
    January 2014
Posted by Seabe on Thursday, February 16, 2017 9:29 PM

Modelcrazy, I really like what you're doing there! 

For a guy used to mostly 4 or two wheels, this is a looot of wheels...

  • Member since
    April 2010
Posted by Theuns on Thursday, February 16, 2017 10:36 PM

I must say I like the blue on the Igor :-)

Wheels are one of my most dreaded things to paint, that is why I like Helos with skids LOL

My Flak 20mm is almost done....I beat it into submition!

Now I just need to figure out how to do a whitewash on the armour plating.


Theuns

  • Member since
    July 2014
Posted by modelcrazy on Sunday, February 19, 2017 1:34 AM
Thanks Theuns.
I am masking Igor and this is taking some time but the results look good. I still have the left leg and both arms to do. I’m glad I primed with silver because some of the blue is chipping off and it’s really adding to the overall effect.

Steve

Building a kit from your stash is like cutting a head off a Hydra, two more take it's place.


http://www.spamodeler.com/forum/

  • Member since
    July 2014
Posted by modelcrazy on Tuesday, February 21, 2017 7:26 AM

Spent a lot of hours masking but I'm done. Now I need to touch up here and there and add just a little weathering.

Steve

Building a kit from your stash is like cutting a head off a Hydra, two more take it's place.


http://www.spamodeler.com/forum/

  • Member since
    April 2010
Posted by Theuns on Tuesday, February 21, 2017 9:09 AM

That Igor is looking really nice.

I completed my Flak 20mm but cant out on the final clearcoat with all the rain we we are having.


Theuns

  • Member since
    January 2014
Posted by Seabe on Tuesday, February 21, 2017 10:58 AM

Send some of that rain down to us in the Western Cape... 

  • Member since
    January 2015
Posted by BrandonD on Tuesday, February 21, 2017 9:31 PM

Nice work, modelcrazy. That striping looks absolutely perfect.

-BD-

  • Member since
    January 2015
Posted by BrandonD on Tuesday, February 21, 2017 9:35 PM

Very small update on the Meng FT-17. I got the decals (all six of them) on. After building a Mirage last year that felt like it had 70 or 80 decals/stencils, this is a nice change of pace, especially when looking at a Phantom that has 100+.

I've since touched up paint on the uppermost part of the suspension so it matches the camouflage pattern on the body. I also got some more parts glued together, but this is still largely press-fit subassemblies.

As of now, it all has a gloss clear on it, and I can start on the weathering. I still need to paint the tools, wooden box on the side and exhaust pipe. But it feels like a tank now.

-BD-

  • Member since
    July 2014
Posted by modelcrazy on Wednesday, February 22, 2017 10:36 PM

Thanks Theuns and BD,

I’m almost done with Igor. The first picture is with some chipping and the second has an oil wash added. I need to work on the base and add the batteries for the lights.


Steve

Building a kit from your stash is like cutting a head off a Hydra, two more take it's place.


http://www.spamodeler.com/forum/

  • Member since
    April 2010
Posted by Theuns on Saturday, February 25, 2017 11:58 PM

I am calling my Flak 20mm Vierling done....

I did not go mad with the weathering, just enough not to look factory fresh.


Theuns

  • Member since
    July 2014
Posted by modelcrazy on Sunday, February 26, 2017 1:22 AM

That is really cool Theuns Yes Something to shoot at you Mustang.

What scale is that again?

Steve

Building a kit from your stash is like cutting a head off a Hydra, two more take it's place.


http://www.spamodeler.com/forum/

  • Member since
    April 2010
Posted by Theuns on Sunday, February 26, 2017 4:21 AM

LOL, it is 1/35


Theuns

  • Member since
    January 2015
Posted by BrandonD on Tuesday, February 28, 2017 11:33 AM

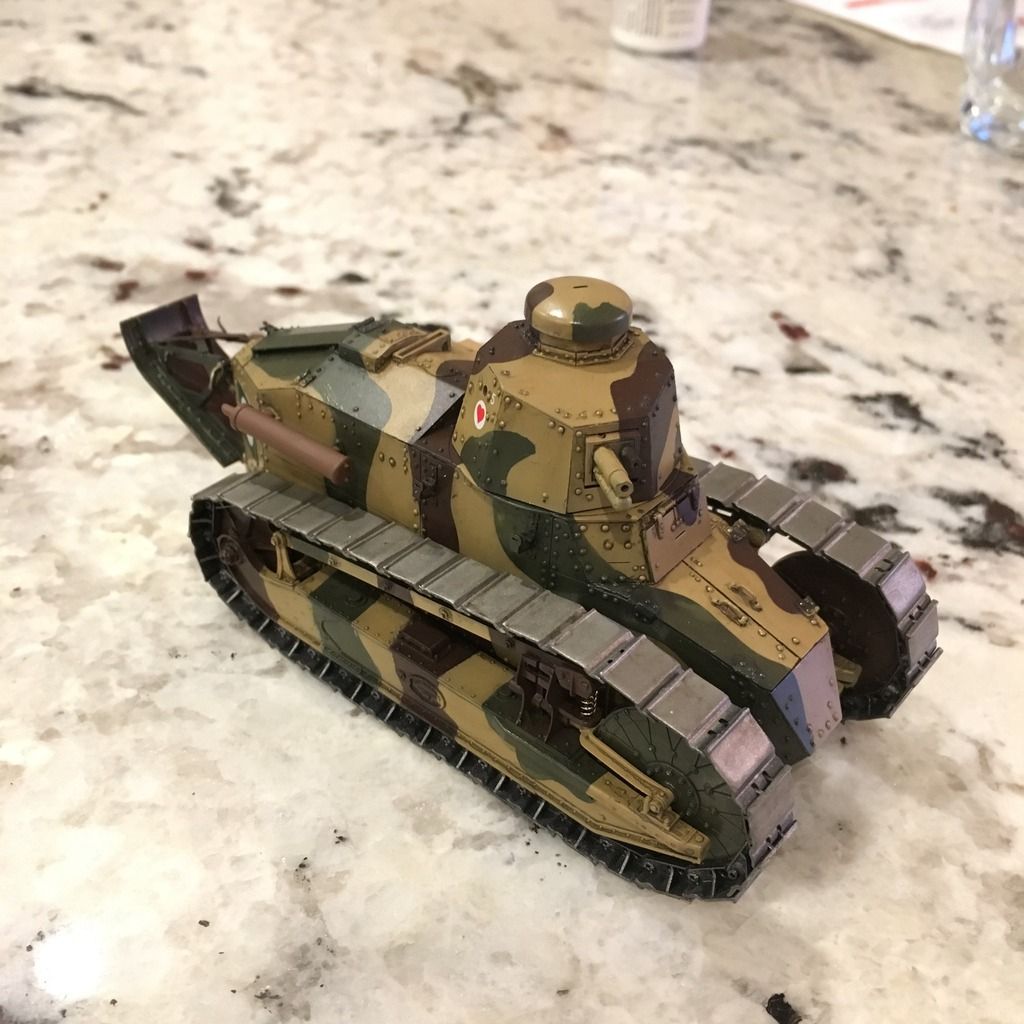
Ok, so...what now, armor experts?

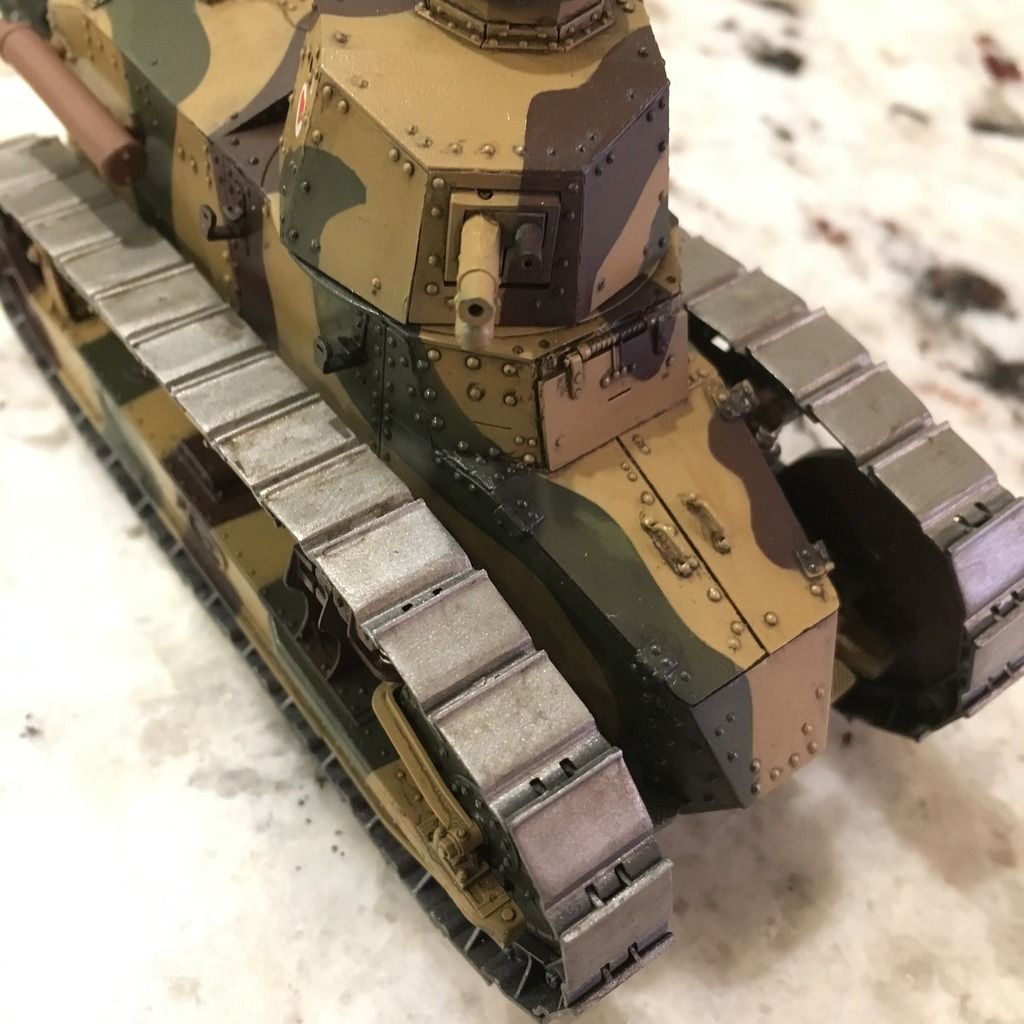
I think I'm at a snag. I keep staring at it and wondering which way to go next. Most of this is still just press-fit in subassemblies, and the tracks are removable at this point. I painted them Mr. Paint Steel, then dropped some Flory Dark Dirt panel line wash on them, using a brush to rough it up and remove most of it. But they're still clean, and while pigments sound fun, I don't know if that's going to be enough. But judging by this pic of the same tank I am building, maybe it is?

There appears to be some mud on the big suspension bars, but the rest appears rather clean. Maybe some mud in the forward part of the track cleats.

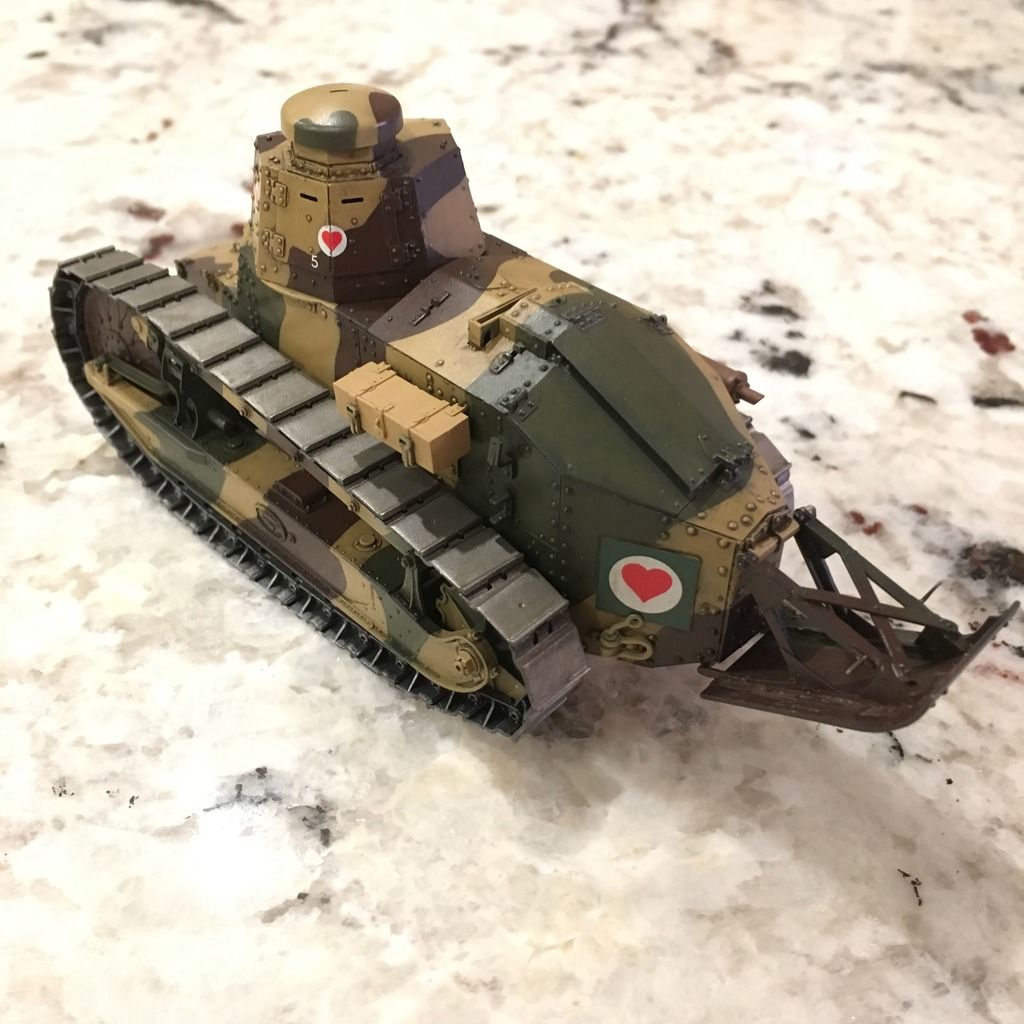
This thing served in Verdun, according to Meng, and having visited Verdun, that's one of the things that drew me to this scheme. I remember Verdun being muddy, even in 2008 when the grass and trees had grown back.

So I guess what I'm asking is this: What's the best way to replicate some stuck-on mud in the tracks as shown in the pic? I have some of the Vallejo Mud product, but have yet to use it, or even open it. I have considered mixing paint with Tamiya putty and stippling it in, and even just dropping pigments onto a wet surface and building them up, but I don't know if that would work.

As for the rest of the vehicle, I still need to add a metal screen on top (one of the PE parts), finish the exhaust and finish painting the wooden storage box and tools, then cement them on.

I also feel like there should be more tonal variation in the paint, and I might hit it with another round of oil filters now that it has a mostly flat coat on it. I oil dot filtered it when it was glossy, and I liked the effect, but it's a bit muted now.

Thanks in advance for any input and advice. This has been a lot of fun, and I will definintely be looking forward to the Mk.V I have in the stash.

-BD-

  • Member since
    April 2010
Posted by Theuns on Tuesday, February 28, 2017 11:43 AM

I am by no means an armour guy but for mud I have in the past used chalk pastel powder miged with pva glue to form a paste, it works well enough for me and if you want a wet look to the "mud" you can put some clear acrylic over it.


Theuns

  • Member since
    January 2014
Posted by Seabe on Tuesday, February 28, 2017 12:03 PM

Wow... both Theuns and Brandon - great work! 

Theuns, how cast in concrete is this end date? I may be in trouble. Haven't been able to do much on any of my three builds (two for the "Red hot and Rollin" GB as well) the last couple of weeks - with a weekend of craziness with my wife working as well.

Then next weekend is Argus... and way too soon after that, Oceans. As fellow Saffa, you may know what I'm talking about... training like crazy in all weird hours of the day the rest of the world would like to call "free time".

  • Member since
    July 2014
Posted by modelcrazy on Tuesday, February 28, 2017 12:06 PM

I'm not a huge armor guy either although do dabble with them on occasion. 

I do what Theuns does with pastels except I found water will make the pastels adhere rather nicely and you can build it up. The glue idea would work even better I should think.

Oddly enough for mud...I use actual dirt I shift through a screen and apply with acrylic varnish or PVA glue. It will create a mud color and. 

My Sherman

Steve

Building a kit from your stash is like cutting a head off a Hydra, two more take it's place.


http://www.spamodeler.com/forum/

  • Member since
    December 2002
  • From: Fort Knox
Posted by Rob Gronovius on Tuesday, February 28, 2017 12:43 PM

Seabe

Modelcrazy, I really like what you're doing there! 

For a guy used to mostly 4 or two wheels, this is a looot of wheels...


Those center hubs on the wheels are made of clear plastic so the crew can check the oil level in the hub. Looks like a clear bottle of Coke when sitting on its side.

  • Member since
    December 2002
  • From: Fort Knox
Posted by Rob Gronovius on Tuesday, February 28, 2017 1:06 PM

BrandonD

Eagle - that sub looks cool. Seems like it would be a really fun weathering project, and like you I don't know where I would start. I'd probably head for oils, but I'll be interested in seeing what people say and how you proceed.

Seabe - that looks like a nice kit. I wonder if it's based on their older M1 boxing? I built one asa kit and remember loving it.

-BD-


Brandon, that Tamiya M1 lower hull and suspension is the exact same parts as their 1980s plain M1 kit. It still has the motorization holes for the motor gearbox. They did add two later style sprockets to the kit. The upper hull is the same as earlier M1A1 kits. Because of this, the version of the M1A2 the kit builds into is an uncommon "straight" M1A2 used by just a few divisions (by only a few tank battalions within those divisions). First Cavalry Division and 4th Infantry Division at Fort Hood were the units fielding them. They were eventually replaced by and in turn were rebuilt as M1A2SEP tanks.

Seabe:  This is actually a 3 in 1 kit where it will build into a US Army M1A2, US Army M1A1 heavy or USMC M1A1 heavy. Make sure you know which optional parts go with which version. The M1A2 has a different cupola and the Marines use a different type of smoke grenade lauchers. The Marines also have an anti-missile device that is mounted where the M1A2 has the commander's viewer. Bottom line, some options will never be seen with other options.

The tracks are better than earlier versions. A staple used to secure them will be unseen under the side skirts if placed somewhere along the top run of the tracks.

  • Member since
    January 2014
Posted by Seabe on Tuesday, February 28, 2017 9:37 PM

Thanks Rob - appreciate the heads-up on the wheels! (Shows I am not an armour boffin!) Yes, did see the different options and realised I have to make a call early - I went for the M1A2 version.

Please shout if you see me stuffin up on options and/or assist with pics such as now - I really appreciate it!

  • Member since
    April 2010
Posted by Theuns on Tuesday, February 28, 2017 10:10 PM

just complete the model, the end date is not so important, we must have fun here ;-)


Theuns

  • Member since
    December 2002
  • From: Fort Knox
Posted by Rob Gronovius on Wednesday, March 1, 2017 12:41 AM

Seabe

Thanks Rob - appreciate the heads-up on the wheels! (Shows I am not an armour boffin!) Yes, did see the different options and realised I have to make a call early - I went for the M1A2 version.

Please shout if you see me stuffin up on options and/or assist with pics such as now - I really appreciate it!


I'm not trying to take the fun out of building your kit as someone implied. Just trying to steer you in the right direction and add some useful tips that you may or may not need. I know I have built jets and stuck various underwing stores on them because they look cool, not knowing that those combinations never happened or with that load the aircraft could never get off the ground with all that stuff.

Even armor modelers miss the clear hubs. It is a unique trait to the Abrams series. Only three of the most recent manufacturers have included a clear part for the hub. Depicting it is just a painting issue trying to replicate clear glass with paint.

Some modelers strive for accuracy. To them, replicating every excruciating detail is fun. Others like to build straight out of the box and that's fun too. I'm probably somewhere in between depending on subject. I like to super detail subjects I "care" about, but will crank out a kit in a weekend that just caught my eye without regards to accuracy or corrections. That's why the title "out of your comfort zone" caught my eye. I like to build models, but I am mainly an armor and sci-fi modeler. And I like to build just about any subject that catches my eye.

Bottom line, neither type of modeler is wrong, just enjoying the hobby differently. Implying that someone who strives for accuracy is not having as much fun as an out of box builder is the same as implying that someone who builds car models is not having as much fun as someone who builds airplanes.

I'm sorry to have crashed your group build. The title got my attention and then the Seabe's Abrams photos caught my eye. I saw some questions asked that I could answer and tried to give some pointers. My mistake, I'll leave now.

JOIN OUR COMMUNITY!

Our community is FREE to join. To participate you must either login or register for an account.

SEARCH FORUMS
FREE NEWSLETTER
By signing up you may also receive reader surveys and occasional special offers. We do not sell, rent or trade our email lists. View our Privacy Policy.