SEARCH FINESCALE.COM

Enter keywords or a search phrase below:

75th Anniversary of 1945 Group Build (World at War)

23373 views
354 replies
1 rating 2 rating 3 rating 4 rating 5 rating
  • Member since
    February 2010
  • From: New Jersey
Posted by 68GT on Saturday, February 15, 2020 12:06 PM

Yeah, its going to take some work.  Kit is a 1991 boxing but the decals looked to be in good shape.


Havnt received a notification in months on anything here on the site.

On Ed's bench, ???


  • Member since
    February 2010
  • From: New Jersey
Posted by 68GT on Saturday, February 15, 2020 2:40 PM

Yeah, nothings working on these decals.  Going to carefully pull them off and get some aftermarkets.  Never had this happen before.  I even have a nice gloss coat of Future on the kit which often helps out.

Going to switch gears and build this 1/48 Fujimi Fw190A as an A-8.  Decals are Eagle Strike and I'm going with white 12 option.  Says it was found by Alied troops after the war so I'm saying its 1945.  74/75/76 scheme with extra RLM 83 streaks on it.


On Ed's bench, ???


  • Member since
    September 2003
  • From: AandF in the Badger State
Posted by checkmateking02 on Sunday, February 16, 2020 4:17 PM

If it was found in '45, then it is a '45!  I'll adjust the build roster.  Sharp looking aircraft; nice camouflage scheme, too.


  • Member since
    February 2010
  • From: Berkeley CA/St. Paul MN
Posted by EBergerud on Tuesday, February 18, 2020 11:19 PM

Checkmate - I haven't got a message from a Finescale GB since January 16. That means 1944 GB, British Army GB and this one. Is anyone else having trouble?

Eric


A model boat is much cheaper than a real one and won't sink with you in it.

  • Member since
    September 2003
  • From: AandF in the Badger State
Posted by checkmateking02 on Wednesday, February 19, 2020 3:22 PM

Eric:  No idea what's going on--or not going on--with email notifications, although I have noticed that other websites that I've signed up with for such things have also ceased sending; or at least I've stopped getting them.


  • Member since
    December 2002
  • From: Bury St Edmunds, Suffolk, England
Posted by Bish on Sunday, February 23, 2020 4:09 PM

I made a start on the S-100 on Thurs. This is my first 72nd scale ship build and the most detailed ship to date. As i am not to familiar with building ships, i am taking my time with this and i am intending follow the instruction sequence rather than jump around as i might do with armour or aircraft.

I don't usually get referance boks for subjects i only have one kit of, but i have made an exception with my larger ship kits.

The kit itself cost me nothing, being a gift from Bobby (Eagle90) a few years back. But i made up for that with the AM. The Griffon premium set contains 14 PE frets, resin parts, metal barrels and torpedo's and a few other things. I got 2 Peddinghaus decal set as the boat i want to do, S-205, is not covered by one of them. Also an Artwox wood deck and some sea mines from CMK.

I started out with the mounts for the railings on the main deck piece. I didn't have much spare time Thurs night so didn't want to get into anything to intricate.

Then over the weekend i made a start on the bridge. Main piece i needed to work on was the RZA 5 torpedo sight. The kit piece lack detail and is totally wrong, and the PE only added a couple of bits. This is what it should look like, from the Squadron book.

And this is the kit part, this being the upper portion. Notice how it narrows at the top.

And the lower portion is part of the front of the bridge. On the real thing, it would extend lower down below the bridge floor.

That whole piece is replace by PE. So i cut out the bit i needed and attached it to the upper portion. I also filled out the side with some styrene rod and added a bit of PE.

I then finished it off with some PE and scratched some detail with styrene and PE scrap. The hand wheel on the rear is from the PE set, the one of the right is made from 2 spare wheels from one of my Luftwaffe ladder sets. I put 2 together to give it some thickness. I finished off with some wireing. This was one of those things when you have to know when enough is enough. I could have spent a whole day adding tiny details and it still would not have matched the real thing. I think this looks enough without going OTT. It was then fitted to the bridge floor.

I then got the front and sides of the bridge fitted out.

And then the armoured front to the bridge/wheel house.

So the bridge is now ready to be primed and painted on the inside. I'll do than and then put it all tofgether. There is some slight cleanup and a few parts to be added to the outside, but they can be done later.

Enjoying this so far, still a long way to go.

I am a Norfolk man and i glory in being so


On the bench: Airfix 1/72nd Harrier GR.3/Fujimi 1/72nd Ju 87D-3

  • Member since
    September 2003
  • From: AandF in the Badger State
Posted by checkmateking02 on Monday, February 24, 2020 4:08 PM

That is quite outstanding, Bish.  A vast improvement over the kit parts.  


  • Member since
    December 2002
  • From: Bury St Edmunds, Suffolk, England
Posted by Bish on Tuesday, February 25, 2020 4:17 AM

Thankls check, and your not wrong. But despite all that PE, still got to do some scratch building.

I am a Norfolk man and i glory in being so


On the bench: Airfix 1/72nd Harrier GR.3/Fujimi 1/72nd Ju 87D-3

  • Member since
    April 2006
  • From: ON, Canada
Posted by jgeratic on Tuesday, February 25, 2020 8:29 AM

68GT

The kit decals were alittle thick on the Typhoon so I tried some solveset with some odd results.  Going to take me a while to get these smoothed out enough to look okay.


The surface area is on a slight curve in two directions.  Although it makes it easier to line up by applying those fuselage markings all in one shot, I'm certain you would of had better luck laying down the roundel separately, as well as each code letter individually.


regards,

Jack

  • Member since
    August 2015
  • From: the redlands Fl
Posted by crown r n7 on Friday, February 28, 2020 6:22 PM

68GT time should fix it.

I gave the basic sea camo.


 Nick.

  • Member since
    September 2003
  • From: AandF in the Badger State
Posted by checkmateking02 on Saturday, February 29, 2020 9:32 PM

Great-looking paintwork, Nick!


  • Member since
    December 2002
  • From: Bury St Edmunds, Suffolk, England
Posted by Bish on Sunday, March 8, 2020 2:52 PM

Its been a couple of weeks, so time for an update. A few people have said they have the same Griffon set, so i am going to start with a few issues i have found with it, mainly down to the instructions.

First one is on the main deck. You have to remove the raised area, greyed out in the instructions. And it clearly shows that the vertical sides are to be left.

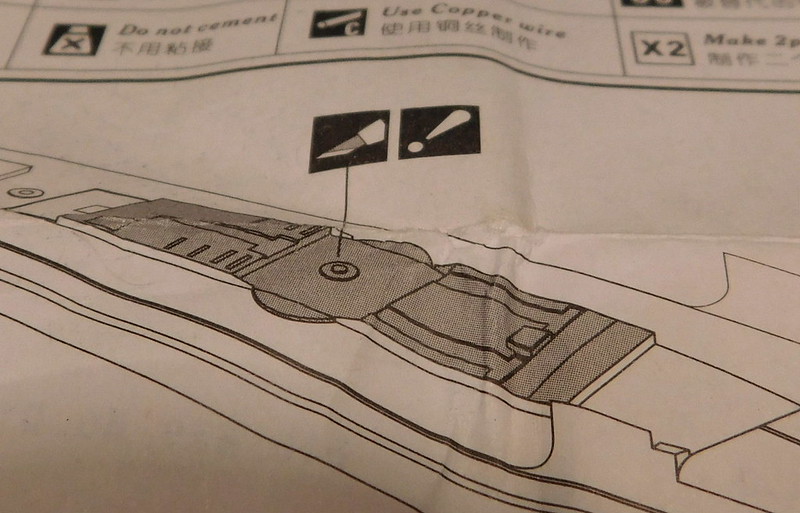
Which leaves you with this.

But the 2 peices that go over the hole look like this underneath.

Clearly the cross piece with not allow it to fit with the sides of the kit in place. So, the sides had to be removed, here the rear has been done but not the front.

Next issue is the rear section of the torpedo tubes. Before adding AM, they should fit like this.

There is a PE piece for each side which going off the instructions fit like this.

Clearly thats not right, in the instructions, the top of the PE run along the plastic piece. Whjat they miss out is the the sides of the vertical plastic bulkhead have to be taken back.

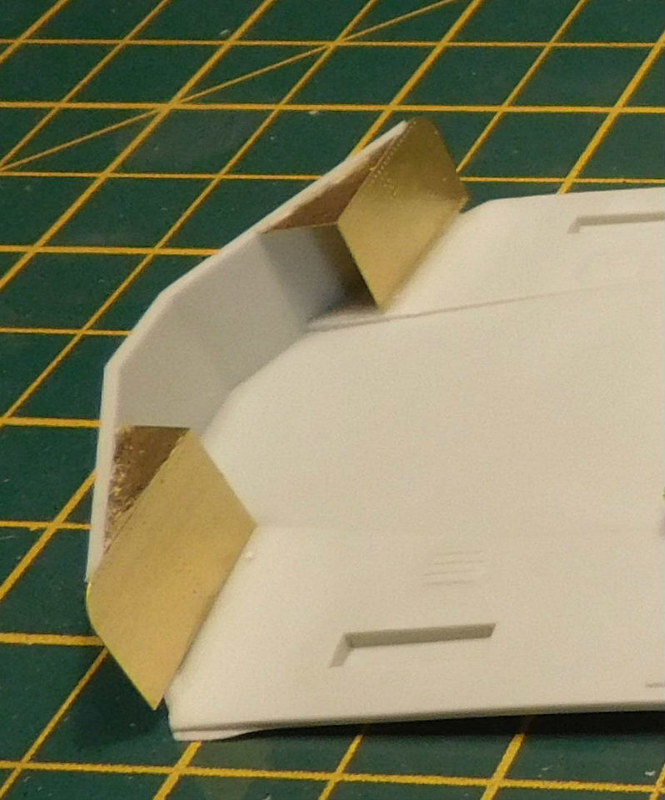
This also means that the torpedo tubes won't fit and have to be cut back, again this is not mentioned.

Those isues caused me some head scratching, though really it should have been clear what to do. I only realised when i look at the Griffon models website and the page on this AM set had a lot of images which included this area without the bridge fitted.

Unfortunatly, the link to different products does not seem to be working at the moment, at least on my computer. The product is a little way down on the right side, BPN 72001.

http://www.griffonmodel.com/

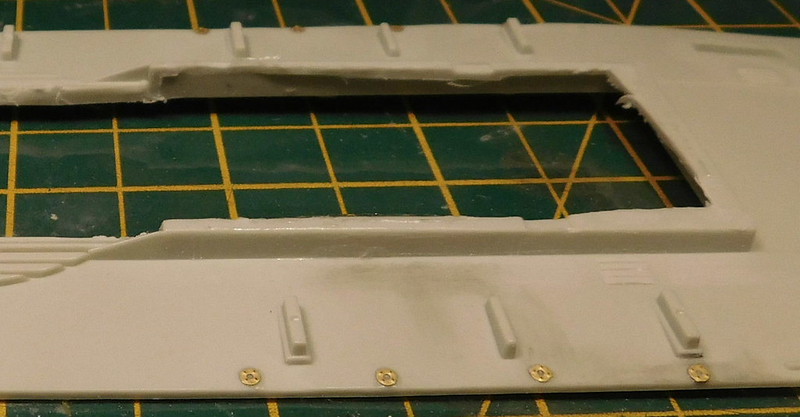
So once those issues where dealt with, this is how the rear deck looked.

I waisted a couple of evenings trying to sort that out, but it got there. So i was able to fit the deck and put the hull together.

I then did some work on the raised front deck including around the forward gun mount and the hatch, this was then fitted. Towards the rear, there are 2 raised circles just behind the small raised deck section. There were 4 of these, the other 2 being on the outside edge. These are the bases for the smoke generators. The instructions tell you to remove the inner ones. But the pics of my boat clearly show the generators on these inner positions, so i removed the other ones.

The prop shafts were also fitted, i left out the rudders.

And i got one of the rear sections of the torpedo tubes donw. Lots of tricky PE on there. You can see the front has been cut back. I did a bit to much so had to add some styrene strip.

And finally, there is some question about the kit props being incorrect. In my seperate WiP thread it was mentioned that the pitch is completly wrong. Several reviews mention this as well. In the ship craft book there are a couple of pics of an S-38 prop which show them well. They also show that the centre prop attaches to the main rudder. The kit has this right, but i thought it must have been wrong when i saw the instructions, but what do i know about ships.

Over on my other thread, one of the guys mentioned that Shapeways has 3D printed props with the correct pitch. When i checked there site, they also have the correct shield for the rear gun of the boat i am doing. I was going to have to scratch that. It should be here tomorrow, my first 3D printed parts.

More to follow.


I am a Norfolk man and i glory in being so


On the bench: Airfix 1/72nd Harrier GR.3/Fujimi 1/72nd Ju 87D-3

  • Member since
    November 2018
  • From: Saskatchewan, Canada
Posted by sickdude on Sunday, March 8, 2020 4:59 PM

Hey fellers. If it's ok with you guys, I would like to join the group, with Airfix's new 1/48 Spitfire FR Mk.XIV (For Bish Wink).

William (Willy)

 
  • Member since
    September 2003
  • From: AandF in the Badger State
Posted by checkmateking02 on Sunday, March 8, 2020 7:51 PM

Welcome to the GB, Willy.  I've added your Spitfire to the GB, something I'm sure Bish will much appreciate.  Thanks for thinking of him!

Bish, that is a beautiful job you're doing with integrating all those little PE things into the kit, and making the modifications to accommodate them.  It looks like it's a massive headache in some spots, so I hope you have plenty of aspirin.

It will be very interesting to see how your 3-D printed parts work out.  I've used some on ship models from time to time.  They sometimes seem a little brittle.  I've broken some trying to detach them from their runners, but  maybe that depends on the type of material they're printed from.


  • Member since
    December 2002
  • From: Bury St Edmunds, Suffolk, England
Posted by Bish on Monday, March 9, 2020 4:17 AM

Thanks check. It has been a bit of a headache, but nothing i should not have been able to figure out for muself.

PJ mentioned that about the 3D parts being brittle, also not to use enamel or lacquer paints. So i am going to try a couple iof coats of future before i paint. But as they have come alot sooner than i expected, i have some time to work with those.

I am a Norfolk man and i glory in being so


On the bench: Airfix 1/72nd Harrier GR.3/Fujimi 1/72nd Ju 87D-3

  • Member since
    December 2002
  • From: Bury St Edmunds, Suffolk, England
Posted by Bish on Monday, March 9, 2020 4:17 AM

sickdude

Hey fellers. If it's ok with you guys, I would like to join the group, with Airfix's new 1/48 Spitfire FR Mk.XIV (For Bish Wink).


I can fall out with people very easily you know Big Smile

I am a Norfolk man and i glory in being so


On the bench: Airfix 1/72nd Harrier GR.3/Fujimi 1/72nd Ju 87D-3

  • Member since
    August 2015
  • From: the redlands Fl
Posted by crown r n7 on Monday, March 9, 2020 5:48 AM

Awesome detail work Bish


 Nick.

  • Member since
    December 2002
  • From: Bury St Edmunds, Suffolk, England
Posted by Bish on Monday, March 9, 2020 7:38 AM

Cheers Nick

I am a Norfolk man and i glory in being so


On the bench: Airfix 1/72nd Harrier GR.3/Fujimi 1/72nd Ju 87D-3

  • Member since
    September 2003
  • From: AandF in the Badger State
Posted by checkmateking02 on Tuesday, March 10, 2020 2:41 PM

Bish:  I had not heard that enamels and lacquers shouldn't be used with 3D parts.  I have used only small parts I obtained from Free Time Hobbies:  1/700 life rafts; 20mm cannon; and naval crewmen.  They make a lot of other small detail parts like this.

I painted them with Colorcoats (thinned with lacquer thinner and airbrushed) and didn't have any problems with them, so it's surprising to learn this.    


  • Member since
    December 2002
  • From: Bury St Edmunds, Suffolk, England
Posted by Bish on Tuesday, March 10, 2020 4:13 PM

Interesting, maybe its down to the plastic being used. Well, just to be safe i'll give them a coat of future.

I am a Norfolk man and i glory in being so


On the bench: Airfix 1/72nd Harrier GR.3/Fujimi 1/72nd Ju 87D-3

  • Member since
    August 2015
  • From: the redlands Fl
Posted by crown r n7 on Tuesday, March 10, 2020 7:17 PM

Cleaned up the camo a bit and added the white bands.


 Nick.

  • Member since
    September 2003
  • From: AandF in the Badger State
Posted by checkmateking02 on Thursday, March 12, 2020 8:16 PM

Nice work, Nick.  Bands like that are not the easiest things to get aligned and straight.  You did a very good job applying these.


  • Member since
    August 2015
  • From: the redlands Fl
Posted by crown r n7 on Thursday, March 12, 2020 8:30 PM

CM many thanks. I used gloss white by mistake but I got though it. I started on decals will up date soon.


 Nick.

  • Member since
    February 2010
  • From: New Jersey
Posted by 68GT on Friday, March 13, 2020 8:44 AM

Nice Nick!  I dont know why we dont see more of these built.  I did this one a while back.

On Ed's bench, ???


  • Member since
    August 2015
  • From: the redlands Fl
Posted by crown r n7 on Friday, March 13, 2020 9:46 AM

68GT. many thanks that P-47 is stunning Ive built many a P-47 but its the SEA P-47's must be the blue roundels. thanks for watching.

decals are on.

next another clear coat.


 Nick.

  • Member since
    September 2003
  • From: AandF in the Badger State
Posted by checkmateking02 on Friday, March 13, 2020 2:15 PM

Nick and Ed:  two great looking Thunderbolts!  Well done!


  • Member since
    November 2018
  • From: Saskatchewan, Canada
Posted by sickdude on Saturday, March 14, 2020 7:32 PM
Very well done fellers on the thunderbolts Yes.

William (Willy)

 
  • Member since
    July 2014
Posted by modelcrazy on Sunday, March 15, 2020 8:50 PM

Check, getting back to the Nick. It needs a little touch up and decals.

Steve

Building a kit from your stash is like cutting a head off a Hydra, two more take it's place.


http://www.spamodeler.com/forum/

  • Member since
    September 2003
  • From: AandF in the Badger State
Posted by checkmateking02 on Monday, March 16, 2020 5:20 PM

Exceptional, Steve.  Nice work on the NMF!  Very good looking!


  • Member since
    July 2014
Posted by modelcrazy on Monday, March 16, 2020 9:56 PM

Thanks Check

She's done, stick her on the wall!! Now back to the North Carolina.

Steve

Building a kit from your stash is like cutting a head off a Hydra, two more take it's place.


http://www.spamodeler.com/forum/

JOIN OUR COMMUNITY!

Our community is FREE to join. To participate you must either login or register for an account.

SEARCH FORUMS
FREE NEWSLETTER
By signing up you may also receive reader surveys and occasional special offers. We do not sell, rent or trade our email lists. View our Privacy Policy.