Enter keywords or a search phrase below:
Somewhat grungier (and likely to get a quick re-touch before closing up) but here. Rather to my surprise I am quite close to doing the above, all of a sudden. Had a panic about the wrong shade of Chromate primer and lost a week to an identical replacement (d'oh!) Now back in play again :)
Buffalo 32nd (1 of 1) by Patrick Nevin, on Flickr
Thanks mate. As for the quake, don't let anybody tell you the last flight of the Vulcan took place in the UK. It didn't. It actually took place right here in little old Lakes Entrance when a die cast Vulcan took flight during the quake. Not a good landing though..... LOL
I long to live in a world where chickens can cross the road without having their motives questioned
Looking good Ferg, it looks a bit basic but a good representation of the Spitfire. That is quite a seam up the nose there though. Yep the quake really shook the house here, a bit of rattling of the model cabinets but no damage anywhere.
John, that is some great, careful work there! I have only had to do flat sanding - doing the inside of the anhedral must have been difficult. Keep it up, enjoying watching this come together.
Great work Falcon! It's moving right along.
Those look amazing guys!!!
"I dream in fire but work in clay." -Arthur Machen
Got a little more work done on the CA-15. got the elevators glued together and almost got the fuselage sides matched up, started cutting out the landing gear.
John
On the Bench: 1/72 Ki-67, 1/48 T-38
1/144 AC-130, 1/72 AV-8A Harrier
See fellas, I do build models.......
This kit is pretty basic and comes with a closed canopy, so I have not bothered a lot with the inside. Some paint, shading and some rough seat belts. I had some problems with the brush painting due to the 'shakes'.
Steve I was goint to have a whinge about the fit and filling i'm going to have to do, and then I saw your Sunderland. Nough said.
LA, you're not asking me if the earth moved for me are you???? It was a ripper mate, thought the house was going to fall down!
Great work Steve, that has been quite a bit of sculpting work there - loved the angle grinder!
The hawk got its first coat of primer, needed a bit of work to clean up a few bits and pieces, specially at the front of the canopy.
Once that was cleaned up and I had static wicks added, got the last primercoat on
Only broken one of the wicks so far, and bent the pitot once...
Thanks guys.
I wet sanded with 2000 grit until all the seams were smooth. Next I need to rescribe and move on th the next steps. The canopy may pose an issue in fit as well.
Steve
Building a kit from your stash is like cutting a head off a Hydra, two more take it's place.
http://www.spamodeler.com/forum/
Splendid
Nick.
Nicely done there, Steve.
Brings back memories of making Airfix's 1/72 Concorde a few years ago. It was donated to me by a neighbour and I suspect had warped a bit over the years he'd had it. Certainly didn't fit well vertically or horizontally :)
Masterfully handled Steve!
Thanks,
Cool, to see you done Steve! Think I'd have done all that sanding in several sessions- a weekend project.
Got 'er done! After sanding with a 320 grit sponge I sprayed the areas with a black primer. Once fully dry I'll tell if an area still needs work. after that I'll wet sand the areas to get an nice smooth finish the rescribe. Luckily the panels were attached like a ship so the patern should be easy to follow.
This is exactly what made me put the Kitty Hawk F-35 asside. But I'm not stoppn with this bad boy.
time to step back and grab the bull by the horns.
Wow Steve, they are worse than the seams on my short run Hawk!
Good luck with that!
Yeah, that's some rough seams! You've got your work cut out for you Steve.
That is some gnarly seam work! The pilots look appreciative though ;)
Back on the Sunderland. after I attached the keel plate and dorsal turret section and saw some horendious joins. After contemplating this I decided to go with the nuclear option and just use superglue and a file.
With that discusting M0jo sucking exercise out of the way I applied some salve in the form of Tamiya putty to the injuries. Once dry, I'll sand and sand until the offending areas are smooth.
This is looking to be quite the challaging little build. Blimey!
Dodgy, did you enjoy the earth tremor today?
She's coming along great Piers!!!
John, yes you have got a lot of sanding to get through, and you will end up with a unique subject out of it.
Nick, that is looking good, nice work with the preshading and thin coats.
I will have to take a leaf out of your book and try thinning more. I had been doing 1:1 like Dodgy, but I seem to loose the preshading too easily.
So I have attached the resin details on the wings (flap fairings and missile rails), made some wing fences, attached a couple of antennae and stuck on the white metal pitot tube. Taking bets about how long I can go without knocking and bending the pitot tube...
Yes, I do thin clears gloss and flat. I apply thin coats also. I like the semi gloss look.
Thanks Darren and Crown. One last question if I may, do you folks also thin the clear coats? I thinned my Tamiya flat 50/50 and it's dried more of a satin than matt. I am spraying around 18 to 20 PSI and using an old Jagdpanther
Cool guys!
Piers: Good to see the Hawk together!
Falcon John: Nice work. Always heard vac-forms were a pile of work and it looks it.
Nick: Great job on the Spit!
Dodgy. many thanks. I agree with Darren, but I thin the paint and test spray 1st on my test mig.
better to mess up here then on your model. I do paint thin and at 18lbs you can always add coats but you cant subtract coats
Hi Dodgy
I typically use a 1:3 ratio of paint to thinner for my Tamiya paints when spraying and a pressure somewhere around 18 psi. For preshading you can usua get away with a 1:8 mix.
They do tend to need some sort of undercoat and I usually use either XF-1 or one of the greys (e.g. XF-66) for that job. Seems to work pretty well even on etch.
I seem to remember it taking me a while to get used to them, but they're now my preferred airbrush paints. It also helps the Mike Starmer's paint charts use them, plus you can reuse the empty bottles for holding mixes.
Hope this helps
Darren
Looking sweet Crown. So tommorrow I will post photos, but I have persevered with the Tamiya paints and learnt that with an undercoat they go down fine, provided I spray them. I have also discovered that if I spray a coat of Tamiya gloss, I can use oils, or enamel washes without any problems to the underlying topcoat. I may have to work on my mix though. At the moment I am using 50/50 paint to Tamiya thinners. I would welcome any advice.
John. lots of patience with those kits.
latest pics ...
some over spray and touch ups to take care of.
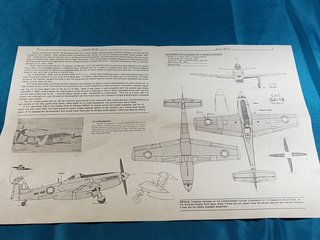
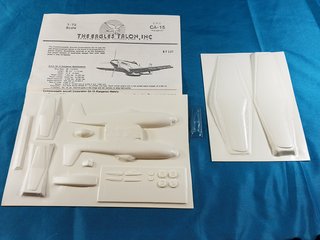
falconmod I may be crazy but I'd like to join with this: a 1/72 CA-15 Kangroo vacu-form. not sure where I even picked this one up from. John
I may be crazy but I'd like to join with this: a 1/72 CA-15 Kangroo vacu-form. not sure where I even picked this one up from.
Our community is FREE to join. To participate you must either login or register for an account.