SEARCH FINESCALE.COM

Enter keywords or a search phrase below:

Fleet Air Arm Group Build

729074 views
11139 replies
1 rating 2 rating 3 rating 4 rating 5 rating
  • Member since
    March 2006
Posted by simpilot34 on Friday, July 31, 2009 12:01 PM

Had to show a screenshot of a test flight I did from Nellis to test the low level handling of the Buccaneer to plan for the nighttime activities to come later!!! Had to see who was playing you know! Wink [;)]

Cheers, Lt. Cmdr. Richie "To be prepared for war, is one of the most effectual means of preserving the peace."-George Washington
  • Member since
    September 2003
  • From: South Central Wisconsin
Posted by Daywalker on Friday, July 31, 2009 5:38 PM

Well, for a ship o' drunks, there's some mighty fine work here all 'round.  Cap'n- That flying boat looks like the dog's bollocks, well done!  Real English paints on an English kit, mighty fine I must say! Approve [^]

Buddy- Glad they helped!  Do you have any pics of your Lanc?

Frank 


  • Member since
    October 2004
  • From: League City, Texas
Posted by sfcmac on Friday, July 31, 2009 7:24 PM

 I second the compliments to the Capt Bondo's Flying boats!  Gonna have to try one of those myself! It looks so good!

Been a cruciatingly slow progress for me I am afraid!  I started the Bench time today splitting threads!

That Guy fellow suggested that with the nylon thread so as to not have the rigging and antenna wires all the same size.

Then I got out my magnifier and basically prelooped and set up the wire for use as to minimize handling. Things are getting fragile with all the small detailed parts.

I'm sorry they dont show up? Lets look closer then.

Divine scale? You can say that again! Takes a small miracal to see it let alone dabble with it! Make a Toast [#toast] Much respect to you who choose this as your primary scale! Bow [bow]

Moving on I worked a bit on the torpedo and Machine gun. There is a blooming handle to add to the magazine cover! Shock [:O]

To replace the grossly thick torpedo fins I took the extra oil cooler fins and trimmed them to shape with some PE metal shears.  Then to create a prop I used the 2 small PE trim wheels?  Extra again and ran what was left of the broken drill bit I had used for the MG barrel and it became the prop shaft. Trim off the arcs between and a wee bend and I have a double torpedo prop to scale.

 Drilled holes through the fuselage and tail which I ran some stretched sprue thru. A tiny touch of liquid cement and a snip or 6 I had something to glue the contol cables to without them touching the flying surfaces. Split thread did the trick for the cables.

One odd thing struck me in this next picture. That I  meant to show the MG progress.

It is a homage to the group build and forum as in it you see Ritchie's Photo etch and refs, Guy's thread, Sean's PE Bug bender and Frank's tweezers that he sent as there is some regulation about him using sharp objects.Dead [xx(]Laugh [(-D]

 Point being when you see that and add the tips and motivation given by all here about the only thing I can take credit for is spending $8 on an old model plane. You all are the best! Bow [bow]

 Almost done but not going to finish it today. Going to wait and get the other two caught up and get them done together as planned but first I may take a sanity break and build this RE 2002 Ariete in 1/48 over at the RA side next door. Gotta get a quick break from the gray color!


  • Member since
    March 2006
Posted by simpilot34 on Friday, July 31, 2009 7:51 PM
Aaron, all I can say is WOW!!!! I was wondering how you were going to detail the fish! That's using the old knowledge box!!!! The sprue through the tail feathers was exactlly how I did it too! I already had the tail done when I found the PE set but I took one look at teh control horns on th efret and was very happy and glad I used the sprue! Aaron can attest to how bloody small the bent up control horns are!! REALLY looking good Mate!!!Bow [bow]Make a Toast [#toast]
Cheers, Lt. Cmdr. Richie "To be prepared for war, is one of the most effectual means of preserving the peace."-George Washington
  • Member since
    June 2008
Posted by lewbud on Friday, July 31, 2009 9:28 PM

Frank,

Nothing worth taking yet.  The fuselage pieces are glued together so I have two halves.  The wings are glued together and the outboard nacelles are attached.  Don't know how bad the seams are because the underwings and nacelles are black plastic.  Got two of the nacelle adapters glued to the top of the wings, gonna need some putty there.  Gonna order the resin pit from Squadron.  Definitely gonna get me some of those resin gun barrels that Bondo and Mac have.  As soon as I get something I'll post them here and over in the Matchbox G/B.  Never done done a resin pit before.  Did get the pit and fuselage glued together for the Airfix Sea Fury for this build.  Will glue the wings on when I get home this evening.  Gonna need some strip styrene to fill that gap plus lots o' putty.  Don't know why but the plastic in the latest issue has a slightly pebbly finish to it as well.Banged Head [banghead]

Buddy- Those who say there are no stupid questions have never worked in customer service.

  • Member since
    March 2007
  • From: Carmel, CA
Posted by bondoman on Saturday, August 1, 2009 12:34 AM

Fall in men. It's Friday at 2 bells of the evening watch and time to take stock of life. Raise a drink and let's sail away

I just got my Daywalker 1.0 modified, and this is a good thing. All parts big or small lay flat:

Highly recommended.

Thaks for the kind words. I went on a Israel jag this morning, until 4 am and besides the pending divorce, (kidding), I now have a divine Ouragon, Mystere and Magister in the blocks. But thats OT, feature of another future post.

I want some rum, a few good shanties, and here's a cup for Roy!

  • Member since
    March 2007
  • From: Carmel, CA
Posted by bondoman on Saturday, August 1, 2009 12:47 AM
 sfcmac wrote:

 Now that Stranraer ( what does that name mean? Is it a fish?)

Ney laddie it's the name of the port on the west coast of Scotland, way down west in Argyll, where the Coastal Command had a patrol squadron based. In this case the 240.

Now we Highlanders (Morrison is my clan)  don't ken much to these RAF types, none the less they had a habit of naming flying boats for the ports from which they flew.

  • Member since
    October 2004
  • From: League City, Texas
Posted by sfcmac on Saturday, August 1, 2009 12:53 AM

 Good info Capt! Thank ye! Pass the rum and I will pour it myself as to ensure freshness and purity!

As far as the  Frank-in -stand 1.0 it looks like me bed! Mischief [:-,]Make a Toast [#toast]Pirate [oX)]

  • Member since
    June 2009
Posted by cropredy on Saturday, August 1, 2009 2:45 AM

Aaron -- Most interesting -- I'm a little puzzled by your mounted PE oil cooler -- in the photos you show the Airwaves and ACE PE sets --

  • the Airwaves set has the oil cooler PE parts removed and presumably on the plane  --but the Airwaves is a Mk II oil cooler (portrait orientation)
  • the ACE PE set still has the oil cooler PE parts on the fret (and this is a Mk I oil cooler which is what I think you are building - landscape orientation)

So, which set did you use?  If the ACE, did you insert spacers between each 'fin'? 

I'm going to practice using my Airwaves PE set and build the Airfix as a Mk II (my three Frogs are reserved for the Mk I - Tony Wray plane).

Thanks

-cropredy

cropredy

  • Member since
    March 2006
Posted by simpilot34 on Saturday, August 1, 2009 9:24 AM

Well a bit of progress on the Buc office chairs. I added the belts and straps and still have a few bits to add but had to share how much it added to the seats with just this much!!!

Enjoy! and thanks for looking!!!

Cheers, Lt. Cmdr. Richie "To be prepared for war, is one of the most effectual means of preserving the peace."-George Washington
  • Member since
    March 2006
Posted by simpilot34 on Saturday, August 1, 2009 9:30 AM
 cropredy wrote:

Aaron -- Most interesting -- I'm a little puzzled by your mounted PE oil cooler -- in the photos you show the Airwaves and ACE PE sets --

  • the Airwaves set has the oil cooler PE parts removed and presumably on the plane  --but the Airwaves is a Mk II oil cooler (portrait orientation)
  • the ACE PE set still has the oil cooler PE parts on the fret (and this is a Mk I oil cooler which is what I think you are building - landscape orientation)

So, which set did you use?  If the ACE, did you insert spacers between each 'fin'? 

I'm going to practice using my Airwaves PE set and build the Airfix as a Mk II (my three Frogs are reserved for the Mk I - Tony Wray plane).

Thanks

-cropredy

So what type of cooler do I have on mine????? Not that I give a Taped Shut [XX] since its finished!!!

Cheers, Lt. Cmdr. Richie "To be prepared for war, is one of the most effectual means of preserving the peace."-George Washington
  • Member since
    October 2004
  • From: League City, Texas
Posted by sfcmac on Saturday, August 1, 2009 9:42 AM

 Hey cropredy!!!  Puzzeled by the oil cooler? Hey if that is all I confused you on the way I jump around you are doing great!

 Sean ( Summit) sent me these pics from the In action book.

Shows the main diffs between the MK I and Mk II that you can see.

 This is the first 1/72 scale aircraft kit I have attempted in al,ost 15 yearsheck maybe 20 if I think about it, Confused [%-)] So Ritchie is da man to ask about kit diffs. Sad to say I think the 1/72 scale is the one that needs the most help for a change. No newer kits being the reason I think.

I used both sets combined as Ritchie sent his leftovers which really had everything I needed but the torpedo stuff which wasn't to hard to fix.

I used the Airwaves for the Oil cooler.
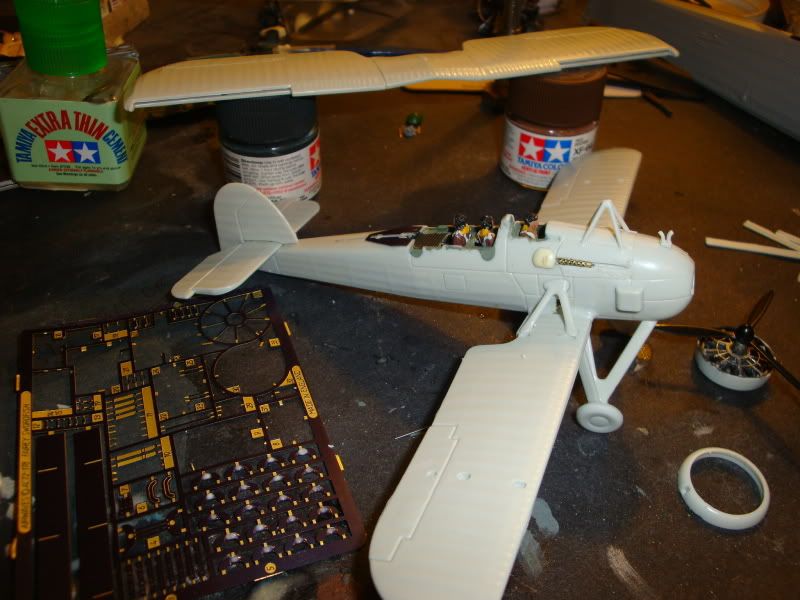
The instructions read to add a .02375 inch spacer or something. Well not being Frank with all his precision expertise I just put a tiny drop of clear glue on the fins and let it dry. Still had to smush them together pretty hard to get them to look ok. In Hind sight I would not have worried about spacers at all. I think the glue used to hold them together will be plenty. Use that clear parts cement though gotta give plenty of drying time to figit with it.

 Then I just measured the 1/32 Mk I oil cooler converted it to 1/72 and stacked the fins until I got there. Cut off the lower fin of the banded pair that make up the top and bottom so I could  make the bands fit the shorter cooler.

Should cut out the center band as there were only 2 on the MK I

Both PE sets are MK II coolers so that was my solution to make a MK I. I have to do stuff like that or Cpt Bondo beats me with his soup spoon! Black Eye [B)]

Whatcha think? Clear as mud?

The Revell kit IMO was to make a Mk III that looked like this.
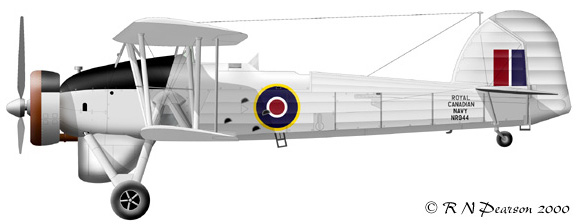
Fairey Swordfish Mk.III NR944
RCNAS Dartmouth, Nova Scotia, Canada
1946-47

Postwar the Swordfish survived in various capacities, that seen here is a radar-equipped Mk.III of the Royal Canadian Navy. Once again in overall aluminum with a black trimmed cowl. On radar equipped aircraft, the operator's cockpit was partially covered over to prevent glare on the scope screen.

  • Member since
    September 2003
  • From: South Central Wisconsin
Posted by Daywalker on Saturday, August 1, 2009 10:19 AM

Aaron- Not THAT is some awesome work!  Can't believe how tiny those PE bits are.  You're gonna need a break after this one for sure.  A few mugs o' rum won't hurt either. Big Smile [:D]

bondo- Glad you are enjoying your new stand!  Amazing isn't it what combinations you can come up with with a little styro and toothpicks, isn't it?

Richie- Excellent work on those bang seats!  I thought of you while at the EAA show Wednesday.  There was a Buckeye there, and I couldn't remember if that was what you were building or a Buccaneer.  I took a photo or two of it just in case.  Sorry it was the wrong plane! Disapprove [V]

Frank 


  • Member since
    October 2004
  • From: League City, Texas
Posted by sfcmac on Saturday, August 1, 2009 12:53 PM

Dittos on the seat work Ritchie!  He musta went to bed! Light weight!!! there is partys to crash! Women to ogle and models to build! Pirate [oX)] Avast! Now I know I could never be a pilot! As I couldn't figure out how to work the seat belts! Jeeze!

  • Member since
    February 2008
  • From: ladner BC Canada
Posted by stick man on Saturday, August 1, 2009 1:36 PM

Good looking build Sfcnac Thumbs Up [tup]

Smile [:)]

I'm 15 and I model I sk8board and I drum what could be better.
  • Member since
    December 2008
  • From: Goffstown, NH
Posted by New Hampshire on Saturday, August 1, 2009 11:57 PM
 sfcmac wrote:

Dittos on the seat work Ritchie!  He musta went to bed! Light weight!!! there is partys to crash! Women to ogle and models to build! Pirate [oX)] Avast! Now I know I could never be a pilot! As I couldn't figure out how to work the seat belts! Jeeze!

Now you know why they have ground crews to strap them in! Big Smile [:D]

  • Member since
    March 2006
Posted by simpilot34 on Sunday, August 2, 2009 4:09 AM
Thanks Aaron and Frank!!! Will be putting the I'm outta here handles on soon and washing the belts to make them stand out abit more. Then the construction of the office will begin! Make a Toast [#toast]
Cheers, Lt. Cmdr. Richie "To be prepared for war, is one of the most effectual means of preserving the peace."-George Washington
  • Member since
    March 2006
Posted by simpilot34 on Sunday, August 2, 2009 8:50 AM

Well I got one of the office chairs done! I'm happy with it, hope I can do the office justice to match the seat. With as many parts there will be it should be camouflaged quite well at least!Wink [;)] Here's a couple pics! Thanks for looking!

Cheers, Lt. Cmdr. Richie "To be prepared for war, is one of the most effectual means of preserving the peace."-George Washington
  • Member since
    September 2003
  • From: South Central Wisconsin
Posted by Daywalker on Sunday, August 2, 2009 9:51 AM
Excellent work Richie!!!  You put a lot of time into that piece, and it really shows.  Well done! Approve [^]

Frank 


  • Member since
    March 2009
  • From: Wirral. UK
Posted by Spike190 on Monday, August 3, 2009 3:44 AM

Great looking seat Richie, I can see all the effort really worked. Look forward to more Smile [:)]

Cheers...

Mike  Toast


  • Member since
    March 2006
Posted by simpilot34 on Monday, August 3, 2009 4:11 AM

Frank and Mike, thank you very much!!! I actually had one bit get eaten by the CM, only a rivet counter that knows this seat inside and out would ever know and I'mTaped Shut [XX]Wink [;)]

Make a Toast [#toast]

Cheers, Lt. Cmdr. Richie "To be prepared for war, is one of the most effectual means of preserving the peace."-George Washington
  • Member since
    March 2007
  • From: Carmel, CA
Posted by bondoman on Monday, August 3, 2009 11:04 AM
 Daywalker wrote:

IIRC, all of the interior framework was black on this aircraft.  These photos are not the best, but it looks like all were black except the ring on the nose glazing in these pics.  Hope they help a little! Big Smile [:D]

Frank- those pics are a great help! I've been planning the construction of the turrets for both the Whitley and the Sunderland using vac clear parks and resin barrels, the rest scratchbuilt. The big question has been the interior color of same. A LOT of online model builds show all the innards as green, but that doesn't make sense to me in a night bomber, and the few US bombers I've been in were black. So now the die is cast-black!

Good show, old chap!

  • Member since
    June 2009
Posted by cropredy on Monday, August 3, 2009 9:44 PM

Fellow FAA GBers -- I was beginning to doubt that this event was ever going to happen but my ACE PE parts for the Frog 1/72 Swordfish finally arrived from Ukraine. Models UA was the vendor.  Now I can finally start the interior.

If anyone is a stamp collector and wants the Ukranian stamps, send me a PM.

cropredy

  • Member since
    September 2004
  • From: Vernon, BC, Canada
Posted by razordws on Monday, August 3, 2009 11:01 PM

Roy, good to see you back even if it is just to say hi!  Stop being such a stranger and no we did not save your rations for you.  How do you think Bondo manages to get drunk all the time.  Always drinking everyone else's Rum rations he is.  Disapprove [V]

Aaron, your Bag is turning heads Wink [;)]  Bondo has you spliting threads.  Egads man... Shock [:O]

Frank, I've got a Lanc in my stash that has a special meaning to me as my Uncle was a wag in one at the very end of the war so if you have any more picies of the beast I'd love to get a hold of them.  He flew Halifax's for most of the war so I'm hoping to see the one that was just restored one of these days.  Only problem is it's on the other side of the country Sad [:(]  Would love a new release of the Halifax too in 1/72. 

Richie, Lovely looking seat and seabelts.  Now lets see you strap a figure in them. Mischief [:-,]

Dave

  • Member since
    March 2007
  • From: Carmel, CA
Posted by bondoman on Monday, August 3, 2009 11:01 PM

Good news! Ivan still owes me 6 Lewis guns, but it's only been a couple of weeks. Maybe he mailed them at the same time.

Happy days!Pirate [oX)]

  • Member since
    May 2009
Posted by -Neu- on Tuesday, August 4, 2009 4:20 AM
Hi guys;

I see some excellent work going on. By the end of this build we'll have more Stringbags than were actually produced for the FAA I reckon. Richie, thats some sweet looking seats you've got there... I really like the bucc and look forward to what you are going to do with the rest of the aircraft.

As for me, I've had a frustrating couple of weeks with the Sea Hawk... I decided to scratchbuild the entire air intake area for the aircraft. In retrospect I should of gone with the FOD covers and save myself the effort. I made the interior flush with the aperture using mori mori putty, and adding the interior vanes with PE I salvaged from the kit. A normal Sea Hawk has three, but I got fed up and just built two. This was supposed to be a "not too serious" build right ;-) You can kinda see them blurry in the background of this photo:


Next I glued the fuselage halves together and let it cure for a few days before sanding the seam lines and rescribing. The worst part was that I had to sand down the seams inside the intake, which were not flush or smooth. Several days later I got it to an acceptable level, and started painting the exhaust on the aircraft. A coat of Alcad jet exhaust and that was that. Tonight I added the tail, so I decided to take some pictures for you guys. The more I build this plane the more am I struck with the beauty of its design. From the Hurri, to the Tempest and the Sea Hawk, Sydney Camm really could design some beautiful aircraft.


So here it stands now. Next Step is more sanding and filling before I move on to painting.

Weekend Madness GB tag
  • Member since
    March 2006
Posted by simpilot34 on Tuesday, August 4, 2009 8:30 AM

Crop glad you got your PE!! Good luck with your build! Looking forward to it!Thumbs Up [tup]

Thanks Dave!Make a Toast [#toast] Figgies???!!! I dun need no stinking figgies!!!Big Smile [:D]

Thanks Neu!!!Make a Toast [#toast] Excellent progress on the Sea Hawk!!! if you hadn't mentioned the number of intake vanes I wouldn't have been the wiser! The effect is there and looks fine anyway!!Thumbs Up [tup] Looking forward to more pics, and yes, they are some beauties that were designed!

Cheers, Lt. Cmdr. Richie "To be prepared for war, is one of the most effectual means of preserving the peace."-George Washington
  • Member since
    June 2009
Posted by cropredy on Tuesday, August 4, 2009 10:37 PM

Aaron -- A couple of questions:


(After digesting your bleed-thru dope on the Swordfish interior exercise - impressive work.)


Q1: For the 1/72 Revell Swordfish - what color (brand/number) did you use to paint the Townend Ring?  Mine came out too coppery and I want to redo.

Q2: How did you build the torpedo crutch?  I've got the pictures of the Tamiya from Air Power Modeler so I know what to build but the two arc pieces have got me stumped for a reliable solution.  Initially I tried cutting away excess bits from the kit's supplied crutch but the resulting diameter seems too thick to be scale.


Thanks


cropredy

cropredy

  • Member since
    October 2004
  • From: League City, Texas
Posted by sfcmac on Tuesday, August 4, 2009 11:45 PM

Looks good Neu!!!  Gonna be all done before you know it!

Q1: For the 1/72 Revell Swordfish - what color (brand/number) did you use to paint the Townend Ring?  Mine came out too coppery and I want to redo.

 I used model masters steel and added brass and brown drops mixed on a pallet until I got a color I liked.  Probably any brand of paint would work the same I would think.  On the Big Bombers tarnished copper was right!  But in pics of some of the Navy stuff like the Skua and that black swordfish it looks more like a tinish bronze to me.

Q2: How did you build the torpedo crutch?  I've got the pictures of the Tamiya from Air Power Modeler so I know what to build but the two arc pieces have got me stumped for a reliable solution.  Initially I tried cutting away excess bits from the kit's supplied crutch but the resulting diameter seems too thick to be scale.

 Hmmmm good question Cropredy!  I haven't yet as I took a break to clear me poor head! Confused [%-)]

But I can tell you my plan!  All that really nice PE set you got?  When it is used you still have lots of fret or tree left. Nicely squared and of different width.  I plan to work from the torpedo up!  Cutting two same sizes rectangles from the used excess brass tree and centering them over the holes in the torpedo.  Bend them to shape around it.

Then it is simple a matter of  making 4 triangles from stretched spru or the spares box attach them to the  arch and that to the bottom of the Swordfish . Piece of cake.  May have to platy with the shape of the arch a bit if there is more to it but even as is it has to be better than those kit parts eh?

Did you take a look at Ritchie's?

Purdy slick looking!

Hey Has anyone besides Lewbud noticed the trend here? Seems a popular marking eh?

Ritchie's!

Mine.

and the mighty 15000 post strong! Bow [bow] Our local Tamiya deity! Admiral Rick" Rjkplasticmod

Party [party]Party [party]Pirate [oX)]Party [party]Party [party]


  • Member since
    March 2006
Posted by simpilot34 on Wednesday, August 5, 2009 5:27 AM
Crop, I did mineon a self drawn plan from ref drawings and a bit of TLAR and SWAG! The curved cradle bits are trimmed down evergreen strip that i taped around a 1/4" flat paintbrush handle and then held it over boiling water for a few minutes then let it cool. It retained the shape and then it was just a matter of trimming till you get the size right. The crutch work is all stretched sprue glued and pinned over my plan balsa model style. Again working from the fish up. Attaching the cradle/crutches appropriately spaced and square, then the spacing rod in between, then the stuff in the middle, then the anti sway rods coming down from the rear crutch. HTH!!!Thumbs Up [tup] 
Cheers, Lt. Cmdr. Richie "To be prepared for war, is one of the most effectual means of preserving the peace."-George Washington
JOIN OUR COMMUNITY!

Our community is FREE to join. To participate you must either login or register for an account.

SEARCH FORUMS
FREE NEWSLETTER
By signing up you may also receive reader surveys and occasional special offers. We do not sell, rent or trade our email lists. View our Privacy Policy.