SEARCH FINESCALE.COM

Enter keywords or a search phrase below:

The P-51"mustang" Group Build. 2008

90748 views
760 replies
1 rating 2 rating 3 rating 4 rating 5 rating
  • Member since
    July 2008
  • From: USA California
Posted by vetteman42 on Saturday, February 7, 2009 10:45 PM

Hi all. Thought I would post some WIP pictures. I did a bit of scratch building, a little PE, and printed up some gages that arent in the kit. Not the greatest work but hey I am learning and having fun.  


I built up the the panel here to give the cockpit a bit more depth and added the oxygen hose, I also made up some panel gages. Actually the gages were an idea I got from here on another thread. I also made the canopy slide rail from a piece of PE fret came out well I think.

Here I am showing some of the scratch building I did I closed up the tail wheel bay and made a cooling radiator came out ok I think, I do need to do a bit of weathering so the raditor looks a little better.

Here is the other half of the fuse, I am going to highlight it with some pastels in a couple of days. I am going to try and keep things a bit clean though, after all this will be my better half's plane. As always comments are welcomed.


Randy


Randy So many to build.......So little time

  • Member since
    September 2006
  • From: From Vernal UT OH YEA!!
Posted by raptordriver on Saturday, February 7, 2009 11:21 PM
Great start Randy, looks like your working hard on it.Smile [:)]

Andrew


  • Member since
    April 2005
Posted by Thunderbolt379 on Sunday, February 8, 2009 1:04 AM

Hi Raptordriver and all,

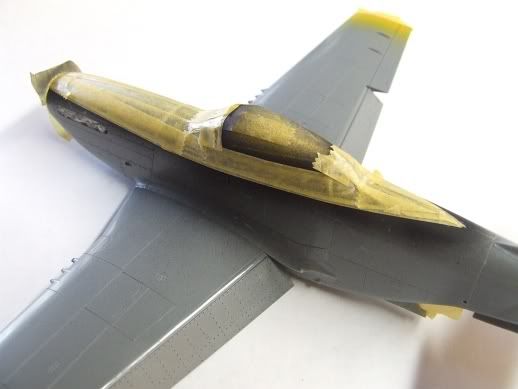
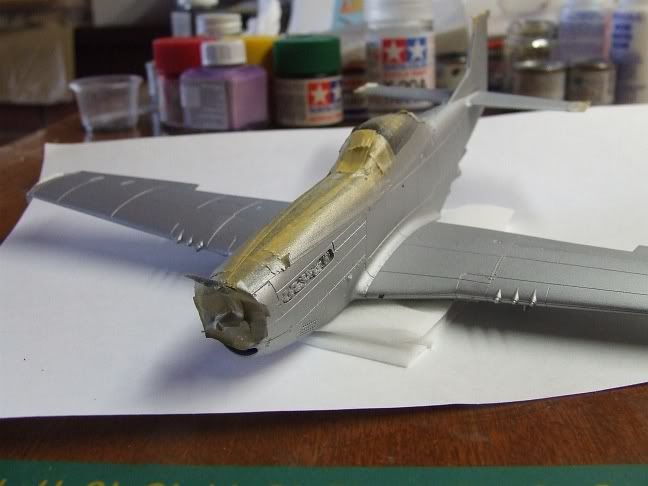
I've finally managed to spend some time on the Mustang, having cleared a deadlined model yesterday. Here I've attached the canopy, then applied the Express Mask set, and filled in the main caopy with Tamiya tape:

Photobucket" border="0" />

Photobucket" border="0" />

Photobucket" border="0" />

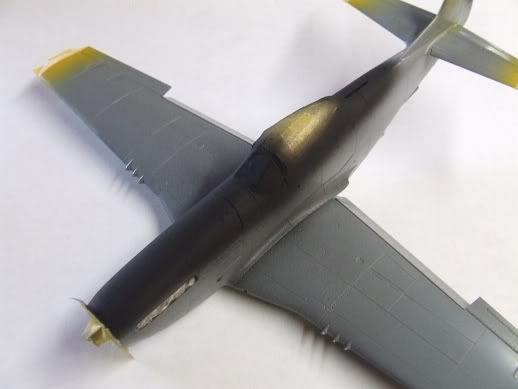
Next up will be XF-1 flat black for the AG panel and windscreen frame. The prop blades are painted, I used satin black but the lustre was just too high. I overcoated them with XF-1 to cut it back, and though research suggests Mustangs had a satin AG panel, the conditions in Korea knocked back the shine pretty fast.

Cheers,

Mike

http://worldinminiature.blogspot.com/

  • Member since
    July 2008
  • From: USA California
Posted by vetteman42 on Sunday, February 8, 2009 10:30 AM

Lookin good Mike


Randy

Randy So many to build.......So little time

  • Member since
    July 2013
Posted by IL2windhawk on Sunday, February 8, 2009 4:29 PM

That is gonna look so sweet after you paint.  Great Work.

Is that a Dallas-style canopy?

  1/32 Revell Duo Discus
  1/32 Revell ASK-21
  1/48 Ardpol SZD-51 Junior
  1/48 Czech Models Grumman Goose
  1/144 FineMolds Millennium Falcon

  • Member since
    July 2008
  • From: USA California
Posted by vetteman42 on Friday, February 13, 2009 2:32 PM

Hello all

I haven't gotten much done this past week, however I did get the Fuselage halves put togeather along with the exhuast stacks and the panels foiled. I dulled the foil a bit with some steel wool and plan on foiling the rest of the plane then using washes to simulate the burnt stainless steel panels. As is the norm I did have to do a bit of filling and sanding on this Revell kit, I used Mr Surfacer 1000 and it really worked out well, althou I do have one large gap to fill that will need some puddy and the Mr Surfacer should clean that up. My one problem is when I sanded I lost some of the rivet detail and a couple of the panel lines. The panel lines I think I can fix but the revets are another matter, anyone have any ideas ?

The exhaust stacks I drilled out, used flat black inside them, then painted them Tamiya redbrown, clear coated them and used dark gray pastel and light gray to give them a used look. However I didnt want them to look too used and I will give then a flat coat of clear a bit down the road.

Let me know what you think and any comments or advice is welcome.

Randy


Randy So many to build.......So little time

  • Member since
    July 2013
Posted by IL2windhawk on Friday, February 13, 2009 10:59 PM

To rebuild rivet detail, maybe you could try this:
DISCLAIMER: I have not tested this method.  Just the first thing that came to mind.Wink [;)]

1) Get some med-CA and accellerator, and a toothpick.
2) Sharpen the toothpick to a very very fine point
3) Dip the point of the toothpick into the CA, then blot it onto a scrap material
4) Keep doing this until you produce bumps of the right size,
5) Apply it ever so lightly to the model. 
6) Spray surface with accellerator

You might want to draw some pencil marks on the model as a guide.  Also, resharpen the toothpick every time so it doesn't grow into a big bulb at the end, thereby producing giant rivets.  When you're done, you should be able to sand them down if they are too tall. 

Good luck if you try this method.  That's what I would try.

-- 

I've got decals on the Mk.II.  I will get some photos up soon.


  1/32 Revell Duo Discus
  1/32 Revell ASK-21
  1/48 Ardpol SZD-51 Junior
  1/48 Czech Models Grumman Goose
  1/144 FineMolds Millennium Falcon

  • Member since
    July 2013
Posted by IL2windhawk on Saturday, February 14, 2009 4:52 PM

Decals, Panel Wash, and Propellor added 

  1/32 Revell Duo Discus
  1/32 Revell ASK-21
  1/48 Ardpol SZD-51 Junior
  1/48 Czech Models Grumman Goose
  1/144 FineMolds Millennium Falcon

  • Member since
    July 2008
  • From: USA California
Posted by vetteman42 on Saturday, February 14, 2009 6:06 PM

SWEET !!!!!!!!!!! IL2 very nice. Great paint job there, love that camo, but then again I think a 51 would look good an most any paint job. Your canopy came out fantastic, guess I will have to ask how you masked it, I still have some trouble with mine but they are getting better. You are right though the Brits do know how to paint a plane. Can't wait to see your finished pics.

Oh and thanks for your idea on the revets on my 51 I will give it a try and let you know what happens.

Randy

Randy So many to build.......So little time

  • Member since
    July 2013
Posted by IL2windhawk on Saturday, February 14, 2009 8:01 PM

Thanks Vett, for your comments. So true: a Mustang looks fine in any scheme. 

About the canopy masking, I've found the best way for complex birdcage canopies is to do them in sections.  For instance, on the Mk.II I painted the longitudinal frames first, then I remasked for the ones that run in the wingspan direction, then I came back and did the little triangles in the corners.  Just what works for me, but it can be very tedious.  Shouldn't be so bad for the P-51D, though.  If I were to do it, I would paint the outline first, then the cross-member second, then come back for the two parallel bars that straddle the gunsight.

Here's a WIP that sorta demonstrates what I mean.

  1/32 Revell Duo Discus
  1/32 Revell ASK-21
  1/48 Ardpol SZD-51 Junior
  1/48 Czech Models Grumman Goose
  1/144 FineMolds Millennium Falcon

  • Member since
    July 2008
  • From: USA California
Posted by vetteman42 on Sunday, February 15, 2009 7:49 PM
Is that Mr Surfacer you are using around the canopy  ?

Randy So many to build.......So little time

  • Member since
    September 2006
  • From: From Vernal UT OH YEA!!
Posted by raptordriver on Tuesday, February 17, 2009 3:50 PM

Hey mike, randy and Il2, They all looks awsome!Thumbs Up [tup]. IL2 your making speedy progress.


Andrew


  • Member since
    April 2005
Posted by Thunderbolt379 on Friday, February 20, 2009 11:53 PM

Hi guys,

Here's the Mustang with the AG areas sprayed into Tamiya XF-1:

Photobucket" border="0" />

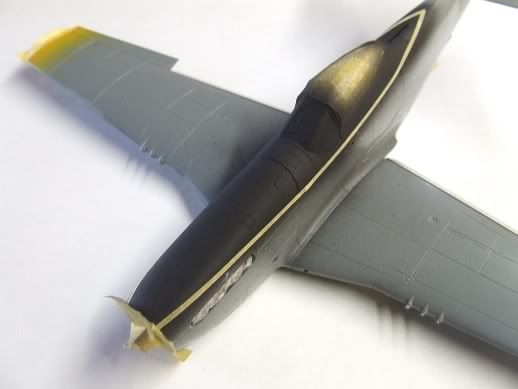
And with the areas outlined in thin strips of low-tack tape:

Photobucket" border="0" />

And finally with the black areas fully masked:

Photobucket" border="0" />

I went on and finished masking the wheelwells (always so fiddly!) and made sure every hole and such had its blob of Maskol. The rudder trim tab was also blown into black and masked, and the lights under the starboard wingtip were masked with the items from the Eduard set. I opted for an emamel spray job, and agonised for a long time over the mix.

I looked at my references over and over and it definitely seems the Mustangs were weather-worn. Dozens were in Japan awaiting scrapping when the war broke out, and were hurreidly returened to duty. 150 were recovered from ANG units, mothballed and shipped out to Korea aboard USS Boxer, and all had seen heavy duty since they were built, not more than six years earlier.

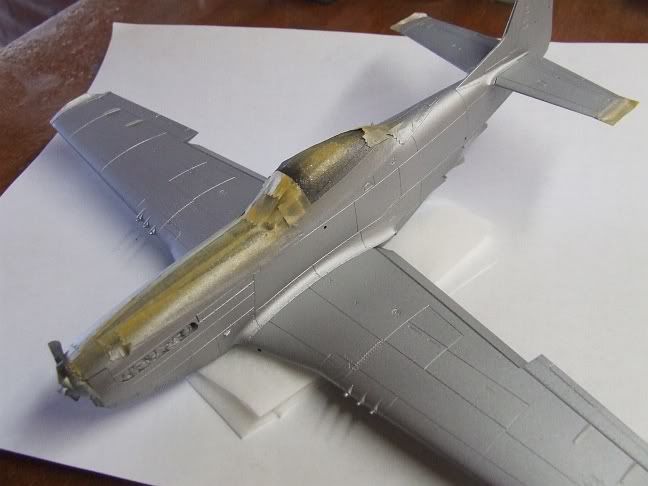
Maybe it's the filmstocks of the time, or the generally appalling weather conditions, or the lighting on the day, but those planes looked drab compared to their appearance in WWII. Even new F-80s were taking a beating at the hands of the weather. I knew I didn't want a bright, shiny finish, so I mixed Humbrol Silver Fox 11 with Humbrol Flat Aluminum 56 at a ratio of 7:3, then thinned by 50%. The paint went on readily enough, here's the result:

Photobucket" border="0" />

And:

Photobucket" border="0" />

Okay, it's not Alclad or SnJ or Metallizer, but what do you all think? Is she too weather-beaten? Is the finish too dull? My plans are to apply the decals, then Promodeller panel wash, and finish with graphite for panel variation. The use of the Flat Aluminum both pulled back the shine and toughened the surface to I'm expecting it to withstand Post-a-note masking for the graphite treatment. I found to my disgust that even Tamiya tape will lift Humbrol or Testor Chrome Silver in its pure state, or at least de-surface it.

Comments and impressions most welcome,

Cheers,

Mike/TB379

http://worldinminiature.blogspot.com/

  • Member since
    July 2008
  • From: USA California
Posted by vetteman42 on Saturday, February 21, 2009 11:11 AM

Wow Thunderbolt I think I can't...infact I know I can't wait to see your finished paint job, love this lines you have choosen. I like the idea of a flat black antiglare panel over the normal OD panel too.

I haven't had much chance to work on my 51 this week so lastnight while waiting for BSG to come on the tube, I decided to do a bit of trimming and fitting on the wing, you know the usual get it ready to glue sort of thing. One of the things that drives me nuts are the flat wings these old Revell kits have, even so I said " Self ? We aren't gonna do it this time, and we will build a flat wing for Momma because she likes em that way." So with that declariation I took up my excato knife and file and started trimming. With the tv show being a half hour away figured I had planty of time to mess with it. So with that in mind and having already told self how things were gonna be, I set to work. Well it didn't take long for self to forget what I had told him and the next thing I know I am scribing the flaps from the wing and filling the gaps with evergreen strips and sanding and shaping away. Morale of the story "SELF" dont listen so good at times <grin>. So now I offer up a WIP picture for you.

Now about the rivet detail on those flaps.................


Randy So many to build.......So little time

  • Member since
    July 2013
Posted by IL2windhawk on Saturday, February 21, 2009 4:45 PM

TBolt your paint looks great!  I want to reach in and pull the masking off!  LOL - can't wait to see how she looks in the end.

 vetteman42 wrote:
Is that Mr Surfacer you are using around the canopy  ?

Sorry for the late response, vetteman.
It is actually Tamiya fine primer.  I wasn't ready to prime the entire body yet, but I did need primer to help me visualize the seam around the vac canopy.

--

I always try something new on each build.  This time: it's post shading.
I've been using Tamiya smoke to accentuate the panel lines.  It's not the best weathering job ever, but I'm pretty pleased with my first try.  Post shading is a bit difficult for me, but it was fun.  Sorry dont have a finished pic.  This one shows the difference between wings that do/don't have shading applied.

  1/32 Revell Duo Discus
  1/32 Revell ASK-21
  1/48 Ardpol SZD-51 Junior
  1/48 Czech Models Grumman Goose
  1/144 FineMolds Millennium Falcon

  • Member since
    April 2005
Posted by Thunderbolt379 on Sunday, February 22, 2009 1:08 AM

Hi all,

Thanks for the positive feedback on the paintjob. I'm still torn two ways -- sometimes I feel it looks too dull to pass muster as a Mustang, at others I think it has a good feel of weathered aluminum. I'm thinking I might do a secondary panel shade -- I'll test it and see if the flat aluminum has hardened the finish so it'll take masking. If it has, I can spray an extra coat of either a lighter or darker mix. Lighter I think, to bring up the reflectivity. We'll see how I go for time, there's only a week left!

My other build, the one with which I actually came aboard, was to be a Salvadorean AF Mustang of the 100 Hours War in 1969. However FSM have just solicited that project for the mag, so I'm thinking the correct etiquette is to pull the project from the forum, right?

I'll have the Korea F-51D done this week and photos all the way along.

Cheers,

Mike/TB379

http://worldinminiature.blogspot.com/

  • Member since
    July 2008
  • From: USA California
Posted by vetteman42 on Monday, February 23, 2009 9:47 AM

Thanks IL2 I still am having trouble with my canopy joints, and I am trying a vacuformed canopy on this build. Will be another first for me.

Thunderbolt I am in agreement with IL2 she is looking great so hurry up and finish that paint job I wanna she her.


Randy So many to build.......So little time

  • Member since
    September 2006
  • From: From Vernal UT OH YEA!!
Posted by raptordriver on Monday, February 23, 2009 6:13 PM

Looks great Mike,Randy and IL2. I am liking this progress. Mike thats a really nice NMF.

Andrew


  • Member since
    July 2008
  • From: USA California
Posted by vetteman42 on Monday, February 23, 2009 11:08 PM

IL2windhawk I gotta tell ya those stripes really look sweet, and the weathering looks good to me. Did you airbrush that on or did you use a wash. Looks like you are very very close to being finished with a fine looking Mustang, cant wait to see it.

I made a little progress this morning, did some work on the wing root where the flaps fit under it, hopefully it won't look too funny with the flaps lowered. I still have more fitting to do on it but that will have to be done after the wings are attached. I am wandering though didn't the leading edge of the flaps have a hinge notch about half way down its length ? I do recall seeing a parked D model with a notch there but am not sure. Well herea a couple of WIP pictures so you can see what I have been up too.

As always comments are welcomed


Randy So many to build.......So little time

  • Member since
    April 2005
Posted by Thunderbolt379 on Tuesday, February 24, 2009 6:17 AM

Hi Raptordriver and all,

With your positive feedback on the paintjob I decided to forge ahead. I sprayed a contrasting metallic shade for the stainless steel (?) panel around the exhausts (acryclic, XF-16 darkened with XF-1), it doesn't show up too well even though I darkened the shade three times, but you can see it in different lighting conditions. This looked so effective that I was tempted to do that contrasting panel job all over the plane, but there's no time for that kind of ambitious stuff at the moment. I'll go with graphite and take it real easy.

The masking is mostly away and the decals are going down nicely, there are seven major decals to go plus twenty-four more stencil items, then I'm onto touch-ups and panel wash. Here she is:

Photobucket" border="0" />

Photobucket" border="0" />

The only difficult decal so far has been the top wing insignia, it's taken lots of MicroSol to get it to conform over the aileron jack, and it'll need to be touched up also. I'll see how the tail band goes on, I'm guessing that'll be a fun experience too...

Cheers,

Mike/TB379

http://worldinminiature.blogspot.com/

  • Member since
    April 2005
Posted by Thunderbolt379 on Thursday, February 26, 2009 7:06 AM

Hi all,

Here's the state of the build:

Photobucket" border="0" />

I'm not sure how well the fine stuff will come across in the pictures. The panel wash is complete, the graphite panel variation is on, all masking is away with the exception of the Eduard canopy elements, and the exhausts are drilled out, painted and mounted. The prop is painted, decaled and assembled. Next come the paint touch-ups (quite a few), underwing load and landing gear, antenna and pitot tube, plus some pigment weathering. Note the 'F' in 'USAF' is damaged: the adhesion of the Tamiya decals is not great at all, and masking the graphite had its casualties. Two others were repairable with a deft repositioning of lifted fragments, but this one is not so easy. I'll take the letter from the equivalent decal in the kit I picked up for the Salvadorean bird and drop it over this one.

The tailband was the decal I tackled last, it seemed a perfect length and went on easier than I expected. There are a few small wrinkles that MicroSol has mostly eliminated.

This is my first NMF in many years and it's come out not too bad, especially as the whole process has been quite experimental.

Cheers,

Mike/TB379

http://worldinminiature.blogspot.com/

  • Member since
    July 2008
  • From: USA California
Posted by vetteman42 on Thursday, February 26, 2009 8:54 PM

Your NMF is really good and the shading looks very very good to me. You have one sweet looking 51 there my friend. I am going to have to check out that graphite thing you did it might be something that will work on my build. So keep goin I gotta see it finished and on her proud feet.


Randy So many to build.......So little time

  • Member since
    April 2005
Posted by Thunderbolt379 on Thursday, February 26, 2009 9:13 PM

Hi vetteman42 --

At last count there were about 25 small jobs to do, and some of them are now finished, I'm aiming for about eight jobs a day and to have her finished by the end of the month to score my badge over at Forgotten War (she's a crossover build).

I'm glad the finish is looking good, NMF has scared the willies out of me for years as I've learned the procedures for working with the fragility of regular metallics. Nevertheless there's a spot which needs a pass with some fresh mix in the AB as masking for the graphite technique lifted some paint. Getting close to the end there are always small accidents that you need to go back and fix -- I fixed the USAF marking earlier with a piece from the same decal in another kit.

Landing gear now underway, warload next.

Cheers,

Mike/TB379

http://worldinminiature.blogspot.com/

  • Member since
    November 2006
  • From: Coastal Maine
Posted by dupes on Friday, February 27, 2009 12:00 PM
 Thunderbolt379 wrote:

Photobucket

Wow T-Bolt...that is HOT!!! Shock [:O]

  • Member since
    March 2007
  • From: NJ
Posted by JMart on Saturday, February 28, 2009 9:28 AM

Ok, finally catching up in here... had to close my ship yard/factory/hangar (aka basement man cave) due to a leaking water tank. Always fun!  New (tankless) water heater in place, some minor repair work in progress, builds will resume in a week or so...  Some great stuff going on in here!

On my "to buy sometime soon" list is some Ott bulbs at Michaels at 50% off.

vetteman42 - Doing a great job on the Revell bird. I like your work on the exhausts, will shamelessly copy your technique on my bird ;) Good fixing of the bird..

Mike - looks good so far!   From my very limited knowledge base, I think pacific P51s were in s much worse condition as their European cousins due to the tropical conditions.  And OH what a nice mustang you have... lol I love mustangs..

IL2-  Nice job on the paint.

Once my basement dries up and I uncover my workbench (under a tarp at the moment), I can start my P-51s. I decided to scratch the Tamiya 8AF kit and dig into my two oldies, the revell P-51 and the testors kit, which I will build in "fly" configuration for fun (and hide the lack of cockpit and wheel bay details! Lol)


  • Member since
    September 2006
  • From: From Vernal UT OH YEA!!
Posted by raptordriver on Saturday, February 28, 2009 10:35 PM

Randy- Good work!  I have enjoyed seeing your progress.

Mike- It looks like you been doing NMF paint jobs for 40 years. Really nice.

Jmart- Alrighty I'll change it.Smile [:)]


Andrew


  • Member since
    April 2005
Posted by Thunderbolt379 on Saturday, February 28, 2009 10:51 PM

Hi Dupes, Jmart and Raptordriver --

Thanks for the positive feedback, guys, it means a lot coming from modelers of skills like yours!

I hope to be pronouncing her finished in a very short while, I'm mounting the landing gear and rockets at this time, then there's the landing light, radio mast and pitot tube to add, some MiG pigments and a last touch up or two. I was going to add some bombs but I still haven't got them done, I think I'll production-line them with bombs for my Corsair and add them later. Do you reckon she'll count as finished in the absence of the 500-pounders?

Cheers,

Mike

EDIT: Nearly finished, gear's now drying and when I can turn it over I'll add the prop and antenna mast. Then a few wash and touchup details and this wild horse is ready for the display case:

Photobucket" border="0" />

http://worldinminiature.blogspot.com/

  • Member since
    November 2005
  • From: USS Big Nasty, Norfolk, Va
Posted by navypitsnipe on Sunday, March 1, 2009 7:14 AM
I regret to inform the entire group build of a Class A Mishap during the construction of Ridge Runner III, cause of casualty was a lack of procedural compliance by a member of the family. the procedure being keeping the cat out of the hobby room while the space isn't manned up. extensive damage to the port wing and vertical stabilizer, luckily i was just in the painting stage and hadn't started decals yet, so those markings survived to see another day. as for the 'stang she's down for the count, and judging by the damage, rebuilding isn't an option. i'm just glad i opted out of using the tamiya kit and cutting up the nose for the engine, so really ot's just a loss of about a $12 kit and several manhours. still hurts deep down a little bit to see a mustang get chewed up by a cat
40,000 Tons of Diplomacy + 2,200 Marines = Toughest fighting team in the world Sis pacis instruo pro bellum
  • Member since
    April 2005
Posted by Thunderbolt379 on Sunday, March 1, 2009 7:26 AM

NPS -- sorry to hear of your mis-hap, what a tragedy it is to see your workmanship bite the dust like that. I feel ya, guy.

I'm happy to report that my Tamiya -D is FINISHED!

Here she is:

Photobucket" border="0" />

It's nearly midnight here and I have a mild infection to take to bed... Proper gallery photos of this wild horse will be coming in the next day or two, I'm looking forward to seeing how she looks under front-lighting and from low camera angles. This is my first time applying gun carbon and exhaust stains with pigments, I'm a bit apprehensive about how they came out!

All comments, tips and feedback welcome!

Cheers,

Mike

http://worldinminiature.blogspot.com/

  • Member since
    July 2008
  • From: USA California
Posted by vetteman42 on Sunday, March 1, 2009 10:31 AM

NPS What a bummer was looking forward to seeing it finished. But now you have no excuse but to build another improved version <grin>.

Thunderbolt Looking great my friend, looks like you could climb into her and take her for a check ride. Your exhaust and gun staining came out great !!!!!!!!! As did the rest of the P-51. I cant wait to see more pictures, so please don't make us wait long.

I hope to have more WIP pictures tomorrow for the group, made lots of progress this weekend. Wings and tailfeathers are on and filled. Oh and I discovered Tamiya liquid cement! Made my life so much easier, and I blame it for faster progress as the amount of filling I would have had to do on the wings went to almost none and I like that <grin>.


Randy So many to build.......So little time

JOIN OUR COMMUNITY!

Our community is FREE to join. To participate you must either login or register for an account.

SEARCH FORUMS
FREE NEWSLETTER
By signing up you may also receive reader surveys and occasional special offers. We do not sell, rent or trade our email lists. View our Privacy Policy.