SEARCH FINESCALE.COM

Enter keywords or a search phrase below:

251 Halftracks GB 1 October '08 - 8 June '09

129713 views
1459 replies
1 rating 2 rating 3 rating 4 rating 5 rating
  • Member since
    April 2007
  • From: Schroon Lake, NY
Posted by SMJmodeler on Friday, July 3, 2009 9:50 AM

SAR: Thank you very much!

espins1: Thanks Scott...like that dirt, huh?  I was afraid it would look overdone(I can't believe I just wrote that)...I like it too.

  • Member since
    December 2002
  • From: Reno, NV
Posted by espins1 on Thursday, July 2, 2009 4:27 PM
SMJ - excellent work on the Stuka Zu Fuss! Nice and dirty! :)

Scott Espin - IPMS Reno High Rollers  Geeked My Reviews 

  • Member since
    August 2007
  • From: n/w indiana
Posted by some assembly required on Thursday, July 2, 2009 2:33 PM
SMJ thats too good.you sir are a first rate modeler!Bow [bow] its been a real pleasure watching your skills mature here on fsm.

  • Member since
    December 2002
  • From: Reno, NV
Posted by espins1 on Thursday, July 2, 2009 12:16 PM

Sure thing SMJ.

Ernest - It's the AFV Club 1/35 Sd.Kfz. 251/1 Ausf D mit PaK40.... special edition kit.

Scott Espin - IPMS Reno High Rollers  Geeked My Reviews 

  • Member since
    April 2007
  • From: Schroon Lake, NY
Posted by SMJmodeler on Thursday, July 2, 2009 11:17 AM

 espins1 wrote:
I'd like to do just a little more weathering to it, but had to stop where I was at to be in compliance with the extended deadline. I'd like to dirty it up just a little, but not too much as "Das Reich" had lots of fresh new equipment as they entered the fray.

I had a hunch the GB deadline had something to do with it.  Post another picture or two when you can!

  • Member since
    December 2002
  • From: Reno, NV
Posted by espins1 on Thursday, July 2, 2009 10:41 AM
I'd like to do just a little more weathering to it, but had to stop where I was at to be in compliance with the extended deadline. I'd like to dirty it up just a little, but not too much as "Das Reich" had lots of fresh new equipment as they entered the fray.

Scott Espin - IPMS Reno High Rollers  Geeked My Reviews 

  • Member since
    April 2007
  • From: Schroon Lake, NY
Posted by SMJmodeler on Thursday, July 2, 2009 10:19 AM

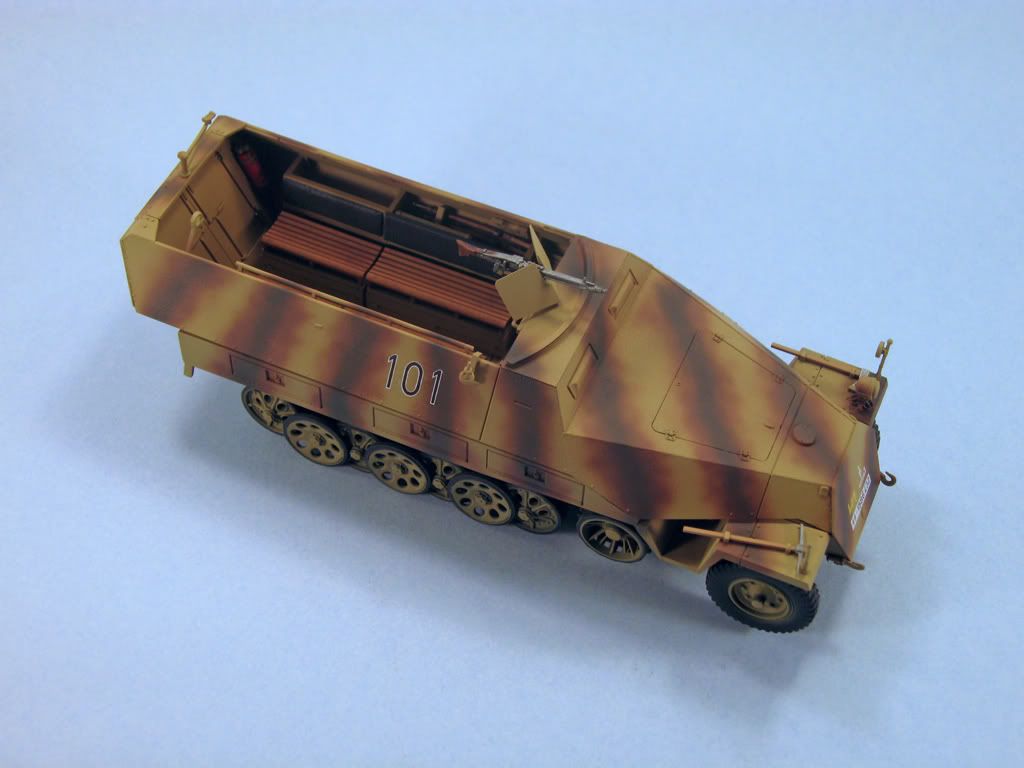
Guys: Here is the final version of my Stuka Zu Fuss for this GB.  I'll spare you guys the multiple pic's download time and just post my favorite picture here.  If you care to see the walkaround pic's go see my other thread...thanks!

  • Member since
    April 2007
  • From: Schroon Lake, NY
Posted by SMJmodeler on Thursday, July 2, 2009 10:16 AM

Scott: A real beauty you got there!  That camo' is SWEET!  I especially like that interior work...the benches are perfect.  I notice a bit of silvering on the decals...maybe it's the lighting...don't sweat it!

Do you have plans to dirty her up a bit?  She's a pinch too clean, IMO...I think it's the pristine decals that makes me think that way...

Great work Scott, and FAST!  Nice close-ups too!

  • Member since
    July 2006
  • From: San Francisco Bay Area
Posted by bufflehead on Wednesday, July 1, 2009 11:52 PM

WOW Scott!  You got that done super fast!  Great job overall!  Camo, interior, etc!! I like the look of that version.  Which kit is it?  Dragon or AFV?  I'm doing an AFV and its just kicking my butt!Black Eye [B)]  Awesome getting it done it time for the extended deadline!Thumbs Up [tup]

As for me, well there's no completed 251 halftrack on my bench....just one that's about 90% assembled.  Except for Fri & Sat when I had family over from L.A. I've been working on this badboy everyday for nine straight days putting at least 5-6 hours at the bench (I've been off work the last two weeks!) and like I said earlier, this kit is just kicking my butt.  The interior alone took me close to two weeks to finish and that's not counting the generator or the searchlight assembly.  Then I dropped the darn thing a couple of times causing some of the front suspension to break off so that took half a day to fix and dry.  Then I had all kinds of fit problems that required alterations to several major parts, and of couse that sucked up more time.Angry [:(!]  To top that off I've had to spend so much time going back and forth between the kit instructions, the Blast Models instructions (if you can call it that), the two Uhu articles in the AFV Modeler magazine and two other Sd.Kfz.251 reference books just to make sure I get the assembly right.Sigh [sigh]   I'm a little frustrated cause I thought with so much time put in this one would be done already!  Sorry, enough of my griping!Blush [:I]

Anyway I'm too far along to just put this aside so I'll keep plugging away.  Unfortunately I might be going to L.A. this weekend to spend July 4th with family and friends...if so that means tomorrow will be my last day at the bench until Monday.  In any event I'll post photos when complete even though dupes will most likely post the wrap-up thread before then.


Ernest

Last Armor Build - 1/35 Dragon M-26A1, 1/35 Emhar Mk.IV Female


Last Aircraft Builds - Hobby Boss 1/72 F4F Wildcat & FW-190A8


  • Member since
    June 2008
Posted by lewbud on Wednesday, July 1, 2009 10:39 PM

Dupes,

Unfortunately, I'm not going to make it.Sigh [sigh]  Will keep plugging away at it.

Buddy- Those who say there are no stupid questions have never worked in customer service.

  • Member since
    December 2002
  • From: Reno, NV
Posted by espins1 on Wednesday, July 1, 2009 3:08 PM
 dupes wrote:

Scott - looks good! Only construction comment I have is about the tracks - they seem to be a bit tight. Are those rubber bands or indies? Any chance to add another link? Weathering wise she seems a bit clean...plan on "slinging any mud"? Smile,Wink, & Grin [swg]

I decided to use the rubber band tracks simply because I could have them finished in time with the rest of the build to meet the new deadline.  Likewise with the weathering, I just did a few washes to accentuate and grubby it up just a tad and simply ran out of time to do more.  Additionally, the 2nd SS "Das Reich" had been sent to France after their grueling battles on the Eastern Front for rest and refit.  A lot of their equipment was new and freshly painted etc. so I wanted to keep the wear and tear to minumum as I modeled mine as one during the early part of Das Reich's involvment in the campaign in northern France.  Cool [8D]

Thanks for hosting this GB Dupes, I really enjoyed it and learned a heck of a lot about German Halftracks in the process!  You also got me out of my comfort zone as this is the very first open topped vehicle I've built, so I learned a lot!  Now I'm not afraid to tackle my Nashorn that's just screaming at me from the shelf to get built!  Wink [;)]

Scott Espin - IPMS Reno High Rollers  Geeked My Reviews 

  • Member since
    November 2006
  • From: Coastal Maine
Posted by dupes on Wednesday, July 1, 2009 1:40 PM

Scott - looks good! Only construction comment I have is about the tracks - they seem to be a bit tight. Are those rubber bands or indies? Any chance to add another link? Weathering wise she seems a bit clean...plan on "slinging any mud"? Smile,Wink, & Grin [swg]

Anyone else with stuff to post? I know there are some other builds happening - checking to see what sort of progress everyone has made. July 1st sure snuck up awfully fast, huh?

Will have some internet time tomorrow afternoon (should be a short day at work). Will try to get on here and update the front page, badges, etc. etc.

  • Member since
    December 2002
  • From: Reno, NV
Posted by espins1 on Wednesday, July 1, 2009 12:46 PM

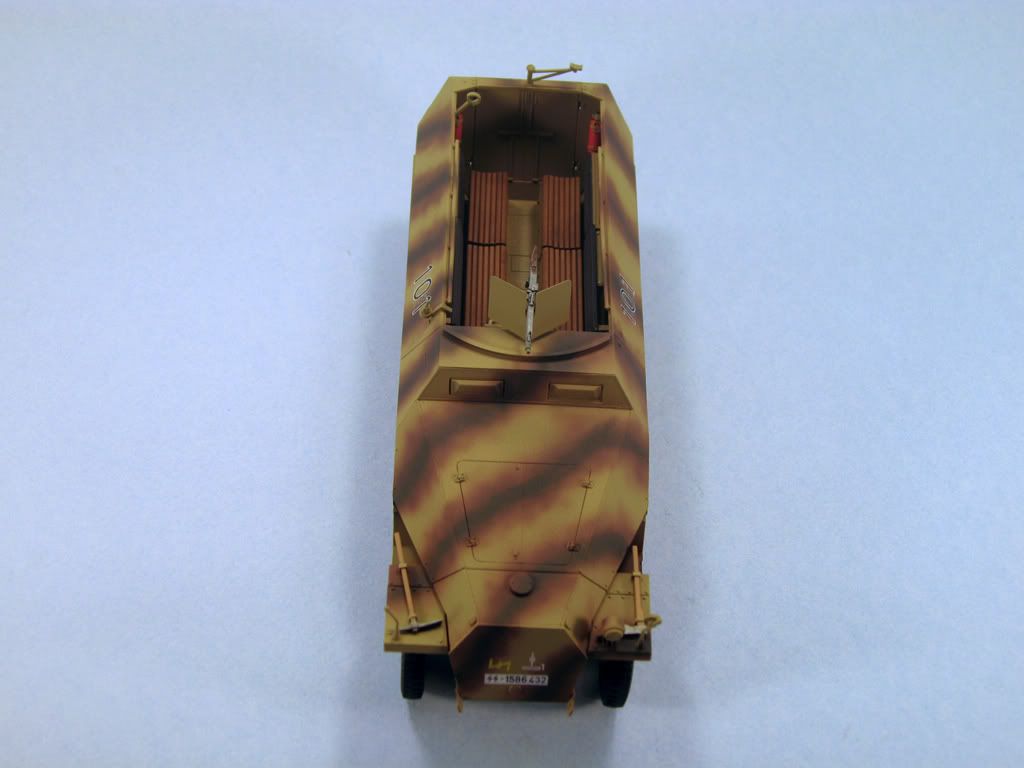
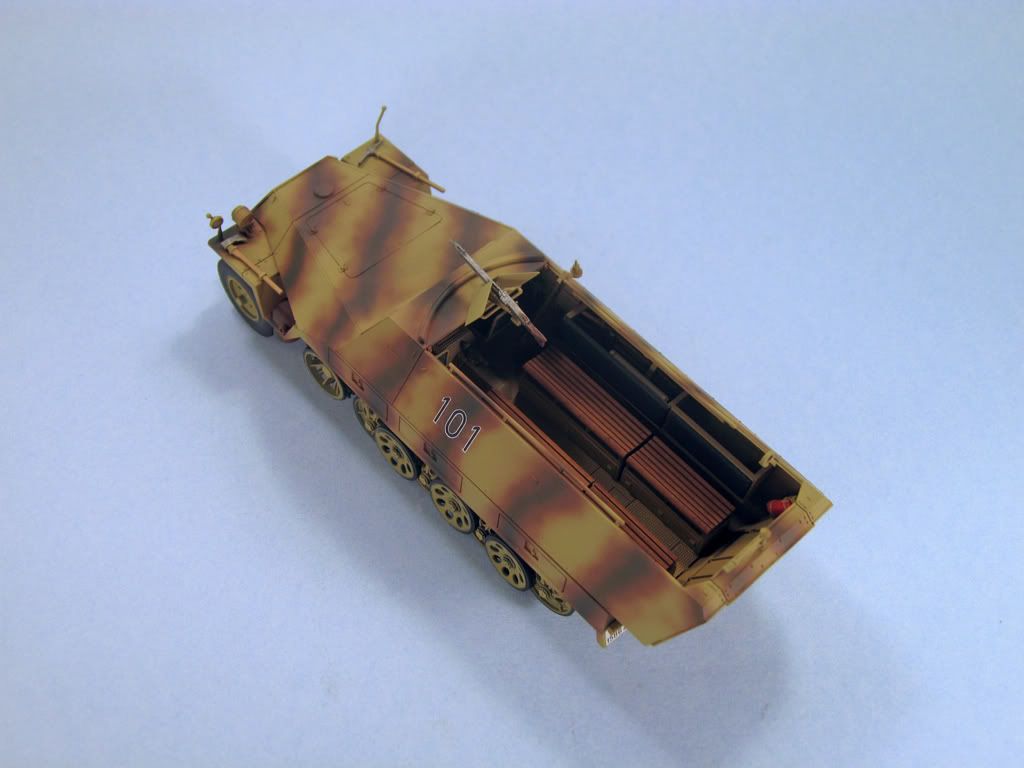
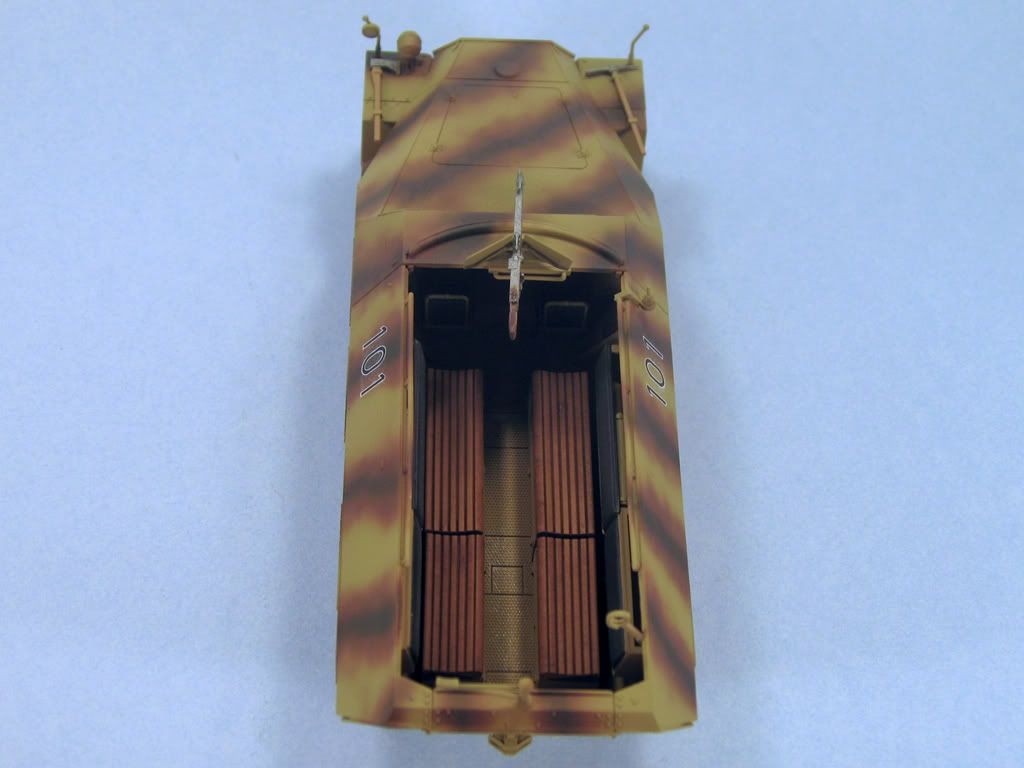
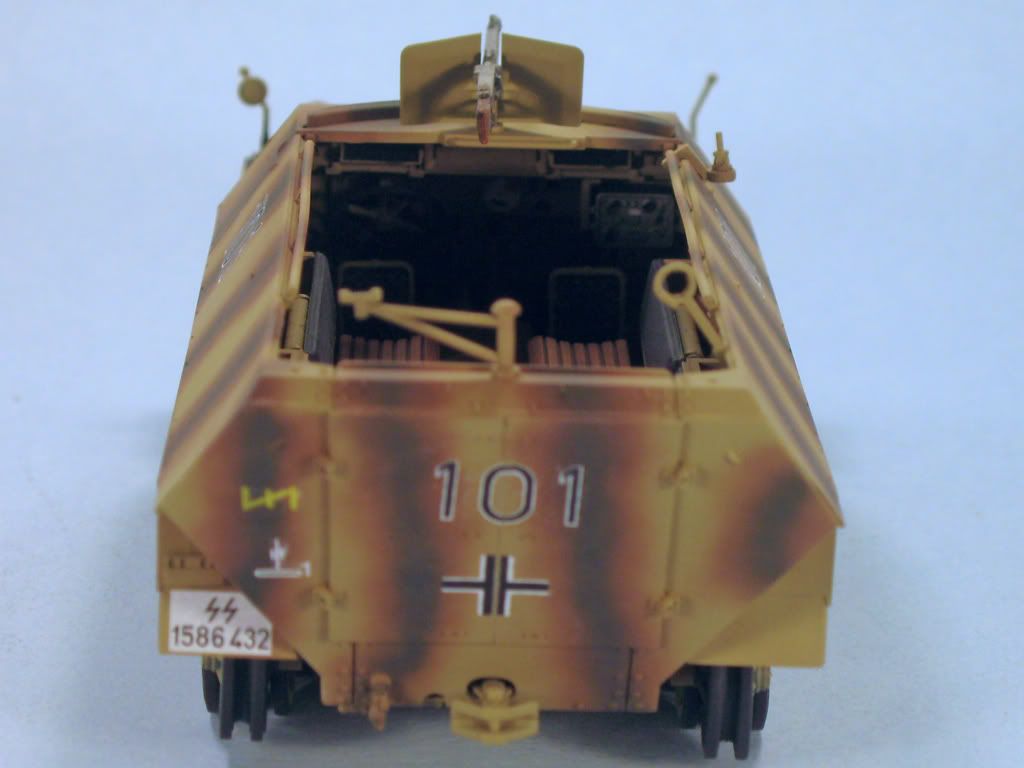
Here are the final photos for my completed AFV Club 1/35 Sd.Kfz. 251/1 Ausf. D.  I did mine as one that served with the 2nd SS "Das Reich" in France around July 1944.  Thanks again for the extension Dupes, it's been a rough year for me with my knee surgery, being sick for several weeks, not to mention some other health issues I'm having which we hope to have some answers for soon. 


Scott Espin - IPMS Reno High Rollers  Geeked My Reviews 

  • Member since
    December 2002
  • From: Reno, NV
Posted by espins1 on Tuesday, June 30, 2009 11:16 PM

Whew!  All done!  I'll post some better pics tomorrow after the oils have dried.  Make a Toast [#toast]

Scott Espin - IPMS Reno High Rollers  Geeked My Reviews 

  • Member since
    December 2002
  • From: Reno, NV
Posted by espins1 on Tuesday, June 30, 2009 3:40 PM
 bbrowniii wrote:
SCOTT!!  Your build looks superb!  I love it! 

One quick question - when you spray your camo, what was your airpressure set at?  Is came out great.  Are you a high pressure guy or a low?

Ooo, I lied, one more question: that pic you used for reference.  Where did it come from?  The Hummel in front of the 251 caught my eye, seein' as how I have one of those in the stash.

Thanks bbrowniii!  Smile [:)]

I used higher pressure when I sprayed the dark yellow basecoat.  I thinned the red-brown and dark green to about 50% and used low pressure so I could get in real close and just gradually build up the colors and to give them the appearance of having been sprayed in the field.

I found the image at this website, just scroll down 3 or 4 posts and you'll see it. 

http://images.google.com/imgres?imgurl=http://castlemaine-boy.smugmug.com/photos/189922772-O.jpg&imgrefurl=http://www.militaryphotos.net/forums/showthread.php%3Ft%3D73139%26page%3D65&usg=__5gfJ4hJpUEEuwa6J_fyIVpdC1qo=&h=751&w=1024&sz=321&hl=en&start=13&sig2=TYdyhWORC3Z8-zArRE1xBg&um=1&tbnid=TORsPzJfg7GQNM:&tbnh=110&tbnw=150&prev=/images%3Fq%3Ddas%2Breich%2Bfrance%2B1944%26hl%3Den%26rlz%3D1G1GGLQ_ENUS244%26sa%3DN%26um%3D1&ei=FHZKSuiCBYLCmQepxtSmAQ 


Scott Espin - IPMS Reno High Rollers  Geeked My Reviews 

  • Member since
    April 2003
  • From: 41 Degrees 52.4 minutes North; 72 Degrees 7.3 minutes West
Posted by bbrowniii on Tuesday, June 30, 2009 2:05 PM

Hey guys,

I've been a little like dupes - not on the site for a while.  Thanks to all who commented on my build while I was gone.


SCOTT!!  Your build looks superb!  I love it! 

One quick question - when you spray your camo, what was your airpressure set at?  Is came out great.  Are you a high pressure guy or a low?

Ooo, I lied, one more question: that pic you used for reference.  Where did it come from?  The Hummel in front of the 251 caught my eye, seein' as how I have one of those in the stash.


'All that is necessary for the triumph of evil is for good men to do nothing' - Edmund Burke (1770 ??)


  • Member since
    December 2002
  • From: Reno, NV
Posted by espins1 on Tuesday, June 30, 2009 12:51 PM

Oh man, tough night on the bench last night.  I grabbed my airbrush with the intention of lightly blowing off any dust and lint that had settled on the model during the day and promplty blasted three of the decals off the front of the halftrack.  I had forgotten I still the air pressure set around 100psi to blow out any risidual water etc from my airbrush after I cleaned it from the last spray session.  Fortunatly all three of them landed in my spray booth and were undamaged... whew!  Shock [:O]  I had to use some Micro-Set to reapply them and get them to hunker down over the flat paint.  I ended up doing the Micro-set treatment to all the decals as there were a few small bubbles here and there under them.  I used a very fine sharp point to pop a miniscule hole in each bubble, then applied the Micro-Set.  Two applications over the course of the evening did the trick!  Approve [^]

I managed to break the front left corner indicator right smack in the middle several times but managed to get it re-attached ok. Black Eye [B)]  I also sprayed the trackes metallic gray and left them to dry.

I let everything sit overnight, then got up at 5:30am this morning and spent two hours on the bench before work.  I carefully sprayed the black rubber pads of the tracks using a 50% thinned mix of XF-1 Flat Black with a few drops of gray to lighten/fade the rubber color.  I then attached the wheels, MG and shield, then sealed everything up with a flat coat consisting of 4 parts Future clear acrylic to 1 part Tamiya Flat Base X-21.  I don't want to take any chances with the oil washes I have planned for this evening as one disaster with the decals was enough!  Laugh [(-D]

Tonight when I get home I'll do a couple of oil washes on the interior and the exterior which will darken things up just a tad and bring out some of the details.  More tonight!
Scott Espin - IPMS Reno High Rollers  Geeked My Reviews 

  • Member since
    October 2007
  • From: N.H.
Posted by panzerguy on Monday, June 29, 2009 10:14 PM
 

   Scott the more common type tracks like the ones you have were steel with rubber blocks, which are black.

  For a short period of time in 44(June-September I think) all steel tracks were used on some 251's but they were not that common.

"Happiness is a belt fed weapon"

  • Member since
    December 2002
  • From: Reno, NV
Posted by espins1 on Monday, June 29, 2009 6:14 PM
Quick question on the tracks for the 251 Halftracks.... are they metal links with huge rubber blocks? 

Scott Espin - IPMS Reno High Rollers  Geeked My Reviews 

  • Member since
    December 2002
  • From: Reno, NV
Posted by espins1 on Monday, June 29, 2009 12:22 PM

 Bish wrote:
espins1 I do like that camo scheme, she is looking really nice, think you will be done in time.

Thanks Bish, ya I'll have it finished by tomorrow evening... barely!  Shock [:O]  Laugh [(-D]

Scott Espin - IPMS Reno High Rollers  Geeked My Reviews 

  • Member since
    December 2002
  • From: Reno, NV
Posted by espins1 on Monday, June 29, 2009 12:14 PM

The decals were applied this morning, the markings are for 2nd SS "Das Reich" France 1944. 

My plan for tonight is to attach all the wheels, attach the upper MG mount and shield and get some oil washes on this bad boy.

Scott Espin - IPMS Reno High Rollers  Geeked My Reviews 

  • Member since
    December 2002
  • From: Bury St Edmunds, Suffolk, England
Posted by Bish on Monday, June 29, 2009 12:12 PM
espins1 I do like that camo scheme, she is looking really nice, think you will be done in time.

I am a Norfolk man and i glory in being so


On the bench: Airfix 1/72nd Harrier GR.3/Fujimi 1/72nd Ju 87D-3

  • Member since
    December 2002
  • From: Reno, NV
Posted by espins1 on Sunday, June 28, 2009 8:23 PM
And here it is after the green stripes were sprayed in the middle of the brown. Time for a beer and some relaxation with my lovely wife. :)


Scott Espin - IPMS Reno High Rollers  Geeked My Reviews 

  • Member since
    December 2002
  • From: Reno, NV
Posted by espins1 on Sunday, June 28, 2009 7:46 PM
Just got done spraying the red-brown stripes. Next up, green stripes up the middle of the brown striping.


Scott Espin - IPMS Reno High Rollers  Geeked My Reviews 

  • Member since
    December 2002
  • From: Reno, NV
Posted by espins1 on Sunday, June 28, 2009 6:48 PM
Thanks Panzerguy, man it's sooooo good to be back on the bench again! I'm having a great time with my build. Thanks Dupes for extending the GB a few weeks so we could finish up our builds, much appreciated!


I just sprayed the wheel centers using a circular artist template. I had sprayed the wheels the rubber color (Flat Black mixed with a touch of gray to lighten it) a while back. I stuck the wheels down on strips of masking tape, although 6 of the wheels had to be stuck into little holes in a box as the shafts were too long and skinny to stick them to the masking tape. Using the 17/32 inch hole I simply held the template over each wheel then did a quick spray in the whole being sure to go at it from several angles to ensure good coverage.... took all of 10 minutes, piece of cake!

Now off to paint the soft edged wavy brown stripes.


Scott Espin - IPMS Reno High Rollers  Geeked My Reviews 

  • Member since
    October 2007
  • From: N.H.
Posted by panzerguy on Sunday, June 28, 2009 5:07 PM
 

   Scott it's nice to see that you're able to get some time in on this guy. The interior looks great. I've found that once you get past that the rest is usually all down hill.

   By the way I like the tablecloth tarpSmile,Wink, & Grin [swg].


"Happiness is a belt fed weapon"

  • Member since
    December 2002
  • From: Reno, NV
Posted by espins1 on Sunday, June 28, 2009 4:51 PM
Here are a few shots right after I sprayed the final base coat of Dunkelgelb. I used a bit of material my wife gave me to protect the interior from any over spray. Next up, the wide brown wavy stripes.


Scott Espin - IPMS Reno High Rollers  Geeked My Reviews 

  • Member since
    December 2002
  • From: Reno, NV
Posted by espins1 on Sunday, June 28, 2009 12:07 PM
Thanks guys, I appreciate the comments and the interest!

The bench seats were pretty easy to do and I'm thrilled with the results. I just simply primered them with Tamiya white primer then sprayed a coat of Tamiya XF-59 Desert Yellow thinned to a 50% ratio with Tamiya X-20A thinner. After the paint had cured I simply did a series of 3 or 4 washes over them using Burnt Umber artist oils mixed with Turpenoid. I liberaly applied the wash then just touched the end of the benches to wick away any excess and allows the effect to build up gradually.

Scott Espin - IPMS Reno High Rollers  Geeked My Reviews 

  • Member since
    October 2007
Posted by White_R34 on Saturday, June 27, 2009 11:59 PM
espins1 : The wood look on those bench seats looks "Amazing"Bow [bow]Bow [bow]Bow [bow]
Building the Impossible Is my main goal!!
  • Member since
    August 2007
  • From: n/w indiana
Posted by some assembly required on Saturday, June 27, 2009 5:20 PM
nicely done scott, im diggin the color of your wood seats.this for me is the hardest to get "right". lookin foward to more!

JOIN OUR COMMUNITY!

Our community is FREE to join. To participate you must either login or register for an account.

SEARCH FORUMS
FREE NEWSLETTER
By signing up you may also receive reader surveys and occasional special offers. We do not sell, rent or trade our email lists. View our Privacy Policy.